
Welcome to our comprehensive guide on how to delete emails in bulk on your iPhone. In today’s world, where email has become an indispensable part of our lives, managing our overflowing inboxes can be a tedious task. Whether you’re dealing with spam, promotional emails, or simply trying to declutter your mailbox, deleting individual emails can be time-consuming and inefficient.
Fortunately, with the iPhone’s advanced features and functionality, you can quickly and easily delete emails in bulk, saving you precious time and effort. In this article, we will walk you through step-by-step instructions on how to efficiently clear out your email inbox with just a few taps, making your email management a breeze.
Inside This Article
- How to Delete Emails in Bulk on iPhone
- Deleting Multiple Emails at Once
- Using the Edit Mode to Delete Emails in Bulk
- Moving Emails to Trash in Bulk
- Using Third-Party Email Apps for Bulk Deletion
- Conclusion
- FAQs
How to Delete Emails in Bulk on iPhone
Managing emails on your iPhone can be a daunting task, especially when you have a crowded inbox. Deleting emails one by one can be time-consuming and tedious. However, there are methods and shortcuts you can use to delete emails in bulk, making the process much more efficient. In this article, we will guide you through different methods that will help you delete multiple emails on your iPhone with ease.
Method 1: Deleting Multiple Emails in Mail App
The Mail app on your iPhone provides a simple and straightforward method to delete emails in bulk.
- Launch the Mail app on your iPhone.
- Navigate to the mailbox and select the folder where the emails you want to delete are located.
- Tap the “Edit” button located in the top right corner of the screen.
- Tap on the circular checkbox next to the emails you want to delete. You can select multiple emails by tapping on each checkbox.
- Once you have selected all the emails you want to delete, tap the “Trash” icon or the “Archive” icon, depending on your preference.
- Confirm the deletion by tapping “Delete” or “Archive” on the prompt that appears.
By following these steps, you can quickly delete multiple emails in a few simple taps.
Method 2: Using the “Edit” Option in Mail App
An alternative method to delete emails in bulk is by using the “Edit” option within the Mail app.
- Open the Mail app on your iPhone.
- Navigate to the mailbox and select the folder that contains the emails you want to delete.
- Tap the “Edit” button located in the top right corner of the screen.
- Instead of selecting individual emails, swipe right on any email to reveal a red “Delete” button.
- Tap this “Delete” button to remove the email.
- Continue swiping right on each email you want to delete until all desired emails are removed.
- Tap the “Done” button in the top left corner to exit the edit mode.
By utilizing this method, you can quickly swipe through and delete multiple emails in a more fluid and efficient manner.
Method 3: Deleting All Emails from a Specific Sender
If you want to delete all emails from a specific sender, there is a shortcut in the Mail app that allows you to do so.
- Open the Mail app on your iPhone.
- Go to the mailbox or folder that contains the emails from the sender you want to delete.
- Tap the search bar at the top of the screen.
- Type the sender’s name or email address.
- At the bottom of the search results, you will see a prompt that says “Delete All.” Tap on it to delete all emails from that sender.
- Confirm the deletion by tapping “Delete All” on the confirmation prompt.
This method is perfect for quickly getting rid of all emails from a specific sender without having to manually select each one.
Method 4: Managing Mail Storage to Delete Emails in Bulk
If your primary concern is to free up storage space on your iPhone, you can manage your mail storage settings to automatically delete older emails in bulk.
- Open the Settings app on your iPhone.
- Scroll down and tap on “Mail.”
- Select “Accounts” or the specific email account you want to manage.
- Tap on “Mailbox Behaviors.”
- Under the “On the Server” section, you will find options to manage your email storage. Enable the “Trash” option to automatically delete emails older than a specified period.
- Adjust the “Delete from Server” setting to match your preferences.
By utilizing these settings, your iPhone will automatically delete older emails, freeing up storage space without the need to manually delete them.
Deleting emails in bulk on your iPhone can help you declutter your inbox and make email management more efficient. Whether you choose to use the built-in options in the Mail app or manage your storage settings, these methods will save you time and effort. Experiment with these methods to find the one that fits your needs best and regain control over your email clutter.
Deleting Multiple Emails at Once
If your iPhone has become cluttered with a plethora of emails, it can be a time-consuming task to delete them one by one. Luckily, there are methods to delete multiple emails at once on your iPhone, allowing you to tidy up your inbox more efficiently. Here, we will explore different methods to help you delete emails in bulk.
Method 1: Deleting Multiple Emails in the Mail App
The Mail app on your iPhone provides a straightforward way to delete multiple emails simultaneously. Follow the steps below:
- Open the Mail app on your iPhone.
- Navigate to the mailbox from which you want to delete multiple emails.
- Tap the “Edit” button located at the top-right corner of the screen.
- Select the emails that you wish to delete by tapping the circle beside each email.
- Once you have selected the desired emails, tap the “Trash” icon to delete them.
Method 2: Using the “Edit” Option in the Mail App
An alternative method is to use the “Edit” option in the Mail app. Here’s how:
- Open the Mail app on your iPhone.
- Navigate to the mailbox you want to clean up.
- Tap “Edit” located at the top of the screen.
- Select the first email you want to delete by tapping the circle next to it.
- While holding the previous email with your finger, use another finger to tap additional emails to select them.
- Once you have selected all the emails you want to delete, tap the “Trash” icon.
Method 3: Deleting All Emails from a Specific Sender
If you want to delete all emails from a specific sender, you can use the search function in the Mail app. Here are the steps:
- Open the Mail app on your iPhone.
- Tap the search bar at the top of the screen.
- Type the name or email address of the sender whose emails you want to delete.
- Select the desired sender from the list of suggestions.
- All the emails from that sender will be displayed.
- Tap “Edit” at the top-right corner of the screen.
- Select all the emails by tapping the circle beside each email.
- Tap the “Trash” icon to delete all the selected emails.
Method 4: Managing Mail Storage to Delete Emails in Bulk
If you find that your iPhone’s storage is getting overwhelmed with emails, you can manage your mail storage to delete them in bulk. Follow these steps:
- Go to the “Settings” app on your iPhone.
- Scroll down and tap on “Mail” or “Mail & Accounts” depending on your iOS version.
- Tap on the email account that you want to manage.
- Under “Mailbox Behaviors,” tap on “Trash” or “Deleted Mailbox.”
- Choose “On My iPhone” from the available options.
- Return to the Mail app, navigate to the desired mailbox, and tap “Edit.”
- Select the emails you want to delete, then tap the “Trash” icon.
By following these methods, you can efficiently delete multiple emails at once on your iPhone, allowing you to declutter your inbox and free up precious storage space.
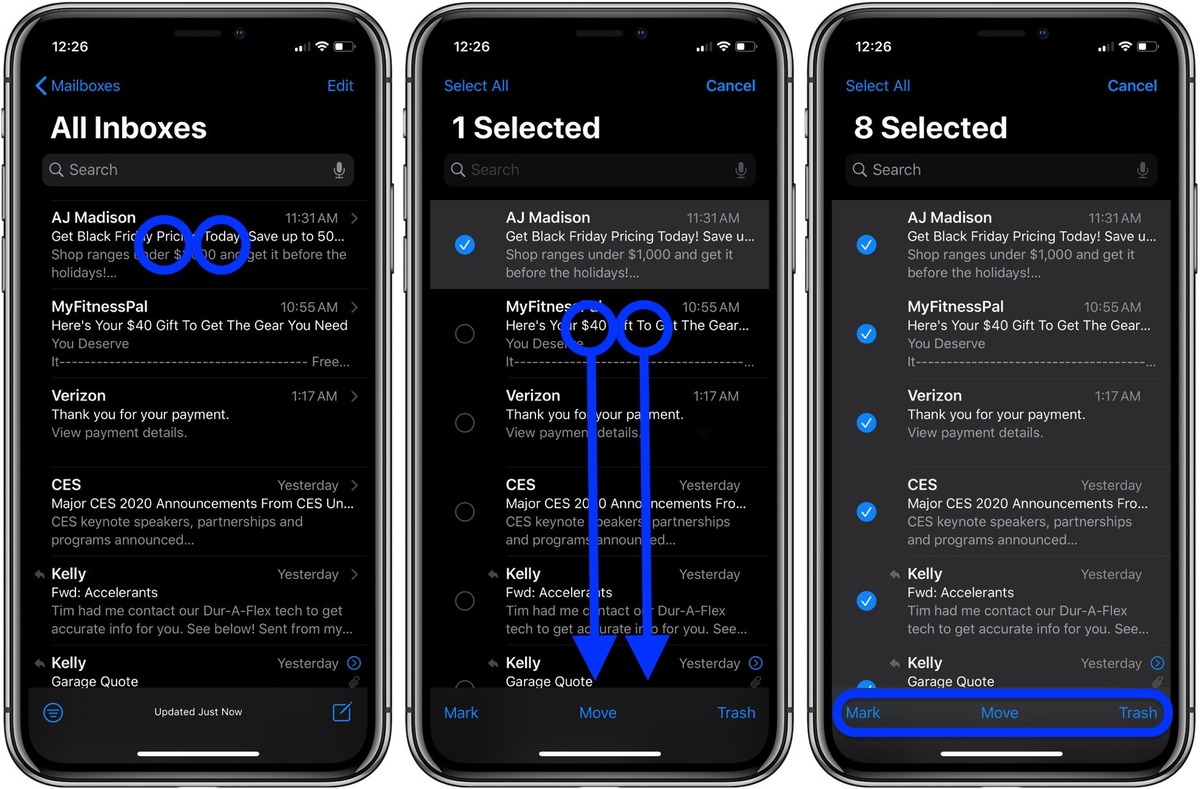
Using the Edit Mode to Delete Emails in Bulk
If you have a large number of emails to delete from your iPhone, using the “Edit” mode in the Mail app can be a quick and efficient way to get the job done. This feature allows you to select multiple emails at once and delete them in bulk.
To access the “Edit” mode, open the Mail app on your iPhone and navigate to the mailbox that contains the emails you want to delete. Once you are in the mailbox, follow these steps:
- Tap the “Edit” button located at the top-right corner of the screen. This will activate the edit mode and reveal checkboxes next to each email.
- Tap the checkboxes next to the emails you wish to delete. You can select multiple emails by tapping on their respective checkboxes.
- After selecting the desired emails, tap the “Trash” icon at the bottom of the screen. This will move the selected emails to the trash folder.
- If you want to permanently delete these emails, go to the “Trash” folder, tap the “Edit” button again, and then tap the “Delete All” button. Confirm the deletion when prompted.
Using the “Edit” mode is a simple and effective way to delete multiple emails at once from your iPhone. It can save you time and effort, especially when dealing with a large inbox or when you need to clear out old or unnecessary emails.
Moving Emails to Trash in Bulk
When you need to clean up your email inbox and get rid of multiple emails at once, you can use the “Move to Trash” option on your iPhone. Here’s how you can easily move emails to the trash in bulk:
1. Launch the Mail app on your iPhone and open the mailbox or folder from which you want to delete emails.
2. Tap on the “Edit” button located at the top right corner of the screen.
3. Select the emails that you wish to delete by tapping on the circle beside each email. You can also tap on “Mark All” to select all emails in the mailbox.
4. Once you have selected the emails, tap on the “Move” button at the bottom of the screen.
5. A pop-up menu will appear with various options. Tap on “Trash” to move the selected emails to the trash folder.
6. Lastly, tap on the “Done” button to confirm and complete the process. The selected emails will now be moved to the trash and removed from your mailbox.
By using the “Move to Trash” option, you can quickly delete multiple emails on your iPhone without the need to individually select and delete each email.
Note: Remember that moving emails to the trash folder does not permanently delete them. They will remain in the trash folder for a specific period of time, typically 30 days, before being permanently deleted.
It is always a good practice to regularly empty your trash folder to free up storage space and keep your mailbox organized.
Using Third-Party Email Apps for Bulk Deletion
If the built-in Mail app on your iPhone doesn’t meet your needs when it comes to bulk deleting emails, you can explore third-party email apps available on the App Store. These apps often offer advanced features and functionalities to help you manage your email inbox more efficiently.
When choosing a third-party email app, look for one that allows you to easily select and delete multiple emails at once. Some popular email apps with this capability include Outlook, Gmail, and Spark. Download and install the app of your choice from the App Store.
Once you have installed the third-party email app, follow the instructions provided by the app to set up your email account. This usually involves entering your email address and password. Once set up, you can start managing your emails in bulk using the app’s features.
Depending on the app you choose, the process for bulk deleting emails may vary. However, most apps provide a similar approach. You can typically select multiple emails by tapping on the checkboxes or using a long-press gesture. After selecting the desired emails, look for the option to delete them in bulk.
Some third-party email apps may offer additional features, such as the ability to swipe to delete or use customizable gestures for faster bulk deletion. Explore the settings of the app and customize it according to your preferences to optimize your email management experience.
Using a third-party email app for bulk deletion can be a great option if you find the Mail app on your iPhone lacking in terms of functionality. Experiment with different apps to find one that suits your needs and simplifies the process of deleting emails in bulk.
Conclusion
In conclusion, knowing how to delete emails in bulk on your iPhone can save you a significant amount of time and effort. With the increasing volume of emails we receive on a daily basis, the ability to efficiently manage our mailbox is crucial. Whether you want to clear out clutter, organize your inbox, or simply declutter your digital life, bulk deleting emails is a handy skill to have.
By following the methods mentioned in this article, you can easily delete multiple emails at once, saving you from the cumbersome task of deleting them individually. Whether you use the Mail app, Gmail app, or any other email client on your iPhone, there are options available to help you quickly remove unwanted emails.
So, take control of your inbox and streamline your email management process by utilizing the bulk delete features on your iPhone. Keep your inbox organized, have more free space, and enjoy a clutter-free digital experience. With these tips, you’ll be able to delete emails in bulk efficiently and effectively.
FAQs
Q: Can I delete emails in bulk on my iPhone?
A: Yes, you can delete emails in bulk on your iPhone. There are a few methods you can use to delete multiple emails at once, saving you time and effort.
Q: How do I delete emails in bulk on my iPhone?
A: Here’s how you can delete emails in bulk on your iPhone:
- Open the Mail app on your iPhone.
- In the mailbox where your emails are located, click on “Edit” at the top right corner of the screen.
- Select the emails you want to delete by tapping on the circle next to each email.
- Once you have selected all the emails you want to delete, tap on the “Trash” icon at the bottom right corner of the screen.
- Confirm the deletion by tapping on “Delete” in the popup confirmation message.
Q: Can I recover deleted emails on my iPhone?
A: If you have accidentally deleted an email, you may be able to recover it if you have set up your email account with an IMAP server. IMAP allows you to sync your emails across multiple devices, including the ability to recover deleted emails from the server. To recover a deleted email, you will need to access your email account from a computer or another device and check the “Trash” or “Deleted Items” folder.
Q: How do I permanently delete emails on my iPhone?
A: To permanently delete emails on your iPhone, follow these steps:
- Open the Mail app on your iPhone.
- Click on the “Trash” or “Deleted Items” folder.
- Tap on “Edit” at the top right corner of the screen.
- Select the emails you want to permanently delete by tapping on the circle next to each email.
- Tapping on the “Trash” or “Delete” icon will immediately delete the selected emails, and they will not be recoverable.
Q: Can I set my iPhone to automatically delete old emails?
A: Yes, you can set your iPhone to automatically delete old emails. To do this:
- Go to the Settings app on your iPhone.
- Scroll down and tap on “Mail.”
- Under the “Mail” section, tap on “Accounts” or “Passwords” depending on your iOS version.
- Tap on the email account you want to manage.
- Tap on “Mail Days to Sync.”
- Select the timeframe for which you want to keep your emails. You can choose from options like “1 day,” “1 week,” “1 month,” or “No Limit.”
These are just a few of the frequently asked questions about deleting emails in bulk on an iPhone. If you have any further queries or need additional assistance, feel free to reach out to our support team.