
Gone are the days of photo albums tucked away in dusty drawers or displayed on living room shelves. With the rise of smartphones, our photo collections have become digital and accessible at our fingertips. However, there may be moments when you want to keep certain photos private or away from prying eyes. Luckily, your iPhone offers a convenient solution to hide photo albums.
In this article, we will guide you on how to hide photo albums on your iPhone, allowing you to keep your cherished memories or personal pictures secure and discreet. Whether you want to safeguard sensitive photos or keep a surprise gift hidden, we’ve got you covered. Read on to learn the step-by-step process and gain peace of mind knowing that your personal photos remain private on your iPhone.
Inside This Article
- Method 1: Using the Hidden Album feature
- Method 2: Creating a private hidden photo album
- Method 3: Using third-party apps to hide photo albums
- Method 4: Locking your photo albums with a passcode
- Method 4: Locking your photo albums with a passcode
- Conclusion
- FAQs
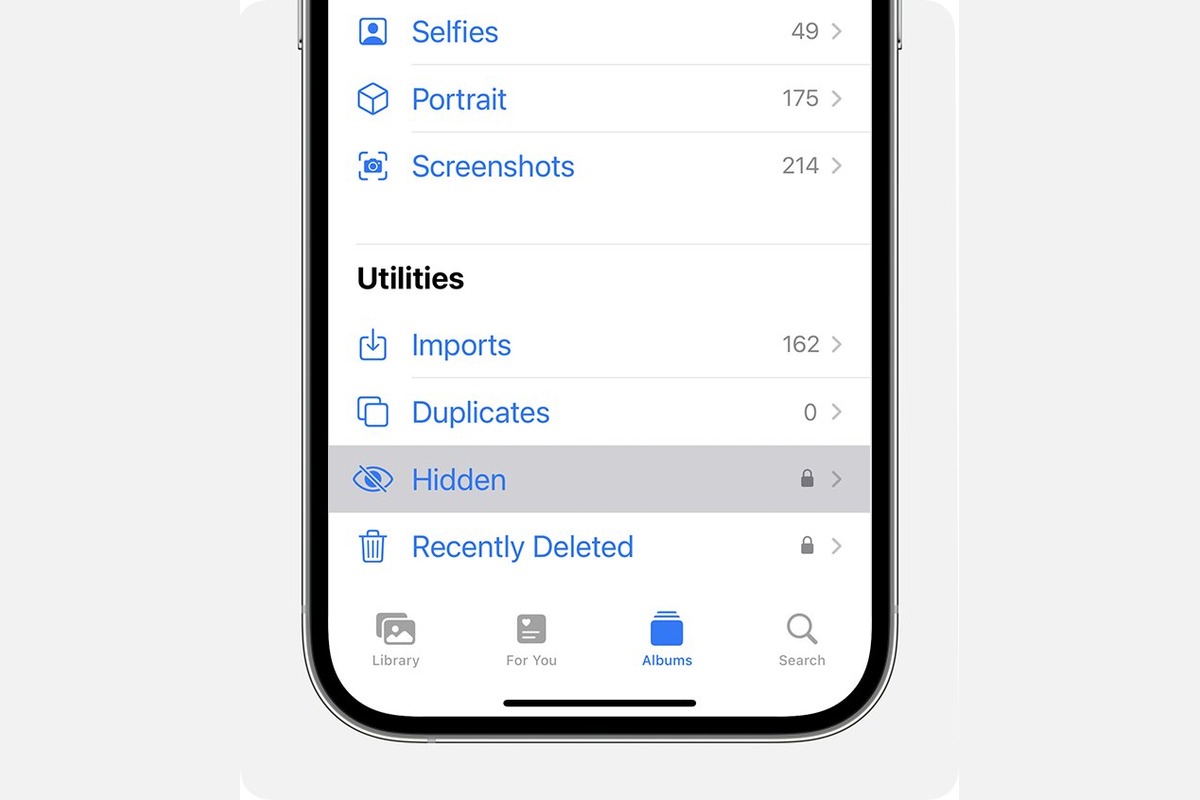
Method 1: Using the Hidden Album feature
Do you have photos on your iPhone that you’d prefer to keep hidden? Luckily, Apple has provided a handy feature called the “Hidden Album” that allows you to hide specific photos from prying eyes. No need to rely on third-party apps or complex settings – this built-in feature makes it easy to keep your private photos separate from the rest of your album.
The Hidden Album feature is a great solution if you want to hide personal or sensitive photos without completely deleting them. When you hide a photo, it will be moved to a dedicated “Hidden Album” within your Photos app. This way, you can still access your hidden photos whenever you want, without worrying about someone stumbling upon them while scrolling through your camera roll.
To make use of the Hidden Album feature, follow these simple steps:
- Open the Photos app on your iPhone.
- Navigate to the Albums tab at the bottom of the screen.
- Scroll down until you find the “Hidden” album.
- Tap on the album to open it.
- Select the photos you want to hide by tapping on them. You can select multiple photos at once.
- Once you’ve chosen the photos, tap on the “Share” icon at the bottom left corner of the screen.
- In the share sheet that appears, tap on the “Hide” option.
- Confirm your action by tapping on “Hide Photo”.
That’s it! The selected photos are now hidden and will be moved to the Hidden Album. To view your hidden photos in the future, simply follow the steps mentioned above and choose the “Hidden” album from your Photos app.
Remember, while the Hidden Album provides a convenient way to hide your photos, it’s important to note that the photos are not completely secure. They can still be accessed by anyone who knows how to navigate to the Hidden Album. If you’re looking for more advanced security, you might want to explore other methods like creating a private hidden photo album or using third-party apps specifically designed for photo protection.
Now that you know how to use the Hidden Album feature on your iPhone, you can easily keep your private and sensitive photos out of sight. Whether it’s personal memories, confidential documents, or anything in between, this feature gives you peace of mind knowing that your hidden photos are safely stored away.
Method 2: Creating a private hidden photo album
If you want to take control of your privacy and keep your personal photos secure on your iPhone, creating a private hidden photo album is a great option. This method allows you to hide specific photos without relying on any pre-existing features or third-party apps.
To create a private hidden photo album, follow these simple steps:
- Open the Photos app on your iPhone and navigate to the “Albums” tab.
- Tap on the “Add” button, typically represented by a “+” icon, to create a new album.
- Give the album a name that won’t give away its hidden nature, such as “Miscellaneous” or “Work-related.”
- Once the album is created, go back to your photo library and select the photos you want to hide.
- Tap the “Share” button at the bottom left corner of the screen.
- In the share options, choose “Add to Album” and select the newly created album.
- After adding the selected photos to the album, they will no longer appear in your main photo library or other albums.
It’s important to note that this method only hides the photos from the main photo library and other albums. The hidden album will still be visible within the Albums tab. However, most people don’t tend to explore this section, so your hidden photos are likely to remain unnoticed.
Remember to also keep your iPhone locked with a passcode or Face ID for an extra layer of security. This way, even if someone gains access to your device, they won’t be able to view your hidden album or any other private information.
This method is a simple and effective way to create a private hidden photo album on your iPhone. By utilizing the native Photos app, you can keep your personal photos tucked away, ensuring your privacy and peace of mind.
Method 3: Using third-party apps to hide photo albums
If the built-in options on your iPhone don’t meet your needs, you can turn to third-party apps to hide your photo albums. These apps offer additional features and customization options to ensure your photos remain private and secure. Here are a few popular options:
1. Private Photo Vault
Private Photo Vault is a highly-rated app that allows you to hide photos, videos, and even contacts. It comes with password protection and supports multiple albums to keep your content organized. The app also provides a break-in report, where it captures a photo of anyone who enters the wrong password.
2. Keepsafe Photo Vault
Keepsafe Photo Vault is another popular app for hiding photo albums on your iPhone. It offers a variety of protection options, including PIN, fingerprint, and Face ID. The app also provides a safe cloud backup for your photos and videos, allowing you to restore them if you switch devices.
3. Secret Calculator
Secret Calculator is a unique app that disguises itself as a calculator, making it even more discreet. You can use it to hide not only your photo albums but also private documents and notes. The app requires a passcode or Touch ID to access the hidden content.
4. Folder Lock
Folder Lock is a comprehensive app that goes beyond hiding photo albums. It allows you to lock and encrypt files, documents, and folders, offering complete protection for your sensitive data. With Folder Lock, you can also securely back up your files to the cloud.
5. PhotoGuard Photo Vault
PhotoGuard Photo Vault is an app that not only hides your photo albums but also tracks any unauthorized access attempts. It provides features like break-in alerts, fake login mode, and decoy albums to divert attention from your private photos. The app also offers cloud backup and synchronization options.
Remember to research and read reviews before choosing a third-party app to ensure its reliability and compatibility with your iPhone model and operating system.
With these third-party apps, you can have more control over hiding and securing your photo albums on your iPhone.
The following is the content about ‘Method 4: Locking your photo albums with a passcode’ with
Method 4: Locking your photo albums with a passcode
as its section title:
Method 4: Locking your photo albums with a passcode
If you want an extra layer of security for your hidden photo albums on your iPhone, you can opt to lock them with a passcode. This method ensures that only authorized users can access your private photo albums, providing you with peace of mind.
To lock your photo albums with a passcode, follow these steps:
- Open the ‘Settings’ app on your iPhone.
- Scroll down and tap on ‘Face ID & Passcode’ (if you have Face ID) or ‘Touch ID & Passcode’ (if you have Touch ID).
- Enter your passcode when prompted.
- Scroll down to the ‘Allow Access When Locked’ section and toggle off the ‘Photos’ option.
- Exit the ‘Settings’ app.
By disabling the ‘Photos’ option in the ‘Allow Access When Locked’ section, your photo albums will not be accessible directly from the lock screen or the Photos app without entering the passcode.
Once you’ve set up the passcode lock for your photo albums, the only way to access them is by unlocking your iPhone using your passcode or biometric authentication (Face ID or Touch ID). This ensures that even if someone gains physical access to your device, they won’t be able to view your hidden photo albums without the passcode.
Remember to choose a strong, unique passcode and avoid sharing it with unauthorized individuals. This method gives you complete control over who can access your private photo albums, keeping your personal and sensitive moments safe and secure.
Please note that locking your photo albums with a passcode only prevents unauthorized access to the albums. It does not encrypt or protect your photos stored in the albums. If you want additional security, consider utilizing encryption methods or third-party apps that offer enhanced privacy features for your photos.
With the ability to lock your photo albums with a passcode, you can ensure that your cherished memories and sensitive photos remain hidden and secure on your iPhone.
Conclusion
In conclusion, hiding your photo albums on your iPhone can be an effective way to ensure the privacy and security of your personal photos. Whether you want to keep certain memories private or protect sensitive information, the iPhone offers various options to keep your photo albums hidden from prying eyes.
By utilizing the built-in features such as the Hidden Album and third-party apps like Secret Photo Vault, you can easily conceal your photo albums and enjoy peace of mind knowing that your personal photos are protected.
Remember, it is always important to regularly back up your photos and secure your device with a strong passcode or Face ID to further enhance the security of your iPhone and its contents.
So, take control of your photo privacy and start hiding your photo albums on your iPhone today!
FAQs
1. How can I hide a photo album on my iPhone?
To hide a photo album on your iPhone, you can follow these steps:
- Open the Photos app
- Navigate to the “Albums” tab
- Tap “Edit” in the top-right corner
- Click on the minus (-) icon next to the album you want to hide
- Finally, tap on “Hide”
2. Can I hide the “Hidden” album on my iPhone?
Yes, it is possible to hide the “Hidden” album on your iPhone. By default, this album is already hidden from the main Albums view. It is only accessible by going to the “Albums” tab and scrolling to the bottom. However, if you want to completely hide the “Hidden” album, it is not possible without using third-party apps or workarounds.
3. Is there a way to password-protect a hidden photo album on iPhone?
Unfortunately, the Photos app on iPhone does not provide an official way to password-protect hidden photo albums. However, you can explore third-party apps available on the App Store that offer this feature. Keep in mind that these apps may require access to your photos and have different levels of security, so it’s wise to read reviews and research before choosing one.
4. Can I still access my hidden photo album when connected to a computer?
When your iPhone is connected to a computer, the hidden photo album will remain hidden and cannot be accessed through the File Explorer or any other file browsing methods used on the computer. The hidden album is specifically designed to keep the photos private and inaccessible to others, even when the device is connected to an external source.
5. How can I unhide a photo album on iPhone?
If you’ve hidden a photo album on your iPhone and want to unhide it, you can follow these steps:
- Open the Photos app
- Navigate to the “Albums” tab
- Scroll to the bottom of the page
- Tap on “Hidden” album
- Find the album you want to unhide and tap on the share icon
- Select “Unhide” from the options