
Are you ready to give your iPhone’s home screen a makeover? Look no further than the latest iOS 14 update, which introduces a brand new feature called Widgets. Perfect for those wanting to add a personal touch and create a more customized user experience, Widgets allow you to display useful information and access your favorite apps right from your home screen.
In this article, we will guide you through the step-by-step process of making widgets on iOS 14. Whether you want to show the weather forecast, track your fitness goals, or have quick access to your most used apps, we will show you how to unleash the full potential of widgets on your iPhone.
Inside This Article
- Overview of Widgets in iOS 14
- Understanding the Widget Development Process
- Setting Up the Xcode Project for Widget Development
- Creating a Widget using SwiftUI
- Customizing the Appearance of the Widget
- Adding Interactivity to the Widget
- Configuring the Widget Permissions and Capabilities
- Testing and Debugging the Widget
- Packaging and Distributing the Widget
- Best Practices for Widget Design and Development
- Conclusion
- FAQs
Overview of Widgets in iOS 14
In iOS 14, Apple introduced a new feature that has been eagerly anticipated by users and developers alike – widgets. Widgets provide users with quick access to important information and app content directly from the home screen. With iOS 14, widgets have gone through a significant transformation, offering more customization options and enhancing the overall user experience.
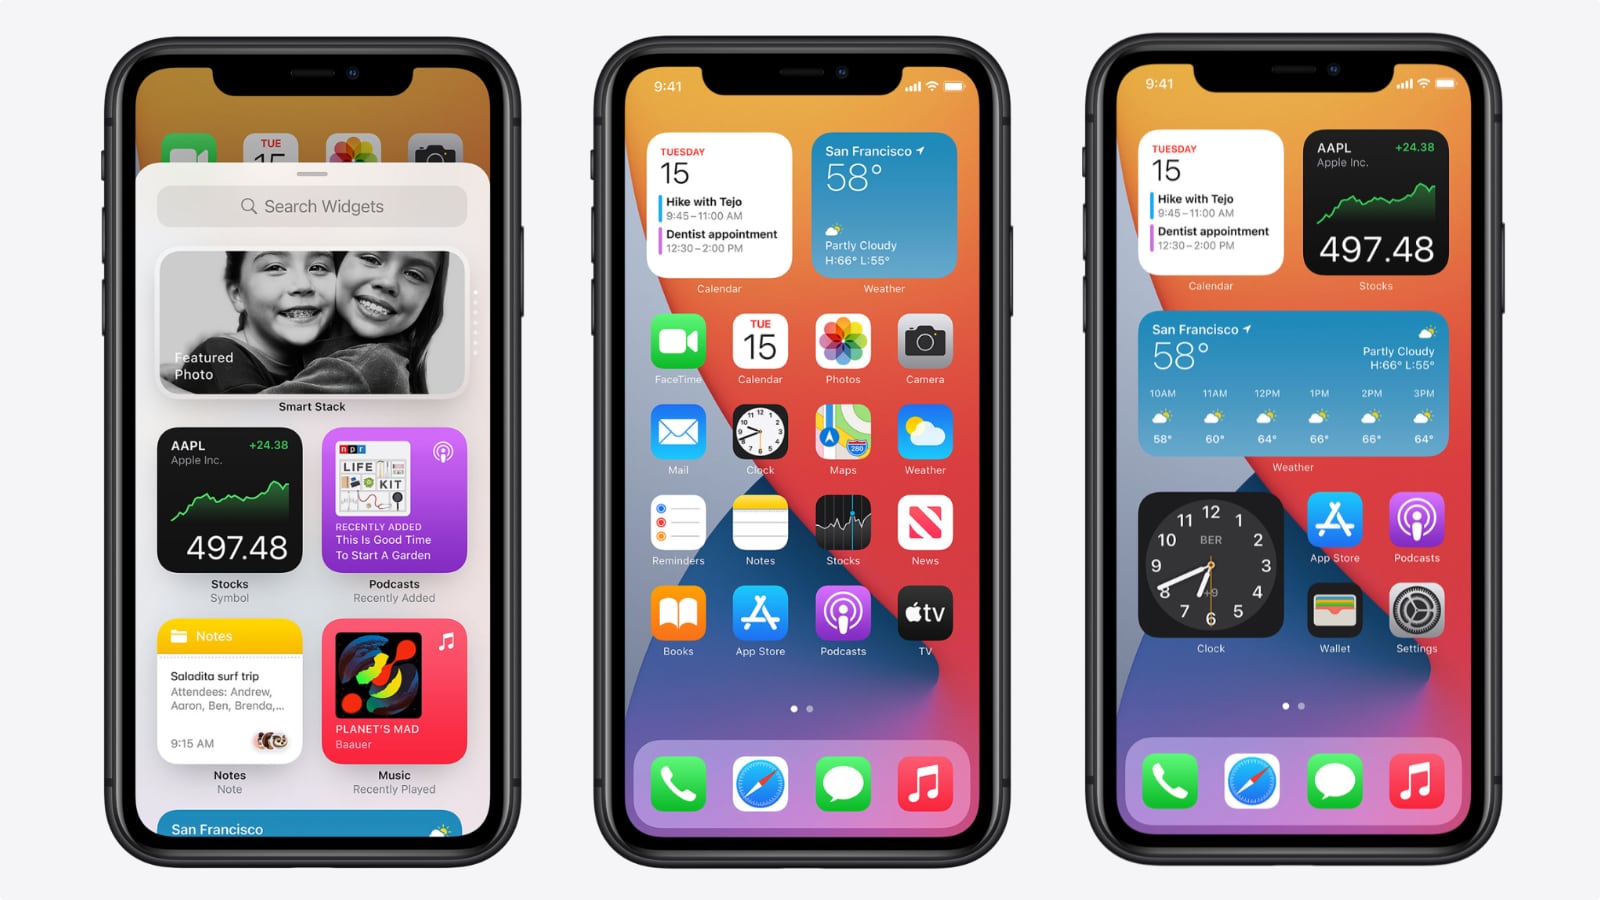
Widgets in iOS 14 come in various sizes and can be placed anywhere on the home screen, allowing users to easily personalize their device and access their favorite apps and information with just a glance. From weather updates and calendar events to news headlines and fitness tracking, widgets provide a dynamic and interactive way to stay informed and engaged.
Developers can now create widgets for their apps, giving users the ability to interact with app content without actually launching the app itself. This opens up new possibilities for developers to showcase key features and engage users directly from the home screen. Whether it’s a sports app that displays live scores or a shopping app that shows personalized recommendations, widgets provide a powerful tool for app developers to enhance user engagement.
Widgets in iOS 14 are built using SwiftUI, Apple’s modern and declarative framework for building user interfaces. SwiftUI makes it easier than ever for developers to create rich and customizable widgets that seamlessly integrate with the existing app design. With SwiftUI, developers have access to a wide range of UI components and layout options, allowing them to create beautiful and functional widgets that blend seamlessly with the overall user experience.
One of the key features of widgets in iOS 14 is the support for widget stacks. Widget stacks allow users to stack multiple widgets on top of each other, flipping through them to quickly access different pieces of information or app content. This provides a convenient way for users to maximize the use of their home screen real estate and access multiple widgets with a single swipe.
Widgets in iOS 14 also support smart stacks, which use machine learning to automatically display the most relevant widget based on the user’s usage patterns and time of day. This feature ensures that users always see the most useful and timely information on their home screen, without the need for manual switching or customization.
With the introduction of widgets in iOS 14, Apple has taken a big step towards creating a more personal and customizable user experience. Users now have the flexibility to customize their home screens with widgets that provide real-time information and quick access to their favorite apps. Developers, on the other hand, have been given a powerful tool to enhance user engagement and showcase the key features of their apps.
As iOS 14 continues to evolve, we can expect to see more innovative and exciting widgets from developers, offering new ways to interact with apps and personalize the home screen experience. Whether you’re a user looking to customize your device or a developer looking to engage your audience, widgets in iOS 14 are definitely worth exploring.
Understanding the Widget Development Process
Widgets have become an essential part of the iOS experience since the introduction of iOS 14. They provide users with a quick and convenient way to access important information or perform common tasks directly from the home screen. If you’re a developer looking to create your own widgets for iOS 14, understanding the widget development process is crucial. Let’s explore the key steps involved in creating and implementing widgets in iOS 14.
The first step in the widget development process is familiarizing yourself with the widget’s functionality and purpose. Determine what information or functionality you want to offer to users and think about how it can be best displayed on the home screen. This will help you design a widget that is both useful and visually appealing to users.
Next, you’ll need to set up the Xcode project for widget development. Ensure that you’re using the latest version of Xcode and have the necessary provisioning profiles and certificates. Create a new target for the widget extension in your project and configure the required settings such as the widget’s size and capabilities.
Once the project is set up, you can start creating the widget using SwiftUI, Apple’s declarative UI framework. SwiftUI provides an intuitive and efficient way to design and build user interfaces for widgets. You can use SwiftUI’s Views and modifiers to customize the appearance of your widget and combine different components to create a dynamic and interactive user experience.
Customization is an essential aspect of widget development. Users appreciate the ability to personalize the appearance and behavior of widgets. Consider adding options for users to customize the widget’s color scheme, font size, or the information displayed. This will enhance the user experience and make your widget stand out from others.
Adding interactivity to your widget can greatly enhance its functionality. You can enable users to perform actions directly from the widget, such as triggering a specific action in your app or opening a particular screen. Implementing interactivity will make your widget more engaging and provide a seamless user experience.
Before distributing your widget, it’s important to configure the required permissions and capabilities. Determine what type of data or functionalities your widget requires and ensure that the necessary permissions are requested and granted. This will ensure that your widget works seamlessly and securely on users’ devices.
Testing and debugging are crucial steps in widget development. Make use of the Xcode simulator and real devices to test your widget’s functionality and performance. Pay attention to different screen sizes and orientations to ensure that your widget looks and works well across a range of devices. Use the debugging tools provided by Xcode to identify and fix any issues or errors.
Once you’re satisfied with the functionality and performance of your widget, it’s time to package and distribute it to users. Create an App Store listing for your app that highlights the features and benefits of your widget. Submit your app to the App Store and follow Apple’s guidelines for widget distribution.
Finally, keep up with the best practices for widget design and development. Stay updated on Apple’s guidelines and recommendations for creating widgets. Pay attention to user feedback and make improvements to your widget based on user preferences and needs. Continuously iterate and optimize your widget to provide the best possible user experience.
By understanding the widget development process and following best practices, you can create compelling and user-friendly widgets for iOS 14. Embrace the opportunities offered by widgets to enhance the usability and accessibility of your app and provide users with valuable functionality right at their fingertips.
Setting Up the Xcode Project for Widget Development
When it comes to creating widget for iOS 14, Xcode is your go-to tool. It provides a seamless development environment and offers the necessary tools and frameworks to build and test widgets. Here’s a step-by-step guide to setting up your Xcode project for widget development.
- Open Xcode: Launch Xcode on your Mac. If you don’t have it installed, you can download it from the Mac App Store.
- Create a New Project: Select “Create a new Xcode project” from the welcome window or go to “File” > “New” > “New Project.”
- Select iOS App Template: In the template selection screen, choose the appropriate iOS app template for your widget. This will serve as the base project for your widget development.
- Configure Project Options: Fill in the necessary details like product name, organization identifier, and language. Choose a location on your Mac to save the project files.
- Add Widget Extension Target: Once the project is created, go to “File” > “New” > “Target.” In the template selection screen, choose “Widget Extension” under the “Application Extension” section.
- Configure Widget Options: Provide a name for your widget extension and select the parent app target. You can also choose the size of the widget and set any additional capabilities you require for your widget.
- Configure Widget Appearance: Xcode will generate a default widget appearance using SwiftUI. You can customize the appearance by modifying the generated code in the Widget.swift file.
- Link Library and Frameworks: If your widget requires any additional libraries or frameworks, you can link them to your project. This can be done by going to the project settings, selecting the widget extension target, and adding the necessary dependencies.
- Build and Run: Now that your Xcode project is set up, you can build and run it on the iOS Simulator or your connected device to test your widget’s initial functionality and appearance.
With the Xcode project set up, you’re all set to dive into widget development for iOS 14. Stay tuned for the next sections, where we’ll explore the process of creating and customizing the widget using SwiftUI.
Creating a Widget using SwiftUI
With the introduction of iOS 14, Apple has made it easier than ever to create widgets using SwiftUI. SwiftUI is a modern and intuitive framework for building user interfaces across all Apple platforms, including iPhone, iPad, and macOS.
To create a widget using SwiftUI, follow these steps:
- Open Xcode and create a new project, selecting “Widget Extension” under the “Application” section.
- Give your widget a unique name, such as “MyWidget” and choose the target platform and language.
- Click “Finish” to create the widget project.
Once your project is set up, you will see the basic structure of the widget extension, including a SwiftUI view file named “WidgetEntryView.swift”. This is where you will define the appearance and behavior of your widget.
Inside the “WidgetEntryView.swift” file, you can use SwiftUI’s declarative syntax to design your widget. You can add text, images, buttons, and other UI elements to create a visually appealing and interactive widget.
For example, you can start by adding a VStack to vertically stack your UI elements:
struct WidgetEntryView : View {
    var body: some View {
        VStack {
            Text("Hello, Widget!")
                .font(.title)
                .foregroundColor(.white)
            Button(action: {
                // Handle button tap
            }) {
                Text("Tap me")
                    .font(.headline)
                    .padding()
                    .background(Color.blue)
                    .foregroundColor(.white)
                    .cornerRadius(10)
            }
        }
        .padding()
        .background(Color.red)
    }
}
Once you have defined the UI elements, you can customize their appearance and behavior using SwiftUI modifiers. For example, you can change the font size, color, and background of the text or add animation effects to the button.
After designing your widget’s appearance, you need to configure the widget’s behavior and logic. This can be done by implementing the WidgetIntentView protocol and handling the widget’s timeline updates. The timeline updates allow you to update the widget’s content periodically, ensuring that it always displays the latest information.
To update the widget’s content, you can use SwiftUI’s @State and @Binding properties to track and propagate changes. This ensures that the widget updates automatically whenever the underlying data changes.
Once you are satisfied with the design and functionality of your widget, you can build and run the widget extension in the iOS Simulator or on a physical device. You can add the widget to the home screen by long-pressing on the home screen and selecting the “+” button to enter the widget gallery. From there, you can choose the desired widget size and add it to your home screen.
Creating widgets using SwiftUI in iOS 14 is a powerful and straightforward process, allowing developers to create visually stunning and interactive widgets. By leveraging the features of SwiftUI and the capabilities of iOS 14, developers can create widgets that enhance the user experience and provide quick and valuable information at a glance.
Customizing the Appearance of the Widget
One of the key aspects of creating a widget in iOS 14 is the ability to customize its appearance to match your app’s branding or the user’s preferences. By incorporating visual elements and engaging design choices, you can create widgets that are not only functional but also aesthetically pleasing. Let’s explore some of the ways you can customize the appearance of your widget.
Widget Sizes: In iOS 14, widgets come in three different sizes: small, medium, and large. Each size offers different possibilities for displaying information and interacting with the widget. When customizing the appearance of your widget, consider how the content will be displayed in each size and optimize the layout accordingly.
Color and Typography: Use color and typography to make your widget visually appealing and consistent with your app’s design. Consider using your app’s brand colors and fonts to create a cohesive look. You can also experiment with different font weights and sizes to highlight important information in your widget.
Images and Icons: Incorporating images and icons can add visual interest to your widget. Use high-quality images that are relevant to the content you are displaying. Icons can be used to represent different actions or categories within your widget, making it easier for users to understand and interact with the widget’s functionality.
Backgrounds and Borders: Customize the background and borders of your widget to create a distinct visual style. Consider using gradients, patterns, or solid colors for the widget background. Use borders to separate different sections or elements within the widget, creating a visually organized layout.
Animations: Add subtle animations to your widget to enhance the user experience. Animations can help draw attention to specific elements or provide feedback when the widget is interacted with. However, be mindful of the performance impact of animations, especially on battery life, and ensure they are used sparingly and purposefully.
Dynamic Content: Make your widget dynamic by updating its content based on real-time data or user interactions. For example, a weather widget could display the current temperature and weather conditions. By providing dynamic content, you can make your widget more useful and engaging for users.
Accessibility: Ensure that your widget is accessible to all users by incorporating accessibility features. Use descriptive text for images and icons, provide alternative text for dynamic content, and ensure that the widget can be navigated and interacted with using VoiceOver. By making your widget accessible, you can cater to a wider audience and improve the overall user experience.
When customizing the appearance of your widget, it is important to strike a balance between visual appeal and usability. Avoid adding too many elements or making the widget too cluttered, as this can make it difficult for users to read and interact with the content. Keep the design simple, intuitive, and in line with the overall aesthetic of your app.
By taking the time to customize the appearance of your widget, you can create a visually stunning and engaging experience for your users, making your app stand out on the home screen of their iOS devices.
Adding Interactivity to the Widget
One of the standout features of widgets in iOS 14 is their ability to provide interactive experiences. Users can now engage with widgets directly on their home screen, making them even more useful and convenient. As a developer, you have the power to enhance the interactivity of your widget and provide users with a richer experience. Here are some ways to add interactivity to your widget:
1. Tap Gestures
One of the simplest ways to add interactivity to a widget is by implementing tap gestures. You can specify a tap action for your widget that triggers a specific action when the user taps on the widget. For example, you can tap on a weather widget to open the weather app or tap on a calendar widget to open the calendar app. Implementing tap gestures allows users to quickly access related content or perform specific tasks.
2. Context Menus
Widgets in iOS 14 also support context menus, which provide users with a set of actions that can be accessed by long-pressing the widget. Context menus allow you to offer a range of options or shortcuts to users right from the home screen. For example, a music widget can provide options to play, pause, or skip songs. By implementing context menus, you can enhance the functionality of your widget and provide users with quick access to common actions.
3. Widget Families
Widget families in iOS 14 allow you to create multiple versions of your widget with different sizes and layouts. Each family represents a specific widget size category, such as small, medium, or large. By utilizing widget families, you can provide users with more interactive elements and information based on the available space. For example, a medium-sized widget can show additional content or allow users to scroll through different items. By adapting your widget to different sizes and layouts, you can improve the interactivity and usability of your widget.
4. Widget Configuration
Another way to add interactivity to your widget is by allowing users to customize its appearance and behavior. Widget configuration allows users to personalize their widgets by selecting different settings, choosing preferred data sources, or customizing the layout. By implementing widget configuration, you can provide users with a more personalized and interactive experience with your widget.
Adding interactivity to your widget not only makes it more engaging but also increases its usability and value to the users. By offering tap gestures, context menus, utilizing widget families, and providing widget configuration options, you can create a more dynamic and interactive widget experience for your users.
Configuring the Widget Permissions and Capabilities
When developing a widget for iOS 14, it is important to configure the necessary permissions and capabilities to ensure optimal functionality and user experience. Here are some key considerations for configuring widget permissions:
1. App Permissions
To interact with the widget, the associated app must have the necessary permissions enabled. This typically includes permissions related to accessing data, such as location, calendar, or notifications. Make sure to clearly communicate to users why these permissions are required and obtain their consent before accessing sensitive data.
2. Widget Configuration
Some widgets may require additional configuration from the user. For example, a weather widget may need the user to specify their location or preferred units. Implement an intuitive and user-friendly configuration process within the app to allow users to customize their widget’s behavior.
3. Background App Refresh
Widgets rely on data updates to provide real-time information. To ensure the widget stays up-to-date, enable the “Background App Refresh” capability for your app. This allows your app to fetch new data in the background, ensuring the widget is always displaying the latest information.
4. Widget Data Privacy
Respect the user’s privacy and only display information in the widget that they have explicitly allowed. Avoid displaying sensitive or personal data on the widget’s home screen, and ensure that any information displayed is properly protected and encrypted.
5. Widget Sizes and Capabilities
Consider the different size options and capabilities available for widgets in iOS 14. Certain sizes may have specific features or functionality available, such as the ability to dynamically change content or provide interactive elements. Take advantage of these capabilities to provide a rich and engaging widget experience.
6. Widget Interaction Permissions
Incorporate any necessary interaction permissions for your widget. For example, if your widget allows users to perform actions directly from the widget, such as marking a task as complete or sending a message, make sure to request the required permissions and clearly explain the purpose of these interactions.
By carefully configuring the widget permissions and capabilities, you can ensure a seamless and secure user experience while providing the desired functionality in your iOS 14 widget.
Testing and Debugging the Widget
Once you have created your widget in iOS 14, it is crucial to thoroughly test and debug it to ensure a smooth user experience. Here are some best practices for testing and debugging your widget:
- Test on Device: The most effective way to test your widget is by running it on an actual device. This allows you to experience the widget in its intended environment and identify any performance issues or display problems that may arise.
- Simulator Testing: While testing on a physical device is recommended, using the iOS Simulator is a convenient option for quick iterations and basic functionality testing. It allows you to simulate different device models and iOS versions, providing a good initial test environment.
- Use Debugging Tools: Xcode offers powerful debugging tools that can help identify and fix issues with your widget. Utilize features such as breakpoints, logging, and the debugger console to track down and address any bugs or unexpected behavior.
- Test with Different Data: Widgets often rely on data from APIs or other sources. It is crucial to test your widget with different data sets to ensure that it can handle various scenarios and edge cases. Test with both real and mock data to cover different use cases.
- Localization Testing: If your app supports multiple languages, make sure to test the widget with different localizations. Check for any text truncation issues, layout problems, or misaligned elements that may occur when using different languages.
- Performance Testing: Widgets should be designed to be efficient and responsive. Perform performance tests to ensure that your widget does not have any noticeable lags or freezes. Monitor its memory usage and consider optimizing any resource-intensive operations.
- Edge Case Testing: Think outside the box and test your widget in unexpected scenarios. For example, what happens when the widget is displayed in a low battery mode? Or when the device is in airplane mode? Identify and handle these edge cases to provide a seamless user experience.
- Accessibility Testing: Ensure that your widget is accessible to users with disabilities. Test it with VoiceOver enabled and check if all the elements are properly labeled, and the widget can be navigated and used using assistive technologies.
- User Testing: Lastly, don’t forget to gather feedback from real users. Share your widget with a group of beta testers or gather user feedback through tools like TestFlight. Having real users test your widget will provide valuable insights and help identify any usability issues that you may have missed.
By thoroughly testing and debugging your widget, you can ensure that it functions as expected and provides a seamless experience for your users. Remember to address any issues or bugs that arise during testing promptly, and iterate on your widget design and functionality to create the best possible user experience.
Packaging and Distributing the Widget
Once you have developed and tested your widget successfully, it’s time to package and distribute it to the users. Here are the steps to package and distribute your widget:
- Create an App ID: Before you can distribute your widget, you need to create an App ID for your widget extension. This App ID will be used to sign and authenticate your widget.
- Generate Provisioning Profiles: Next, you’ll need to generate provisioning profiles for both your main app and the widget extension. These profiles will ensure that your app and widget can be installed and run on users’ devices.
- Create an App Store Connect Record: In order to distribute your widget through the App Store, you’ll need to create an App Store Connect record for your widget. This record will contain all the necessary information about your widget, such as its name, description, screenshots, and pricing.
- Upload your Widget to App Store Connect: Once you have created the App Store Connect record, you can upload your widget binary to the platform. Make sure to follow all the guidelines and requirements set by Apple for widget distribution.
- Submit your Widget for Review: After uploading your widget, you’ll need to submit it for review by Apple. The review process ensures that your widget meets all the necessary guidelines and app store policies before it is made available to users.
- Promote your Widget: Once your widget is approved and live on the App Store, it’s time to promote it to attract users. Use various marketing channels, such as social media, your website, and app store optimization techniques, to showcase your widget and encourage downloads.
Remember to keep your widget updated and address any bugs or issues reported by users. Regular updates not only improve the functionality of your widget but also help in retaining users and attracting new ones.
Additionally, consider exploring other distribution channels beyond the App Store. You could offer your widget as a standalone download from your website or distribute it through third-party app stores or platforms.
By following these steps and actively promoting your widget, you can reach a wide audience and make your widget a valuable addition to users’ iOS 14 experience.
Best Practices for Widget Design and Development
Creating a successful widget requires careful planning and execution. By following these best practices for widget design and development, you can ensure that your widget provides a great user experience and performs optimally.
1. Keep it Simple and Focused
Widgets are meant to deliver at-a-glance information to users. Keep your widget design simple and focused on a specific task or feature. Avoid cluttering the widget with too much information or unnecessary elements. Stick to the core functionality and provide clear and concise information.
2. Optimize for Performance
Widgets should be lightweight and perform efficiently to ensure a smooth user experience. Optimize your widget’s code and resources to minimize load times and memory usage. Avoid using excessive animations or complex calculations that can impact performance.
3. Design for Different Sizes
iOS 14 introduced different widget sizes, allowing users to choose the layout that best suits their needs. Design your widget to dynamically adjust to different sizes. Take advantage of SwiftUI’s flexible layouts to create responsive widgets that adapt to different screen sizes.
4. Use Appropriate Widget Features
iOS 14 introduced new widget features, such as widget families and timeline views. Familiarize yourself with these features and choose the ones that align with your widget’s purpose. Use widget families to provide different layouts for various use cases, and leverage timeline views to display relevant information over time.
5. Utilize Widget Configuration
Allow users to customize their widget experience by implementing widget configuration. This feature enables users to choose preferences or select specific data to display in the widget. Provide a simple and intuitive configuration interface to enhance user engagement and personalization.
6. Test on Different Devices and iOS Versions
Test your widget on various iOS devices and different versions of iOS to ensure compatibility and optimal performance. Consider edge cases and handle scenarios where resources may be limited or network connectivity may be unstable. Conduct thorough testing to identify and fix any potential issues.
7. Consider Accessibility Guidelines
Design your widget with accessibility in mind to ensure that all users can access and interact with it. Follow iOS accessibility guidelines, such as providing alternative text for images and ensuring proper color contrast. Test your widget using VoiceOver and other accessibility features to ensure usability for everyone.
8. Continuously Iterate and Improve
Monitor user feedback and analytics to identify areas for improvement. Collect user insights and understand their needs to refine your widget’s functionality and design. Regularly update your widget with new features, bug fixes, and performance enhancements to provide a superior user experience.
By following these best practices, you can create a well-designed and engaging widget that meets the needs of your users. Remember to stay updated with the latest iOS developments and design trends to stay ahead in the world of widget design and development.
Conclusion
The iOS 14 update has brought exciting new features to iPhone users, including the ability to create personalized widgets. By following a few simple steps, you can transform your home screen into a dynamic and customized display of information.
Creating widgets on iOS 14 is a great way to access important information and quickly perform tasks without having to open multiple apps. Whether you want to check the weather, view your fitness data, or keep track of your calendar events, widgets make it easier than ever before.
With the flexibility and customization options offered by iOS 14, you can design your widgets to match your unique style and preferences. By arranging them in creative layouts, you can create a truly personalized home screen that is both visually appealing and functional.
So, go ahead and unleash your creativity with iOS 14 widgets. Make the most out of your iPhone’s home screen and enjoy a more efficient and tailored user experience.
FAQs
FAQs can provide helpful information to readers and address common queries they may have. Below, we have compiled a list of frequently asked questions about making widgets in iOS 14:
1. Can I make custom widgets in iOS 14?
Yes, with the release of iOS 14, Apple introduced a feature called WidgetKit that allows developers to create and customize widgets for their apps. This means you can now make your own custom widgets to personalize your home screen.
2. How do I create a widget in iOS 14?
Creating a widget in iOS 14 is a relatively simple process. First, long-press on the home screen to enter “Jiggle mode.” Then, tap the “+” icon in the top-left corner of the screen to open the widget gallery. From there, select the app you want to create a widget for and choose the widget size you prefer. Finally, customize the widget by selecting the desired content or settings, and add it to your home screen.
3. Can I resize widgets in iOS 14?
Yes, iOS 14 allows you to resize widgets to fit your desired layout. After adding a widget to your home screen, long-press on it and select “Edit Widget.” From there, you can choose from different available sizes for that widget and adjust its dimensions to meet your preferences.
4. Are there any limitations to making widgets in iOS 14?
While iOS 14 provides developers with greater flexibility in creating widgets, there are a few limitations to be aware of. Widgets can only be placed on the home screen, and they cannot be placed on the lock screen or in folders. Additionally, not all apps have widget functionality, so not every app will have a corresponding widget available.
5. Can I customize the appearance of widgets in iOS 14?
With WidgetKit, developers can provide users with predefined styles for their widgets. However, users don’t have complete control over the appearance of widgets. The design and layout of each widget are determined by the app developer. Nonetheless, you can choose the widget size and position on your home screen to create a visually appealing layout.