
Are you tired of having amazing photos stored on your mobile phone, but not being able to share them with your friends and family on Facebook? Well, look no further! In this article, we will guide you through the simple steps to post pictures from your phone to Facebook effortlessly. Whether you’re using an Android or iOS device, we’ve got you covered with easy-to-follow instructions. Say goodbye to the endless scrolling through your camera roll and hello to the joy of sharing your favorite moments with the click of a button. So grab your phone, open up your Facebook app, and get ready to become a social media maestro as we show you how to post pictures from your phone to Facebook. Let the uploading begin!
Inside This Article
- Uploading pictures from your phone to Facebook
- Step 1: Open the Facebook app
- Step 2: Access the photo upload feature
- Step 3: Choose the photo(s) you want to upload
- Frequently Asked Questions (FAQs)
- Step 4: Add a caption or tag friends (optional)
- Step 5: Adjust privacy settings (optional)
- Step 6: Post your photo(s) to Facebook
- Conclusion
- FAQs
Uploading pictures from your phone to Facebook
Facebook has become one of the most popular platforms for sharing photos. Whether you have captured a breathtaking sunset, a delicious meal, or a memorable moment with friends, you can effortlessly upload these pictures from your phone to Facebook. In this article, we will explore different methods to make sharing your mobile photos with friends and family on Facebook a breeze.
Using the Facebook mobile app
If you haven’t done so already, start by downloading the Facebook mobile app from your phone’s app store. Once installed, open the app and log in to your Facebook account. From the home screen, you will notice a camera icon at the bottom of the screen. Tap on it to start the photo upload process.
After tapping on the camera icon, you will be prompted to either take a new photo or choose an existing one from your phone’s gallery. Select the desired photo and wait for it to load. Once the photo is loaded, you can add a caption or tag friends if desired. When you’re ready, tap on the ‘Post’ button, and your photo will be instantly uploaded to your Facebook timeline for all to see.
Uploading directly from your phone’s photo gallery
If you prefer to upload photos directly from your phone’s photo gallery without using the Facebook app, there is a simple way to do so. Open your phone’s gallery app and locate the photo you wish to upload. Tap and hold on the photo until a menu appears. From the menu, select the option to share the photo.
A list of available apps for sharing will appear on your screen. Look for the Facebook icon and tap on it to select it. You may need to provide your Facebook login credentials if you haven’t already done so. Once logged in, you can add a caption and choose the audience for your photo. Finally, tap on the ‘Post’ button to upload your photo directly to Facebook.
Syncing your phone’s photo folder with Facebook
Another method to automatically upload photos from your phone to Facebook is by syncing your phone’s photo folder with the Facebook app. To do this, open the Facebook app and go to the settings menu by tapping on the three horizontal lines in the top-right corner of the screen. From the menu, select the ‘Settings & Privacy’ option, and then choose ‘Settings’.
Scroll down until you find the ‘Media and Contacts’ section and tap on it. Enable the ‘Sync Photos’ option and choose the folder on your phone that you want to sync with Facebook. Once selected, every photo you take and save in that folder will be automatically uploaded to your Facebook account.
Using third-party apps to post pictures to Facebook
If you want more flexibility and features when uploading photos to Facebook, you can explore third-party apps that integrate with Facebook. These apps often offer additional editing tools, filters, and sharing options. Some popular options include Instagram, Snapchat, and Flickr.
Simply download the app from your app store, create an account, and connect it to your Facebook account. Once connected, you can easily post pictures to your Facebook timeline directly from the app, taking advantage of the app’s unique features.
Now that you have learned different methods for uploading pictures from your phone to Facebook, you can effortlessly share your special moments with your friends and family. Whether you choose to use the Facebook app, upload directly from your phone’s gallery, sync your photo folder, or utilize third-party apps, the process of sharing photos on Facebook has never been easier.
Step 1: Open the Facebook app
To begin posting pictures from your phone to Facebook, you will need to open the Facebook app on your smartphone. This app allows you to access all the features and functionalities of the popular social media platform conveniently.
Here’s how you can easily launch the Facebook app on your smartphone:
- Locate the Facebook app icon on your phone’s home screen or app drawer.
- Tap on the icon to open the app.
After you’ve successfully opened the Facebook app, you’ll need to ensure that you are logged in to your Facebook account before proceeding with the photo upload process.
In case you are not currently logged in, follow these steps to log in to your Facebook account:
- Enter your Facebook email address or phone number in the provided login field.
- Enter your Facebook password in the designated password field.
- Tap on the “Log In” button to access your account.
By logging in to your Facebook account, you will gain access to all your personal information, friends list, and the ability to upload and share photos with your social network.
Step 2: Access the photo upload feature
Now that you are in the Facebook mobile app, it’s time to start posting pictures from your phone to Facebook. After opening the app, locate and tap on the “Photo” button, which is usually found at the top of your News Feed or Timeline.
When you tap on the “Photo” button, it will open the photo upload screen, where you can choose the pictures you want to share with your friends and followers on Facebook.
This feature allows you to select photos from your phone’s gallery or take a new photo using your phone’s camera. You can also choose to add filters, crop or rotate the image, and even tag friends before uploading the picture to Facebook.
By tapping on the “Photo” button, you’ll have access to a range of options that will enhance your photo uploading experience on Facebook. Whether you want to share a memorable vacation picture, a delicious meal, or a cute selfie, this feature makes it easy and convenient to showcase your favorite moments.
Once you’ve tapped on the “Photo” button and opened the photo upload screen, you’ll be ready to proceed to the next step, which involves selecting the photos you want to share on Facebook.
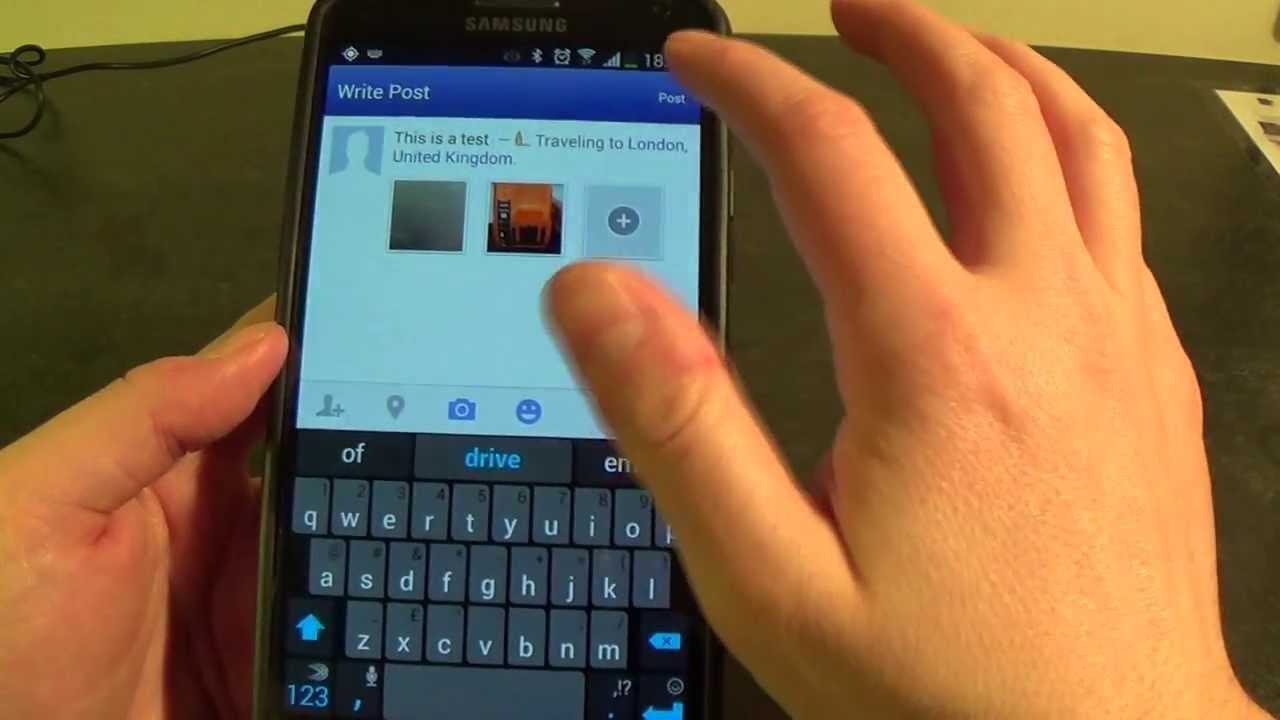
Step 3: Choose the photo(s) you want to upload
Now that you have opened the Facebook mobile app and are ready to upload photos, the next step is to choose the photo(s) you want to share with your friends and family. Follow these simple steps:
1. Tap on the “Choose Photo” button: When you are on the upload screen, look for the “Choose Photo” button. This button usually has an icon of a picture or a camera. By tapping on this button, you will be directed to your device’s photo library.
2. Open your device’s photo library: After tapping on the “Choose Photo” button, your device’s photo library will open up. This is where all the photos you have taken or saved on your phone are stored. You will be able to browse through different albums and folders.
3. Select the desired photo(s) from your gallery: Take your time to browse through your photo gallery and choose the photo(s) you want to upload to Facebook. You can tap on each photo individually to select them, and a checkmark or icon will indicate that it has been selected. If you want to select multiple photos at once, look for the “Select Multiple” option (usually represented by a checkbox) and tap on it. Then, tap on the desired photos to select them.
4. Confirm your selection: Once you have chosen the photo(s) you want to upload, look for a confirmation button on the screen. It might be labeled as “Done” or “Confirm.” Tap on this button to proceed.
5. Edit the photos (optional): At this point, you may have the option to edit your chosen photos before uploading them to Facebook. Depending on the app or device you are using, you might have access to various editing tools like cropping, filters, adjustments, and more. If you want to make any changes to your photos, take advantage of these editing options.
6. Upload the photos: After confirming your selection and applying any desired edits, the final step is to upload the photos to Facebook. Look for the “Upload” or “Post” button on your screen and tap on it. The app will then start uploading your selected photos to your Facebook account. The time it takes to upload will depend on the size and number of photos you have chosen.
7. Add a caption (optional): Once the photos have uploaded, you may want to add a caption or description to provide context or share your thoughts about the pictures. Look for the caption or text input field on the post and enter your desired text.
8. Post the photos: Finally, click on the “Post” or “Share” button to publish your photos and make them visible to your friends and followers on Facebook. Congratulations! Your photos are now uploaded and ready to be enjoyed by others.
Frequently Asked Questions (FAQs)
- Can I upload photos to Facebook without using the mobile app?
- Why can’t I see the “Choose Photo” button on my Facebook app?
- Are there any limitations on the number or size of photos I can upload?
- What if I accidentally upload the wrong photo(s)? Can I delete them?
- Can I upload photos with captions to an existing Facebook album?
Step 4: Add a caption or tag friends (optional)
After successfully uploading your photo to Facebook, you have the option to add a caption or tag your friends. This step allows you to provide more context to your photo and engage with your friends in a more personalized way.
To add a caption, simply locate the designated text field below your uploaded photo. Tap on the text field to activate it, and then type in your desired caption. Whether it’s a witty comment, a heartfelt description, or a funny anecdote, the caption is your chance to express yourself and enhance the meaning behind your photo.
Additionally, if you want to tag your friends in the photo, Facebook offers a convenient option to do so. By tapping on the “Tag Friends” option, you can easily search for and select the friends you want to tag. This feature highlights the people present in the photo and notifies them, creating a more interactive and social experience.
Keep in mind that adding a caption or tagging friends is completely optional. If you prefer to let the photo speak for itself, you can simply skip this step and proceed with sharing the photo on your timeline.
Remember, posting pictures on Facebook is a great way to share moments, memories, and stories with your friends and family. Adding a caption and tagging friends can further enhance the experience, allowing you to connect and engage on a deeper level.
Step 5: Adjust privacy settings (optional)
Before posting your photos on Facebook, it’s important to consider your privacy preferences. Fortunately, the platform provides you with the option to customize the privacy settings for each uploaded photo. This way, you can control who can see your pictures and ensure that they are shared with the intended audience.
To adjust the privacy settings for your uploaded photos, follow these simple steps:
- Tap on the audience selector: After selecting the photo you want to upload, you will see an audience selector icon. It looks like a silhouette of people or a lock, depending on your device. Tap on this icon to proceed.
- Choose your audience: Once you tap on the audience selector, a dropdown menu will appear. From here, you can select who can view your photo. The options may include:
- Public: This option makes your photo visible to everyone on Facebook, including people who are not on your friends list.
- Friends: Selecting this option restricts the visibility of your photo to only your Facebook friends.
- Specific friends: If you want to share your photo with only a selected few, you can choose this option and manually select the friends you wish to include.
- Only me: This option ensures that your photo is visible only to yourself. It acts as a private album and keeps your photo hidden from others.
- Custom: By selecting this option, you can create a custom audience list by excluding or including specific people or groups.
After you have selected your desired audience, simply tap on the “Done” or “Save” button, depending on your device, to save the privacy settings for your photo. Now you can proceed with posting your picture with the peace of mind that it will be shared with the right people.
Step 6: Post your photo(s) to Facebook
After taking or selecting the perfect photo on your mobile phone, it’s time to share it on Facebook. Here’s how you can easily post your photo(s) to your Facebook profile:
1. After making any desired adjustments to your photo, tap the “Post” button to start the uploading process.
2. Next, wait for the upload to complete. The time it takes will depend on the size of the photo and the speed of your internet connection.
3. Once the upload is finished, your photo(s) will be shared on your Facebook profile for your friends and followers to see and interact with.
Posting photos on Facebook allows you to share memorable moments, express your creativity, and keep your loved ones updated with your adventures. So, whether it’s a stunning landscape, a funny selfie, or a delicious meal, let’s dive into the different methods you can use to post pictures from your phone to Facebook.
Using the Facebook mobile app
If you have the Facebook mobile app installed on your phone, you can easily upload photos directly from the app. Follow these steps:
- Launch the Facebook app on your phone and log in to your account.
- Tap on the “Create Post” or “What’s on your mind?” section at the top of your News Feed or profile.
- Select the “Photo/Video” option.
- Choose the photo(s) you want to upload from your phone’s gallery.
- Once you’ve selected the photo(s), you can add a caption or location if desired.
- After making any adjustments, tap the “Post” button to upload your photo(s).
Your photo(s) will now be shared on your Facebook profile, visible to your friends or followers depending on your privacy settings.
Uploading directly from your phone’s photo gallery
If you prefer to upload photos from your phone’s gallery without using the Facebook app, here’s what you need to do:
- Open your phone’s photo gallery app.
- Select the photo(s) you want to upload to Facebook.
- Tap on the share icon (usually represented by three dots or an arrow pointing up).
- From the share menu, choose the Facebook icon or the option to share on Facebook.
- Add a caption or location if desired.
- Tap the “Post” button to start the upload.
Wait for the upload to complete, and your photo(s) will be shared on your Facebook profile.
Syncing your phone’s photo folder with Facebook
If you want a more seamless experience, you can also sync your phone’s photo folder with Facebook. This way, whenever you take a new photo, it will automatically be uploaded to your Facebook account. Here’s how to set it up:
- Open the Facebook app on your phone and log in to your account, if you haven’t already.
- Tap on the menu icon (usually represented by three horizontal lines) located at the top right corner of the app.
- Scroll down and select “Settings & Privacy” followed by “Settings.”
- Go to the “Media and Contacts” section.
- Choose “Sync Photos” or a similar option, depending on your device.
- Toggle the switch to enable syncing.
- Select the folder or albums you want to sync with Facebook.
- Your phone’s photo folder will now be synced with Facebook, and any new photos you take will be automatically uploaded.
Using third-party apps to post pictures to Facebook
Alternatively, you can use third-party apps specifically designed for photo sharing and integration with Facebook. These apps often offer additional features and editing options. Here are a few popular options:
- Instagram: This widely-used app allows you to post photos and videos to Instagram and share them directly on Facebook.
- Snapseed: A powerful photo editing app that also allows you to share your edited photos on Facebook.
- VSCO: Known for its stunning filters and creative editing tools, VSCO lets you post your photos directly to Facebook.
Simply download the app of your choice from your phone’s app store, sign in to your Facebook account, and follow the instructions provided by the app to post your photos.
Now that you know various methods to post pictures from your phone to Facebook, have fun capturing moments, expressing yourself through photos, and sharing them with your friends and followers!
Conclusion
Posting pictures from your phone to Facebook has become easier than ever before. With the advancements in mobile technology and the availability of social media apps, you can now share your favorite memories with just a few taps on your phone screen.
By following the steps outlined in this guide, you can effortlessly upload and share your pictures with your friends and family on Facebook. Remember to optimize your photos for social media and use descriptive captions to engage your audience.
Whether you’re documenting your travels, sharing special moments, or promoting your business, posting pictures on Facebook allows you to connect with others and express yourself creatively. So don’t hesitate to capture the perfect shot and share it with the world!
FAQs
Here are some frequently asked questions about posting pictures from your phone to Facebook:
1. Can I post pictures to Facebook directly from my mobile phone?
Yes, you can easily post pictures to Facebook directly from your mobile phone. Facebook has a dedicated mobile app that allows you to upload and share pictures seamlessly.
2. Can I edit my pictures before posting them on Facebook?
Absolutely! Many mobile devices come with built-in photo editing features that you can use to enhance your pictures before sharing them on Facebook. Additionally, there are numerous third-party photo editing apps available for download that offer a wide range of editing tools and filters.
3. What are the steps to post pictures from my phone to Facebook?
To post pictures from your phone to Facebook, follow these steps:
- Open the Facebook app on your mobile phone.
- Tap on the “Photo” or “Camera” button to select the picture you want to upload.
- Add a caption or description to your picture if desired.
- Select the privacy settings for your post.
- Tap the “Post” button to upload and share your picture on Facebook.
4. What is the maximum file size for pictures uploadable to Facebook from a mobile device?
Currently, the maximum file size for pictures uploaded to Facebook from a mobile device is 25MB. If your picture exceeds this limit, you’ll need to reduce its size before uploading.
5. Can I post pictures on multiple Facebook pages or groups at once from my phone?
Yes, you can post pictures simultaneously to multiple Facebook pages or groups from your phone. When composing your post, select the desired pages or groups you wish to share the picture with. However, it’s important to note that you should respect the posting guidelines and recommendations of each page or group to avoid spamming or violating any rules.
Remember, Facebook’s interface may evolve over time, so if you encounter any difficulties or changes in the upload process, refer to the latest instructions provided by Facebook or seek assistance from their support channels.