
Are you using Facebook on your mobile device and want to know how to change the identity you are interacting as? Whether you have multiple accounts or need to switch between your personal profile and a Facebook Page, understanding how to change who you are interacting as on Facebook mobile is essential. This feature allows you to maintain your privacy, manage different accounts, and engage with your audience seamlessly. In this article, we will guide you through the process of changing your identity on the Facebook mobile app. So, whether you are an avid social media user or a business owner looking to manage your online presence, keep reading to discover the easy steps to change who you are interacting as on Facebook mobile.
Inside This Article
- Steps to change your Facebook profile on mobile
- Step 1: Open the Facebook app- Launch the Facebook app on your mobile device
- Step 2: Tap on the menu button – Look for the three horizontal lines at the top right corner of the screen and tap on them to open the menu
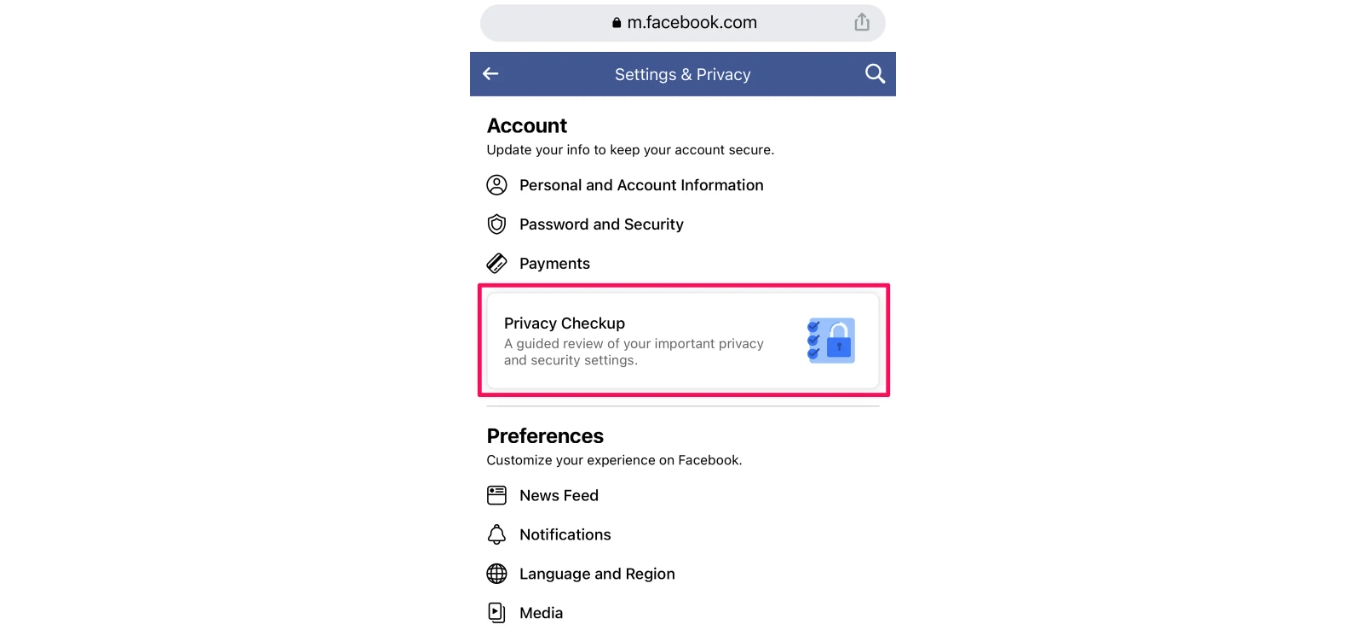
- Step 3: Scroll down and select “Settings & Privacy”
- Step 4: Access “Settings” – Tap on the “Settings” option within the “Settings & Privacy” section
- Step 5: Tap on “Account Settings” or “Account”- In the Settings menu, find and tap on either “Account Settings” or “Account” option
- Step 6: Select “General” settings- Look for the “General” setting option and tap on it to open the general account settings
- Step 7: Tap on “Name” or “Name and Pronouns”
- Step 8: Enter your desired name- Type in your new preferred name in the provided text box
- Step 9: Review and save changes
- Step 10: Confirm your password- To ensure security, Facebook might ask you to re-enter your password to confirm the changes
- Step 11: Update your profile picture (optional)- If you wish to change your profile picture as well, tap on the “Edit” or “Change” option next to your current profile picture
- Step 12: Select a new picture from your device or take a new photo
- Step 13: Adjust the image if needed and save changes- Crop or adjust the image as desired and tap on the “Save” or “Done” button to set it as your new profile picture
- Step 14: Verify changes – Go to your Facebook profile and confirm that your name and profile picture have been updated
- Conclusion
- FAQs
Steps to change your Facebook profile on mobile
Changing your Facebook profile on your mobile device is a straightforward process. Whether you want to update your name, profile picture, or other information, follow these steps:
- Step 1: Open the Facebook app
- Step 2: Tap on the menu button
- Step 3: Scroll down and select “Settings & Privacy”
- Step 4: Access “Settings”
- Step 5: Tap on “Account Settings” or “Account”
- Step 6: Select “General” settings
- Step 7: Tap on “Name” or “Name and Pronouns”
- Step 8: Enter your desired name
- Step 9: Review and save changes
- Step 10: Confirm your password
- Step 11: Update your profile picture (optional)
- Step 12: Select a new picture from your device or take a new photo
- Step 13: Adjust the image if needed and save changes
- Step 14: Verify changes
Launch the Facebook app on your mobile device. Make sure you are logged in to your account.
Look for the three horizontal lines at the top right corner of the screen and tap on them to open the menu.
Scroll down the menu options and locate the “Settings & Privacy” section. Tap on it to expand the options.
Tap on the “Settings” option within the “Settings & Privacy” section. This will take you to the main settings page.
In the Settings menu, find and tap on either “Account Settings” or “Account” option. The exact wording may vary depending on the version of the Facebook app.
Look for the “General” setting option and tap on it to open the general account settings.
Find the “Name” option or “Name and Pronouns” option and tap on it to edit your Facebook profile name.
Type in your new preferred name in the provided text box. Make sure to adhere to Facebook’s name policy.
Review the changes you made and if you are satisfied, tap on the “Save” or “Done” button to save your new profile name.
To ensure security, Facebook might ask you to re-enter your password to confirm the changes. Enter your password and tap on the “Confirm” or “Continue” button.
If you wish to change your profile picture as well, tap on the “Edit” or “Change” option next to your current profile picture.
Choose a new picture from your device’s gallery or use your phone’s camera to take a new photo. Make sure the image follows Facebook’s guidelines for profile pictures.
Crop or adjust the image as desired and tap on the “Save” or “Done” button to set it as your new profile picture.
Go to your Facebook profile and confirm that your name and profile picture have been updated successfully.
Following these easy steps will allow you to change various aspects of your Facebook profile on your mobile device. Enjoy customizing your Facebook presence to reflect your personality and style!
Step 1: Open the Facebook app- Launch the Facebook app on your mobile device
So you’ve decided to change who you are interacting as on Facebook and you’re ready to get started. The first step is to open the Facebook app on your mobile device. Whether you have an iPhone or an Android phone, the process is the same. Simply locate the Facebook app icon on your home screen or app drawer and tap on it.
Once you tap on the Facebook app, it will launch and take you to the login page or directly to your news feed if you are already logged in. If you are not logged in, enter your email address or phone number and password to access your account. If you are already logged in, you will be taken to your news feed where you can see posts from your friends and pages you follow.
Opening the Facebook app is the crucial first step in changing who you are interacting as. It allows you to access your account settings and make the necessary changes to your profile.
Now that you have successfully opened the Facebook app on your mobile device, you are ready to move on to the next step and start the process of changing who you are interacting as on Facebook.
Step 2: Tap on the menu button – Look for the three horizontal lines at the top right corner of the screen and tap on them to open the menu
After launching the Facebook app on your mobile device, you’ll find the menu button located in the top right corner of the screen. It is represented by three horizontal lines stacked on top of each other. Tap on these lines to open the menu and access various options and settings.
The menu button is a crucial navigation tool in the Facebook app, as it allows you to explore different features and customize your Facebook experience. By tapping on the menu button, you’ll be able to access your profile, friends list, notifications, groups, and much more.
When you tap on the menu button, an overlay or slide-out menu will appear, displaying a list of options. This menu is designed to provide quick and easy access to different sections of the Facebook app, making it convenient to navigate through various features without cluttering the main screen.
By opening the menu, you can easily switch between different sections of Facebook, such as your news feed, profile, friends, events, and settings. It allows you to jump to specific areas of the app with just a few taps, making it a handy feature for accessing different parts of your Facebook account.
Overall, tapping on the menu button is the first step towards exploring the full range of features and settings available on the Facebook mobile app. It’s a convenient and efficient way to navigate through Facebook, access important information, and customize your Facebook experience to suit your preferences.
Step 3: Scroll down and select “Settings & Privacy”
After opening the Facebook app on your mobile device, you need to scroll down to access the “Settings & Privacy” section. To do this, simply swipe your finger upwards on the screen to scroll through the menu options.
As you scroll, you will notice various settings and options available to customize your Facebook experience. Keep swiping until you locate the “Settings & Privacy” section.
Once you find the “Settings & Privacy” section, tap on it to access the submenu. This submenu contains a range of functions that enable you to customize and manage your account.
By selecting “Settings & Privacy”, you will open up a new page with different settings and privacy options. These options allow you to control various aspects of your Facebook profile, including account security, privacy settings, and notification preferences.
It is important to note that the exact location of the “Settings & Privacy” section may vary slightly based on your device and the version of the Facebook app you are using. However, in most cases, you can find it by scrolling down the menu options.
Scrolling down and selecting “Settings & Privacy” is a crucial step in changing your Facebook profile on mobile. It is the gateway to a variety of settings and customization options that can help you personalize your Facebook experience to better suit your preferences.
Step 4: Access “Settings” – Tap on the “Settings” option within the “Settings & Privacy” section
Once you have opened the Facebook app and tapped on the menu button, the next step is to access the “Settings” option. To do this, scroll down the menu options until you find the “Settings & Privacy” section. Within this section, tap on the “Settings” option to proceed.
Accessing the “Settings” menu is vital as it allows you to make various changes to your Facebook profile, including your name, privacy settings, notification preferences, and much more. It is the control center for managing your account and customizing your Facebook experience.
By tapping on the “Settings” option, you will be directed to a submenu that contains different categories of settings. These categories include Account, Privacy, Security, Notifications, and more. Each section within the settings provides you with a range of options that you can adjust according to your preferences.
It’s important to note that the exact placement of the “Settings” option may differ slightly depending on the version of the Facebook app you are using. However, in most cases, you can find it within the “Settings & Privacy” section, making it easily accessible.
Once you have successfully tapped on the “Settings” option, you are ready to move on to the next step in customizing your Facebook profile and making the desired changes to enhance your social media experience.
Step 5: Tap on “Account Settings” or “Account”- In the Settings menu, find and tap on either “Account Settings” or “Account” option
Once you have accessed the Settings menu on the Facebook mobile app, it’s time to proceed to the next step. Look for the option labeled “Account Settings” or simply “Account” within the menu. This is where you’ll find the settings related to your Facebook profile.
The exact wording may vary slightly depending on the version of the app you’re using, but the general idea remains the same. The “Account Settings” or “Account” option acts as a gateway to various customization options for your Facebook profile.
To select this option, simply tap on it. This will take you to the specific settings page where you can make changes to your account.
It’s worth noting that Facebook regularly updates its app, so the layout and design of the settings menu may change slightly over time. However, the core functionality of accessing your account settings will remain consistent.
This step is crucial as it paves the way for making changes to your existing account settings. Whether you want to modify your personal information, privacy settings, or any other aspect of your profile, accessing the account settings is where it all begins.
Step 6: Select “General” settings- Look for the “General” setting option and tap on it to open the general account settings
Once you are in the Facebook app and have accessed the menu, it’s time to fine-tune your account settings. Scroll through the menu options until you find the labeled section that reads “Settings & Privacy.” Tap on it to expand the options within this section.
Within the “Settings & Privacy” section, you will see various settings related to your account. Look for the option that says “Settings” and tap on it. This will take you to another page where you can customize different aspects of your Facebook account.
In the “Settings” menu, you will come across different options, ranging from privacy and security to notifications and language settings. Scroll down this menu until you find the option labeled “General” and tap on it. This will open the general settings of your Facebook account.
When you tap on the “General” option, a new page will open up, revealing a range of settings that you can tweak according to your preferences. These settings include options like changing your profile name, updating your contact information, managing your privacy, and much more.
Take your time to explore the “General” settings and determine which options you want to modify. Facebook offers a wide variety of customization features that allow you to tailor your account to your liking.
Some common settings you may come across within the “General” section include changing your password, adjusting your notification preferences, and controlling the visibility of your posts. Take a moment to familiarize yourself with these options as they can directly impact your overall Facebook experience.
Remember that the “General” settings are designed to provide you with control and flexibility over your account. By tapping on this option, you can take charge of your Facebook profile and ensure that it represents you in the best possible way.
Step 7: Tap on “Name” or “Name and Pronouns”
One of the key aspects of editing your Facebook profile on mobile is changing your profile name. To do this, you need to tap on the “Name” or “Name and Pronouns” option in your account settings.
When you navigate to the “Account Settings” or “Account” section in the Facebook app, you will find various options related to your profile. Look for the “Name” option or, if available, the “Name and Pronouns” option, and tap on it.
This action will open the section where you can update and modify your profile name. Facebook allows you to change your name to better reflect your identity or to update any outdated information.
By tapping on the “Name” or “Name and Pronouns” option, you gain access to the edit feature, enabling you to modify your profile name according to your preference.
Keep in mind that Facebook has certain guidelines and restrictions when it comes to changing your profile name. Your name should be your real name and must not include any special characters, symbols, or random phrases. Additionally, you are not allowed to use titles, such as “Dr.” or “Ph.D.,” in your name.
Make sure to enter your desired name accurately and adhere to the platform’s policies to avoid any issues or limitations. Once you are satisfied with your new profile name, you can proceed to save your changes and update your Facebook profile.
Remember that changing your name on Facebook may require a review process for verification purposes, especially if you have recently made changes or if your new name differs significantly from your previous one.
It’s important to note that Facebook regularly updates its features and user interface. Therefore, the exact steps and options may vary slightly depending on the version of the app you are using. However, by exploring the account settings section in your Facebook app, you will be able to locate and access the option to change your profile name.
Step 8: Enter your desired name- Type in your new preferred name in the provided text box
Once you have accessed the “Name” or “Name and Pronouns” option in your Facebook account settings, you are now ready to enter your desired name. Simply tap on the text box provided and start typing in the name you want to display on your Facebook profile.
When entering your new preferred name, you have the freedom to choose any name you like, as long as it adheres to Facebook’s guidelines. It can be your legal name, a nickname, or even a pseudonym. Feel free to get creative and use the name that truly represents your identity.
As you type in your new name, Facebook will provide real-time feedback and suggestions. This helps to ensure that your name fits within their guidelines and is not flagged as inappropriate. Pay attention to any prompts or warnings that may appear while you are entering the name.
It is important to note that once you change your name on Facebook, you may not be able to change it again for a specified period of time. Therefore, make sure that the name you enter is the one you truly want to display on your profile. Take your time to consider your options before finalizing the change.
After you have entered your desired name, take a moment to review it and make sure there are no spelling errors or typos. Double-check that the name reflects how you want to be identified by your Facebook friends and connections.
Once you are satisfied with the name you have entered, proceed to the next step by tapping on the “Save” or “Done” button. This will save your new profile name and update it across all areas of Facebook where your name is displayed.
It’s worth noting that while changing your name on Facebook will update it on the platform, it may take some time for the changes to be reflected in external search engines or other websites that may have indexed your old profile information.
Remember, changing your Facebook profile name is a personal choice, and it should be done to accurately represent yourself. Choose a name that you feel comfortable with and that aligns with your true identity.
Step 9: Review and save changes
After making the necessary changes to your Facebook profile name, it’s crucial to take a moment to review them before saving. This step ensures that you are satisfied with the modifications and that everything appears as intended.
Take the time to carefully examine your new profile name to ensure accuracy and relevance. Make sure there are no typos or misspellings that could potentially misrepresent your identity or confuse your friends. Pay attention to capitalizations, special characters, and any other formatting elements you have included.
By reviewing the changes, you can also verify that your updated profile name aligns with your desired image and reflects who you truly are. It’s essential to consider how you want to be perceived by others on Facebook and ensure that your profile name contributes to that image.
Once you have thoroughly reviewed the changes and are satisfied with the new profile name, it’s time to save your modifications. Look for the “Save” or “Done” button on the screen, typically located at the bottom or top right corner, depending on your device and Facebook app version.
Tap on the “Save” or “Done” button to initiate the process of saving your new profile name. This action tells Facebook to update your profile name across the platform, ensuring that your friends and acquaintances will see the revised name when they interact with your profile.
After tapping the “Save” or “Done” button, you may need to wait a few moments for the changes to take effect. Facebook needs to update your information in its database, so it’s essential to be patient during this process. Once the changes are saved, you’ll receive a confirmation message or notification indicating that your new profile name has been successfully updated.
It’s important to note that changing your profile name on Facebook is subject to the platform’s guidelines and policies. If your revised name violates any of these rules, your change request may be rejected. Make sure to adhere to Facebook’s terms to ensure a smooth and successful update to your profile name.
By reviewing the changes and saving your new profile name, you can confidently present yourself on Facebook with a name that accurately represents your identity and personal brand.
Step 10: Confirm your password- To ensure security, Facebook might ask you to re-enter your password to confirm the changes
After making changes to your profile name and picture, it’s essential to confirm your identity by re-entering your password. Facebook takes security seriously and wants to ensure that only you have access to your account modifications.
By requiring users to confirm their password, Facebook adds an extra layer of protection against unauthorized changes to your profile. This step prevents someone else from making modifications without your knowledge or permission.
When prompted to confirm your password, carefully enter your current Facebook account password in the designated text field. Make sure to type it accurately to avoid any errors or delays.
Once you’ve entered your password, click or tap on the “Confirm” or “Continue” button, and Facebook will verify the authenticity of your account. If the password is correct, you will proceed to the next step. However, if you enter an incorrect password, you will receive an error message and be required to try again.
It’s important to note that confirming your password serves as a security measure to ensure that only authorized individuals can make changes to your Facebook account. This step helps protect your personal information, posts, and activities from being altered or tampered with by others.
Additionally, confirming your password reaffirms your identity to Facebook, reinforcing the platform’s commitment to user privacy and security. It helps maintain the integrity of your profile and ensures that any modifications made are truly authorized by you.
Keep in mind that you should never share your Facebook password with anyone. Facebook employees will never ask for your password, and giving it to unauthorized individuals can compromise the security of your account.
So, when prompted to confirm your password on Facebook, enter it accurately, ensuring the correct authentication of your account modifications. This extra step of security helps protect your profile and maintains the privacy of your personal information.
Step 11: Update your profile picture (optional)- If you wish to change your profile picture as well, tap on the “Edit” or “Change” option next to your current profile picture
Your profile picture is one of the most important visual representations of your Facebook presence. It’s what others see when they visit your profile or come across your posts and comments. If you want to change your profile picture, Facebook makes it easy to do so right from your mobile device.
To update your profile picture on the Facebook mobile app, follow these simple steps:
- Open the Facebook app on your mobile device.
- Tap on the menu button, which is represented by three horizontal lines, located at the top right corner of the screen. This will open the menu options.
- Scroll down until you find the “Settings & Privacy” section. Tap on it to expand further options.
- In the expanded menu, tap on “Settings” to access the Facebook app settings.
- Look for the “Account Settings” or “Account” option and tap on it. This will take you to a page with various account settings.
- On the account settings page, locate and tap on the “General” setting option.
- Within the “General” settings, you will find the option to update your profile picture. It may be labeled as “Edit” or “Change”. Tap on it.
- A dialog box will appear, giving you the option to choose a new picture from your device’s gallery or to take a new photo using your device’s camera.
- If you choose to select a new picture from your gallery, browse through your device’s photo albums and select the image you want to use as your new profile picture.
- If you want to take a new photo, tap on the camera icon to open your device’s camera and capture a new image. You can then use this freshly taken photo as your profile picture.
- Once you have selected or taken a new picture, you may have the option to crop, rotate, or make other adjustments to the image. Make any necessary adjustments and tap on the “Save” or “Done” button to finalize your changes.
- After confirming your changes, go to your Facebook profile to ensure that your new profile picture has been successfully updated.
Remember, updating your profile picture is entirely optional. If you are happy with your current profile picture, there’s no need to make any changes. However, if you want to refresh your online presence or simply want to have a new look, updating your profile picture can be a fun and easy way to do so.
Step 12: Select a new picture from your device or take a new photo
Changing your Facebook profile picture can help you give your profile a fresh look. Here’s how you can select a new picture from your device’s gallery or even capture a new photo using your phone’s camera.
1. Open the Facebook app on your mobile device and navigate to your profile page.
2. Locate the “Edit” or “Change” option next to your current profile picture and tap on it.
3. A menu will appear with the options to either choose a picture from your gallery or take a new photo.
4. If you want to select a picture from your device’s gallery, tap on the option that says “Choose from Gallery” or something similar. This will open up your photo gallery.
5. Browse through your gallery and select the picture you want to set as your new profile picture by tapping on it.
6. Once you’ve selected the picture, you may have the option to crop or resize it. Use the available tools to adjust the picture to your desired size or orientation.
7. After making necessary adjustments, tap on the “Save” or “Done” button to set the picture as your new profile picture.
8. If you prefer to take a new photo using your phone’s camera, select the option that says “Take Photo” or something similar.
9. Your phone’s camera app will launch, allowing you to capture a new photo. Position yourself or the subject of the photo within the frame and tap on the shutter button to take the picture.
10. After taking the photo, you can review it and retake it if necessary. If you’re satisfied with the picture, tap on the “Save” or “Done” button to set it as your new profile picture.
11. Once you’ve selected or taken a new picture, your Facebook profile picture will be updated, and it will be visible to your friends and followers on Facebook.
Remember, the profile picture is often one of the first things people see when they visit your profile, so choose a picture that represents you well and reflects your personality or interests.
Step 13: Adjust the image if needed and save changes- Crop or adjust the image as desired and tap on the “Save” or “Done” button to set it as your new profile picture
Once you have selected a new picture for your Facebook profile, you might need to make some adjustments to ensure it looks perfect. Don’t worry, it’s easy to crop or edit your image directly within the Facebook app. Here’s how:
1. After choosing a new picture, you will see options to adjust or crop the image. Tap on these options to make any necessary changes.
2. Depending on the tool Facebook provides, you can use your fingers to resize, rotate, or crop the image. Simply pinch or expand with two fingers to scale the image, or use the handles to adjust its composition.
3. Take your time to adjust the image as desired. Ensure important details are included and unnecessary elements are removed. You can also experiment with different cropping options to find the perfect composition.
4. Once you are satisfied with the adjustments, tap on the “Save” or “Done” button to apply the changes. This will set the cropped or adjusted image as your new profile picture.
Note that Facebook might have specific guidelines for profile picture dimensions. If your chosen image doesn’t meet the required size, you may need to edit it further or select a different picture that fits within the requirements.
Remember, your profile picture is often the first impression people have of you on Facebook. So, take the time to ensure it represents you accurately and reflects your personality.
Step 14: Verify changes – Go to your Facebook profile and confirm that your name and profile picture have been updated
After making changes to your Facebook profile name and profile picture, it’s important to verify that the updates have been successfully applied. By following this step, you can ensure that your Facebook profile reflects the changes you made.
To verify the changes, start by opening the Facebook app on your mobile device. Once the app is open, navigate to your profile by tapping on your profile picture or selecting the profile icon.
Once you are on your Facebook profile, take a moment to review your profile name. Ensure that it displays the new name you entered in the settings. If the updated name appears correctly, congratulations! Your new profile name has been successfully updated.
Next, shift your focus to your profile picture. Look for your updated photo or the new picture you uploaded. Check that it is correctly displayed as your current profile picture. If everything looks as intended, you can be confident that your profile picture has been successfully changed.
Taking the time to verify these changes is crucial to ensure the accuracy of your Facebook profile. It also allows you to confirm that your online identity is being presented in the way you desire.
If you encounter any issues or notice that the changes have not been applied correctly, you may want to repeat the previous steps or consult Facebook’s support resources for further assistance.
Now that you have confirmed the changes to your Facebook profile name and profile picture, you can enjoy interacting on the platform with your updated information and a refreshed online presence.
Conclusion
In conclusion, changing who you are interacting as on Facebook Mobile is a simple and straightforward process. Whether you want to switch to a different profile, manage a page, or control your interactions on the platform, the steps outlined in this article will guide you through the process seamlessly.
By accessing the “Settings” menu, you can easily navigate to the “Account Settings” section and locate the “Switch Account” option. From there, you can select the desired account and switch between profiles with ease.
Remember to always double-check the account you are interacting as to ensure that you are posting, commenting, and engaging with the intended persona. This is particularly important for those who manage multiple profiles or pages.
With these simple steps, you can take control of your Facebook interactions on mobile and ensure a smooth, hassle-free experience while connecting with others on the platform. So go ahead and explore the various personas you can assume on Facebook Mobile!
FAQs
1. Can I change the account I am interacting as on Facebook Mobile?
Yes, you can change the account you are interacting as on Facebook Mobile. Facebook allows you to switch between multiple accounts if you have them. This feature can be beneficial if you use Facebook for personal and professional purposes, or if you manage multiple pages or groups.
2. How do I change the account I am interacting as on Facebook Mobile?
To change the account you are interacting as on Facebook Mobile, follow these steps:
- Open the Facebook app on your mobile device.
- Tap on the three horizontal lines in the top-right corner of the app.
- Scroll down and tap on “Settings & Privacy”.
- Under “Settings”, tap on “Account Settings”.
- Tap on “Switch Account”.
- Select the account you want to switch to from the list of accounts linked to your Facebook app.
- You will be redirected to the selected account, and you can now interact as that account on Facebook Mobile.
3. Can I add a new account to switch between on Facebook Mobile?
Yes, you can add a new account to switch between on Facebook Mobile. Here’s how you can do it:
- Follow the steps mentioned in question 2 to access the “Switch Account” feature.
- Scroll down to the bottom of the list of accounts.
- Tap on the option “Add Account”.
- Follow the prompts to enter the login details of the new account.
- Your new account will now be added, and you can switch between it and your existing accounts using the steps mentioned earlier.
4. Is there a limit to the number of accounts I can switch between on Facebook Mobile?
Facebook does not have a specific limit on the number of accounts you can switch between on Facebook Mobile. However, it is recommended to only link and switch between accounts that belong to you or that you have permission to access. Switching between too many accounts may become overwhelming and could potentially lead to account security issues.
5. Do I have to log out of my current account to switch to a different account on Facebook Mobile?
No, you do not have to log out of your current account to switch to a different account on Facebook Mobile. The “Switch Account” feature allows you to seamlessly switch between multiple accounts without the need to log in and out repeatedly. This makes it convenient for users who need to manage multiple accounts or change their interaction context on the go.