
In today’s digital age, capturing and sharing moments through photos has become an integral part of our lives. Whether it’s a stunning sunset or a candid selfie, our Android phones have become powerful tools for preserving memories. But what happens when you need to transfer those precious pictures onto a flash drive? Fear not, as we’ve got you covered!
In this article, we will guide you through the process of how to put pictures on a flash drive from an Android phone. We’ll explore various methods that will allow you to transfer your photos seamlessly and securely. Whether you’re looking to free up storage space on your device or simply want to create a backup of your cherished photos, we’ll help you navigate the steps to accomplishing this task effortlessly. So, let’s dive in and get those pictures onto your flash drive in no time!
Inside This Article
- How to Put Pictures on a Flash Drive from an Android Phone
- Enable USB Debugging on Your Android Phone
- Connect Your Android Phone to the Computer
- Select and Transfer Pictures to the Flash Drive
- Safely Eject the Flash Drive from your Computer
- Conclusion
- FAQs
How to Put Pictures on a Flash Drive from an Android Phone
Transferring pictures from your Android phone to a flash drive is a convenient way to free up storage space on your device and keep your memories safe. With a few simple steps, you can quickly and easily transfer your pictures to a flash drive. In this article, we will guide you through the process of putting pictures on a flash drive from an Android phone.
Enable USB Debugging on Your Android Phone
Before you can transfer pictures from your Android phone to a flash drive, you need to enable USB debugging on your phone. USB debugging allows your phone to be connected to a computer and transfer files. Here’s how to enable USB debugging:
- Go to the Settings menu on your Android phone.
- Scroll down and tap on ‘About phone’ or ‘About device’.
- Locate the ‘Build number’ or ‘Software information’ option.
- Tap on the build number or software version 7 times to unlock developer options.
- Go back to the Settings menu and tap on ‘Developer options’.
- Enable USB debugging by toggling the switch.
Once you have enabled USB debugging, you can proceed to the next step.
Connect Your Android Phone to the Computer
Now that USB debugging is enabled on your Android phone, you can connect it to your computer using a USB cable. Make sure your computer is turned on and the flash drive is connected to a USB port.
When you connect your phone to the computer, you may see a notification on your phone asking how you want to connect. Select the ‘Transfer files’ or ‘File transfer’ option. This will allow you to access the files on your phone from your computer.
Select and Transfer Pictures to the Flash Drive
Once your Android phone is connected to the computer, open the file explorer on your computer. Navigate to the folder where you want to save the pictures on the flash drive.
On your Android phone, open the gallery app or any other app that contains the pictures you want to transfer. Select the pictures you want to transfer by tapping on them. You can select multiple pictures by tapping and holding on one picture, then tapping on the others.
After selecting the pictures, tap on the share icon or the three-dot menu icon, depending on the app you are using. From the options that appear, select the ‘Save to’ or ‘Copy to’ option. Choose the flash drive as the destination folder.
The selected pictures will now be copied or saved to the flash drive. The time it takes to transfer the pictures will depend on the number and size of the files.
Safely Eject the Flash Drive from your Computer
Once the transfer is complete, make sure to safely eject the flash drive from your computer before disconnecting it. This will ensure that the files are properly saved and prevent any data loss.
To safely eject the flash drive, locate the icon representing the flash drive in the system tray or file explorer. Right-click on the icon and select the ‘Eject’ or ‘Safely Remove Hardware’ option. Wait for the notification confirming that it is safe to remove the flash drive and then disconnect it from the computer.
And there you have it! You have successfully put pictures on a flash drive from your Android phone. Now you can enjoy more storage space on your phone and have a backup of your precious memories.
Enable USB Debugging on Your Android Phone
USB debugging is a developer option on Android devices that allows you to connect your phone to a computer and access advanced debugging features. By enabling USB debugging, you gain the ability to transfer files, execute ADB commands, and test apps directly from your computer. Here’s how you can enable USB debugging on your Android phone:
- Open the Settings app on your Android phone. You can usually find it in the app drawer or by swiping down from the top of the screen and tapping the gear icon.
- Scroll down and tap on “About phone” or “About device” depending on your device model.
- Find the “Build number” entry and tap on it multiple times, usually about 7 times, until you see a message saying “You are now a developer!” This will enable the developer options on your phone.
- Go back to the main Settings screen and scroll down to find “Developer options.”
- Tap on “Developer options” and look for “USB debugging.” It is usually located near the top of the menu.
- Toggle the switch next to “USB debugging” to enable it. You may see a warning message about the potential risks of enabling USB debugging; simply tap “OK” to proceed.
- Connect your Android phone to your computer using a USB cable. Make sure the phone is unlocked and the screen is active.
Once you have enabled USB debugging on your Android phone, you can now proceed to connect it to your computer and transfer pictures to a flash drive.
Connect Your Android Phone to the Computer
Connecting your Android phone to the computer is a necessary step to transfer pictures to a flash drive. Follow these simple instructions to establish a connection:
1. Use a USB cable: Locate the USB cable that came with your Android phone. It should have a small USB connector on one end and a larger connector, typically USB-A or USB-C, on the other end.
2. Plug in the USB cable: Insert the small USB connector into your Android phone’s charging port. Take the larger connector and plug it into an available USB port on your computer. Make sure to firmly connect both ends.
3. Enable File Transfer mode: Once the phone and computer are connected via the USB cable, your Android phone may prompt you to select the type of USB connection. Choose the “File Transfer” or “MTP (Media Transfer Protocol)” option. This will allow your computer to access the files on your Android phone.
4. Grant permission on your phone: Depending on your Android phone’s version and settings, you may be required to grant permission for the computer to access your phone’s files. If prompted, tap “Allow” or “OK” on your phone’s screen to grant access.
5. Computer recognition: After granting permission, your computer should recognize your Android phone as a removable storage device. You can verify this by opening the “File Explorer” (Windows) or “Finder” (Mac) and looking for your Android phone listed as a connected device.
6. Navigate to the pictures folder: Once the connection is established, navigate through the file directory on your computer to find the folder where your pictures are located. Typically, the pictures folder is located in the “DCIM” or “Pictures” directory on your Android phone’s internal storage or SD card.
7. Select and transfer pictures: With the pictures folder open, simply select the pictures you want to transfer to the flash drive. You can select multiple pictures by holding down the Ctrl key (Windows) or Command key (Mac) while clicking on the desired pictures. Right-click on the selected pictures and choose the “Copy” option.
8. Paste on the flash drive: Navigate to the flash drive on your computer and open its directory. Right-click inside the directory and select the “Paste” option to transfer the selected pictures from your Android phone to the flash drive.
9. Safely disconnect your Android phone: Once the transfer is complete, safely disconnect your Android phone from the computer. On Windows, you can do this by right-clicking on your Android phone in the “File Explorer” and selecting “Eject” or “Safely Remove Hardware.” On a Mac, you can drag and drop the Android phone icon to the Trash or use the eject button next to the device in the “Finder.”
By following these steps, you can easily connect your Android phone to the computer and transfer pictures to a flash drive. This method allows you to free up storage space on your phone while creating a backup of your precious memories.
Select and Transfer Pictures to the Flash Drive
Now that your Android phone is connected to the computer, it’s time to select and transfer the pictures to the flash drive. Follow these steps:
- Open the file explorer on your computer by clicking on the folder icon in the taskbar or by pressing the Windows key + E.
- Navigate to the folder where your Android phone is connected. It might appear as a removable storage device or have the name of your phone model.
- Double-click on the Android phone icon to open it and access its contents.
- Locate the folder or directory where your pictures are stored on the Android phone. This might be the default “Pictures” folder or a specific folder you designated for your photos.
- Open the folder containing the pictures you want to transfer to the flash drive.
- Select the pictures you want to transfer by holding down the Ctrl key and clicking on each picture. If you want to select all pictures in the folder, press Ctrl + A.
- Right-click on one of the selected pictures and choose the “Copy” option from the context menu.
- Go back to the file explorer window and navigate to the flash drive.
- Right-click on an empty space in the flash drive and choose the “Paste” option from the context menu.
- The selected pictures will now be copied to the flash drive. The time it takes to complete the transfer will depend on the number and size of the pictures.
Once the transfer is complete, you can safely eject the flash drive from your computer and use it to access the pictures on any device that supports USB connectivity.
Safely Eject the Flash Drive from your Computer
Once you have transferred all your pictures to the flash drive, it is important to safely eject the device from your computer. This step ensures that all data has been written to the drive and reduces the risk of data corruption or loss.
To safely eject the flash drive, follow these simple steps:
- Locate the flash drive icon on your computer’s desktop or file explorer.
- Right-click on the flash drive icon.
- In the context menu that appears, select “Eject” or “Safely Remove” option. This will ensure that all pending write operations are completed before removing the drive.
- Wait for the system to inform you that it is safe to remove the device.
- Once you receive the notification, gently remove the flash drive from the USB port.
It is important to note that forcefully removing the flash drive without following the proper ejection process can result in data corruption or even physical damage to the drive or the port. Therefore, always remember to safely eject the flash drive before unplugging it from your computer.
By following these simple steps, you can ensure the integrity of your data and prevent any potential loss or damage. So, the next time you transfer pictures to a flash drive from your Android phone, make sure to safely eject the device before unplugging it from your computer.
Conclusion
In conclusion, transferring pictures from an Android phone to a flash drive is a simple and convenient process. By following the steps outlined in this article, you can easily free up space on your device and ensure that your precious memories are safely stored on a flash drive.
Remember to always choose a high-quality flash drive with ample storage capacity to accommodate all your images. Additionally, make sure your Android phone is powered on and connected to the flash drive through a compatible USB OTG adapter or cable.
Whether you’re looking to back up your photos, share them with friends and family, or simply want to create more room on your phone, transferring pictures to a flash drive is a practical solution. So go ahead, take control of your photo library and enjoy the convenience and peace of mind that comes with having your pictures safely stored on a flash drive.
FAQs
FAQ 1: Can I put pictures on a flash drive from an Android phone?
Yes, you can easily transfer pictures from your Android phone to a flash drive. There are multiple ways to do this, including connecting your phone directly to the flash drive using an OTG (On-The-Go) cable, transferring the pictures to your computer and then copying them to the flash drive, or using cloud storage services to download and save the pictures to the flash drive.
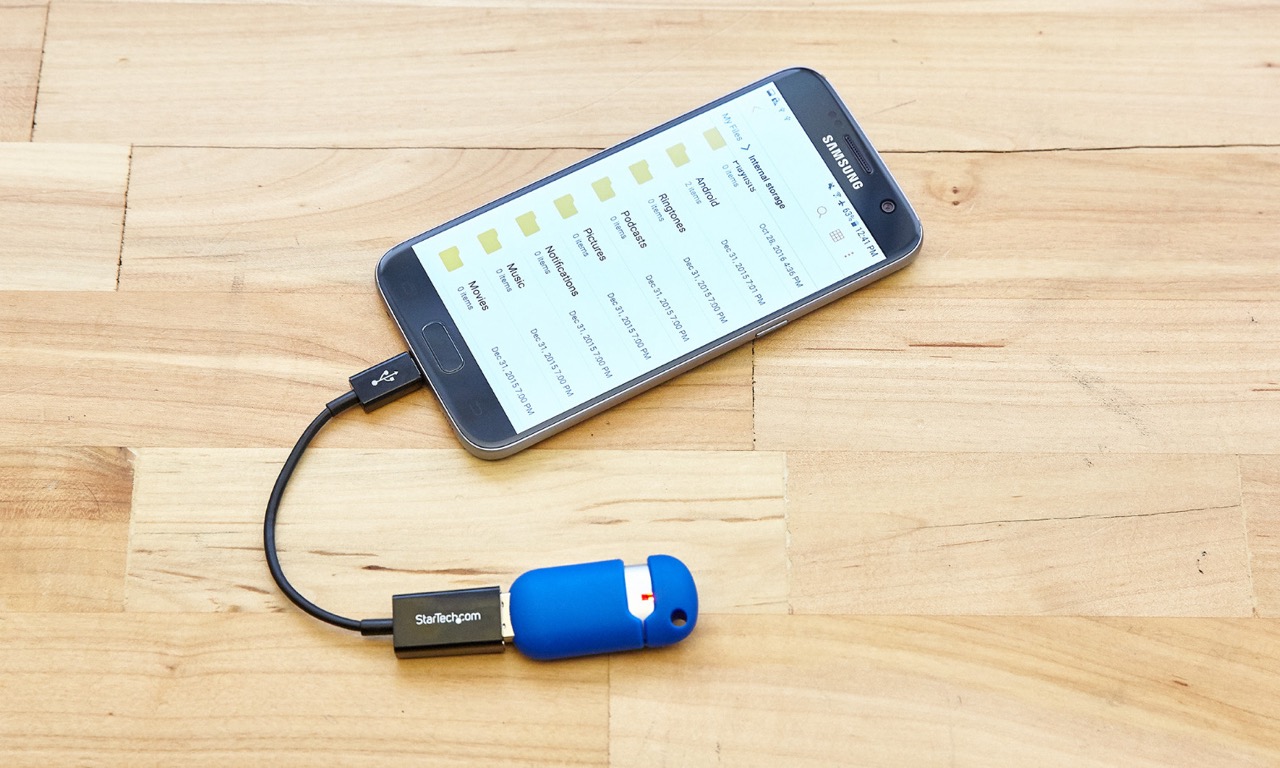
FAQ 2: What is an OTG cable and how does it help transfer pictures to a flash drive?
An OTG (On-The-Go) cable is a special cable that allows you to connect USB devices, such as a flash drive, directly to your Android phone. By using an OTG cable, you can transfer pictures from your phone’s storage to the flash drive without the need for a computer or any additional software. Simply connect the OTG cable to your phone and plug the flash drive into the other end of the cable.
FAQ 3: How do I transfer pictures from my Android phone to a flash drive using a computer?
To transfer pictures from your Android phone to a flash drive using a computer, follow these steps:
1. Connect your Android phone to the computer using a USB cable.
2. On your phone, swipe down from the top of the screen and tap the notification that says “USB connected” or similar.
3. Select the option that allows you to transfer files or access files on the phone.
4. On your computer, open the file explorer and locate your Android phone under “My Computer” or “This PC”.
5. Navigate to the folder where your pictures are stored on the phone.
6. Open a new window and navigate to the location where you want to save the pictures on the flash drive.
7. Select the pictures you want to transfer and drag them to the flash drive folder on your computer.
FAQ 4: Can I transfer pictures from an Android phone to a flash drive using cloud storage services?
Yes, you can transfer pictures from your Android phone to a flash drive using cloud storage services. Most cloud storage apps, such as Google Drive or Dropbox, allow you to download files to your device, including pictures. Here’s how:
1. Install the cloud storage app on your Android phone.
2. Open the app and sign in with your account.
3. Upload the pictures from your phone to the cloud storage.
4. On your computer, open a web browser and sign in to the same cloud storage account.
5. Download the pictures to your computer.
6. Connect the flash drive to your computer and copy the pictures to the flash drive folder.
FAQ 5: What are the benefits of transferring pictures from an Android phone to a flash drive?
Transferring pictures from an Android phone to a flash drive offers several benefits:
1. Backup: By having your pictures stored on a flash drive, you create a backup copy in case something happens to your phone.
2. Storage Space: Transferring pictures to a flash drive frees up storage space on your phone, allowing you to capture more photos and videos without worrying about running out of storage.
3. Portability: Flash drives are compact and easy to carry, making it convenient to share pictures with friends or family by simply plugging the flash drive into their computer or device.
4. Security: If you have sensitive or private pictures, keeping them on a flash drive provides an added layer of security as the pictures are not stored on a cloud or online server that could be vulnerable to hacking.