
Are you looking to transfer your pictures from your phone to a flash drive? With the increasing popularity of mobile photography, it’s no surprise that many of us have a large collection of pictures on our smartphones. However, storing all these precious moments on your device can quickly eat up valuable storage space. That’s where transferring your pictures to a flash drive comes in handy.
In this article, we will guide you through the process of transferring pictures from your phone to a flash drive. Whether you have an Android or iOS device, we have you covered. You don’t need to be a tech expert to follow our step-by-step instructions – we’ll break it down in a simple and straightforward way so you can easily move your pictures to a flash drive and free up space on your phone.
Ready to declutter your phone and safely store your pictures? Let’s jump right in!
Inside This Article
- How to Transfer Pictures From My Phone to a Flash Drive
- Overview
- Method 1: Using a USB OTG Cable
- Method 2: Using a Computer
- Method 3: Using Cloud Storage Services
- Conclusion
- FAQs
How to Transfer Pictures From My Phone to a Flash Drive
Transferring pictures from your phone to a flash drive can be a convenient way to free up storage space on your device and keep your precious memories safe. Whether you want to transfer a few snapshots or a whole photo album, there are a few methods you can use to accomplish this task. In this article, we will guide you through three easy methods for transferring pictures from your phone to a flash drive.
Method 1: Using a USB OTG Cable
If your phone supports USB On-The-Go (OTG) functionality, you can directly connect a flash drive to your device using a USB OTG cable. Here’s how:
- Check if your phone supports OTG: Not all phones support this feature, so verify if your phone is OTG compatible.
- Purchase a USB OTG cable: You will need a USB OTG cable that has a micro USB or USB-C connector on one side and a standard USB connector on the other.
- Connect the cable and flash drive: Plug the micro USB or USB-C end of the cable into your phone’s charging port and connect the flash drive to the standard USB port on the cable.
- Access the files: Once connected, your phone should recognize the flash drive. Use a file manager app to navigate to the location of your pictures and copy them to the flash drive.
- Safely eject the flash drive: After transferring the pictures, make sure to safely eject the flash drive from your phone to avoid any data loss.
Method 2: Using a Computer
If you prefer using a computer for file transfers, you can follow these steps:
- Connect your phone to the computer: Use a USB cable to connect your phone to the computer. Make sure to unlock your phone and choose the appropriate USB connection mode (e.g., File Transfer or MTP).
- Select the pictures: On your computer, open the file explorer or the photo management software. Locate your phone and navigate to the pictures you want to transfer.
- Copy the pictures: Select the desired pictures, right-click, and choose the “Copy” option. Then, navigate to the desired folder on your computer or the flash drive and right-click again. Choose the “Paste” option to transfer the pictures.
- Verify the transfer: After the transfer is complete, double-check the destination folder to confirm that the pictures are successfully transferred.
- Safely disconnect your phone: Once the transfer is complete, safely disconnect your phone from the computer to avoid any data loss or corruption.
Method 3: Using Cloud Storage Services
If you have a large number of pictures or prefer a wireless transfer method, cloud storage services can come in handy. Here’s how to use them:
- Choose a cloud storage service: Select a cloud storage service that fits your needs (e.g., Google Drive, Dropbox, or OneDrive) and install the corresponding app on your phone.
- Create an account or sign in: Open the cloud storage app and either create a new account or sign in with your existing credentials.
- Upload your pictures: Use the app’s upload feature to select and upload the pictures from your phone to the cloud storage service.
- Access the pictures on your computer: Once the pictures are uploaded, you can access them from a computer by signing in to the cloud storage service using a web browser or the desktop app. From there, you can download the pictures to your computer or directly to the flash drive.
By following these simple methods, you can easily transfer pictures from your phone to a flash drive. Whether you choose to use a USB OTG cable, a computer, or cloud storage services, you’ll have a convenient way to keep your memories safe and organized.
Overview
Transferring pictures from your phone to a flash drive can be a convenient way to free up storage space on your device or to backup important photos. Whether you want to transfer a few snapshots or hundreds of images, there are different methods you can use to achieve this. In this article, we will explore three popular methods for transferring pictures from your phone to a flash drive: using a USB OTG cable, using a computer, and using cloud storage services.
With the advancements in technology, smartphones have become our go-to devices for capturing memorable moments. However, over time, the storage on our smartphones can fill up quickly, especially with the increasing quality of photos and videos. Transferring pictures to a flash drive not only helps to create more space on your phone but also provides a secure backup for your precious memories.
Each method has its own advantages and requirements, so you can choose the one that suits your needs the best. Whether you are an Android user or an iPhone enthusiast, we’ve got you covered with options that work for both platforms. So, let’s dive in and explore these methods in detail.
Method 1: Using a USB OTG Cable
Transferring pictures from your phone to a flash drive can be done effortlessly using a USB OTG (On-The-Go) cable. This method allows you to directly connect your phone to the flash drive, making the transfer quick and convenient.
To begin, you will need a USB OTG cable, which is a special type of cable with a micro USB or USB-C connector on one end and a standard USB-A connector on the other end. Most newer Android phones and some iPhones support USB OTG functionality.
Here are the steps to transfer pictures using a USB OTG cable:
- Start by connecting one end of the USB OTG cable to your phone’s charging port.
- Connect the other end of the cable to the USB port of the flash drive.
- Once the connection is established, your phone should recognize the flash drive as a storage device.
- Go to the file manager app on your phone and locate the pictures you want to transfer.
- Select the desired pictures by long-pressing on them or tapping the checkboxes next to each picture.
- Tap on the “Share” or “Send” button, usually represented by an arrow pointing upwards.
- From the available sharing options, choose “Save to USB” or “Copy to USB.”
- Navigate through the folders on the flash drive and select the location where you want to save the pictures.
- Tap on the “Save” or “Copy” button to initiate the transfer.
- Wait for the transfer process to complete. The time taken depends on the size of the pictures and the speed of your device.
- Once the transfer is finished, safely disconnect the USB OTG cable and the flash drive from your phone.
By following these simple steps, you can easily transfer pictures from your phone to a flash drive using a USB OTG cable. It is a convenient method that allows you to free up storage space on your phone and keep your precious memories safe on an external device.
Method 2: Using a Computer
If you prefer to transfer pictures from your phone to a flash drive using a computer, there are a few simple steps you can follow. This method is especially useful when you have a large number of photos that you want to transfer at once or if you don’t have a USB OTG cable.
Here’s how you can transfer pictures from your phone to a flash drive using a computer:
- Connect your phone to the computer using a USB cable. Make sure you have a compatible USB cable that fits the ports on both your phone and computer.
- On your phone, you may see a prompt asking for permission to allow USB debugging or to transfer files. Select the option that allows file transfer.
- On your computer, open the file explorer or Finder, depending on whether you’re using a Windows PC or a Mac.
- In the file explorer or Finder, you should see your phone listed as a connected device. Click on your phone to open it.
- Navigate to the folder where your pictures are stored on your phone. This will typically be the DCIM folder or a folder named “Pictures.”
- Open the folder on your flash drive where you want to transfer the pictures.
- Select the pictures you want to transfer from your phone. You can do this by clicking and dragging to select multiple pictures or by holding down the Ctrl (Windows) or Command (Mac) key and clicking on each picture individually.
- Once you’ve selected the pictures, right-click on them and choose the “Copy” option from the context menu.
- Go to the open folder on your flash drive, right-click inside the folder, and choose the “Paste” option. This will copy the selected pictures from your phone to the flash drive.
- Wait for the transfer process to complete. The time it takes will depend on the number and size of the pictures you’re transferring.
- Once the transfer is finished, safely eject your phone and the flash drive from your computer.
That’s it! You have successfully transferred pictures from your phone to a flash drive using a computer. You can now disconnect the USB cable and use the pictures on your flash drive for backup, sharing, or any other purpose you desire.
Method 3: Using Cloud Storage Services
If you want a convenient and flexible way to transfer pictures from your phone to a flash drive, using cloud storage services is a great option. Cloud storage allows you to store your files online and access them from any device with an internet connection. This means you can easily transfer your pictures from your phone to the cloud and then download them onto your flash drive.
Here’s how you can transfer pictures using cloud storage services:
- Choose a Cloud Storage Service: Start by selecting a reliable and user-friendly cloud storage service. Popular options include Google Drive, Dropbox, and OneDrive. Sign up for an account and install the app on your phone.
- Upload Pictures to the Cloud: Open the cloud storage app on your phone and navigate to the pictures you want to transfer. Select the pictures and choose the “Upload” or “Save” option. The pictures will be uploaded to your cloud storage account.
- Access the Cloud Storage from Your Computer: Once the pictures are uploaded, you can access them from your computer by opening the cloud storage service’s website or using the desktop application.
- Download Pictures to Your Computer and Transfer to Flash Drive: Locate the pictures you want to transfer from the cloud storage on your computer. Select the pictures and choose the “Download” or “Save” option to save them to your computer. Once the pictures are saved, insert your flash drive into the computer and copy the pictures onto the flash drive.
Using cloud storage services not only allows you to easily transfer pictures from your phone to a flash drive, but it also provides a backup for your pictures in case your phone gets lost or damaged. Plus, you can conveniently access your pictures from any device, making it a versatile option for transferring and storing your valuable memories.
Now that you know how to transfer pictures from your phone to a flash drive using cloud storage services, you can easily free up space on your phone and have backup copies of your important pictures.
Conclusion
In conclusion, transferring pictures from your phone to a flash drive is a simple and convenient way to backup and store your precious memories. With the advancements in technology, mobile phones have become an integral part of our lives, serving as our primary cameras. However, it’s important to have a reliable backup option to ensure your photos are safe and accessible.
By following the steps outlined in this article, you can easily transfer your pictures from your phone to a flash drive. Whether you’re using an iPhone or an Android device, there are various methods available to suit your needs. From using USB cables to wireless transfers and cloud storage, you have multiple options at your disposal.
Remember to select the method that best suits your preferences in terms of ease of use, speed, and reliability. Keep in mind that having a backup of your photos is essential, as it provides peace of mind in case of unexpected device failures or loss. So, take the time to transfer your pictures and keep those cherished moments safe!
FAQs
Q: Can I transfer pictures from my phone to a flash drive?
A: Yes, you can transfer pictures from your phone to a flash drive. There are multiple methods to do this, and it can vary depending on the type of phone you have.
Q: What do I need to transfer pictures from my phone to a flash drive?
A: To transfer pictures from your phone to a flash drive, you will need a compatible flash drive, a USB OTG (On-The-Go) adapter (for Android devices), a lightning to USB Camera Adapter (for iPhones), and a compatible cable to connect your phone to the flash drive.
Q: How do I transfer pictures from an Android phone to a flash drive?
A: To transfer pictures from an Android phone to a flash drive, you can follow these steps:
1. Connect the USB OTG adapter to your Android phone.
2. Plug the USB flash drive into the adapter.
3. Access the file manager or gallery app on your phone.
4. Select the pictures you want to transfer to the flash drive.
5. Copy or move the selected pictures to the flash drive.
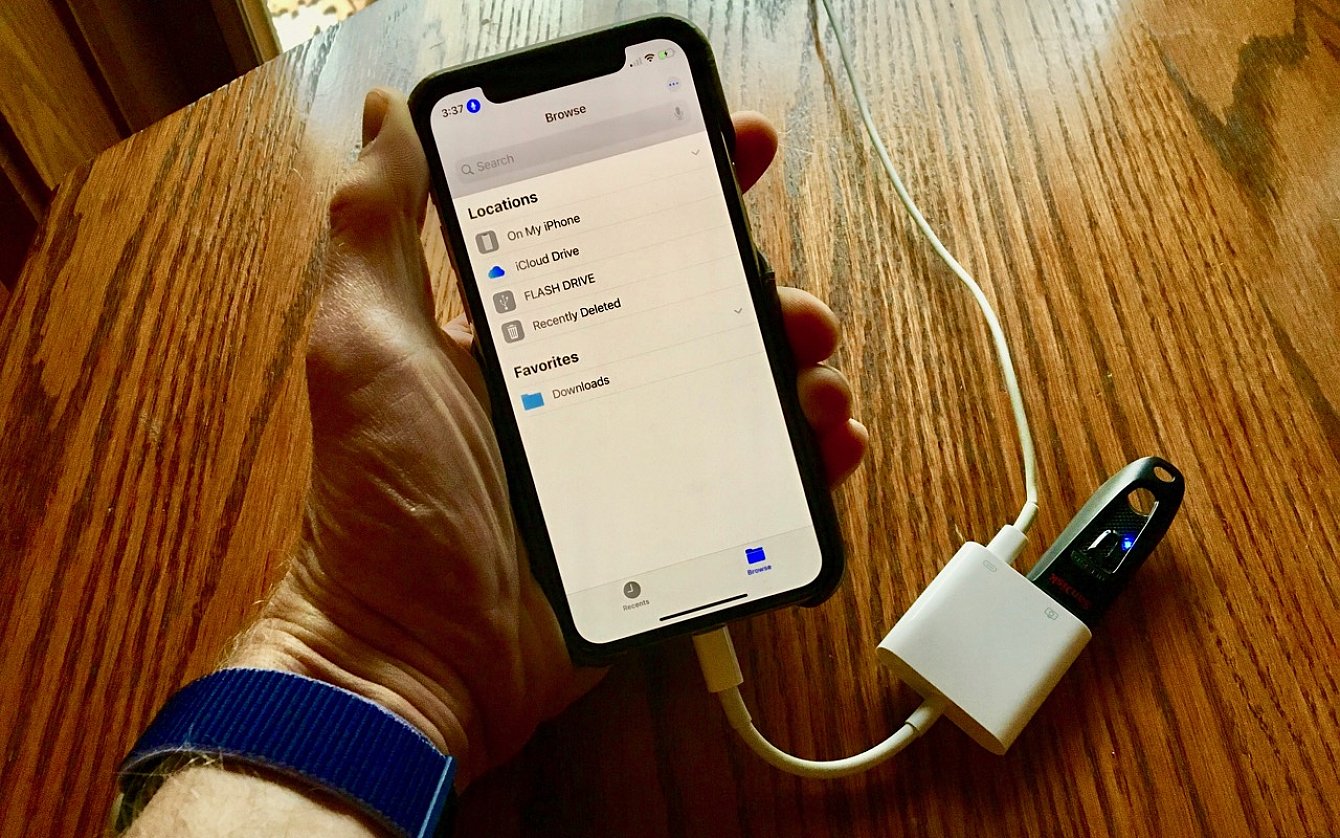
Q: How do I transfer pictures from an iPhone to a flash drive?
A: To transfer pictures from an iPhone to a flash drive, you can follow these steps:
1. Connect the lightning to USB Camera Adapter to your iPhone.
2. Plug the USB flash drive into the adapter.
3. On your iPhone, open the Photos app.
4. Select the pictures you want to transfer to the flash drive.
5. Tap the “Share” button and choose the option to copy the pictures.
6. Go to the Files app on your iPhone and open the flash drive.
7. Paste the copied pictures into the flash drive folder.
Q: Can I transfer pictures directly from my phone to a flash drive without a computer?
A: Yes, you can transfer pictures directly from your phone to a flash drive without a computer. With the help of USB OTG (On-The-Go) adapters or lightning to USB Camera Adapters (depending on your phone type), you can connect your phone to a flash drive and transfer pictures on the go.