
In today’s digital age, our smartphones have become invaluable tools for communication and convenience. One of the many features that make iPhones so popular is their ability to record audio, including your own voice. Whether you want to create a personalized voicemail greeting, memos, or even contribute to a podcast, learning how to record your voice on an iPhone is a valuable skill.
In this article, we will explore the step-by-step process of recording your voice on an iPhone, using built-in apps and third-party options. We will also provide helpful tips to enhance the quality of your recordings and share some FAQs to address common questions that iPhone users may have. So, if you’re ready to unleash your creativity and start capturing your voice on your iPhone, let’s dive in!
Inside This Article
- Option 1: Using the Voice Memos app
- Option 2: Using a third-party voice recording app
- Option 3: Recording voice memos using Siri
- Option 4: Using a screen recording tool
- Conclusion
- FAQs
Option 1: Using the Voice Memos app
If you’re an iPhone user and want to record your voice, the Voice Memos app is the perfect built-in option for you. This app comes pre-installed on iPhones and provides a straightforward and convenient way to quickly capture and save audio recordings.
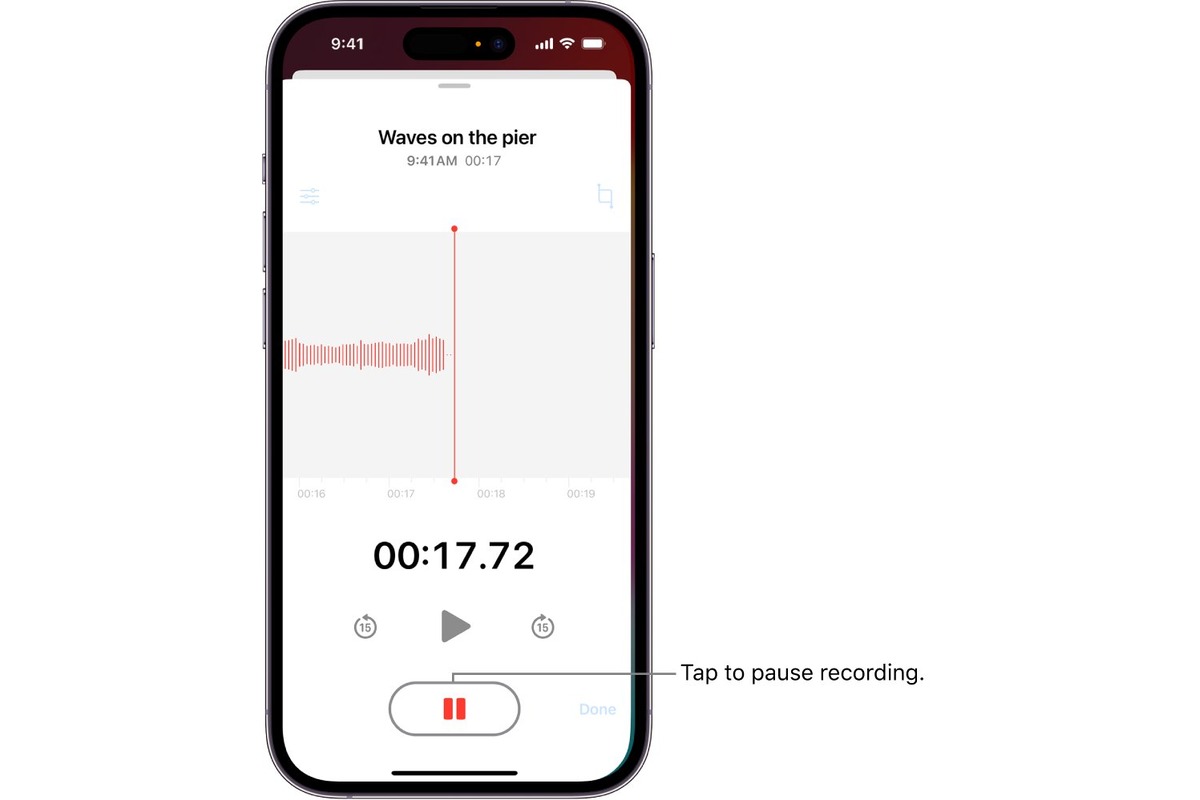
To begin using the Voice Memos app, simply locate the app on your home screen and tap to open it. Once the app is launched, you will see a large red button at the center of the screen. Tap on it to start recording your voice.
When you’re done recording, tap the red button again to stop the recording. The app will automatically save your recording with a timestamp and a title that you can edit later. You can access your saved recordings by tapping on the list icon at the bottom-right corner of the screen. From there, you can play, rename, share, or delete the recordings as needed.
One of the great features of the Voice Memos app is its ability to sync recordings across your Apple devices using iCloud. This means that you can record a voice memo on your iPhone and access it on your Mac or iPad seamlessly. To enable iCloud syncing, go to Settings on your iPhone, tap on your Apple ID, select iCloud, and toggle on the Voice Memos option.
The Voice Memos app also offers basic editing capabilities. If you want to trim your recorded voice memo, tap on the recording you wish to edit and then tap on the three-dot menu icon. From there, select Edit Recording, and you can adjust the start and end points of your recording.
Overall, the Voice Memos app provides a simple and effective way to record your voice on your iPhone. Whether you need to capture a quick voice memo, record a lecture, or even create a podcast, this app has got you covered.
Option 2: Using a third-party voice recording app
If you’re looking for more advanced features and customization options, using a third-party voice recording app on your iPhone is a great option. These apps offer additional functionality and flexibility, allowing you to record high-quality voice memos with ease.
One popular app for voice recording is “Voice Recorder & Audio Editor.” This app offers a simple and intuitive interface, making it easy to start recording with just a few taps. With this app, you can also edit and trim your recordings, add notes and tags, and share them with others.
Another highly-rated option is “Voice Notes – Voice Recorder.” This app provides a sleek and user-friendly design, making it a breeze to record your voice. It also offers features like automatic iCloud backups, transcription services, and the ability to organize your recordings into folders for easy access.
If you’re looking for a more professional-grade voice recording app, “AudioShare” is a top choice. This app is geared towards musicians and audio professionals, offering extensive options for recording and editing. With AudioShare, you can apply effects, adjust levels and EQ, and even connect external audio devices to enhance your recordings.
When selecting a third-party voice recording app, make sure to read reviews and consider the features that matter most to you. Some other popular options include “Voice Record Pro,” “Evernote,” and “QuickVoice Recorder.”
Regardless of the app you choose, keep in mind that you may need to grant the necessary permissions for the app to access your microphone. Once you have the app installed, simply launch it and follow the on-screen instructions to start recording your voice memos.
Using a third-party voice recording app gives you more control and flexibility over your voice recordings, allowing you to capture and organize your audio in the way that suits you best. So go ahead, download one of these apps and start recording your voice on your iPhone today!
Option 3: Recording voice memos using Siri
If you prefer a hands-free approach to recording your voice on your iPhone, you’re in luck! Siri, Apple’s virtual assistant, can help you effortlessly create voice memos with just a few voice commands. Here’s how to do it:
1. Activate Siri by pressing and holding the Home button or saying “Hey Siri” if enabled.
2. Once Siri is active, simply say something like “Record a voice memo” or “Make a voice recording.”
3. Siri will instantly launch the Voice Memos app and start recording your voice. Just start speaking, and Siri will continue recording until you tell it to stop.
4. When you’re ready to end the recording, say “Stop recording” or “Finish recording” to Siri.
5. Siri will automatically save your voice memo to the Voice Memos app, where you can give it a name and organize it.
Using Siri to record voice memos is not only convenient but also allows for a truly hands-free experience. Whether you’re on the go or simply want to save time, Siri makes it easy to capture your thoughts and ideas without lifting a finger.
Note that Siri can also perform other voice commands related to voice memos, such as play a specific memo or delete a memo. So feel free to explore the various voice commands Siri can handle within the Voice Memos app.
Now that you know how to use Siri to record voice memos on your iPhone, you can start capturing your thoughts, reminders, and creative ideas effortlessly. Enjoy the convenience and ease of hands-free voice recording with Siri!
Option 4: Using a screen recording tool
Another way to record your voice on an iPhone is by using a screen recording tool. This method allows you to capture both the audio and the visual elements of your device’s screen, making it perfect for recording voice memos or any other audio-related activities on your phone.
To use a screen recording tool, you’ll first need to enable the option in your iPhone’s Control Center. Here’s how:
- Open the Settings app on your iPhone.
- Scroll down and tap on “Control Center”.
- Tap on “Customize Controls”.
- Under the “More Controls” section, find “Screen Recording” and tap on the green plus button next to it to add it to your Control Center.
Once you’ve added the Screen Recording option to your Control Center, follow these steps to record your voice:
- Swipe up from the bottom of your iPhone’s screen to open the Control Center.
- Tap on the Screen Recording button, which looks like a circle inside a circle.
- A countdown timer will appear, and you’ll see a red bar at the top of your screen indicating that the recording is in progress.
- To record your voice, simply open the voice recording app or any other app that captures audio, and speak into the microphone.
- When you’re done recording, swipe up from the bottom of the screen again to access the Control Center, and tap on the red bar to stop the recording.
The recorded screen recording, including the audio, will be saved to your Photos app, where you can access and share it as needed.
Using a screen recording tool allows you to record your voice along with any visual cues or demonstrations that you want to include. This can be especially useful if you want to provide step-by-step instructions or tutorials that involve both audio and visual elements. Whether it’s for professional purposes or simply to record personal voice memos, screen recording provides a versatile and effective method to capture your voice on an iPhone.
In conclusion, recording your voice on your iPhone is a valuable feature that can enhance your creativity and productivity. Whether you need to record voice memos, create podcasts, or simply capture your thoughts and ideas on the go, the iPhone offers a reliable and user-friendly solution. By using the built-in Voice Memos app or exploring third-party recording apps, you have the flexibility to record high-quality audio and customize your settings to suit your needs.
With the advancements in technology, the process of recording your voice on an iPhone has become more seamless and convenient. The ability to share your recordings with others through messaging apps, email, or cloud storage platforms makes it easier than ever to collaborate or simply share your voice with the world. So, grab your iPhone, find a quiet spot, and let your voice be heard.
FAQs
1. How can I record my voice on iPhone?
2. Are there any built-in voice recording apps on iPhone?
3. Can I record my voice during a phone call on iPhone?
4. Is it possible to edit my recorded voice on iPhone?
5. How do I share my recorded voice files from my iPhone?