
If you've ever wondered "Where do voice memos go on iPhone 10?" you're not alone. Voice memos are a handy feature for recording thoughts, ideas, or important reminders on your iPhone 10. However, understanding where these voice memos are stored and how to access them can be a bit perplexing. In this comprehensive guide, we'll delve into the world of iPhone 10 voice memos, exploring their storage location, organization, and how to manage them effectively. Whether you're a seasoned iPhone user or a newcomer to the iOS ecosystem, this article will provide you with the insights you need to navigate the realm of voice memos on your iPhone 10. So, let's embark on this journey to unravel the mysteries of voice memo storage on your iPhone 10!
Inside This Article
- How to Access Voice Memos on iPhone 10
- Using the Voice Memos App
- Syncing Voice Memos with iCloud
- Transferring Voice Memos to Computer
- Conclusion
- FAQs
How to Access Voice Memos on iPhone 10
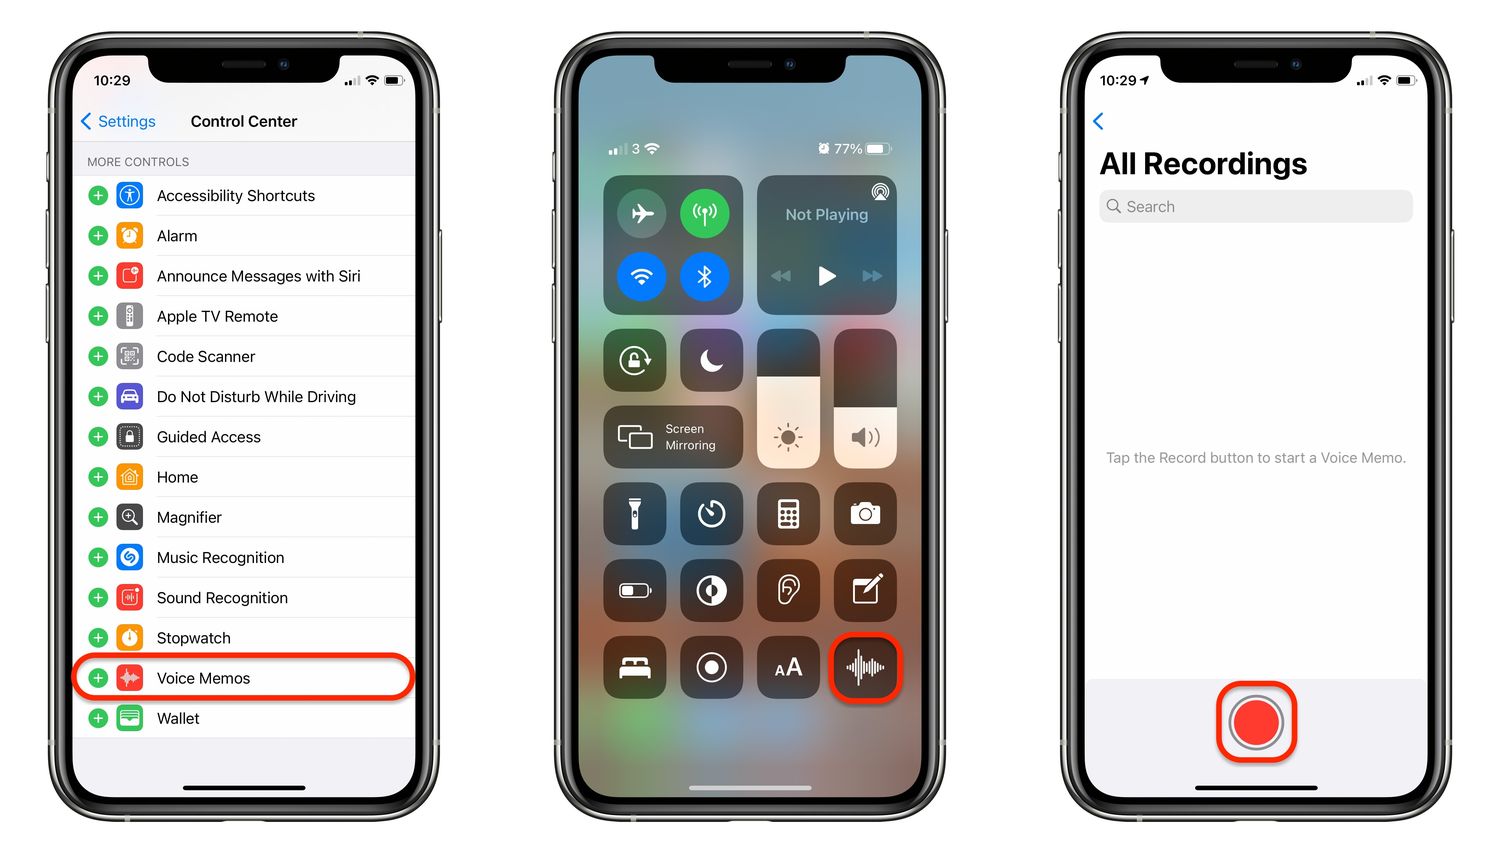
Accessing voice memos on your iPhone 10 is a breeze, allowing you to conveniently record and revisit important audio notes. Whether it’s a spontaneous idea, a crucial meeting, or a memorable melody, your iPhone 10 is equipped to capture it all with the Voice Memos app.
First and foremost, locating the Voice Memos app on your iPhone 10 is the initial step. You can easily find it by swiping right on your home screen to access the search function. Simply type “Voice Memos” into the search bar, and the app icon will appear, ready for you to tap and open.
Once the Voice Memos app is open, you’ll be greeted by a list of your recorded memos, each labeled with a title and timestamp. You can tap on any memo to listen to it, edit its title, or share it with others via AirDrop, Messages, or Mail.
If you’re looking for a specific memo, but you have a lengthy list to sift through, you can utilize the search bar at the top of the app to quickly locate it. Simply enter a keyword or phrase related to the memo you’re seeking, and the app will display relevant results, streamlining the process of finding your desired audio recording.
Using the Voice Memos App
Utilizing the Voice Memos app on your iPhone 10 is a straightforward process that allows you to effortlessly capture and manage audio recordings. Whether you’re attending a lecture, conducting an interview, or simply jotting down ideas, the Voice Memos app is a versatile tool that is easily accessible from your device’s home screen.
To begin recording, simply tap the Voice Memos icon to launch the app. Upon opening the app, you’ll be greeted with a simple interface featuring a prominent “Record” button, making it easy to initiate a new recording with just a single tap. The app also displays your existing recordings, enabling you to seamlessly manage and organize your audio files.
When you’re ready to start recording, tap the “Record” button to commence capturing audio. As the app captures your voice or other sounds, a visual indicator will display the recording duration, allowing you to monitor the length of your recording in real-time.
Once you’ve finished recording, tap the “Stop” button to conclude the audio capture. The app will then prompt you to enter a title for the recording, providing a convenient way to label and identify your audio files for future reference.
Furthermore, the Voice Memos app offers additional features such as the ability to trim and edit recordings, ensuring that you can refine your audio content with ease. Whether you need to remove unwanted segments or enhance the clarity of your recordings, the app provides intuitive tools for editing and refining your audio files.
**
Syncing Voice Memos with iCloud
**
Syncing your voice memos with iCloud is a convenient way to ensure that your recordings are securely backed up and accessible across all your Apple devices. This seamless integration allows you to effortlessly sync voice memos from your iPhone 10 to your other Apple devices, such as your iPad or Mac, using iCloud. Follow these simple steps to enable this feature and enjoy the flexibility of accessing your voice memos from any of your Apple devices.
To start syncing your voice memos with iCloud on your iPhone 10, ensure that you are signed in to iCloud with the same Apple ID across all your devices. Once you have confirmed this, navigate to the “Settings” app on your iPhone 10 and tap on your Apple ID at the top of the screen. Next, select “iCloud” and ensure that the toggle next to “Voice Memos” is switched on. This will enable the automatic syncing of your voice memos with iCloud, ensuring that they are securely stored and accessible across your Apple ecosystem.
Once you have enabled the syncing of voice memos with iCloud, any new recordings you make on your iPhone 10 will be automatically uploaded and synchronized with iCloud. This means that you can access these recordings from your other Apple devices that are signed in to the same iCloud account. Whether you need to listen to a voice memo on your iPad or Mac, you can easily do so without the need for manual transfers or additional steps, thanks to iCloud syncing.
Furthermore, iCloud syncing ensures that your voice memos are securely backed up in the cloud, providing peace of mind in case of any unexpected data loss or device issues. This seamless backup and syncing process simplifies the management of your voice memos, allowing you to focus on capturing important audio recordings without worrying about their accessibility and security.
Transferring Voice Memos to Computer
Transferring voice memos from your iPhone 10 to your computer is a straightforward process that allows you to back up your recordings and free up space on your device. There are several methods to achieve this, including using iTunes, AirDrop, or third-party apps. Below, we’ll explore the steps for transferring voice memos to your computer using iTunes and AirDrop.
Using iTunes, you can easily sync your voice memos to your computer. Simply connect your iPhone 10 to your computer using a USB cable and launch iTunes. Select your device from the iTunes interface and navigate to the “Music” tab. Check the box next to “Sync Music” and ensure that the “Include voice memos” option is selected. Click “Apply” to start the syncing process, and your voice memos will be transferred to your computer.
If you prefer a wireless method, AirDrop provides a convenient way to transfer voice memos from your iPhone 10 to your Mac computer. Ensure that both your iPhone 10 and Mac are connected to the same Wi-Fi network and have Bluetooth enabled. Open the Voice Memos app on your iPhone, select the memo you want to transfer, tap the “More” option, and choose “Share.” From the list of available options, select your Mac from the AirDrop section, and the voice memo will be sent wirelessly to your computer.
Once your voice memos are transferred to your computer, you can access and manage them as needed. Whether you use iTunes for a traditional wired transfer or AirDrop for a wireless transfer, both methods offer efficient ways to move your voice memos from your iPhone 10 to your computer.
In conclusion, the iPhone 10's Voice Memos feature offers a convenient way to capture and store audio recordings, whether it's for personal reminders, interviews, or creative projects. With the ability to sync seamlessly across devices and share recordings with ease, it enhances productivity and organization for users. The flexibility to access voice memos from the cloud ensures that important recordings are always within reach. Additionally, the option to edit and enhance recordings directly on the iPhone 10 provides a comprehensive user experience. Overall, Voice Memos on the iPhone 10 exemplify the device's commitment to user-friendly functionality and practicality, making it an indispensable tool for capturing and managing audio content. Whether for work or leisure, the Voice Memos feature adds a valuable dimension to the iPhone 10 user experience.
html
In conclusion, the iPhone 10’s Voice Memos feature offers a convenient way to capture and store audio recordings, whether it’s for personal reminders, interviews, or creative projects. With the ability to sync seamlessly across devices and share recordings with ease, it enhances productivity and organization for users. The flexibility to access voice memos from the cloud ensures that important recordings are always within reach. Additionally, the option to edit and enhance recordings directly on the iPhone 10 provides a comprehensive user experience. Overall, Voice Memos on the iPhone 10 exemplify the device’s commitment to user-friendly functionality and practicality, making it an indispensable tool for capturing and managing audio content. Whether for work or leisure, the Voice Memos feature adds a valuable dimension to the iPhone 10 user experience.
FAQs
Q: Where do voice memos go on iPhone 10?
A: Voice memos on iPhone 10 are stored in the Voice Memos app, which can be found on the home screen.
Q: Can I transfer voice memos from my iPhone 10 to my computer?
A: Yes, you can transfer voice memos from your iPhone 10 to your computer using iTunes or iCloud.
Q: Can I share voice memos with other iPhone users?
A: Yes, you can easily share voice memos with other iPhone users through the Messages app or by using AirDrop.
Q: Are voice memos backed up to iCloud?
A: Yes, voice memos can be backed up to iCloud if you have iCloud Backup enabled on your iPhone 10.
Q: Can I edit voice memos on my iPhone 10?
A: Yes, you can edit voice memos on your iPhone 10 using the built-in editing tools in the Voice Memos app.