
Voice recordings can be incredibly useful for a variety of reasons, whether you’re capturing an important conversation, creating a memo, or recording a lecture. With the advancement of technology, making a voice recording on your iPhone has never been easier. The iPhone comes equipped with a built-in voice recording feature that allows you to capture audio with just a few taps of your finger.
In this article, we will guide you through the process of making a voice recording on your iPhone. We will provide step-by-step instructions and offer some tips to help you get the best audio quality possible. So whether you need to record interviews, brainstorming sessions, or simply want to document your thoughts on the go, keep reading to learn how to make a voice recording on your iPhone.
Inside This Article
- How To Make A Voice Recording On iPhone
- Using the Voice Memos App
- Recording with Siri
- Voice Recording through third-party apps
- Conclusion
- FAQs
How To Make A Voice Recording On iPhone
Recording voice memos on your iPhone is a handy feature that can be used for various purposes. It allows you to quickly capture thoughts, ideas, or even important conversations. Whether you want to record a reminder for yourself or conduct an interview, the iPhone offers several methods to make voice recordings with ease.
One of the simplest ways to make a voice recording on your iPhone is by using the built-in Voice Memos app. This app comes pre-installed on all iPhones and is the go-to option for most users. To start recording, simply locate the Voice Memos app on your home screen and tap on it.
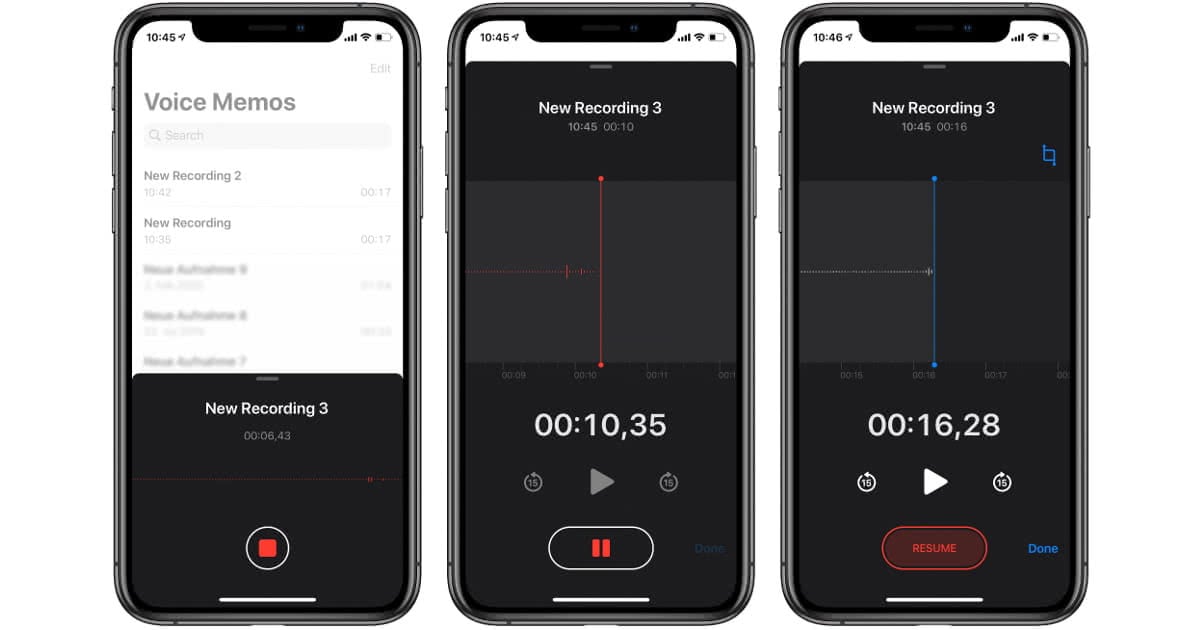
Once you’re in the app, you’ll notice a prominent red record button at the bottom of the screen. Tap on it to start the recording. As you speak, the voice memos app will display a waveform representation of the audio, allowing you to monitor the recording’s progress.
To end the recording, tap the same red button again. The app will automatically save the recording and display it in the list of voice memos. From here, you can rename the recording, share it with others, or delete it if needed.
Another convenient method for making voice recordings on your iPhone is by using Siri, Apple’s virtual assistant. Simply activate Siri by either holding down the home button or using the “Hey Siri” voice command.
Once Siri is active, you can say “Make a voice recording” or other similar commands like “Start recording”. Siri will immediately open the Voice Memos app and begin the recording process. You can then speak into the microphone and Siri will automatically save the recording for you.
If you prefer more customization options or additional features, you can explore third-party voice recording apps available on the App Store. These apps offer a wide range of functionalities, such as advanced editing options, cloud storage integration, and more.
To find third-party voice recording apps, simply open the App Store on your iPhone and search for “voice recording apps”. Take some time to read the reviews and descriptions to find the app that best suits your needs.
Once you’ve installed a voice recording app, open it and follow the on-screen instructions to start making recordings. These apps often provide additional features like noise reduction, bookmarking, and even transcription services.
Now that you know how to make voice recordings on your iPhone using the Voice Memos app, Siri, and third-party apps, you can easily capture important moments or record your thoughts anytime, anywhere.
Remember to always respect people’s privacy and adhere to any legal requirements when using voice recording features on your iPhone.
Using the Voice Memos App
The Voice Memos app is a built-in feature on iPhones that allows users to easily record their voice and save it for later use. It provides a convenient way to capture audio notes, memos, or even make recordings for interviews or podcasts. Here’s a step-by-step guide on how to use the Voice Memos app on your iPhone:
1. Open the Voice Memos app on your iPhone. The app icon looks like a microphone on a white background.
2. To start a new recording, tap the red record button at the bottom center of the screen. You can also use the 3D Touch feature (available on iPhone 6s and newer) by pressing firmly on the app icon and selecting “New Recording” from the quick actions menu.
3. Hold the iPhone close to your mouth and speak clearly into the microphone. The recording level meter will show the volume of your voice as you speak. Try to minimize background noise for better audio quality.
4. To pause the recording, tap the red button in the middle of the screen. To resume, tap the same button again.
5. To stop the recording, tap the red button one more time. The recording will automatically be saved with a timestamp and a title based on the date and time of the recording.
6. To listen to a recording, tap on its title in the list of recordings. You can then use the playback controls to play, pause, or skip through the recording. By default, the recordings are saved locally on your iPhone.
7. If you want to edit or trim a recording, tap on the More Options icon (three dots) next to the recording and choose “Edit Recording.” This will allow you to trim the beginning or end of the recording as needed.
8. If you want to share a recording, tap on the More Options icon next to the recording and select “Share.” From there, you can choose various options like sending it via messaging apps, email, or uploading it to cloud storage services.
9. If you want to organize your recordings, you can create folders by tapping on the “Folders” tab at the bottom of the screen and then tapping the “+” button. This will allow you to categorize your recordings for easier access and management.
The Voice Memos app on the iPhone is a powerful tool for capturing audio on the go. Whether you need to record a quick memo, an interview, or a personal reminder, this app has got you covered. It’s easy to use, offers high-quality recordings, and provides various options for organization and sharing.
Recording with Siri
Another convenient way to make a voice recording on your iPhone is by using Siri, your virtual assistant. Siri can help you initiate and control voice recordings with just a few simple voice commands.
To start a voice recording with Siri, simply activate Siri by saying “Hey Siri” or pressing and holding the home button on older iPhone models. Once Siri is activated, give the command “Record a voice memo.” Siri will then launch the Voice Memos app and immediately start the recording process.
During the recording, Siri will provide you with helpful voice prompts, such as the elapsed time and remaining storage space. If you need to pause the recording, you can simply say “Pause.” To resume the recording, say “Resume.” And when you’re ready to finish the recording, just say “Stop” or “End the recording.”
Once the recording is completed, Siri will automatically save the file and provide you with the option to name it. You can either use the default name or provide a custom name by saying “Rename this recording as [your desired name].”
If you would like to access your voice recordings later, you can ask Siri to open the Voice Memos app by saying “Open Voice Memos.” This way, you can easily listen to your recordings, edit them, or share them with others.
Using Siri to record voice memos is not only convenient but also hands-free, allowing you to have a completely hands-free recording experience. Whether you’re driving or your hands are occupied, Siri makes it effortless to capture important voice notes or create personal audio reminders.
Voice Recording through third-party apps
If you’re looking for more advanced features and customization options for voice recording on your iPhone, you can turn to third-party apps available in the App Store. These apps offer a wide range of additional functionalities to enhance your voice recording experience.
One popular choice is the “Voice Record Pro” app, which allows you to record, edit, and manage your audio recordings easily. With this app, you can not only capture high-quality audio but also apply various effects and filters to enhance the sound. Additionally, you can trim, merge, and mix multiple recordings to create a professional-quality audio file.
Another excellent option is the “Evernote” app, known for its robust note-taking capabilities. Besides organizing your notes, Evernote allows you to record audio directly within the app. You can add voice recordings to your notes, making it convenient to capture ideas, important meetings, or lectures. Moreover, Evernote syncs seamlessly across your devices, ensuring your recordings are accessible wherever you go.
If you’re interested in integrating your voice recordings with cloud storage services, the “OneDrive” app by Microsoft is a fantastic choice. It allows you to record and store your audio files directly to your OneDrive account, providing easy access and reliable backup options. With this app, you can effortlessly share your recordings with others or collaborate on projects, making it an excellent solution for work or personal use.
For those who prioritize simplicity and intuitive design, the “Voice Recorder and Audio Editor” app is worth considering. This app offers a streamlined interface, making it easy to record and manage your voice recordings effortlessly. Moreover, it provides basic audio editing features like trimming, merging, and applying filters to enhance the sound quality.
Lastly, if you’re looking for a voice recording app that offers advanced organization and labeling features, “Notability” is the go-to option. Notability allows you to create folders, add tags, and search for recordings based on keywords or labels. This makes it ideal for individuals who record a large volume of voice notes and need efficient organization and retrieval options.
With a myriad of third-party apps available, you’re sure to find one that suits your unique voice recording needs. Whether you’re a student, professional, or just someone who wants to capture important moments, these apps offer enhanced functionality and customization to elevate your voice recording experience.
Conclusion
In conclusion, recording voice memos on your iPhone is a handy feature that can be used for various purposes. Whether you need to jot down important ideas, capture moments of inspiration, or simply make a to-do list, the Voice Memos app on your iPhone provides a convenient and user-friendly solution.
With just a few taps, you can start and stop recordings, add labels for easy organization, and even edit your recordings to trim or enhance them. Whether you’re a student, professional, or someone who loves documenting their thoughts and ideas, the Voice Memos app can be a valuable tool in your daily life.
Now that you know how to make a voice recording on your iPhone, you can start harnessing the power of audio for your productivity, creativity, and more. So go ahead, grab your iPhone, and let your voice be heard!
FAQs
1. How do I make a voice recording on my iPhone?
To make a voice recording on your iPhone, open the Voice Memos app, which comes pre-installed on most iPhones. Tap the red record button to start recording your voice. When you’re done, tap the stop button to end the recording. Your voice recording will be saved in the Voice Memos app for easy access and playback.
2. Can I edit my voice recordings on my iPhone?
Yes, you can edit your voice recordings on your iPhone. After making a recording in the Voice Memos app, you can tap on the recording to access the editing options. You can trim the recording to remove any unwanted parts, or you can even add markers to highlight specific sections of the recording.
3. How can I share my voice recordings with others?
To share your voice recordings with others, open the Voice Memos app and select the recording you want to share. Tap on the share button, which looks like a square with an arrow pointing out of it. From there, you can choose to share the recording via email, message, or any other compatible app installed on your iPhone.
4. Can I transfer my voice recordings from my iPhone to my computer?
Yes, you can transfer your voice recordings from your iPhone to your computer. There are a few different ways to do this. You can connect your iPhone to your computer using a USB cable and transfer the files manually. Alternatively, you can use cloud storage services like iCloud or Dropbox to sync your recordings across devices and access them on your computer.
5. How long can I record a voice memo on my iPhone?
The length of time you can record a voice memo on your iPhone will depend on the available storage space on your device. iPhones typically have a generous amount of storage, so you can record voice memos for an extended period of time. However, it’s always a good idea to regularly manage your recordings and delete any unnecessary files to free up space.