
Are you a budding musician looking to record your songs on the go? With the advancements in technology, it’s now easier than ever to capture your musical ideas and create high-quality recordings. Thanks to the power of smartphones, you no longer need expensive recording equipment or a dedicated studio space. All you need is your trusty mobile phone and a few essential tools.
In this article, we will explore the different methods and techniques for recording songs on your phone. Whether you’re an aspiring singer-songwriter, a guitarist, or a keyboard player, we’ve got you covered. From choosing the right recording app to optimizing your audio settings, we’ll guide you step-by-step through the process of turning your phone into a portable recording studio. So, grab your phone and let’s dive in!
Inside This Article
- Choosing the Right App for Recording
- Setting up Your Environment for Recording
- Adjusting Recording Settings
- Recording Your Song
- Editing and Enhancing Your Recording
- Saving and Sharing Your Recorded Song
- Conclusion
- FAQs
Choosing the Right App for Recording
When it comes to recording songs on your phone, one of the most important steps is choosing the right app. With the multitude of options available in app stores, it can be overwhelming to make a decision. However, selecting the right app is crucial for achieving high-quality recordings. Here are a few key factors to consider when choosing a recording app:
1. Audio Quality: The first thing to look for in a recording app is its ability to capture high-quality audio. Look for apps that support lossless audio formats like FLAC or WAV, as these formats preserve the original sound quality without any compression.
2. Recording Features: Consider the features offered by the app. Does it have the ability to adjust microphone sensitivity, set recording levels, or add effects? Look for an app that provides the necessary tools and flexibility to enhance your recording experience.
3. User Interface: A well-designed and intuitive user interface makes the recording process smoother. Look for an app that is easy to navigate and offers a clean and organized layout, allowing you to focus on your recordings without being distracted by a cluttered interface.
4. Compatibility: Ensure that the app is compatible with your mobile device. Some apps may be limited to certain operating systems or specific models. Read the app’s description and reviews to ensure it will work seamlessly on your phone.
5. Reviews and Ratings: Don’t forget to check the reviews and ratings of the app before downloading it. User feedback can provide valuable insights into the app’s performance, stability, and overall user satisfaction.
6. Price: While some recording apps are available for free, others may require a one-time purchase or a subscription. Consider your budget and requirements before making a decision. Remember, the price should be justified by the features and quality offered by the app.
By considering these factors, you can make an informed decision and choose the right app for recording songs on your phone. Remember, the app you select will play a significant role in the quality and ease of your recording process. So take your time, research, and try out different apps to find the perfect one for your needs.
Setting up Your Environment for Recording
When it comes to recording songs on your phone, creating the right environment is crucial. The quality of your recording can be greatly influenced by the surroundings, so it’s important to prepare your space before hitting that record button. Here are a few tips to help you set up the perfect recording environment:
1. Find a Quiet Location: Select a room or area where you can minimize external noise as much as possible. Find a space away from traffic, loud appliances, or any other sources of disruption. This will help ensure that your recording captures only the sound you want.
2. Reduce Background Noise: Even in a relatively quiet space, there may still be some background noise that can impact your recording. Consider using soundproofing materials like foam panels or curtains to absorb the sound and reduce echo, creating a more professional recording environment.
3. Position Your Phone Correctly: Proper microphone placement is essential for capturing the best sound quality. Experiment with different positions and distances from your phone to find the sweet spot. Avoid holding the phone directly in front of your mouth, as it may result in muffled or distorted audio. Using a stand or tripod can help maintain a consistent position throughout the recording.
4. Control the Lighting: Good lighting not only improves the visual quality of any accompanying video but can also affect your mood and performance while recording. Make sure you have sufficient lighting, whether it’s natural sunlight or artificial studio lights, to create a pleasant and engaging atmosphere.
5. Eliminate Clutter: A clutter-free environment can help you focus on your music without distractions. Clear your recording space of any unnecessary objects or clutter that could interfere with your performance or the sound quality of the recording.
6. Manage Ambient Temperature: Temperature variations can have a subtle effect on the sound quality of your recording. Aim for a comfortable temperature range to ensure you stay focused and that your equipment performs optimally.
By taking the time to set up an ideal recording environment, you can greatly improve the overall quality of your recorded songs. Remember, a conducive environment will not only enhance the sound but also contribute to your comfort and performance.
Adjusting Recording Settings
When it comes to recording songs on your phone, adjusting the recording settings is crucial to ensuring high-quality sound. Here are some key settings you should consider:
1. Microphone Sensitivity: Begin by adjusting the microphone sensitivity to capture the right level of sound. If the sensitivity is too low, your recording might sound distant and faint. On the other hand, if it’s too high, you might experience distortion or clipping. It’s best to find a balance that captures the natural dynamics of your voice or instrument.
2. Bitrate and Sample Rate: These settings determine the audio quality and file size of your recording. Higher bitrates and sample rates generally result in better sound quality but also produce larger file sizes. Consider the purpose of your recording and the available storage space on your phone when choosing these settings.
3. File Format: Different audio recording apps offer various file formats for saving your recordings. The most common formats include WAV, MP3, and AAC. WAV files provide uncompressed audio and maintain the highest quality, but they also occupy more storage space. MP3 and AAC formats are compressed and offer smaller file sizes but may slightly degrade the audio quality. Choose the format that best suits your needs.
4. Stereo or Mono: Depending on your phone’s microphone capabilities and the nature of your recording, you might need to choose between stereo or mono recording. Stereo recording enables the capture of a wider sound field, ideal for performances or instrumentals. Mono recording captures sound from a single source, which is sufficient for voice recordings or solo instruments.
5. Background Noise Reduction: To achieve a clean and professional sound, consider enabling background noise reduction features if available in your recording app. These settings help minimize unwanted background noises such as room ambiance, air conditioning, or other environmental sounds that might interfere with your recording.
6. Recording Levels: Monitoring the recording levels is essential to avoid distortion or clipping. Aim for a moderate level that avoids exceeding the maximum recording input of your device. Pay attention to the bars or meters provided on the recording interface to ensure your levels stay within the optimal range.
7. Playback Monitoring: While recording, it’s crucial to hear what you’re performing to ensure the quality and accuracy of your recording. Ensure that you enable playback monitoring so you can listen to your music or vocals through headphones or speakers while capturing your performance.
By properly adjusting these recording settings on your phone, you can greatly enhance the quality of your recorded songs. Take the time to experiment and find the settings that best suit your style and preferences, allowing you to capture your musical ideas with clarity and precision.
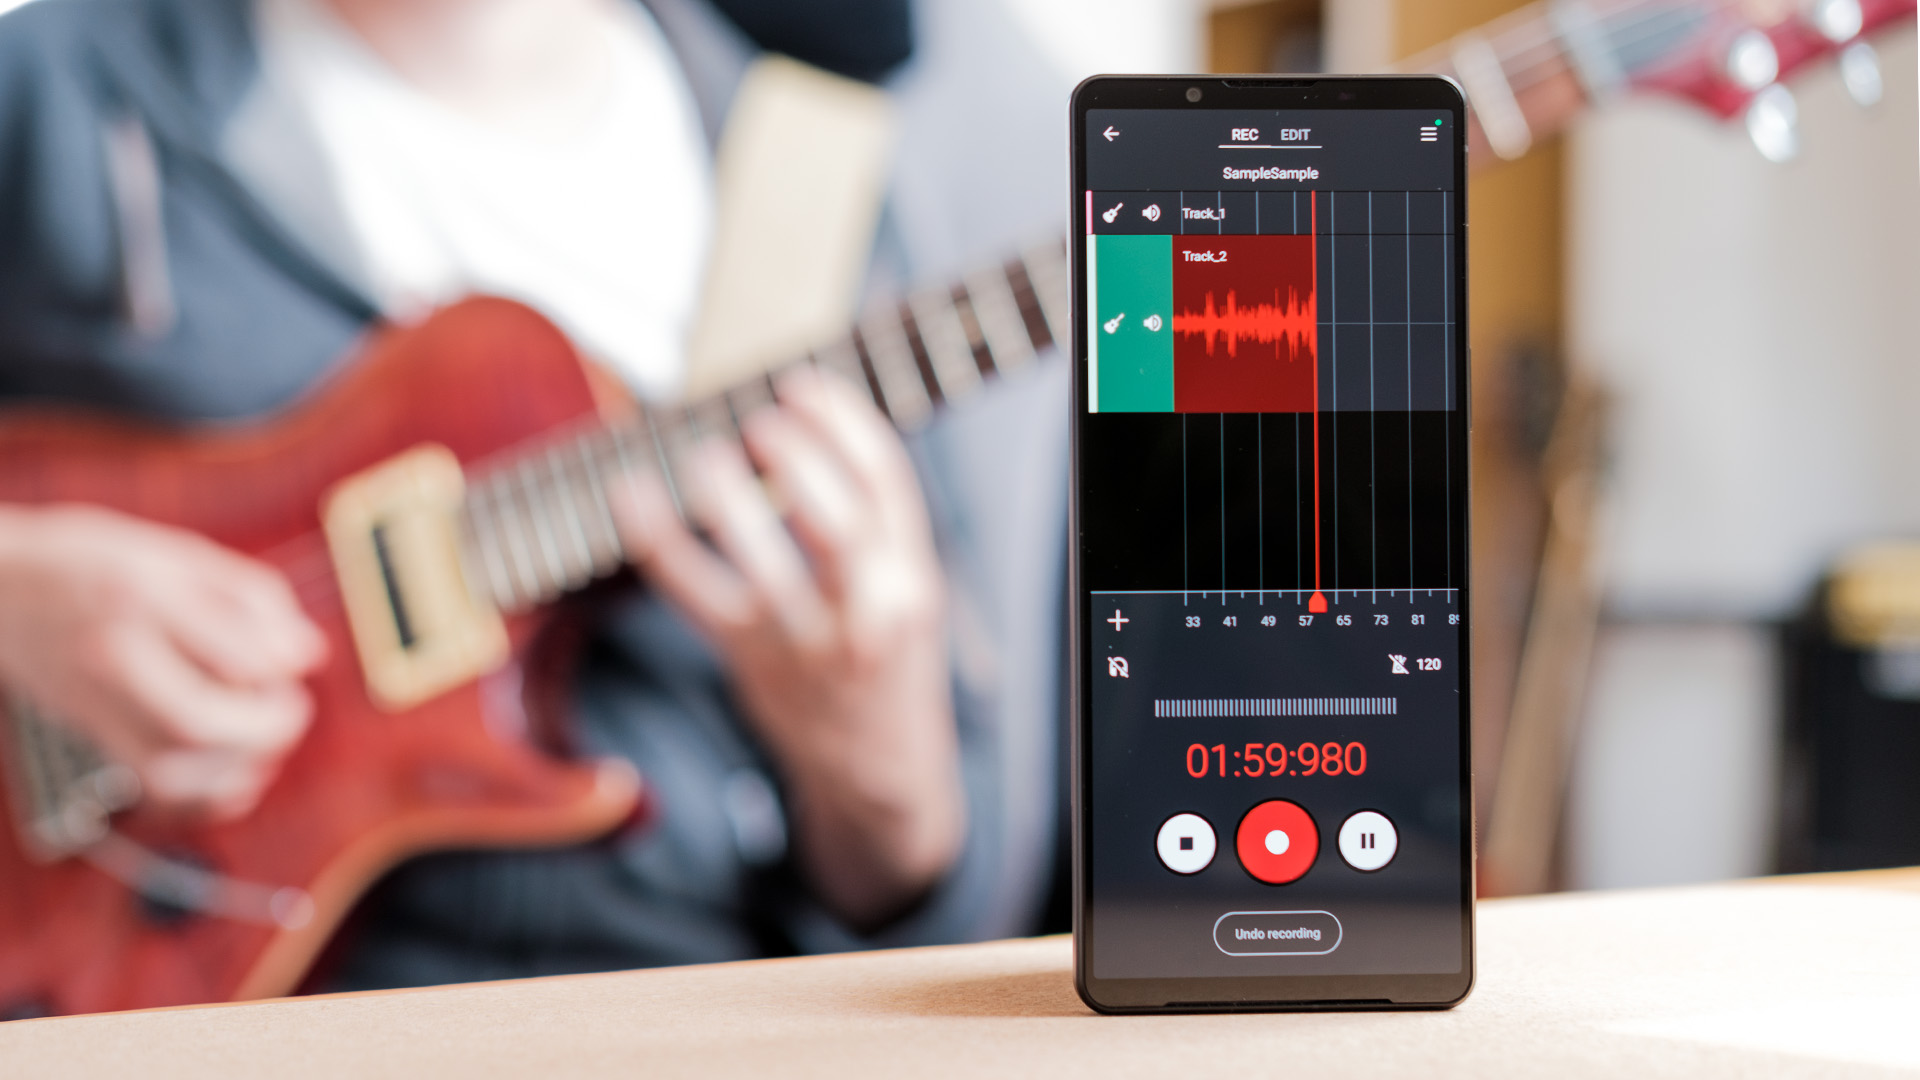
Recording Your Song
Now that you have set up your environment and adjusted the recording settings, it’s time to start recording your song. Here are the steps to guide you through the process:
- Warm up and prepare: Before you start recording, it’s important to warm up your voice or instrument. Spend a few minutes doing vocal exercises or playing scales on your instrument to get your muscles ready.
- Select your song: Choose the song you wish to record. Whether it’s an original composition or a cover, make sure you are comfortable with the melody and lyrics.
- Set up your recording app: Open the recording app on your phone. Ensure that you have selected the appropriate settings, such as the desired audio quality and file format.
- Position your phone: Place your phone in a stable position, either on a stand or a surface. Make sure it is positioned close enough to capture the sound clearly, but without distorting it.
- Press record: Once you are ready, hit the record button on the app. Take a deep breath and start performing your song. Try to stay relaxed and focused throughout the recording.
- Take multiple takes: Don’t worry if your first take is not perfect. It often takes a few tries to get the desired performance. Experiment with different variations and approaches to find the best rendition of your song.
- Make use of headphones: If possible, wear headphones while recording. This allows you to monitor your performance and catch any mistakes or issues in real-time.
- Record in sections: If your song has different sections, consider recording them separately. This allows you to focus on each part and ensure a higher level of precision and quality.
Remember to take breaks in between recording sessions to rest your voice or fingers. This helps to prevent fatigue and maintain the overall quality of your performance.
Once you have finished recording your song, it’s time to move on to the next steps of editing and enhancing your recording.
Editing and Enhancing Your Recording
After you have recorded your song on your phone, you may want to make some improvements to enhance the overall quality. Editing and enhancing your recording can help you achieve a more professional-sounding result. Here are some tips to help you get started:
1. Trim and Crop: Begin by trimming any unwanted sections at the beginning or end of your recording. This can help eliminate any unnecessary noise or gaps. Additionally, you can crop specific sections within the recording to remove mistakes or unwanted background sounds.
2. Adjust Volume Levels: Use your recording app or a separate audio editing software to adjust the volume levels of different tracks or sections. Ensure that all instruments and vocals are balanced properly, so that no part of the song overpowers the others.
3. Apply Effects: Experiment with different audio effects to enhance the overall sound of your recording. You can try adding reverb for a spacious feel, equalization to tweak the frequencies, or compression to even out the volume fluctuations.
4. Fix Timing and Pitch: If you notice any slight timing issues or pitch problems in your recording, you can use editing tools to correct them. This can help align the instruments and vocals, making the song sound more polished and in tune.
5. Add Layers and Overdubs: Consider layering additional tracks or overdubs to enhance the depth and richness of your recording. This can involve adding harmonies, backing vocals, or additional instrument parts to make the song more dynamic and interesting.
6. Mix and Balance: Spend time adjusting the levels of different tracks to create a well-balanced mix. Ensure that each element is clear and distinct without overpowering the others. Pay attention to panning, stereo imaging, and spatial effects to create a sense of depth and dimension in the audio.
7. Mastering: The final step in the editing process is mastering. This involves applying the finishing touches to the recording, such as equalization, compression, and overall level adjustments. Mastering helps ensure that your song sounds consistent across different playback devices and environments.
Remember, editing and enhancing your recording is a creative process, so feel free to experiment and trust your ears. Don’t be afraid to make changes and try different techniques to achieve the desired sound. With practice and patience, you can turn your phone recording into a high-quality, professional-sounding song.
Saving and Sharing Your Recorded Song
Now that you have successfully recorded and edited your song on your phone, it’s time to explore the options for saving and sharing your masterpiece. Here are some simple steps to help you with the process:
- Save your recording: Before anything else, it’s crucial to save your recorded song in a format that is easy to access and share. Most recording apps offer the option to save your recordings directly to your phone’s internal storage or an external SD card, so choose the location that is most convenient for you.
- Choose the file format: When saving your recorded song, consider the file format you want to use. The most common file formats for audio recordings are MP3, WAV, and AAC. MP3 is widely compatible and offers good quality, while WAV provides high-quality lossless audio. AAC is popular for its smaller file size. Select the format that best suits your needs and the device you plan to share your recording with.
- Organize your recordings: As you record more songs or audio files on your phone, it’s helpful to organize them in a structured manner. Create folders or playlists to keep your recordings organized and easily accessible. This will make it easier to find and share specific recordings in the future.
- Backup your recordings: To avoid the risk of losing your recorded songs due to accidental deletion or device malfunction, it’s a good practice to regularly back up your recordings. You can backup your recordings to cloud storage services like Google Drive, Dropbox, or iCloud, or you can transfer them to a computer or external storage device.
- Share your recording: Once your recording is saved and organized, it’s time to share your masterpiece with the world. Most recording apps offer built-in sharing options, allowing you to share your recordings directly through social media platforms, messaging apps, or email. You can also transfer the recording to your computer and share it through various online platforms, such as SoundCloud or YouTube.
- Consider copyright and permissions: If you plan to share your recorded song publicly or use it for commercial purposes, it’s important to consider copyright laws and permissions. Make sure you have the necessary rights to distribute and share the recorded song, especially if it includes copyrighted material.
By following these steps, you can easily save and share your recorded songs using your mobile phone. Whether you want to showcase your musical talents or simply share your creations with friends and family, the possibilities are endless. So, go ahead and let your voice be heard!
Conclusion
Recording songs on your phone has never been easier or more accessible. With advancements in mobile phone technology, you can now turn your device into a powerful recording tool. Whether you’re a professional musician looking for a convenient way to capture your ideas on the go, or simply a music enthusiast wanting to explore your creativity, the options are plentiful.
From using built-in voice recording apps to downloading specialized audio recording apps, there is a wide range of choices available. Experiment with different methods, find the one that suits your needs and preferences, and start recording those catchy melodies, heartfelt lyrics, or breathtaking instrumental compositions.
Remember to optimize your recordings by finding a quiet location, using quality headphones or external microphones, and adjusting the audio settings to capture the best sound quality possible. With practice and a bit of experimentation, you’ll be amazed at the professional-level recordings you can achieve right from the palm of your hand.
So, don’t let the limitations of traditional recording studios hold you back. Embrace the flexibility and convenience of recording songs on your phone and unlock your musical potential anytime, anywhere.
FAQs
Q: Can I record songs on my phone?
A: Absolutely! In fact, recording songs on your phone has become incredibly common and accessible thanks to advancements in mobile technology.
Q: What do I need to record songs on my phone?
A: To record songs on your phone, you will need a smartphone with a built-in microphone or an external microphone that can be connected to your device. Additionally, you may want to consider installing a recording app or using an audio editing software for better control over your recordings.
Q: Are there any specific apps or software I should use?
A: There are a multitude of apps and software available for recording songs on your phone. Some popular options include GarageBand (for iOS), FL Studio Mobile, and Voice Recorder & Audio Editor. These apps offer various features such as multi-track recording, virtual instruments, effects, and editing capabilities.
Q: Can I achieve professional-sounding recordings with my phone?
A: While recording songs on your phone may not provide the same level of quality as a professional recording studio, you can still achieve impressive results with the right techniques and tools. Experimenting with microphone placement, using noise reduction features, and investing in a high-quality external microphone can greatly enhance the overall sound of your recordings.
Q: How can I improve the sound quality of my mobile phone recordings?
A: There are several ways to improve the sound quality of your mobile phone recordings. Here are a few tips:
- Find a quiet environment to minimize background noise.
- Use headphones while recording to monitor the sound and identify any issues.
- Invest in a high-quality external microphone for better audio capture.
- Experiment with different recording techniques and microphone placements.
- Use a pop filter to minimize plosives and improve vocal clarity.
- Consider using audio editing software to enhance the final mix.