
Removing a phone from your Apple ID can be a bit tricky if you’re not familiar with the process. Whether you’ve upgraded to a new device, sold your old phone, or simply want to remove it for security reasons, this guide will walk you through the steps. By unlinking your phone from your Apple ID, you’ll ensure that it no longer has access to your personal information and can’t be used for unauthorized activities. In this article, we’ll cover everything you need to know to successfully remove a phone from your Apple ID, providing you with peace of mind and control over your device’s usage. So, let’s dive in and learn how to remove a phone from your Apple ID.
Inside This Article
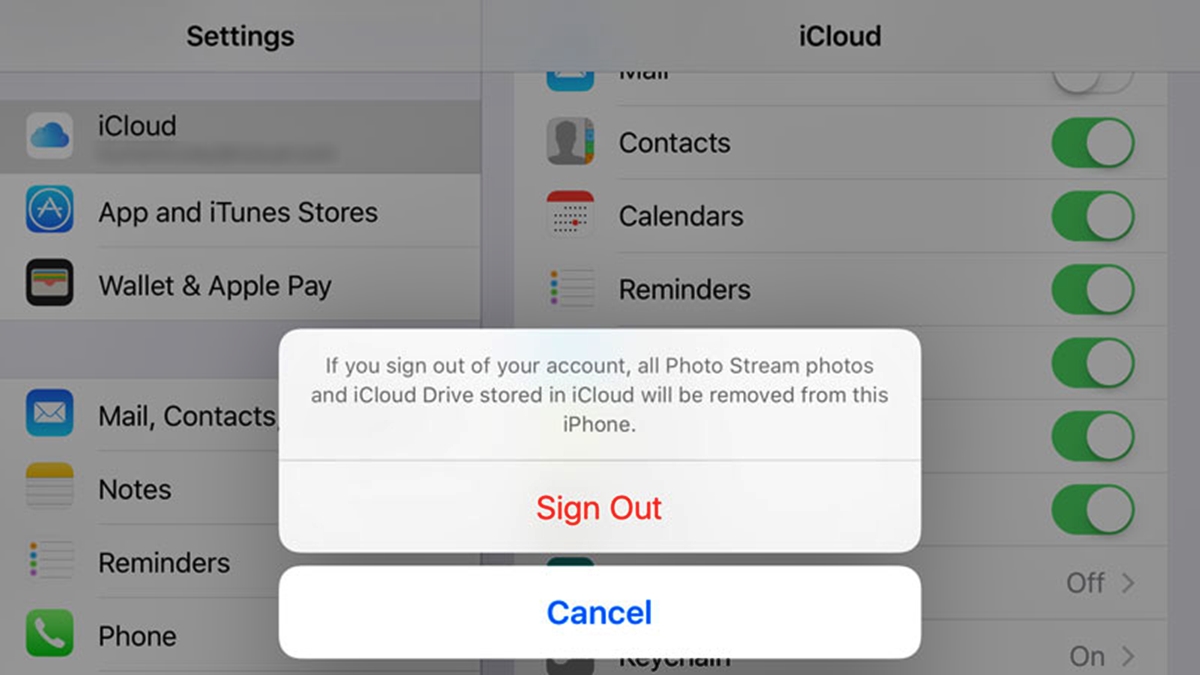
- Step 1: Sign Out of iCloud on the iPhone
- Step 2: Remove Device from Find My iPhone
- Step 3: Deauthorize the Phone from iTunes
- Step 4: Reset the iPhone to Factory Settings
- Conclusion
- FAQs
Step 1: Sign Out of iCloud on the iPhone
When you need to remove a phone from your Apple ID, the first step is to sign out of iCloud on the iPhone. This will disassociate the device from your account and prevent any further syncing or access to your iCloud data.
To sign out of iCloud, follow these simple steps:
- Open the Settings app on your iPhone.
- Scroll down and tap on your Apple ID, which is located at the top of the Settings menu.
- In the Apple ID menu, you will see your name, email, and profile picture. Scroll down and tap on “Sign Out”.
- You will be prompted to enter your Apple ID password. Enter the password and tap on “Turn Off” to confirm.
- After signing out, you can choose whether to keep a copy of your iCloud data on the iPhone or delete it. Select the appropriate option based on your preference.
- Finally, tap on “Sign Out” again to confirm and complete the process.
Step 2: Remove Device from Find My iPhone
Removing your device from Find My iPhone is an important step in removing it from your Apple ID. Find My iPhone is a feature that allows you to locate and track your iPhone remotely. By removing your device from this feature, you ensure that it is no longer linked to your Apple ID and can be set up with a new one if needed.
To remove your device from Find My iPhone, follow these simple steps:
- Open the Settings app on your iPhone.
- Tap on your Apple ID banner at the top of the screen.
- From the Apple ID menu, select “iCloud”.
- Scroll down to find “Find My iPhone” and tap on it.
- You will see a toggle switch next to “Find My iPhone”.
- Tap on the toggle switch to turn off Find My iPhone.
- You will be prompted to enter your Apple ID password to confirm the action.
- Once you have entered your password, tap on “Turn Off” to disable Find My iPhone.
By following these steps, you have successfully removed your device from Find My iPhone. This means it is no longer associated with your Apple ID and can be freely linked to a different Apple ID or used without any account association.
It’s important to note that if you are selling or giving away your iPhone, it is recommended to remove it from Find My iPhone to ensure the new owner can set it up with their own Apple ID and use it without any issues.
Step 3: Deauthorize the Phone from iTunes
Once you have signed out of iCloud and removed the device from Find My iPhone, the next step is to deauthorize the phone from iTunes. This is an essential step to ensure that your phone is no longer associated with your Apple ID.
To deauthorize the phone from iTunes, follow these simple steps:
- Launch iTunes on your computer.
- If you are not already signed in, go ahead and sign in with your Apple ID.
- Click on “Account” in the top menu bar, and then select “Authorizations”.
- From the drop-down menu, select “Deauthorize This Computer”.
- Enter your Apple ID and password when prompted.
- Click “Deauthorize” to confirm.
By deauthorizing your phone from iTunes, you are revoking its access to your Apple ID and any associated content, such as music, movies, and apps. This ensures that your personal information and purchases are no longer tied to the device.
It’s important to note that deauthorizing your phone from iTunes does not erase any data or settings on the device. This step simply removes the device from your list of authorized devices in iTunes.
If you no longer have access to the phone, or if you want to remove it from your Apple ID remotely, you can also deauthorize all devices associated with your account. This can be done by following the same steps in iTunes, but selecting “Deauthorize All” instead.
Once you have successfully deauthorized the phone from iTunes, you can be confident that your device is no longer linked to your Apple ID, giving you peace of mind and ensuring the security of your personal information.
Step 4: Reset the iPhone to Factory Settings
Resetting your iPhone to factory settings is a crucial step in removing it from your Apple ID. This process erases all data and settings on the device, returning it to its original state when you first purchased it. Follow the steps below to complete this process:
1. Backup Your Data: Before resetting your iPhone, it’s important to create a backup of all your important data. You can do this by connecting your iPhone to a computer and using iTunes or by using iCloud to backup your device wirelessly.
2. Access the Settings Menu: On your iPhone, navigate to the “Settings” app, which is represented by a gear icon on your home screen.
3. Tap on “General”: Within the Settings menu, scroll down and tap on “General,” which is typically located towards the top of the list.
4. Find and Select “Reset”: In the General settings, locate and tap on the “Reset” option. This will be towards the bottom of the menu.
5. Choose “Erase All Content and Settings”: Within the Reset menu, you will find various reset options. Select “Erase All Content and Settings,” which will prompt you to confirm your decision.
6. Confirm the Reset: After selecting “Erase All Content and Settings,” you will be prompted to enter your passcode or Apple ID password for security purposes. Follow the on-screen instructions to confirm the reset process.
7. Wait for Reset to Complete: The reset process may take a few minutes to complete. During this time, your iPhone will be restored to its factory settings, and all data will be erased.
8. Set Up as a New iPhone: After the reset is finished, you will see the “Hello” screen, indicating that your iPhone has been successfully reset. Follow the on-screen instructions to set up your iPhone as a new device.
By following these steps, you have successfully reset your iPhone to factory settings, effectively removing it from your Apple ID. It’s important to note that once the reset is complete, all data and settings on the device will be erased permanently. Therefore, make sure you have a backup of important data before proceeding with this step.
Conclusion
In conclusion, removing a phone from your Apple ID is a straightforward process that can be done from your device’s settings or through the iCloud website. By following the steps outlined in this article, you can disconnect your phone from your Apple ID and ensure that your account remains secure. Whether you are upgrading to a new phone, selling your device, or simply want to remove an old phone from your account, the steps provided will guide you through the process effortlessly. Remember to backup your data before removing your phone to ensure that you don’t lose any important information. With these instructions in mind, you can confidently manage your Apple ID and keep it up-to-date with your current devices.
FAQs
1. How do I remove a phone from my Apple ID?
To remove a phone from your Apple ID, follow these steps:
1. Open the “Settings” app on your iPhone.
2. Tap on your Apple ID at the top of the screen.
3. Scroll down and tap on “Devices”.
4. You will see a list of devices connected to your Apple ID. Tap on the device you want to remove.
5. Tap on “Remove from Account”.
6. Confirm your choice by tapping on “Remove”.
By following these steps, you can successfully remove a phone from your Apple ID.
2. Will removing a phone from my Apple ID delete all the data on the device?
No, removing a phone from your Apple ID will not delete any data on the device. It simply deactivates the association between the device and your Apple ID. Your personal data, apps, and settings will remain intact on the device.
3. Can I remove a phone from my Apple ID remotely?
Yes, you can remove a phone from your Apple ID remotely. To do so, follow these steps:
1. Go to the iCloud website (www.icloud.com) and sign in with your Apple ID.
2. Click on “Find iPhone”.
3. Select the device you want to remove.
4. Click on “Erase iPhone”.
5. Confirm your choice.
By erasing the iPhone remotely, you will effectively remove it from your Apple ID.
4. Can I remove a phone from my Apple ID without resetting it?
Yes, you can remove a phone from your Apple ID without resetting it. Removing a phone from your Apple ID simply removes the device from the list of associated devices. It does not require resetting the phone or erasing its data.
5. Will removing a phone from my Apple ID prevent it from being tracked?
Removing a phone from your Apple ID does not directly prevent it from being tracked. If Find My iPhone is enabled on the device, it will still be trackable using the iCloud website or the Find My app on another Apple device. To prevent tracking, you would need to disable Find My iPhone on the device itself.