
When it comes to digital photography, there may be times when you want to revert an edited photo back to its original state. Whether it’s because you’re unsatisfied with the changes you made or you simply want to start fresh, learning how to undo the edits and restore the original version of a photo is a valuable skill to have.
In this article, we will guide you through the process of reverting an edited photo to its original state. We will explore different methods that you can use, depending on the tools and software you have at your disposal. From basic editing software to more advanced programs, we will cover the various steps and techniques you can take to ensure that your photo returns to its original form without any loss of quality.
Inside This Article
- Understanding the Need to Revert an Edited Photo
- Methods to Revert an Edited Photo to Original
- Using Undo or History Feature in Photo Editing Software
- Reversing Edits through the “Revert to Original” Option
- Utilizing the “Reset” or “Default” Function in Photo Editing Tools
- Restoring Original Image from Backup or File Version History
- Conclusion
- FAQs
Understanding the Need to Revert an Edited Photo
In today’s digital age, editing photos has become a common practice. Whether it’s enhancing colors, removing blemishes, or applying artistic filters, photo editing allows us to unleash our creativity and capture the essence of a moment. However, there are instances when we realize that the edited version of a photo may not have turned out as expected. In such cases, the need to revert an edited photo back to its original state arises. Understanding this need is crucial to preserving the integrity of the image and ensuring that it reflects the true essence of the captured moment.
There are several reasons why one might want to revert an edited photo. One common scenario is when we accidentally make unintended changes while editing, such as altering the color balance, cropping too much of the image, or applying excessive filters that distort the original image. In these cases, reverting the photo back to its original state becomes necessary to restore its natural look and authenticity.
Another scenario where reverting becomes important is when we receive feedback or criticism from others regarding the edited version of a photo. It could be a client who is dissatisfied with the edits, a friend or family member who feels that the original image was more captivating, or even our own self-reflection, realizing that the edited photo does not accurately represent the moment or subject. In these cases, reverting back to the original version allows us to address the concerns and ensure that the final image resonates with its intended purpose.
Moreover, reverting an edited photo becomes relevant when we want to compare the before and after versions of an image. It helps us assess the impact of our editing choices and gauge whether the changes have truly enhanced or detracted from the photo. By comparing the original and edited versions side by side, we gain valuable insights into our editing style and can refine our skills to create more compelling and visually appealing images.
Ultimately, understanding the need to revert an edited photo stems from a desire to preserve the integrity of the image and ensure that it accurately reflects the moment it was captured. By reverting back to the original version, we can correct unintended changes, address feedback or criticism, and gain a deeper understanding of our editing choices. This process allows us to maintain the authenticity and artistic vision of the photo, resulting in a truly captivating and visually powerful image.
Methods to Revert an Edited Photo to Original
There may be times when you have edited a photo and later realized that you want to revert it back to its original state. Whether it’s to undo certain edits or to restore the original aesthetics of the image, there are a few methods you can use to accomplish this.
1. Using Undo or History Feature in Photo Editing Software: Most photo editing software come equipped with an “Undo” or “History” feature that allows you to step back through your editing actions and revert changes. Simply locate the “Undo” or “History” option in the software’s toolbar or menu, and click on it until you reach the desired original state of the photo.
2. Reversing Edits through the “Revert to Original” Option: Some photo editing tools provide a specific “Revert to Original” option that instantly reverts all applied edits and filters. Look for this option in the software’s menu or toolbar and select it to restore the photo to its original form.
3. Utilizing the “Reset” or “Default” Function in Photo Editing Tools: Another method to revert an edited photo to its original state is by using the “Reset” or “Default” function available in many photo editing tools. This function allows you to reset all adjustments, filters, and edits, bringing the photo back to its original appearance as if no changes were made.
4. Restoring Original Image from Backup or File Version History: If you have a backup of the original image or access to previous file versions, you can simply replace the edited photo with the original version. This method requires you to locate the original image file or check your backup storage to retrieve the unedited version. Make sure to save it with a different name or in a separate location to preserve the edited version if needed.
By using these methods, you can easily revert an edited photo back to its original form. It’s always a good idea to experiment with different edits, knowing that you have the flexibility to revert the photo if needed. So, next time you make edits to a photo and want to revert it back to the original, remember these methods to restore its original beauty.
Using Undo or History Feature in Photo Editing Software
When it comes to reverting an edited photo back to its original state, one of the simplest and most common methods is to utilize the “Undo” or “History” feature in your photo editing software. These features allow you to step back through the edits you have made, making it easy to undo any changes and restore the photo to its original appearance.
The “Undo” feature typically works by allowing you to reverse the most recent edit or action you performed. This is often accomplished by using a keyboard shortcut, such as “Ctrl + Z” on Windows or “Command + Z” on Mac. By repeatedly pressing the undo shortcut, you can step back through a series of edits until you reach the point where the photo was in its untouched state.
On the other hand, the “History” feature provides a more comprehensive view of the edits made to the photo. It allows you to browse through a list of previous states of the image, allowing you to choose a specific point in the editing process that you want to revert to. This can be especially useful if you are looking to undo multiple changes or if you want to go back further in the editing timeline.
Keep in mind that the availability and functionality of the undo or history feature may vary depending on the photo editing software you are using. Some programs may have a dedicated “Undo” button or a history panel that shows a visual representation of the edits. Others may have a limited number of undo steps, so it is important to save a backup of the original photo before making significant changes.
By using the undo or history feature in your photo editing software, you can easily revert an edited photo to its original state without the need for complex processes or additional tools. This method provides a quick and efficient way to undo changes and restore your photo to its initial condition, allowing you to experiment and make edits with the comfort of knowing you can always return to the original version.
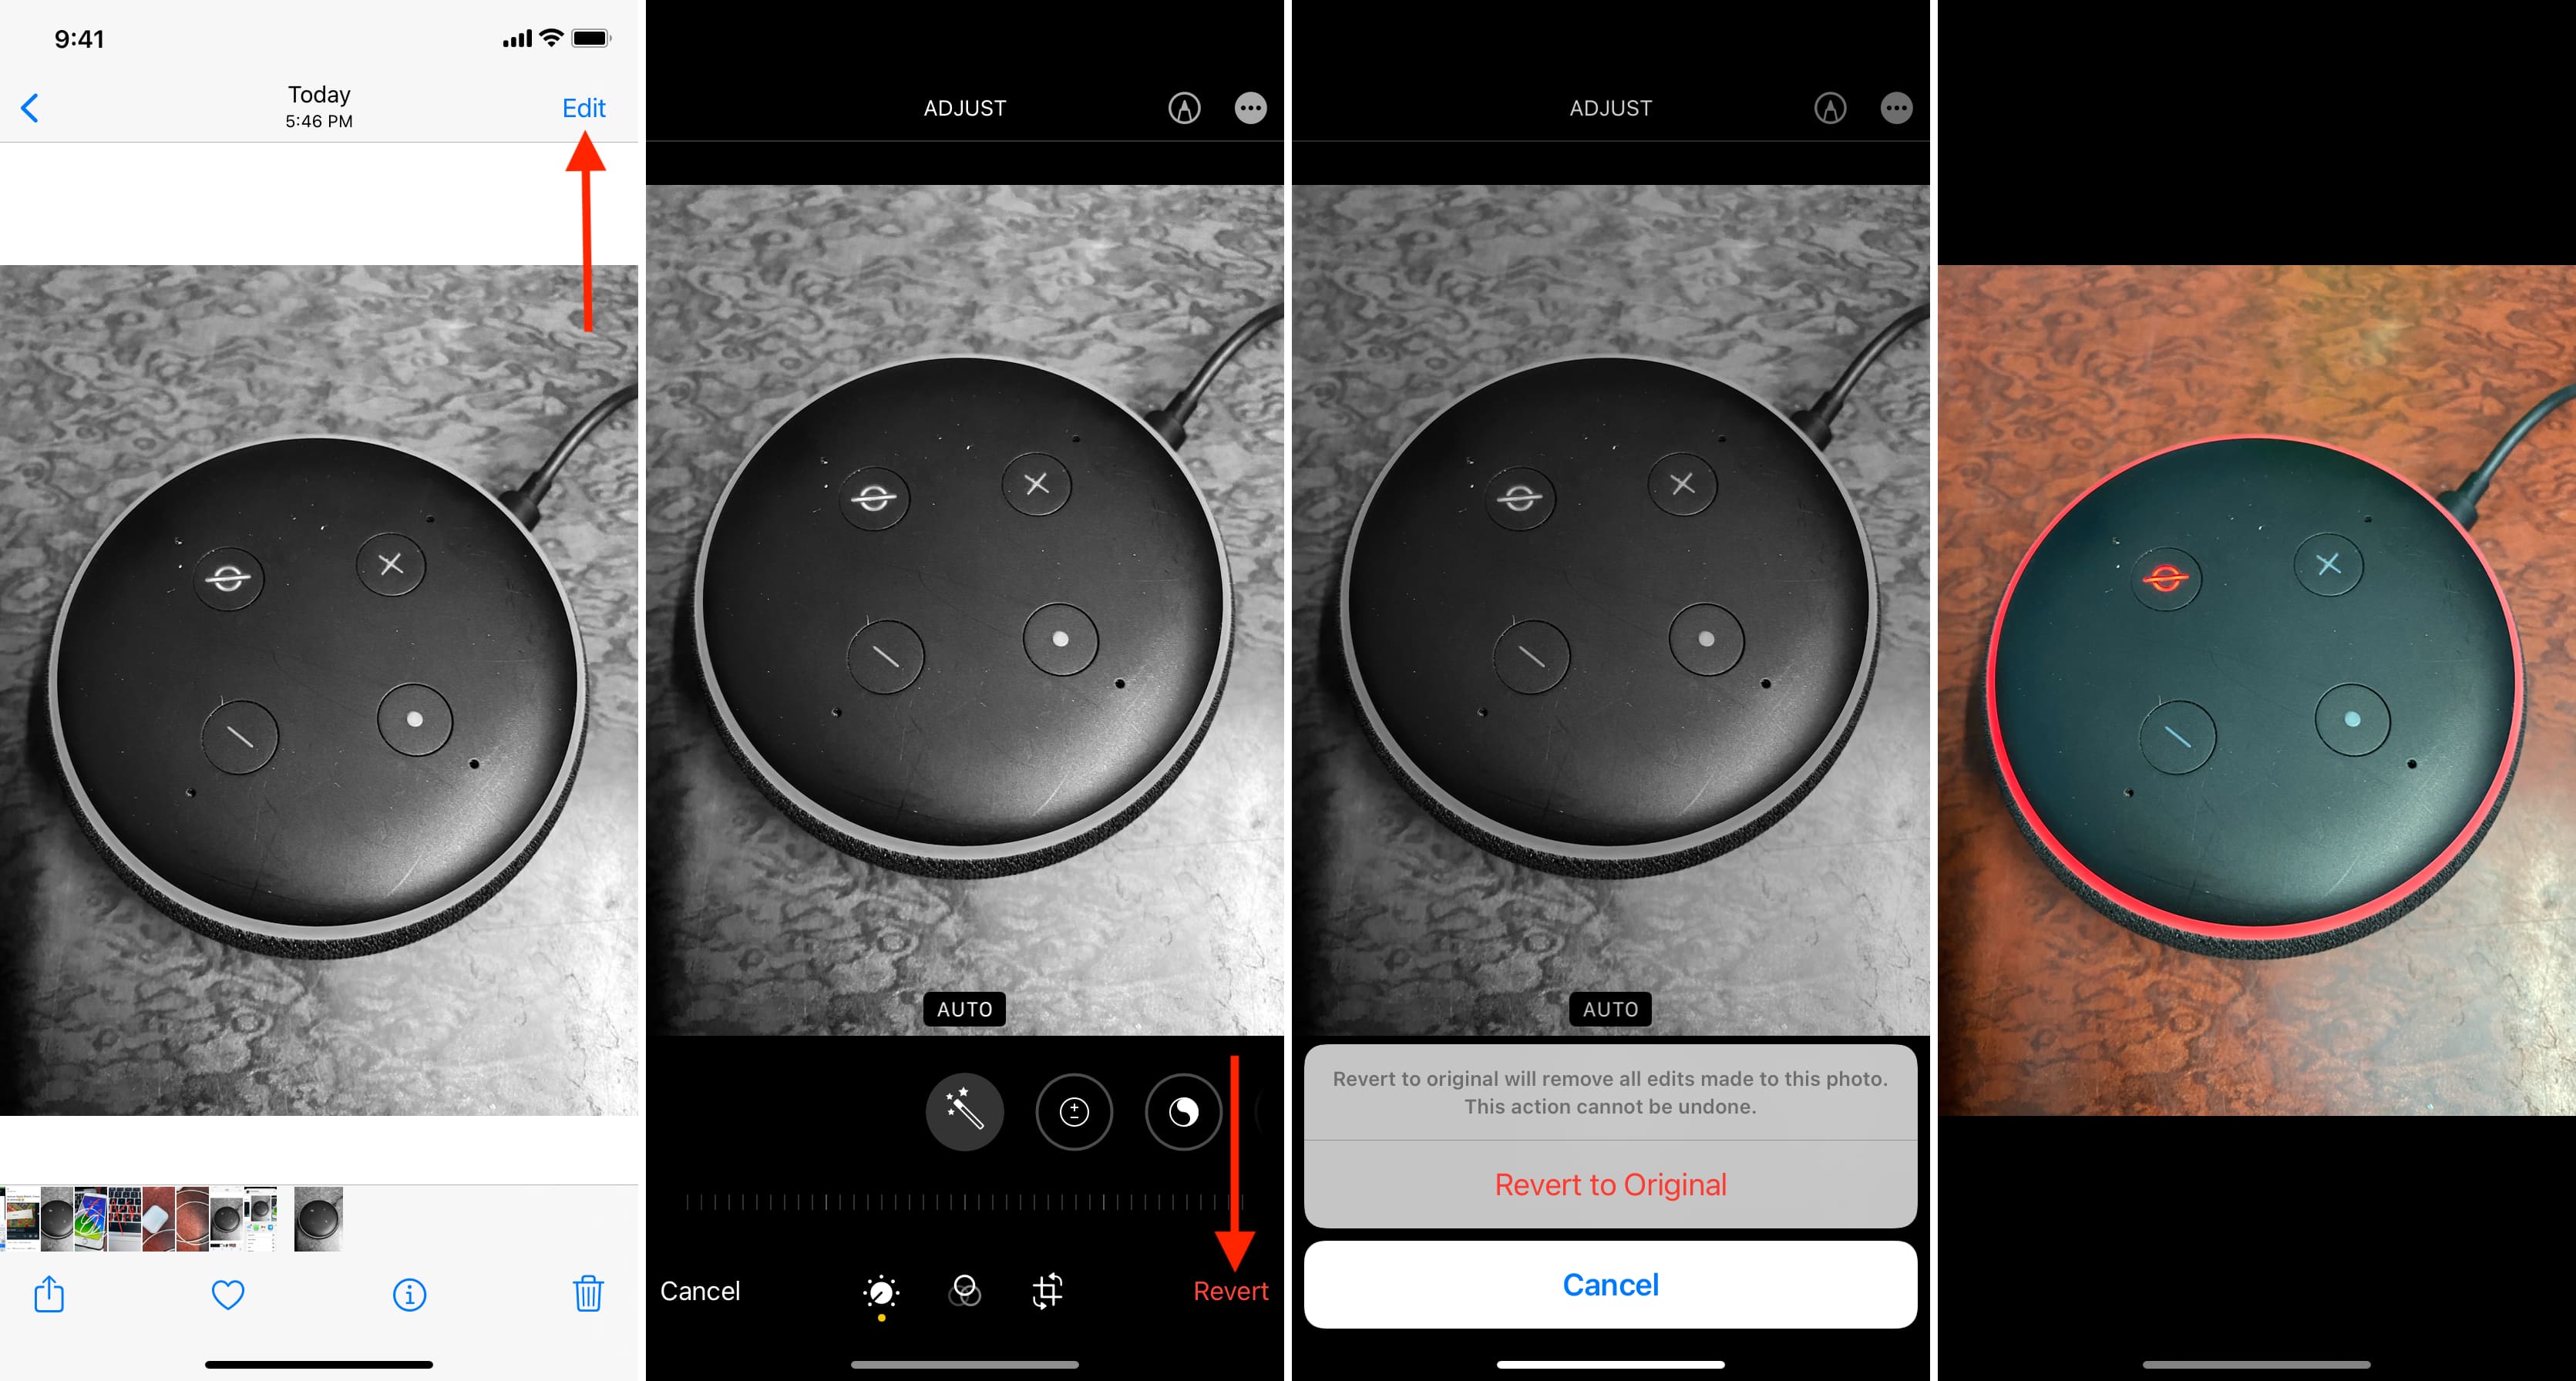
Reversing Edits through the “Revert to Original” Option
One of the most convenient ways to revert an edited photo to its original state is by utilizing the “Revert to Original” option in photo editing software. This feature allows you to undo all the modifications made to the image and restore it to its initial condition with just a few clicks.
When you open your photo editing software, look for the “Revert to Original” option. It is often located in the “Edit” or “Image” menu. Alternatively, you might find it by right-clicking on the photo and selecting the appropriate option from the context menu.
Once you have found the “Revert to Original” option, select it, and the software will automatically remove all the applied edits, filters, and adjustments from the photo. This process usually happens instantaneously, bringing the image back to its original appearance.
It is essential to note that the availability and functionality of the “Revert to Original” option may differ across various photo editing software. Some programs may offer a dedicated button or keyboard shortcut for quick access to this feature.
Before using the “Revert to Original” option, make sure to save your edited photo as a separate copy. This will allow you to preserve the modified version while reverting to the original. Additionally, saving a backup of your edited photo ensures that you can always retrieve it, even if you accidentally overwrite the original file.
By using the “Revert to Original” option, you can effortlessly remove any effects, adjustments, or alterations applied to your edited photo. This feature is particularly useful when you want to start fresh or discard changes that did not turn out as expected.
Remember to explore your photo editing software’s documentation or seek online tutorials for specific instructions on how to use the “Revert to Original” option. Different software may have slight variations in terms of the location or functionality of this feature.
Utilizing the “Reset” or “Default” Function in Photo Editing Tools
When it comes to editing photos, using professional photo editing software offers a plethora of options to enhance and modify images. However, sometimes you may find yourself wanting to revert an edited photo back to its original version. One convenient way to achieve this is by utilizing the “Reset” or “Default” function in photo editing tools.
The “Reset” or “Default” function is a powerful tool found in many photo editing software programs. It allows you to easily undo all the edits made to an image and revert it back to its original state with just a few clicks. Whether you made extensive enhancements, adjustments to colors and exposure, or applied various effects and filters, the reset function can save you time and effort in returning the photo to its initial appearance.
To utilize the “Reset” or “Default” function, open the edited photo in your chosen photo editing software. Look for the relevant option, which is often located in the Edit, Image, or Settings menu. The exact location may vary depending on the software you are using, but it is typically easy to find.
Once you have located the “Reset” or “Default” function, click on it to activate the process. In most scenarios, a dialog box or confirmation prompt will appear to ensure you want to proceed with the reset. Confirm your decision, and the software will apply the necessary adjustments to revert the photo to its original form.
It is important to note that using the “Reset” or “Default” function will undo all the changes made to the photo, including cropping, resizing, and any added text or graphics. Therefore, it is recommended to make a backup or save a copy of the edited version before proceeding with the reset, especially if you want to preserve any changes separately.
This function can be particularly useful when you want to compare the edited version with the original, or when you simply prefer the original look of the photo. By utilizing the “Reset” or “Default” function, you can quickly and effortlessly revert an edited photo back to its original state without the need for manual adjustments.
Next time you find yourself needing to revert an edited photo, remember the convenience of the “Reset” or “Default” function in photo editing tools. It’s a simple yet powerful feature that can save you time and enable you to effortlessly restore your photo to its original form.
Restoring Original Image from Backup or File Version History
Accidents happen, and sometimes we make irreversible edits to our photos without realizing it. In such cases, restoring the original image becomes essential. One reliable method to achieve this is by leveraging backups or accessing file version history.
If you are diligent about creating backups of your files, you can easily revert an edited photo to its original form. Simply locate the backup file you created before making any changes and restore it. This will override the edited version and bring back the original image. It’s crucial to have a backup system in place to safeguard your important files.
Another pathway to restoring the original image is by utilizing the file version history feature. This feature is available in various operating systems and cloud storage platforms. It allows you to access previous versions of a file and revert it to an earlier state.
If you’re using a computer with Windows, you can right-click on the edited photo file, select “Properties,” and then choose the “Previous Versions” tab. From there, you can view and restore previous versions of the file, including the original image.
Users of macOS can make use of the Time Machine feature, which creates regular backups of files. By entering the Time Machine interface, you can navigate to the edited photo, select a previous version, and restore it as the current version, effectively bringing back the original image.
Cloud storage platforms such as Google Drive and Dropbox also offer file version history. By accessing the web interface of these platforms, you can locate the edited photo, right-click on it, and choose the “Version History” or “Previous Versions” option. From there, you can select a previous version and restore it, reverting the photo to its original state.
It’s important to note that restoring the original image from backup or file version history may result in the loss of any edits or changes you made after the backup was created. Make sure to carefully consider whether these changes are worth sacrificing before proceeding with the restoration process.
Conclusion
Editing photos has become a common practice in today’s digital age. Whether you want to enhance the colors, adjust the lighting, or remove unwanted objects, photo editing tools make it easy to transform your images. However, there may come a time when you want to revert an edited photo to its original state.
In this article, we have explored various methods to help you revert an edited photo back to its original version. From using the “Undo” feature in your editing software to recovering the original image from a backup, these techniques can come in handy if you ever accidentally make a mistake or simply want to return to the photo’s initial look.
Remember, the key is to be cautious when editing your photos and to keep backups of the original files whenever possible. By following these steps and techniques, you can confidently navigate the world of photo editing and easily revert any changes made along the way.
Reverting an edited photo to its original state is a valuable skill for photographers and hobbyists alike. So the next time you find yourself needing to undo edits, refer back to this guide to help you through the process.
FAQs
1. Can I revert an edited photo back to its original version?
Yes, you can revert an edited photo back to its original version. Most photo editing software or apps have an option to undo or revert changes made to an image. Look for the “Undo” or “Revert to Original” function in the application you are using to edit the photo. It will allow you to step back through the editing process and restore the original version.
2. Will reverting a photo to its original version remove all the edits I made?
Yes, reverting a photo to its original version will remove all the edits you made. When you choose to revert a photo, it means you want to go back to the initial state of the image before any modifications were applied. This action will discard all the changes and filters you have added during the editing process.
3. What are the steps to revert an edited photo to its original?
The steps to revert an edited photo to its original version may vary depending on the software or app you are using. However, here is a general guideline:
- Open the photo editing software or app where you made the edits.
- Locate the “Undo” or “Revert to Original” function. It is typically found under the Edit or History menu.
- Select the option to undo or revert the changes.
- Confirm the action when prompted.
- The photo will now be reverted back to its original version.
4. Can I revert a photo to its original version on my mobile phone?
Yes, you can revert a photo to its original version on your mobile phone. Many photo editing apps available on mobile devices offer an undo or revert option. Open the app, find the editing history or settings, and look for the option to undo changes or revert the photo to its original state. Follow the prompts or instructions provided by the app to complete the reversion.
5. Is it possible to revert a photo back to its original if I closed the editing app without saving?
If you closed the editing app without saving the changes you made to a photo, it might not be possible to revert it back to the original version. Most apps only save the changes when you explicitly save the edited image. However, you could check if there is an option in the app to recover unsaved changes. Some apps have a temporary auto-save feature that allows you to retrieve unsaved edits. If such an option is not available, unfortunately, the edits may be lost and cannot be reverted.