
In this digital age, smartphones have become an essential part of our everyday lives. With their advanced features and capabilities, mobile phones connect us to the world like never before. But did you know that your iPhone can also help you stay connected with your family members? Apple’s Family Sharing feature allows you to share purchases, subscriptions, and even location information with your loved ones. Whether you want to share an app, a music subscription, or simply keep track of each other’s whereabouts, Family Sharing is the perfect solution.
In this article, we will guide you through the process of sending and accepting Family Sharing invitations on your iPhone. Whether you’re new to Family Sharing or simply need a refresher, our step-by-step instructions will make it easy for you to set up this valuable feature on your device. Stay connected with your loved ones and make the most of your iPhone’s capabilities by utilizing Family Sharing. Let’s get started!
Inside This Article
- Overview of Family Sharing on iPhone
- How to Send Family Sharing Invitations
- How to Accept Family Sharing Invitations
- Troubleshooting Family Sharing Invitations on iPhone
- Conclusion
- FAQs
Overview of Family Sharing on iPhone
Family Sharing is a powerful feature on the iPhone that allows you to share your purchases, subscriptions, and iCloud storage with up to six family members, making it easier to manage and enjoy content as a family. Introduced by Apple, Family Sharing ensures that everyone in your family has access to the same apps, music, movies, TV shows, books, and more without the need to purchase multiple copies.
With Family Sharing, you can create a secure and private network within your family, where you can easily share content and coordinate family activities. Not only does it simplify sharing, but it also allows you to keep track of your family members’ locations, helping you stay connected and ensuring their safety.
One of the most significant advantages of Family Sharing is the ability to control and manage purchases made by family members, especially when it comes to younger users. Parents can set up “Ask to Buy” which requires their approval before their child can make a purchase, providing an additional layer of security and control.
Family Sharing also extends beyond purchases and content sharing. It allows the sharing of calendars, location information, and even updates on app usage. This makes it easier for families to stay organized, plan events, and keep track of each other’s activities.
Furthermore, Family Sharing enables the use of iCloud Family Sharing, which allows your family members to share an iCloud storage plan, helping you save money by eliminating the need for multiple subscriptions. This is especially beneficial when it comes to storing and backing up important files, photos, and videos.
How to Send Family Sharing Invitations
Sending Family Sharing invitations on your iPhone is a straightforward process that allows you to share content and services with your family members seamlessly. Whether it’s sharing app purchases, Apple Music subscriptions, or iCloud storage, Family Sharing is a convenient feature to keep your family connected and organized.
Here’s how you can send Family Sharing invitations:
- Start by opening the Settings app on your iPhone.
- Scroll down and tap on your Apple ID at the top of the screen.
- In the Apple ID menu, select “Family Sharing”.
- Tap on “Add Family Member” or “Invite Someone to Join Family”.
- You’ll have the option to send an invitation via iMessage, Mail, or in-person.
- If you choose to send the invitation via iMessage or Mail, enter the contact details of the person you want to invite and tap “Send”.
- If you prefer to invite someone in-person, tap “Invite in Person” and hold their device near yours to establish a connection using the proximity sensor.
Once you’ve sent the Family Sharing invitation, the recipient will receive a notification to join your Family Sharing group. They can accept the invitation directly from the notification or via the “Family Sharing” settings.
It’s important to note that the person being invited to the Family Sharing group needs to have their own Apple ID. If they don’t have one, they’ll need to create an Apple ID before they can accept the invitation.
Family Sharing on iPhone is a powerful tool that not only allows you to share content and services with your family but also enables you to manage and control their access. With Family Sharing, you can set up parental controls, monitor and limit spending, and control app and content purchases within the family group.
By following these simple steps, you can send Family Sharing invitations to your loved ones and enjoy the benefits of shared content and services on your iPhone.
How to Accept Family Sharing Invitations
Accepting family sharing invitations on your iPhone is a simple process that allows you to join a shared family plan and access the benefits of shared purchases and subscriptions. Whether you’re joining a family plan with your loved ones or being invited to join someone else’s family, here’s a step-by-step guide on how to accept family sharing invitations on your iPhone.
Step 1: Open the “Settings” app
Begin by opening the “Settings” app on your iPhone. It is represented by a gray gear icon and can usually be found on your home screen.
Step 2: Tap on your Apple ID
Scroll down the Settings menu until you see your Apple ID. Tap on it to access your account settings.
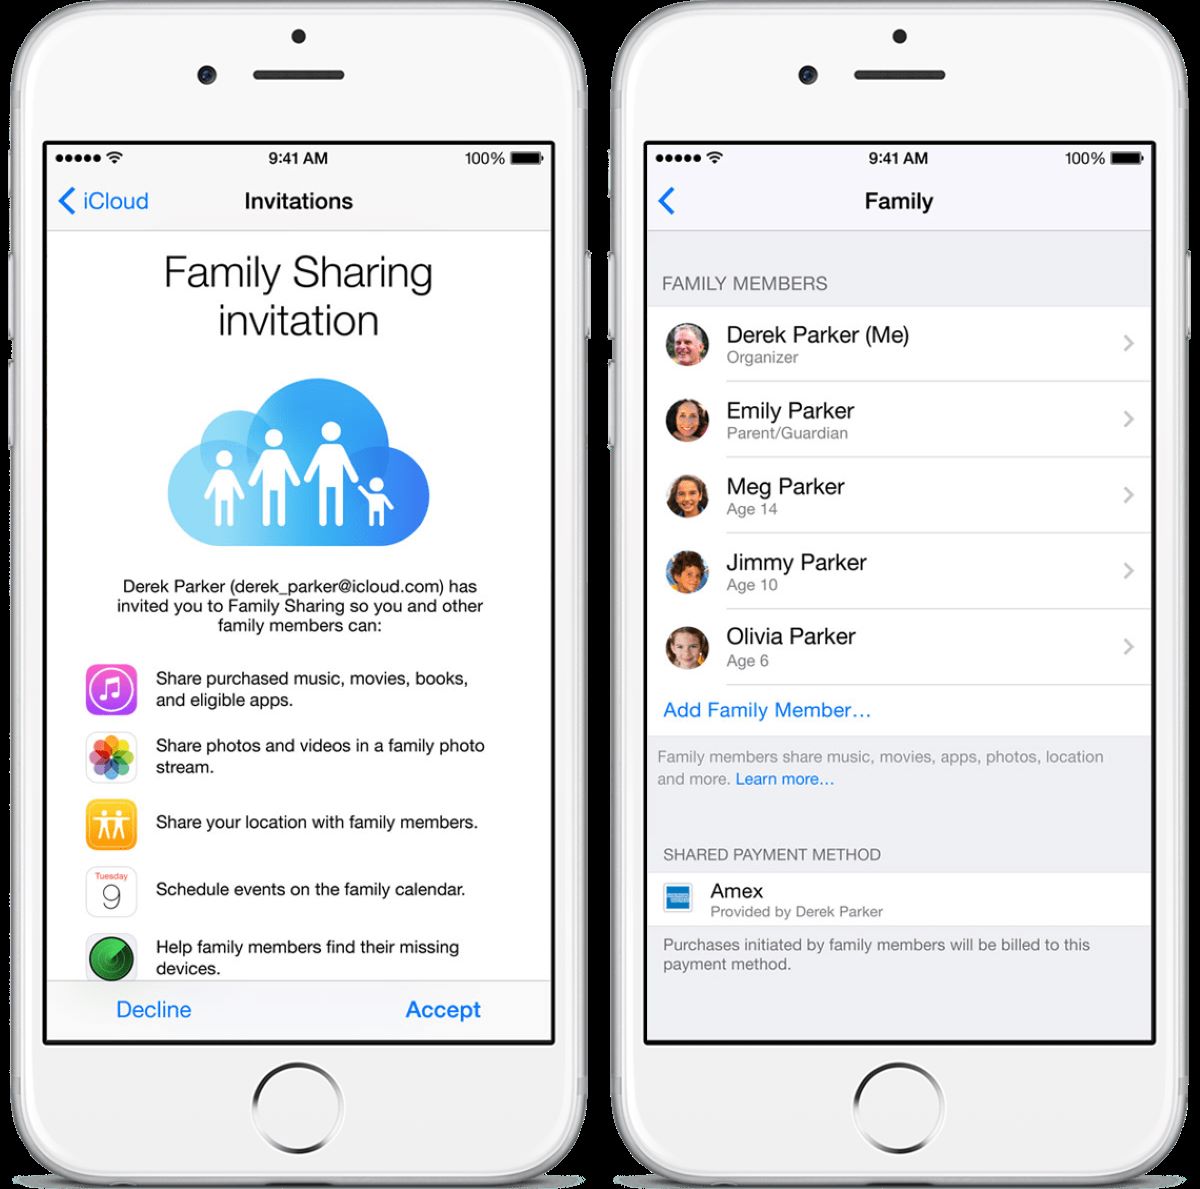
Step 3: Tap on “Invitations”
Once you’re in your Apple ID settings, look for the “Invitations” option and tap on it. This will take you to a page where you can view all the family sharing invitations you’ve received.
Step 4: Accept the invitation
In the Invitations menu, you will see a list of all the pending family sharing invitations. Tap on the invitation you want to accept.
Step 5: Confirm your acceptance
After selecting the invitation, you will be taken to a screen that provides more details about the family plan and the organizer. Review the information and tap “Accept” to confirm your acceptance.
Step 6: Set up family sharing options
Once you’ve accepted the invitation, you will be prompted to set up your family sharing options. You can choose to share your location, share purchases, and manage other aspects of the family plan. Customize these settings according to your preferences.
Step 7: Enjoy family sharing benefits
Once you’ve completed the setup process, you are now part of the family sharing plan. You can now enjoy the benefits of shared purchases, subscriptions, and other family sharing features on your iPhone.
Remember, accepting a family sharing invitation may require you to authorize your payment information if you haven’t done so already. This ensures that future purchases made by family members can be billed accordingly.
By following these simple steps, you can accept family sharing invitations seamlessly on your iPhone and enjoy the convenience and cost-saving benefits of shared services and purchases with your loved ones.
Troubleshooting Family Sharing Invitations on iPhone
Family Sharing on iPhone is a convenient feature that allows you to share purchases, subscriptions, and other content with your family members. However, sometimes you may encounter issues while sending or accepting family sharing invitations. In this guide, we will explore some common troubleshooting steps to help you resolve any problems you may encounter.
1. Ensure iCloud is properly set up: Family Sharing relies on iCloud to function properly. It’s important to ensure that your iCloud account is set up correctly on your iPhone. Go to Settings > [Your Name] > Family Sharing and check if your account is listed as the Organizer. If not, sign in with your iCloud account and make sure it’s selected as the Organizer account.
2. Check your internet connection: A stable and reliable internet connection is essential for Family Sharing to work smoothly. Make sure you are connected to Wi-Fi or have a strong cellular data signal. If you’re experiencing connectivity issues, try restarting your iPhone or disconnecting and reconnecting to your Wi-Fi network.
3. Verify the email addresses of family members: When sending family sharing invitations, ensure that you enter the correct email addresses of your family members. Double-check for any typos or misspellings. Also, make sure that the email addresses are associated with Apple IDs. You can use the “Invite via iMessage” option to send invitations directly to their iMessage accounts.
4. Check for pending invitations: If you’re having trouble accepting family sharing invitations, make sure to check for any pending invitations in your inbox. Sometimes invitations can end up in the spam or junk folders, so be sure to check those as well. If you can’t find the invitation, you can ask the organizer to resend it or send it again manually.
5. Update your iPhone and iOS: Keeping your iPhone and iOS up to date is crucial for optimal performance and compatibility with Family Sharing. Make sure that your device is running the latest version of iOS. To check for updates, go to Settings > General > Software Update, and if an update is available, follow the prompts to install it.
6. Reset Family Sharing settings: If you’re still encountering issues with Family Sharing invitations, you can try resetting the Family Sharing settings on your iPhone. Go to Settings > [Your Name] > Family Sharing, and tap on “Stop Sharing” to disable Family Sharing. Then, set it up again by tapping on “Set Up Family Sharing” and follow the on-screen instructions.
7. Contact Apple Support: If you’ve exhausted all troubleshooting steps and are still experiencing problems with Family Sharing invitations, it’s best to reach out to Apple Support for further assistance. They will be able to provide you with specific guidance tailored to your situation and help resolve any technical issues you may be facing.
By following these troubleshooting steps, you should be able to resolve any issues related to sending or accepting Family Sharing invitations on your iPhone. Family Sharing is a powerful feature that brings your family closer by allowing you to share content seamlessly. Enjoy the benefits of Family Sharing and simplify your digital life with ease!
Conclusion
In conclusion, sending and accepting Family Sharing invitations on your iPhone is a simple and convenient way to share content and enjoy the benefits of a connected family ecosystem. By following the step-by-step guide outlined in this article, you can easily invite family members to join your Family Sharing group and start sharing purchases, Apple Music subscriptions, and more.
Remember to keep your iPhone and Family Sharing settings up to date to ensure a smooth and seamless experience. If you encounter any issues or have any questions, refer back to this article or consult Apple Support for further assistance.
Embrace the power of Family Sharing to create a cohesive digital experience for your loved ones. Share unforgettable moments, discover new content together, and make the most out of your Apple devices. Start inviting your family members today and embark on a journey of shared enjoyment and connectivity!
FAQs
1. How do I send a Family Sharing invitation on my iPhone?
To send a Family Sharing invitation on your iPhone, follow these steps:
- Open the Settings app on your iPhone.
- Tap on your Apple ID, located at the top of the Settings menu.
- Tap on “Family Sharing” from the list of options.
- Select “Add Family Member” or “Invite in Person” (if they are nearby).
- Choose the method you prefer to send the invitation, such as via iMessage, email, or directly in person.
- If prompted, enter the Apple ID or contact details of the person you want to invite.
- Follow the remaining prompts to complete the invitation process.
2. How can I accept a Family Sharing invitation on my iPhone?
Accepting a Family Sharing invitation on your iPhone is straightforward. Just follow these steps:
- Open the Messages app or the Mail app on your iPhone, depending on how the invitation was sent to you.
- Find the invitation message or email and tap on it.
- Tap on the “Accept” button to join the Family Sharing group.
- Follow any additional prompts to set up Family Sharing features and preferences.
3. Can I remove someone from my Family Sharing group on the iPhone?
Yes, you can easily remove someone from your Family Sharing group on your iPhone. Here’s how:
- Open the Settings app on your iPhone.
- Tap on your Apple ID at the top of the Settings menu.
- Tap on “Family Sharing.”
- Select the person you want to remove from the list of family members.
- Tap on “Remove” to confirm your decision.
- If you’re the organizer, you can also choose to remove someone by tapping on their name on the “Family” page and then selecting “Remove.” You may need to enter your Apple ID password to authorize the removal.
4. Are there any limits on the number of people I can add to Family Sharing on my iPhone?
Yes, there are limits on the number of people you can add to Family Sharing on your iPhone. A maximum of six family members can participate in Family Sharing, including the organizer. This limit ensures that the sharing features and benefits are effectively managed and properly shared among family members.
5. Can I customize what I share with my family members on Family Sharing?
Absolutely! The Family Sharing feature on your iPhone allows you to customize what you share with your family members. You can choose to share purchases from the App Store, iTunes Store, and Apple Books, as well as subscriptions, iCloud storage, Apple Music, and more. Additionally, you can set up screen time limits and parental controls for younger family members. This level of customization ensures that each family member enjoys the benefits of Family Sharing while maintaining individual preferences and privacy.