
Are you concerned about your child’s device usage or want to create boundaries for communication on your iPhone or iPad? Look no further! In this article, we will guide you through the steps to set up communication limits on your Apple devices.
With advancements in technology, it has become crucial to strike a balance between staying connected and managing screen time. By setting up communication limits, you can ensure a healthy digital lifestyle for yourself or your children.
Whether you want to restrict certain contacts, limit texting or calling during specific hours, or prevent unauthorized internet communication, we will walk you through the process to set up communication limits that meet your needs.
So, if you’re ready to take control of your iPhone or iPad and establish healthy communication habits, let’s explore the steps to set up communication limits together.
Inside This Article
- Enabling Communication Limits
- Managing Contacts
- Setting Time Limits for Communication
- Configuring Allowed Communication Options
- Conclusion
- FAQs
Enabling Communication Limits
One of the most important features of modern smartphones is the ability to stay connected with friends, family, and colleagues. However, it’s also important to establish limits and ensure a healthy balance between your digital life and real-world interactions. With the iPhone and iPad, you can easily set up communication limits to manage how and when you can communicate with others.
To enable communication limits on your iPhone or iPad, follow these simple steps:
- Open the Settings app on your device.
- Scroll down and tap on “Screen Time”.
- Tap on “Communication Limits” from the list of options.
- Toggle on the “Communication Limits” switch.
By enabling communication limits, you gain better control over who you can communicate with and when. It allows you to set restrictions on incoming and outgoing communications, ensuring a more balanced digital lifestyle.
Managing Contacts
When it comes to managing contacts on your iPhone or iPad, there are a few handy features at your disposal. These features allow you to control who your device can communicate with, ensuring a safe and secure experience. Here are some ways you can manage your contacts:
Add Contacts
To add a contact to your device, simply open the Contacts app and tap on the “+” button. From there, you can enter the contact’s name, phone number, email address, and any other relevant details. Once you’ve added a contact, you can easily access their information whenever you need it.
Edit Contacts
If you need to update or modify a contact’s information, you can do so in just a few steps. Open the Contacts app, find the contact you want to edit, and tap on their name. From there, you can make changes to their phone number, email address, or any other details. The updated information will be saved automatically.
Delete Contacts
If you no longer need a contact on your device, you can delete them from your Contacts app. Simply locate the contact, tap on their name, and scroll down to the bottom of the screen. There, you’ll find the option to delete the contact. Confirm the deletion, and the contact will be removed from your device.
Create Contact Groups
If you want to organize your contacts into specific groups, you can create contact groups on your iPhone or iPad. This allows you to categorize your contacts based on shared characteristics, such as family, friends, or work. To create a contact group, open the Contacts app, tap on the “Groups” button, and select “New Group.” Give the group a name and start adding contacts to it.
Block Contacts
In certain cases, you may want to block a contact from contacting you on your iPhone or iPad. To do this, open the Contacts app, find the contact you want to block, and tap on their name. Scroll down to the bottom of the screen, and you’ll see the option to block the contact. Once blocked, they won’t be able to call, message, or FaceTime you.
By effectively managing your contacts, you can ensure that your communication on your iPhone or iPad stays under control. Whether it’s adding new contacts, editing existing ones, or blocking unwanted ones, these features give you the power to maintain a safe and secure communication experience.
Setting Time Limits for Communication
Setting time limits for communication on your iPhone or iPad can be a great way to manage and control the amount of time you and your family spend using your devices. By implementing these limits, you can strike a balance between staying connected and minimizing distractions. Here’s how you can set time limits for communication:
1. Open the “Settings” app on your iPhone or iPad.
2. Scroll down and tap on “Screen Time”.
3. If you haven’t already set up Screen Time, you will be prompted to do so. Follow the on-screen instructions to enable it.
4. Once in the Screen Time menu, tap on “Communication Limits”.
5. You will see options to “Set Limits for Today” and “Customize Days”. Choose the option that suits your needs.
6. Select the device you want to set communication limits for if you have multiple devices connected to the same Apple ID.
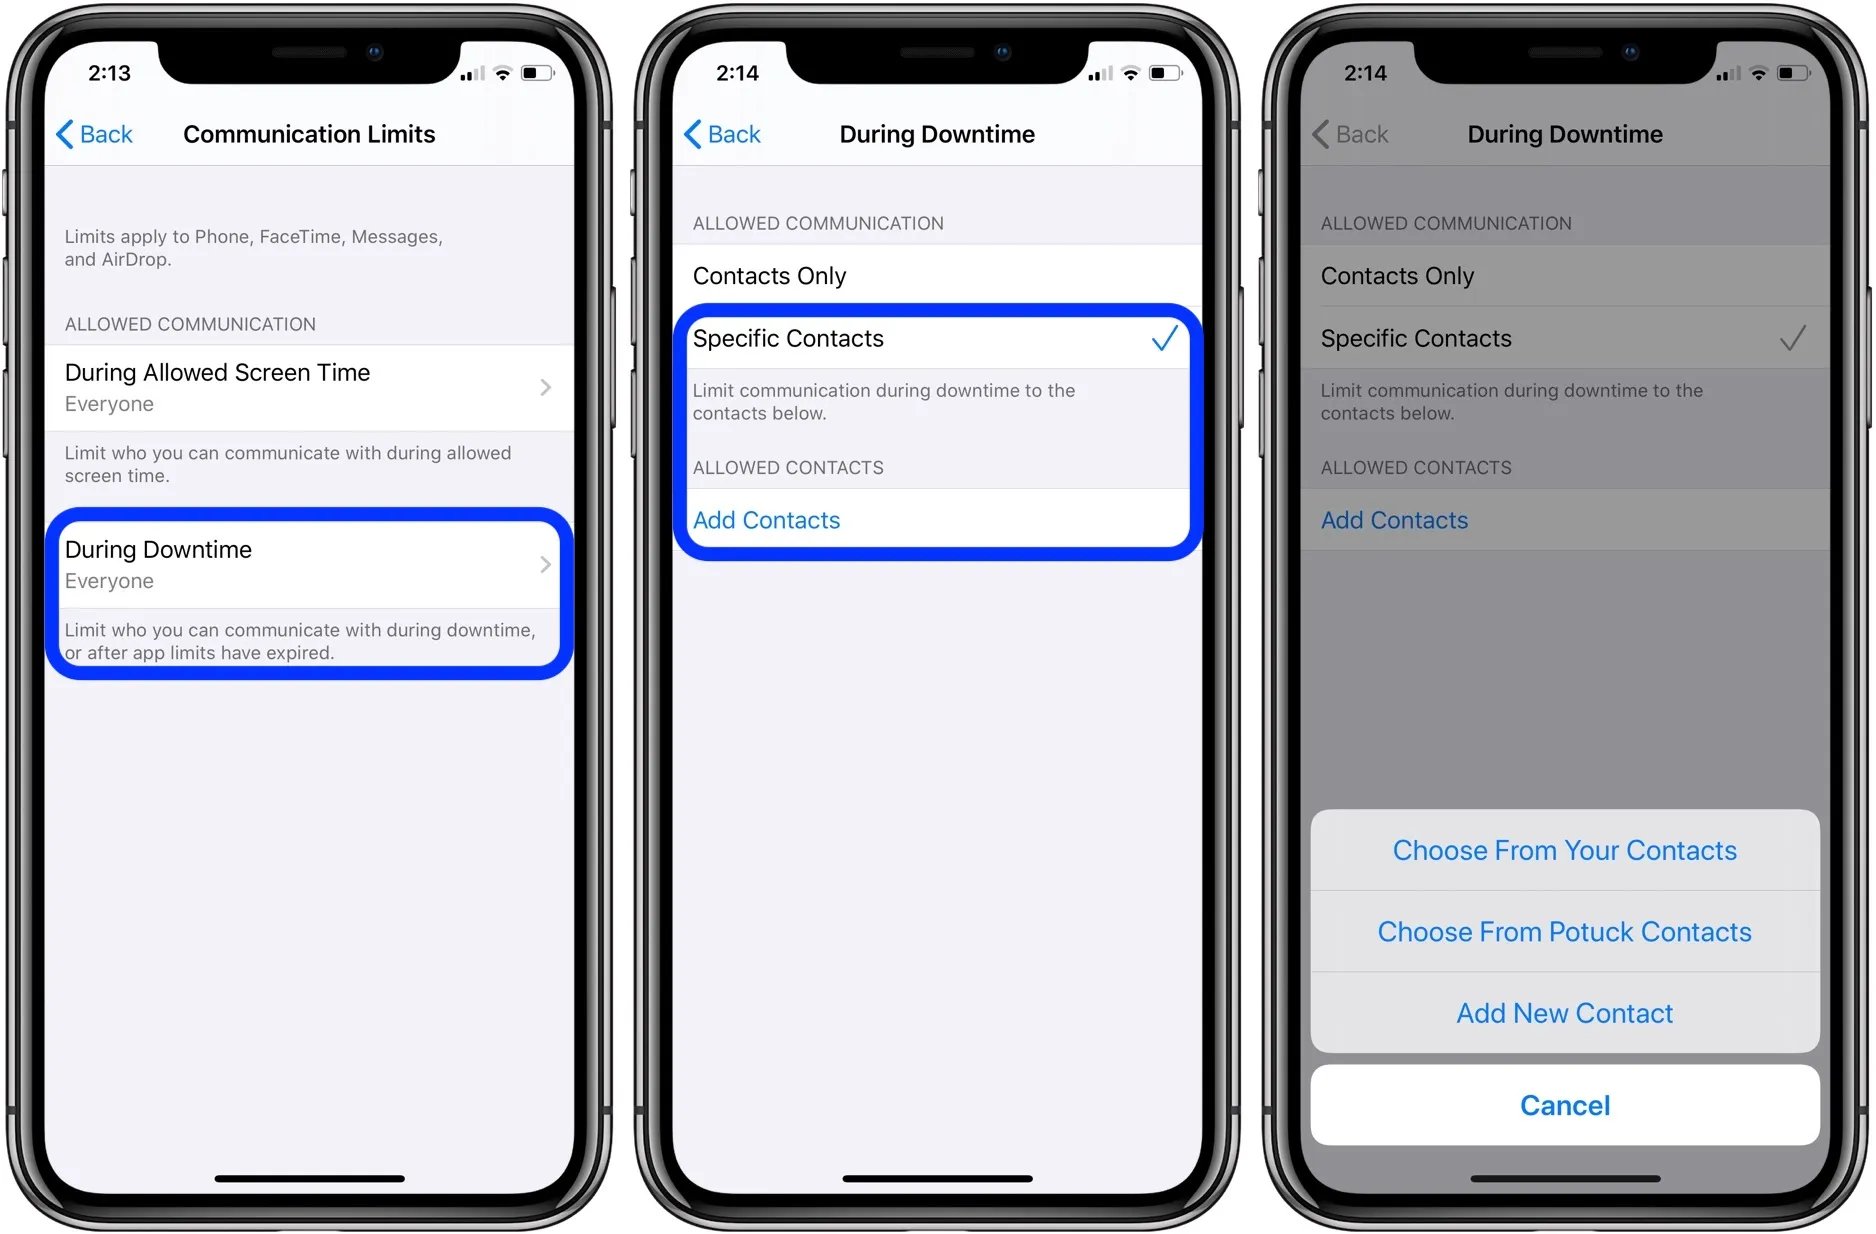
7. Next, you can choose to limit communication with everyone, contacts only, or specific groups of contacts. Tap on the desired option.
8. If you selected “Contacts Only”, you can manage the contacts by tapping on “Manage Contacts”. From here, you can allow or block specific contacts from communicating with you during the designated time limits.
9. After selecting the contacts, go back to the previous screen and set the time limits by dragging the sliders for weekdays and weekends.
10. Once you have set the time limits, tap on “Back” to save the changes.
By setting time limits for communication, you can ensure that you and your family have designated periods of uninterrupted time for work, study, or simply enjoying quality time together.
It’s important to note that emergency calls to 911 and approved contacts will always be allowed, regardless of the communication limits you have set.
Configuring Allowed Communication Options
When setting up communication limits on your iPhone or iPad, it’s important to have control over the specific communication options that are allowed. This ensures that you can tailor the device usage to fit your needs, whether it’s for yourself or for a family member. Here’s how you can configure allowed communication options:
1. Messages: By default, messages are allowed on your device. However, you can choose to limit it to specific contacts or completely disable it. This gives you the freedom to allow communication only with close friends and family members, or to restrict it entirely.
2. Phone Calls: Similar to messages, phone calls can be limited to specific contacts or turned off altogether. This can be useful if you want to ensure that only important calls are allowed, or if you want to restrict phone usage during certain times of the day.
3. FaceTime: FaceTime is a popular video calling feature that allows you to connect with others visually. You can choose to allow FaceTime calls to everyone, limit it to specific contacts, or disable it completely. This gives you control over who can initiate video calls with your device.
4. Siri: Siri, the virtual assistant on iPhone and iPad, can also be configured as per your preferences. You can choose to allow Siri to access certain apps, or disable Siri altogether if you want to restrict the device’s capabilities.
5. AirDrop: AirDrop allows you to share files wirelessly with other Apple devices. You can choose to allow AirDrop to everyone, limit it to contacts only, or disable it completely if you want to restrict file sharing on your device.
6. CarPlay: If your iPhone is connected to a CarPlay system, you can configure its settings too. You can choose to limit CarPlay to certain contacts or disable it entirely to prevent distractions while driving.
7. Safari: Safari is the default web browser on iPhone and iPad. You can restrict access to specific websites or enable content blocks to promote a safe and controlled browsing experience.
By configuring these allowed communication options, you can customize your device’s usage and ensure a safer and more controlled digital environment. Remember, these settings can be adjusted at any time, giving you the flexibility to adapt to changing needs and circumstances.
The ability to set up communication limits on your iPhone and iPad is a valuable feature that can help you maintain control over your device usage and ensure a safer and more balanced digital experience. By implementing communication limits, you can protect yourself or your loved ones from unwanted or excessive phone calls, messages, and app usage.
With the use of Screen Time settings and restrictions, you can easily customize who can contact you during certain times of the day or restrict communication with specific contacts altogether. This feature is particularly beneficial for parents who want to manage their children’s access to communication and prevent potential distractions.
By following the steps outlined in this guide, you can take charge of your device’s communication capabilities, prioritize your digital well-being, and create a healthier relationship with your phone. Utilize these features to strike a balance between staying connected and maintaining a productive and focused lifestyle. With communication limits in place, you can embrace the benefits of technology while avoiding its potential drawbacks.
FAQs
Q: Why are communication limits important on iPhones and iPads?
A: Communication limits on iPhones and iPads are important for several reasons. Firstly, they help parents or guardians in monitoring and managing their children’s digital communication, ensuring a safe and secure online experience. Additionally, these limits can help curb excessive device usage and promote a healthy balance between screen time and offline activities.
Q: How can I set up communication limits on my iPhone or iPad?
A: To set up communication limits on your iPhone or iPad, follow these steps:
- Go to the Settings app on your device.
- Scroll down and tap on “Screen Time.”
- Select “Content & Privacy Restrictions.”
- Enable “Content & Privacy Restrictions” if it’s not already turned on.
- Tap on “Communication Limits.”
- You will be prompted to create a Screen Time passcode if you haven’t already done so.
- From here, you can set limits on who your child can communicate with via phone, FaceTime, and Messages.
- Adjust the settings to your preference.
- Tap on “Contacts & System” to manage who your child can communicate with in third-party apps.
- When you’re done, exit the Settings app.
Q: Can I set different communication limits for different apps?
A: Yes, you can set different communication limits for different apps on your iPhone or iPad. Once you have enabled Content & Privacy Restrictions in the Settings app, you can navigate to “Communication Limits” and tap on “Contacts & System.” From there, you can customize the communication permissions for individual third-party apps, allowing or blocking specific contacts.
Q: Are there any restrictions on communication limits for adults?
A: By default, communication limits are primarily designed to protect children or teenagers using iPhones or iPads under the supervision of an adult. However, adults can also choose to enable communication limits on their devices if they wish to have restrictions on certain contacts or apps.
Q: Can I override or modify the communication limits on my iPhone or iPad?
A: Yes, as the device owner, you have the ability to override or modify the communication limits on your iPhone or iPad. You can access the Communication Limits settings in the Screen Time section of the Settings app and make any necessary adjustments. However, it is important to remember that these limits are in place for a reason, especially when managing the digital well-being of children or teenagers.