
Are you looking to share a slideshow on your iPhone? Whether you have captured precious memories from a recent vacation or created a stunning presentation for work, sharing your slideshow with others can be a great way to showcase your creativity and engage your audience. In this article, we will guide you through the process of sharing a slideshow on your iPhone, providing step-by-step instructions to ensure that you can easily share your visual masterpiece with friends, family, or colleagues. From choosing the right app to preparing your slideshow for sharing, we’ve got you covered. So, let’s dive in and discover the various methods to share your slideshow on your iPhone, allowing you to spread your creativity far and wide.
Inside This Article
- An Overview of Slideshow Sharing
- Method 1: Sharing Slideshows via AirDrop
- Method 2: Sharing Slideshows through Messaging Apps
- Method 3: Sharing Slideshows via Cloud Storage Services
- Conclusion
- FAQs
An Overview of Slideshow Sharing
Sharing slideshows on your iPhone is a great way to showcase your photos and videos with friends, family, or colleagues. Whether you want to share memorable moments from a recent vacation, present a project at work, or simply have a fun time reminiscing with loved ones, knowing how to share slideshows on your iPhone can come in handy.
There are multiple methods you can use to share slideshows on your iPhone, depending on your preferences and the platforms available. In this article, we will explore three popular methods: sharing slideshows via AirDrop, sharing slideshows through messaging apps, and sharing slideshows via cloud storage services.
Each method has its advantages and may be more suitable for different situations. By understanding the various options, you can choose the method that best fits your needs and allows for a seamless and convenient slideshow sharing experience on your iPhone. Now, let’s dive into the details of each method!
Method 1: Sharing Slideshows via AirDrop
Sharing slideshows with friends and family has never been easier, thanks to the AirDrop feature on iPhone. AirDrop allows you to wirelessly transfer files, including slideshows, to nearby Apple devices.
To share a slideshow via AirDrop, follow these simple steps:
Step 1: Make sure both your iPhone and the recipient’s device have AirDrop enabled. To do this, swipe up from the bottom of the screen to open the Control Center, then tap on the AirDrop icon. Select “Contacts Only” or “Everyone” depending on whom you want to share the slideshow with.
Step 2: Open the Photos app on your iPhone and navigate to the slideshow you want to share. Tap on the share icon, which looks like a box with an arrow pointing upwards.
Step 3: A list of sharing options will appear. Look for the recipient’s name or device in the AirDrop section. Tap on it to initiate the transfer.
Step 4: Once the transfer is complete, the recipient will receive a notification on their device. They can then open the slideshow in the Photos app or save it to their camera roll.
AirDrop is a quick and convenient way to share slideshows with others, especially if they are in close proximity to you. It eliminates the need for email attachments or third-party file-sharing apps.
So, the next time you capture a memorable moment in a slideshow on your iPhone, use AirDrop to instantly share it with your loved ones.
Method 2: Sharing Slideshows through Messaging Apps
Sharing your slideshows through messaging apps is a convenient way to quickly send them to your friends, family, or colleagues. Here are a few popular messaging apps that you can use to share your slideshows:
1. WhatsApp: With over 2 billion users worldwide, WhatsApp is one of the most widely used messaging apps. To share a slideshow on WhatsApp, simply open the app and select the contact or group you want to share it with. Tap on the attachment icon (usually a paperclip or a “+” sign) and select the slideshow from your phone’s gallery. Finally, hit the send button to share the slideshow.
2. Facebook Messenger: Messenger is another popular messaging app that allows you to share slideshows seamlessly. Open the Messenger app and open a chat with the person or group you want to share the slideshow with. Tap on the “Add Files” or “Attach” icon (usually a paperclip or a “+” sign) and choose the slideshow from your phone’s gallery. Once selected, tap on the send button to share the slideshow.
3. iMessage (iPhone users only): If you and the recipient both have iPhones, you can use the iMessage app to share your slideshows. Open the Messages app, select the contact or group you want to share the slideshow with, and tap on the camera icon located next to the message input field. Choose the slideshow from your phone’s gallery and hit the send button to share it via iMessage.
4. Telegram: Telegram is a feature-rich messaging app that supports file sharing, including slideshows. Open the Telegram app, select the chat you want to share the slideshow with, and tap on the attachment icon. Choose the slideshow from your phone’s gallery, add any captions or notes if needed, and hit the send button to share the slideshow.
5. WeChat (China and Asia-focused): WeChat is a popular messaging app primarily used in China and other Asian countries. To share a slideshow on WeChat, open the app, go to the chat window, and tap on the “+” sign or attachment icon. Select the slideshow from your phone’s gallery and send it to the desired recipient by tapping on the send button.
Remember, the steps to share a slideshow may vary slightly depending on the messaging app and the operating system you’re using. Explore the sharing options within the app to find the most suitable method for sharing your slideshow with others. Enjoy sharing your memorable moments through messaging apps effortlessly!
Method 3: Sharing Slideshows via Cloud Storage Services
Cloud storage services have become increasingly popular for sharing files, including slideshows, due to their convenience and accessibility. These services allow you to upload your slideshow to the cloud, making it available for sharing with others.
Here are the steps to share your slideshow via cloud storage services:
- Select a cloud storage service: There are several popular cloud storage services available, such as Dropbox, Google Drive, and OneDrive. Choose the one that best suits your needs and sign up for an account if you don’t have one already.
- Upload your slideshow: Once you have signed in to your cloud storage account, locate the “Upload” or “Add Files” button and choose your slideshow file from your device’s storage. The file will be uploaded to your cloud storage.
- Generate a sharing link: After the upload is complete, navigate to the uploaded file and select the option to generate a sharing link. This link will be used to grant access to your slideshow.
- Set permissions: Depending on the cloud storage service, you may have the option to set permissions for the sharing link. You can choose to allow viewers to only view the slideshow or enable editing capabilities if collaboration is required.
- Share the link: Once you have generated the sharing link and set the permissions, you can copy the link and share it with your intended audience. You can send the link via email, messaging apps, or any other preferred communication method.
When someone receives the link, they can click on it to access the slideshow directly from the cloud storage service. They can view or edit the slideshow, depending on the permissions you have set. Whenever you make any changes to the slideshow, the updated version will automatically be reflected for all viewers with access to the link.
Sharing slideshows via cloud storage services provides a convenient and efficient way to distribute your presentations. It eliminates the need for large file attachments and ensures everyone can access the latest version of the slideshow. Just remember to review the sharing settings and permissions to maintain control over who can view and edit your slideshows.
Overall, the ability to share slideshows on an iPhone opens up a world of possibilities for sharing memorable moments with friends, family, and colleagues. Whether it’s a collection of vacation photos or a professional presentation, the iPhone provides a convenient and user-friendly platform to showcase your slideshows.
By following the simple steps outlined in this guide, you can easily create and share stunning slideshows on your iPhone. From selecting the ideal app to customizing transitions and effects, you have the tools at your fingertips to create dynamic and engaging slideshows that will captivate your audience.
So, next time you want to share a collection of photos or a captivating presentation, don’t hesitate to explore the slideshow sharing capabilities of your iPhone. With just a few taps, you can showcase your creativity and share your moments with the world!
FAQs
1. Can I share a slideshow on my iPhone?
Yes, you can share a slideshow on your iPhone. The native Photos app on iPhone allows you to create and share slideshows with ease. Simply select the photos you want to include in your slideshow, customize the settings, and then share it with your friends, family, or on social media platforms.
2. How do I create a slideshow on my iPhone?
To create a slideshow on your iPhone, follow these steps:
- Open the Photos app.
- Tap on the “Select” button at the top right corner and choose the photos you want to include in the slideshow.
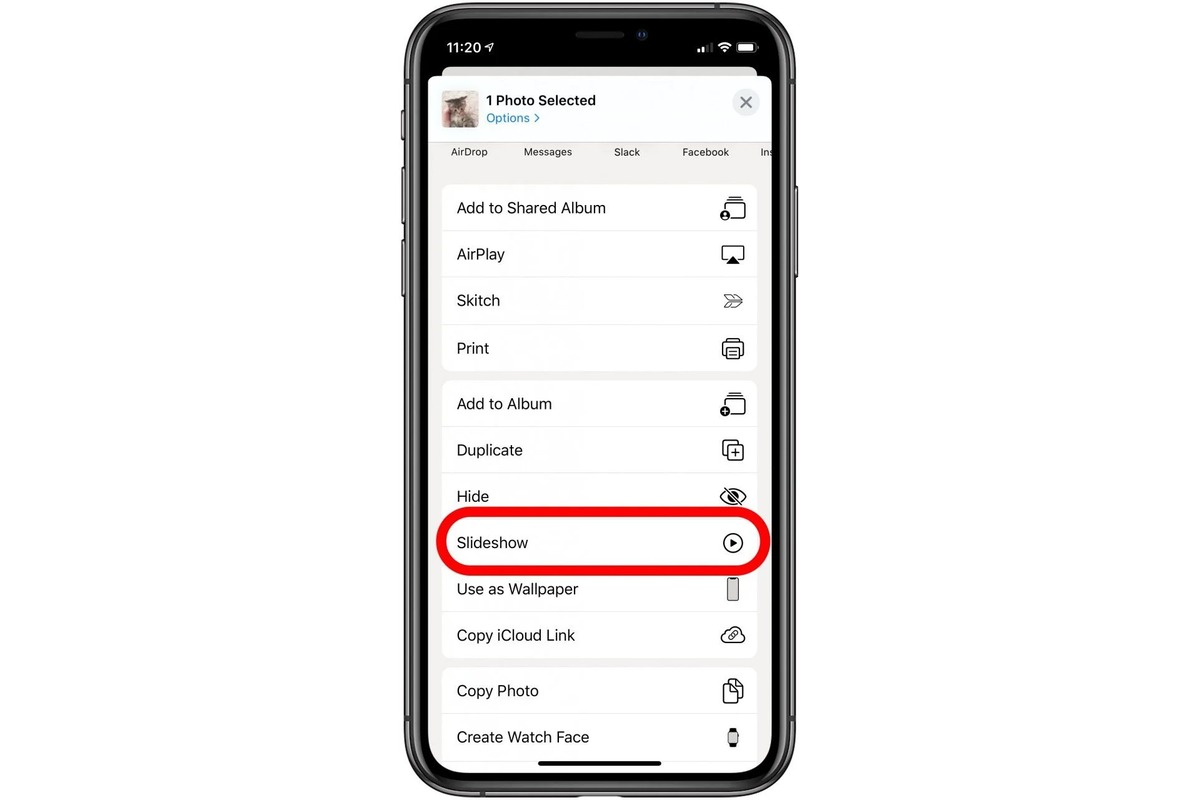
- Tap on the “Share” button at the bottom center.
- Scroll down and select “Slideshow”.
- Customize the slideshow settings, such as theme, music, and duration.
- Tap on “Play Slideshow” to preview and enjoy your creation.
3. Can I add music to my iPhone slideshow?
Yes, you can add music to your iPhone slideshow. When creating a slideshow using the Photos app, you can choose a song from your iPhone’s music library to accompany the slideshow. Simply select the “Music” option when customizing the slideshow settings and pick the desired song. This adds a more dynamic and enjoyable element to your slideshow.
4. How can I share my iPhone slideshow with others?
To share your iPhone slideshow with others, you have several options:
- You can directly send the slideshow via messaging apps like Messages or WhatsApp.
- You can share it on social media platforms like Facebook, Instagram, or TikTok.
- You can save the slideshow as a video and upload it to video-sharing platforms like YouTube or Vimeo.
- You can also share it via email or through cloud storage services like iCloud or Google Drive.
Choose the method that best suits your needs and preferences.
5. Can I edit my iPhone slideshow after creating it?
Unfortunately, once you have created and saved your iPhone slideshow, you cannot edit it directly within the Photos app. However, you can duplicate the slideshow and make necessary changes to the duplicate version. This allows you to experiment with different settings, themes, or music choices without affecting the original slideshow.