
Are you looking for a simple and convenient way to create stunning slideshows on your iPhone? Look no further than the built-in Photos app on your device. With just a few taps, you can transform a collection of photos and videos into a captivating slideshow that you can share with friends and family.
Creating a slideshow in the iPhone Photos app is a great way to showcase your favorite memories, whether it’s a vacation, a birthday party, or a special event. You can customize your slideshow with music, transitions, and even add text and filters for that extra touch of creativity.
In this article, we will guide you step-by-step on how to make a slideshow in the iPhone Photos app. We’ll cover everything from selecting the photos and videos, to choosing the perfect theme and customizing the settings. So, grab your iPhone and get ready to bring your photos to life!
Inside This Article
- # How to Make a Slideshow in the iPhone Photos App
- Creating a Slideshow
- Customizing Slideshow Settings
- Adding Music to Your Slideshow
- Sharing and Saving Your Slideshow
- Conclusion
- FAQs
# How to Make a Slideshow in the iPhone Photos App
Do you want to create a stunning slideshow on your iPhone using your favorite photos? Luckily, the iPhone Photos app makes it incredibly easy to bring your memories to life. Whether you want to showcase your vacation pictures or create a visual story for a special occasion, the iPhone Photos app has got you covered. In this article, we will guide you through the step-by-step process of making a slideshow using the iPhone Photos app.
1. Open the Photos app on your iPhone. Select the “Albums” tab at the bottom of the screen.
2. Scroll down and find the album containing the photos you want to include in your slideshow. Tap on the album to open it.
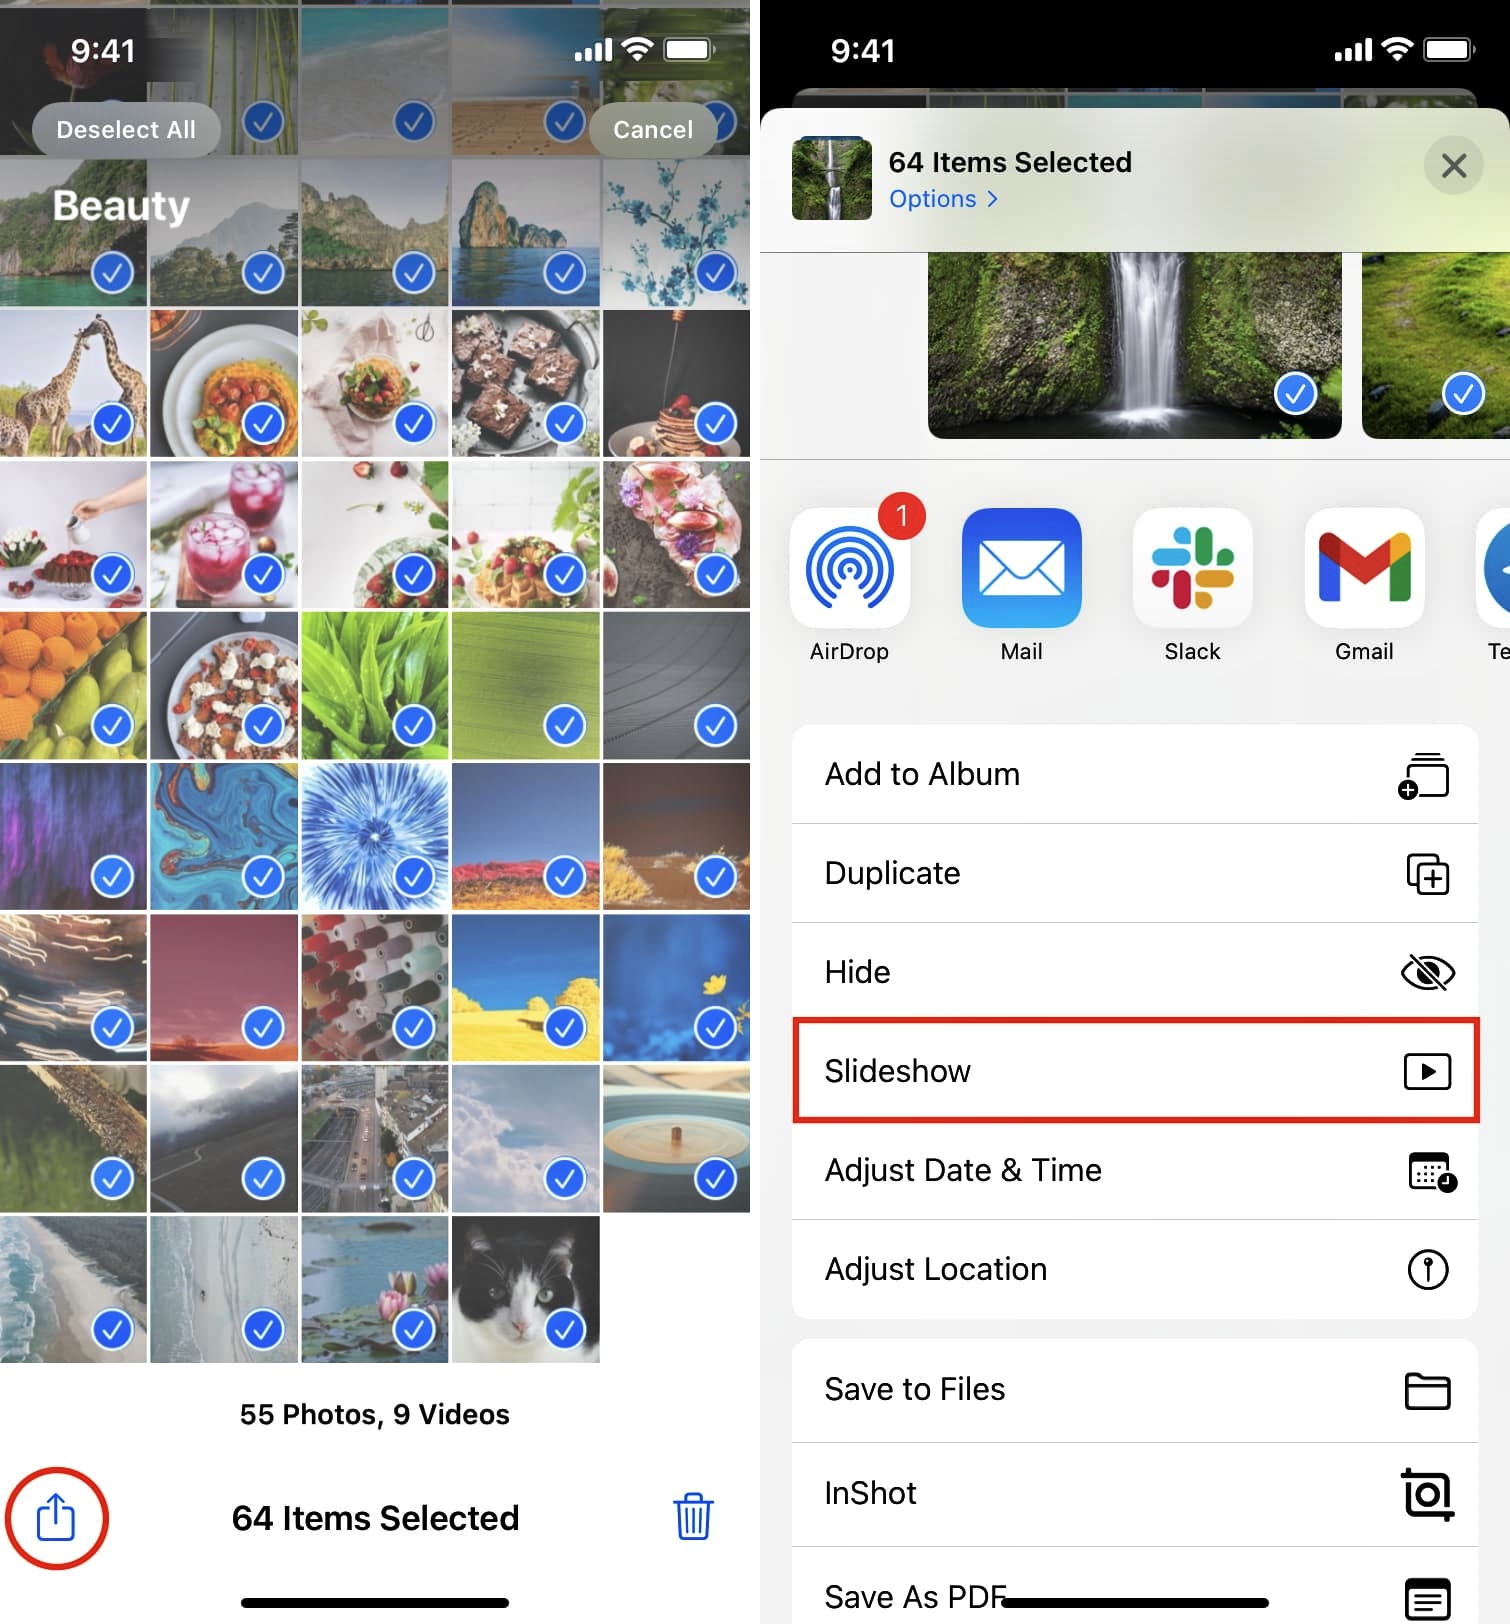
3. Once inside the album, tap on the “Select” option at the top-right corner of the screen. Select the photos you want to include in your slideshow by tapping on them. You can choose multiple photos by tapping on each one individually.
4. After selecting the photos, tap on the share icon at the bottom-left corner of the screen. It looks like a square with an upward arrow.
5. In the share menu, scroll down and locate the “Slideshow” option. Tap on it.
6. The Photos app will automatically generate a slideshow using the selected photos. You can preview the slideshow by tapping on the play button. You can also customize the slideshow settings by tapping on the options button (three dots) at the bottom-right corner of the screen.
7. In the slideshow settings, you can choose the slideshow theme, set the slide duration, and enable or disable the music. You can experiment with different themes and durations to find the perfect combination.
8. If you want to add music to your slideshow, tap on the “Music” option in the slideshow settings. You can select a song from your iPhone’s music library or choose from the preloaded soundtracks provided by the Photos app.
9. Once you are satisfied with the slideshow settings, tap on the “Done” button at the top-right corner of the screen.
10. Finally, you can share your slideshow with others by tapping on the share icon at the bottom of the screen. You can send it via messages, email, or social media platforms. Alternatively, you can save the slideshow to your iPhone’s Photos app by selecting the “Save Video” option.
That’s it! You have successfully created a slideshow using the iPhone Photos app. Now you can enjoy sharing your special moments with friends and family in a visually captivating way.
Creating a Slideshow
If you want to showcase your favorite photos in a dynamic and engaging way, creating a slideshow on your iPhone using the Photos app is a perfect option. With just a few simple steps, you can transform a collection of photos into a captivating slideshow that you can share with friends and family.
Here’s how to create a slideshow on your iPhone:
- Open the Photos app on your iPhone.
- Navigate to the album or folder where your desired photos are located.
- Tap on the “Select” option at the top right corner of the screen.
- Choose the photos you want to include in your slideshow by tapping on them. Selected photos will be marked with a blue checkmark.
- Tap on the “Share” icon, which looks like a square with an arrow pointing upward.
- Scroll down and select the “Slideshow” option from the sharing menu.
- Customize your slideshow settings by adjusting the options available such as slide duration, music, and theme (if desired).
- Tap on the “Play” button to preview your slideshow.
- If you’re satisfied with the slideshow, tap on the “Done” button to save it.
That’s it! You’ve successfully created a slideshow using the Photos app on your iPhone. Now you can view and enjoy your slideshow whenever you want.
Remember, creating a slideshow is a fun way to showcase and relive your favorite memories. You can create slideshows for special occasions, vacations, or just for capturing everyday moments. So don’t forget to experiment with different photos, themes, and music to make your slideshows truly unique and personal.
Customizing Slideshow Settings
When creating a slideshow in the iPhone Photos app, you have the option to customize various settings to make your slideshow truly unique. Here are some of the key settings to consider:
1. Slide Duration: The default slide duration is set to 3 seconds, but you can adjust it to your preference. To change the slide duration, tap on the timer icon at the bottom of the screen and select the desired time interval.
2. Transition Effects: The Photos app offers a variety of transition effects to add visual interest between slides. To choose a transition effect, tap on the “Transition” option below the slide duration settings. You can browse through the available options and select the one that suits your slideshow theme.
3. Slide Order: By default, the Photos app arranges slides in chronological order based on the date your photos were taken. However, you can rearrange the order of the slides to tell a specific story or create a specific flow. To change the slide order, tap on the “Edit” button at the top right corner of the screen, then drag and drop the photos into the desired sequence.
4. Captions and Titles: You can add captions and titles to individual slides to provide additional context or highlight specific moments. To add a caption or title, tap on a photo in the slideshow view, then tap on the “Add a Title” or “Add a Caption” option. Enter the desired text and tap “Done” to save the changes.
5. Theme Selection: The Photos app offers a variety of pre-designed themes that apply different styles, transitions, and music to your slideshow. To select a theme, tap on the “Themes” button at the top right corner, then browse through the available options and choose the one that best complements your slideshow.
6. Background Music: In addition to customizing visual settings, you can also add background music to your slideshow to enhance the mood and create a more immersive experience. Refer to the section on “Adding Music to Your Slideshow” for detailed instructions on how to do this.
7. Repeat and Shuffle: By default, the slideshow plays through all the selected photos once. However, you can choose to repeat the slideshow or shuffle the photos for a different viewing experience. To enable repeat or shuffle, tap on the “Options” button below the slide duration settings and toggle the respective options on or off.
By customizing these slideshow settings, you can create a personalized and engaging visual presentation of your photos on your iPhone. Experiment with different options to find the perfect combination that suits your style and showcases your cherished memories.
Adding Music to Your Slideshow
Adding music to your slideshow can enhance the overall experience and evoke emotions in your viewers. With the iPhone Photos app, you can easily add your favorite songs or soundtracks to accompany your slideshow. Here’s how:
- Open the Photos app on your iPhone and navigate to the album containing the photos you want to include in your slideshow.
- Select the photos you want to include by tapping on them. You can choose multiple photos by tapping and dragging your finger across them.
- Tap on the ‘Share’ button, usually represented by a square with an upward arrow.
- In the sharing options, tap on the ‘Slideshow’ button.
- On the Slideshow screen, tap on the ‘Music’ option.
- You can choose from the pre-selected music categories or tap on ‘My Music’ to select songs from your personal library.
- Browse through the available music options or search for a specific song using the search bar.
- Once you’ve found the desired song, tap on it to select it for your slideshow.
- You can also adjust the duration of each slide by tapping on the ‘Duration’ option and selecting the desired time.
- To further customize the slideshow, tap on the ‘Theme’ option and choose from the available themes to change the visual style of your slideshow.
- Once you’re satisfied with the music selection and customization options, tap on the ‘Play’ button to preview your slideshow with the added music.
After previewing your slideshow, you can make any necessary adjustments or edits. When you’re ready to share your masterpiece, tap on the ‘Done’ button in the top-right corner of the screen. From there, you can choose to share the slideshow via messaging, email, or social media platforms, or save it to your device.
Adding music to your slideshow can add depth and emotion to your photos, elevating them to a whole new level of storytelling. With the iPhone Photos app, it’s easy to create a dynamic and engaging slideshow that captures the essence of your memories and leaves a lasting impression on your audience.
Sharing and Saving Your Slideshow
Once you have created and customized your slideshow using the iPhone Photos app, you may want to share it with others or save it for later viewing. The good news is that the app offers several ways to easily share and save your slideshow.
One option is to share your slideshow directly from the Photos app. To do this, open the slideshow you want to share and tap on the share icon at the bottom of the screen. You will then be presented with various sharing options, such as AirDrop, Messages, Mail, and more. Simply select the method you prefer and follow the prompts to send your slideshow to the desired recipient.
If you want to save your slideshow for offline viewing or keep a copy for yourself, you can easily save it to your iPhone’s camera roll. To do this, open the slideshow in the Photos app and tap on the share icon. From the sharing options, choose “Save Video” or “Save Image” to save the slideshow as a video or a series of images, respectively. The saved slideshow will then be available in your camera roll for future access.
Another way to share and save your slideshow is by using iCloud. If you have iCloud enabled on your iPhone, you can upload your slideshow to iCloud and share it with others or access it from other devices. To do this, open the slideshow and tap on the share icon. From the sharing options, select “Add to iCloud Drive” or “Add to iCloud Photos” depending on your iCloud settings. Your slideshow will then be uploaded to iCloud, and you can share the iCloud link with others or access it from any device with iCloud sync enabled.
Lastly, if you want to share your slideshow on social media platforms like Facebook or Instagram, you can export the slideshow as a video and then upload it to your desired platform. To do this, open the slideshow in the Photos app and tap on the share icon. From the sharing options, choose the “Export as Video” option. Once the slideshow is exported as a video, you can easily upload it to your preferred social media platform and share it with your friends and followers.
With the iPhone Photos app, sharing and saving your slideshow is a breeze. Whether you want to send it to a friend, save it for offline viewing, upload it to iCloud, or share it on social media, you have multiple options at your disposal. So go ahead, create your stunning slideshow and share your special moments with the world!
Creating a slideshow in the iPhone Photos app is a great way to showcase your memories and bring them to life. With just a few simple steps, you can transform your collection of photos into a captivating slideshow that can be shared with friends and family.
The iPhone Photos app offers a user-friendly interface and a range of customization options to suit your preferences. Whether you want to add music, adjust the timing of each photo, or include special effects, the app provides the necessary tools to make your slideshow truly unique.
Remember to choose the perfect theme that complements the mood of your photos and enhances the overall viewing experience. Once you’ve created your slideshow, you can easily share it via social media, email, or AirPlay, ensuring that your memories are enjoyed by others.
So, go ahead and unleash your creativity with the iPhone Photos app, and let your photos come to life in a mesmerizing slideshow that will captivate everyone who watches it.
FAQs
1. Can I make a slideshow in the iPhone Photos app?
Yes, the iPhone Photos app has a built-in feature that allows you to create and customize slideshows with your photos and videos. It’s a great way to share your memories with friends and family in a fun and engaging way.
2. How do I create a slideshow in the iPhone Photos app?
To create a slideshow in the iPhone Photos app, follow these steps:
- Open the Photos app on your iPhone.
- Tap on the “Albums” tab at the bottom of the screen.
- Select the album containing the photos and videos you want to include in your slideshow.
- Tap on the “Select” button at the top right corner of the screen.
- Choose the photos and videos you want to add to the slideshow by tapping on them.
- Tap on the “Share” button at the bottom left corner of the screen.
- Scroll down and tap on the “Slideshow” option.
- Customize the slideshow by selecting a theme, adding music, and adjusting the duration of each slide.
- Tap on the “Play” button to preview your slideshow.
- Once you’re satisfied with the slideshow, tap on the “Done” button to save it.
3. Can I add music to my iPhone Photos slideshow?
Yes, you can add music to your iPhone Photos slideshow. During the slideshow customization process, you’ll have the option to choose from the available music in your iPhone’s library or select a specific song from your device. This allows you to create a more personalized and enjoyable viewing experience for your audience.
4. Can I adjust the duration of each slide in the iPhone Photos slideshow?
Absolutely! The iPhone Photos app gives you the flexibility to adjust the duration of each slide in your slideshow. By default, each slide is displayed for around 3 seconds, but you can increase or decrease this time to suit your preferences. This feature allows you to control the pacing of your slideshow and ensure that each photo or video gets the attention it deserves.
5. How do I share my slideshow created in the iPhone Photos app?
Once you’ve created and customized your slideshow in the iPhone Photos app, you can easily share it with others. After tapping the “Done” button and saving your slideshow, you’ll be taken back to the main screen of your Photos app. From there, tap on the slideshow you want to share, then tap the “Share” button. You can choose to share it via messages, email, social media platforms, or even AirDrop it to nearby devices. Sharing your slideshow allows you to spread your creativity and memories with your loved ones.