
Signing documents is an essential part of our day-to-day lives, and with the advancement of technology, it has become even more convenient. In the digital age, signing a document on your iPhone is no longer a daunting task. Whether you’re signing a contract, a lease agreement, or an important form, your iPhone can be your go-to device to get it done quickly and efficiently.
In this article, we will walk you through the step-by-step process of how to sign a document on your iPhone. We will explore the built-in tools and features that make it possible, providing you with the knowledge you need to confidently sign documents on the go. So, grab your iPhone and let’s dive in to discover how you can easily and securely sign documents right from the palm of your hand.
Inside This Article
- The Importance of Signing Documents on iPhone
- Methods for Signing Documents on iPhone
- Method 1: Using the Markup Tool in the Files App
- Method 2: Utilizing the Sign Documents Feature in the Mail App
- Method 3: Using a Third-Party App for Document Signing
- Tips and Tricks for Signing Documents Efficiently on iPhone
- Conclusion
- FAQs
The Importance of Signing Documents on iPhone
In today’s digital world, signing documents has become an essential part of our personal and professional lives. Whether it’s a contract, agreement, or consent form, signing documents is a crucial step to validate and authenticate the information contained within. With the advent of smartphones, specifically the iPhone, signing documents has become more convenient and accessible than ever before.
Signing documents on your iPhone offers a range of benefits. Firstly, it eliminates the need for printing, scanning, and faxing, saving you time, effort, and resources. You can conveniently sign documents wherever you are, without the hassle of finding a printer or scanner. This is especially helpful when you’re on the go or in a time-sensitive situation.
Furthermore, signing documents on your iPhone ensures the security and integrity of your information. With advanced security measures, such as biometric authentication and encryption, your signatures and documents are protected from unauthorized access and tampering. This provides peace of mind, knowing that your confidential information is secure.
Another advantage of signing documents on your iPhone is the ability to seamlessly integrate with other productivity apps and platforms. Many document signing apps allow you to import documents from cloud storage services like iCloud or Dropbox, edit them, and easily share them with others. This ensures smooth collaboration and a streamlined workflow.
Moreover, signing documents on your iPhone enhances efficiency and productivity. You can quickly review and sign documents on the go, without being tied down to a physical office space. This is particularly beneficial for remote workers, freelancers, and professionals who frequently travel.
Lastly, signing documents on your iPhone is eco-friendly. By eliminating the need for paper and ink, you’re contributing to the reduction of waste and promoting a greener environment. This aligns with the growing trend towards sustainability and responsible consumption.
Methods for Signing Documents on iPhone
Signing documents on your iPhone has never been easier. With the advancement of technology, you no longer need access to a printer or scanner to sign important paperwork. The iPhone offers several convenient methods for signing documents digitally. Here are three effective methods you can use:
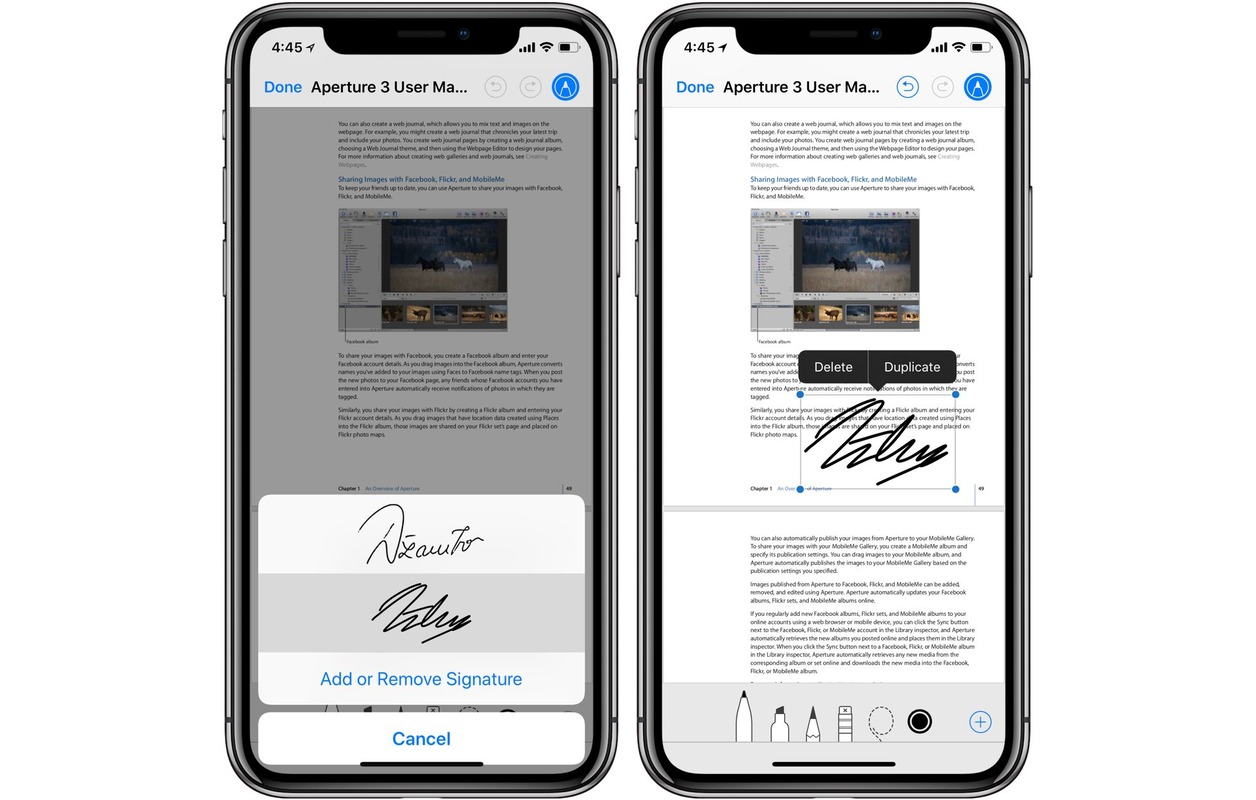
1. Using the Markup Tool in the Files App: One of the easiest ways to sign a document on your iPhone is by using the built-in Markup tool in the Files app. Simply open the document in the Files app, tap on the Markup icon, and select the signature tool. You can either sign directly using your finger or stylus, or choose from existing signatures you have saved. Once you have signed the document, you can save it and share it as needed.
2. Utilizing the Sign Documents Feature in the Mail App: If you receive a document via email that requires your signature, you can use the Mail app on your iPhone to sign it. Open the email, tap on the document attachment, and then tap on the markup icon. From there, you can add your signature using your finger or stylus. Once you have signed the document, you can send it back directly from the Mail app.
3. Using a Third-Party App for Document Signing: There are a variety of third-party apps available on the App Store that specialize in document signing. These apps often offer more advanced features such as the ability to add multiple signatures, create templates, and securely store signed documents. Some popular options include Adobe Acrobat Reader, DocuSign, and SignEasy. Simply download the app of your choice, import the document, and follow the app’s instructions to sign it.
Each of these methods provides a quick and convenient way to sign documents on your iPhone. Whether you prefer using built-in tools or third-party apps, you can easily sign important paperwork without the hassle of printing or scanning.
Method 1: Using the Markup Tool in the Files App
Signing documents on your iPhone has never been easier, thanks to the powerful Markup tool in the Files app. With just a few taps, you can add your signature to any document, making it legally valid and ready for submission. Here’s how to use the Markup tool for signing documents:
- Open the Files app on your iPhone. If you can’t find it on your home screen, swipe down and use the search bar to locate it.
- Navigate to the folder where the document you want to sign is located. Tap on the file to open it.
- Once the document is open, tap on the Markup icon, which looks like a pen tip within a circle, located at the top right corner of the screen.
- The Markup toolbar will appear at the bottom of the screen, offering various annotation tools. Tap on the Signature tool, represented by a small handwriting icon.
- If you have already set up a signature, tap on it to insert it into the document. If you haven’t, tap on the “+ Add Signature” option.
- A signature window will appear with different options for creating your signature. You can use your finger to draw your signature directly on the screen, or you can choose to sign using your Apple Pencil if you have one.
- Once you are satisfied with your signature, tap on “Done” to save it.
- Now, you can move, resize, or rotate your signature, if needed, by using the handles around it. Drag it to the appropriate location on the document.
- If you need to sign multiple documents, you can save your signature for future use. Simply tap on the signature, select “Save”, and give it a name.
- Once you have positioned your signature correctly, tap on “Done” to finalize the process.
- Finally, don’t forget to save the signed document. Tap on the Share icon, represented by a square with an arrow pointing upwards, and choose the desired method to save or share the document.
By utilizing the Markup tool in the Files app on your iPhone, you can easily sign documents on the go, without the need for printing, scanning, or using external devices. It’s a convenient and efficient way to handle important paperwork and streamline your workflow.
Method 2: Utilizing the Sign Documents Feature in the Mail App
If you find yourself needing to sign a document on your iPhone, the Mail app offers a simple and convenient method. The Sign Documents feature allows you to add your signature directly to the document using your device’s touchscreen. Follow these steps to sign a document using the Mail app:
Step 1: Open the Mail app on your iPhone and locate the email containing the document you need to sign. Tap on the email to open it.
Step 2: Once you have opened the email, locate the attachment that contains the document. Tap on the attachment to open it.
Step 3: Once the document is open, you will see a toolbar at the bottom of the screen. Tap on the Markup button, which looks like a pen tip inside a circle.
Step 4: The Markup toolbar will appear, displaying various tools you can use to annotate the document. Tap on the “+” icon to access additional options.
Step 5: From the list of options, select the “Signature” tool. This will prompt you to create or add a signature to your document.
Step 6: If you already have a signature saved, choose the one you want to use from the list. If not, tap on “Create New Signature” and follow the instructions to create a new signature using your finger or stylus.
Step 7: After selecting or creating your signature, you can resize and reposition it by tapping and dragging on the corners of the signature box.
Step 8: Once you are satisfied with the placement of your signature, tap on “Done” to finalize the process.
Step 9: The document will now display your signature. If you need to add additional information, such as the date or your initials, you can use the Markup tools to do so.
Step 10: When you have finished signing the document, tap on the “Done” button at the top-right corner of the screen to save your changes.
Step 11: Finally, you can choose to reply to the email with the signed document attached, or you can save it to your device or cloud storage for future reference.
Utilizing the Sign Documents feature in the Mail app is a convenient and efficient way to sign documents on your iPhone. Whether you need to sign a contract, fill out a form, or provide authorization, this method allows you to quickly and easily add your signature without the need for additional apps or software.
Method 3: Using a Third-Party App for Document Signing
If you’re looking for more advanced features and customization options when it comes to signing documents on your iPhone, using a third-party app is a great option. These apps offer a wide range of functionalities to make the signing process more efficient and convenient. Here’s how you can use a third-party app for document signing on your iPhone:
1. First, head to the App Store on your iPhone and search for document signing apps. There are several popular options available such as Adobe Acrobat Reader, DocuSign, and SignNow. Choose the app that best suits your needs and download it to your device.
2. Once the app is installed, open it and create an account if required. This will allow you to access the app’s features and save your signed documents securely. Some apps may offer a basic free version with limited features, while others may require a subscription for full access.
3. After setting up your account, the app will guide you through the process of adding a document for signing. You can typically upload documents from various sources, including your device’s storage, cloud storage services like Dropbox or Google Drive, or by scanning a physical document using your iPhone’s camera.
4. Once the document is uploaded, the app will provide you with options to add your signature. You can either use your finger to create a digital signature directly on the screen or import a pre-created signature image from your device. Some apps also offer the option to draw or type your signature for a more personalized touch.
5. Once you’ve added your signature, you can position and resize it within the document as needed. The app may also provide additional options for adding date stamps, initials, or other annotations to the document.
6. Finally, review the signed document to ensure everything looks correct. You can preview the document within the app and make any necessary adjustments before saving or sharing it. Most apps allow you to save the signed document as a PDF file, which can be easily shared via email or other messaging services.
Using a third-party app for document signing on your iPhone gives you more flexibility and control over the signing process. These apps often have advanced features like automatic form filling, document editing, and secure cloud storage integration, making them a valuable tool for professionals who frequently deal with document signing.
Remember to choose a reputable app from the App Store to ensure the security and privacy of your documents. Take the time to explore different apps and find one that suits your specific needs and preferences. With the right third-party app, signing documents on your iPhone can be a seamless and efficient process.
Tips and Tricks for Signing Documents Efficiently on iPhone
Signing documents on your iPhone can be a convenient and time-saving task. To help you make the most of this feature, here are some useful tips and tricks:
1. Familiarize Yourself with the Markup Tools: The Markup feature on your iPhone allows you to add your signature, annotate, and make changes to documents. Take some time to explore and learn the various tools available, such as the highlighter, text box, and signature tool. This will help you utilize these features efficiently and make quick edits when needed.
2. Customize your Signature: To save time, customize your digital signature on your iPhone. Open the Markup tool, tap on the signature icon, and choose “Add or Remove Signature.” You can then either sign directly on the screen using your finger or use the option to scan a physical signature. Once created, you can easily insert your signature into documents with just a few taps.
3. Use the Text Annotation Tool: If you need to fill in forms or add comments to a document, the text annotation tool can be a time-saver. Tap on the “+” icon in the Markup tool and select the “Text” option to add a text box. You can then type directly into the box, customize the font, size, and color, and place it in the desired location on the document.
4. Utilize the Copy and Paste Feature: If you frequently need to sign multiple copies of the same document, utilize the copy and paste feature on your iPhone. After signing the original document, tap and hold on the signature, select “Copy,” and then paste it onto the other copies. This will save you from having to sign each document individually.
5. Use iCloud Drive for Document Storage: To have easy access to your documents across all your Apple devices, utilize iCloud Drive. When signing a document on your iPhone, save it to iCloud Drive, and it will be readily available on your Mac, iPad, or other Apple devices. This seamless integration ensures that you can access and sign your documents from anywhere.
6. Enable Face ID or Touch ID for Security: To add an extra layer of security to your signed documents, enable Face ID or Touch ID authentication for sensitive files. This ensures that only you can access and sign important documents, giving you peace of mind knowing your signatures are protected.
7. Utilize Third-Party Apps: If the built-in markup tools on your iPhone don’t meet your needs, explore third-party apps specifically designed for document signing. Some popular options include Adobe Acrobat Reader, DocuSign, and SignNow. These apps offer advanced features such as cloud storage integration, advanced annotations, and collaboration tools for a more efficient signing experience.
Remember, practice makes perfect when it comes to signing documents on your iPhone. The more familiar you become with the features and tools available, the more efficiently you’ll be able to handle document signing tasks, saving you time and effort in the process.
By following these tips and tricks, you’ll be able to sign documents efficiently on your iPhone, empowering you to handle important paperwork effortlessly, even when you’re on the go.
Conclusion
Signing documents on your iPhone has never been easier. With the advancements in digital technology and the availability of various apps, you can now sign important documents with just a few taps on your smartphone. Whether you’re signing a contract, a lease agreement, or any other legal document, the convenience and efficiency of signing on your iPhone cannot be denied.
Gone are the days of printing, signing, and scanning documents. The process is now streamlined and hassle-free. You can simply open the document, use your finger or a stylus to add your signature, and save it digitally within seconds. This not only saves time but also reduces the need for paper and promotes environmental sustainability.
So next time you need to sign a document on the go, remember that your iPhone is all you need. Embrace the digital revolution and enjoy the convenience of signing documents with ease, right in the palm of your hand.
FAQs
1. Can I sign a document on my iPhone?
Yes, you can easily sign a document on your iPhone. There are several apps available that allow you to sign digital documents using your iPhone’s touchscreen. These apps provide you with a convenient and secure way to sign contracts, agreements, and other important documents right from your device.
2. Which app should I use to sign documents on my iPhone?
There are several reliable apps that you can use to sign documents on your iPhone, such as Adobe Acrobat Reader, DocuSign, and HelloSign. These apps offer user-friendly interfaces and robust features to ensure a smooth and secure signing process. Choose the one that best suits your needs and preferences.
3. Is it legal to sign documents electronically on an iPhone?
Yes, signing documents electronically on your iPhone is legally binding in most cases. Electronic signatures have gained legal recognition in many countries, including the United States and several European countries. However, it is important to familiarize yourself with the specific laws and regulations in your jurisdiction to ensure compliance.
4. How secure is signing documents on an iPhone?
Signing documents on an iPhone can be highly secure, as long as you use reputable apps and follow best practices for secure document handling. Apps like Adobe Acrobat Reader and DocuSign offer encryption and other security measures to protect your data. Additionally, make sure to keep your device and apps up to date with the latest security patches to minimize the risk of unauthorized access.
5. Can I sign documents with my finger on an iPhone?
Yes, you can sign documents on your iPhone using your finger. Most signing apps provide a feature that allows you to draw your signature directly on the touchscreen. The app will then convert your finger drawing into a digital signature that can be inserted into the document. It’s a simple and convenient way to sign documents without the need for a stylus or pen.