
Are you struggling to figure out how to sync your iPad and iPhone? Don’t worry, you’re not alone! With the increasing integration and connectivity of mobile devices, it’s becoming more important than ever to keep your devices in sync. Whether you want your contacts, apps, photos, or other data to seamlessly transfer between your iPad and iPhone, we’ve got you covered. In this article, we will guide you through the steps to sync your devices so you can enjoy a seamless experience across both platforms. By following our easy-to-understand instructions, you’ll be able to keep your iPad and iPhone in perfect harmony, ensuring you never miss a beat.
Inside This Article
- Method 1: Using iCloud
- Method 2: Using iTunes
- Method 3: Using iCloud Drive
- Method 4: Using Third-Party Apps
- Conclusion
- FAQs
Method 1: Using iCloud
One of the easiest ways to sync your iPad and iPhone is by leveraging the power of iCloud. iCloud is a cloud-based storage and synchronization service provided by Apple, which allows you to seamlessly sync your data between multiple devices. Here’s how you can use iCloud to sync your iPad and iPhone:
1. Make sure that both your iPad and iPhone are connected to Wi-Fi and signed in to the same iCloud account.
2. On your iPad, go to “Settings” and tap on your name at the top. Then, select “iCloud” and make sure that the desired content types, such as contacts, calendars, and photos, are enabled for syncing.
3. On your iPhone, follow the same steps as on your iPad to ensure that the desired content types are selected for syncing.
4. Once the settings are configured, any changes made to the synced content on either device will automatically be reflected on the other. For example, if you add a new contact on your iPad, it will appear on your iPhone and vice versa.
5. Additionally, iCloud also allows you to sync other data such as app data, bookmarks, and documents. To enable syncing for these types of data, go to “Settings” on your iPad and iPhone, tap on your name, select “iCloud,” and enable the respective options.
Using iCloud to sync your iPad and iPhone ensures that your data is always up to date and easily accessible across both devices. It provides a seamless and convenient way to keep your information synchronized without the need for manual transfers or additional hardware.
Method 2: Using iTunes
If you prefer to use iTunes to sync your iPad and iPhone, follow these simple steps:
-
Connect your iPad and iPhone to your computer using the USB cable.
-
Open iTunes on your computer. If it doesn’t open automatically, you can manually launch it from your applications or desktop.
-
Once iTunes is open, you’ll see your devices listed in the top left corner of the screen. Click on the device icon for your iPad.
-
In the top bar of the iTunes window, you’ll see a series of tabs, such as Summary, Apps, Music, Movies, and more. Click on the “Info” tab.
-
Scroll down to the “Sync” section and check the box next to “Sync Contacts”, “Sync Calendars”, or any other data type you want to sync between your iPad and iPhone.
-
Customize your syncing options by selecting specific categories or groups within each data type. You can also choose to merge or replace information on your devices.
-
Once you are satisfied with your syncing options, click the “Apply” or “Sync” button in the bottom right corner of the iTunes window.
-
Wait for iTunes to complete the syncing process. This may take a few minutes, depending on the amount of data being synced.
-
Once the syncing is finished, you can disconnect your iPad and iPhone from your computer.
Using iTunes to sync your iPad and iPhone allows you to have full control over the syncing process and customize the data you want to sync. It’s a reliable and efficient method that many users prefer.
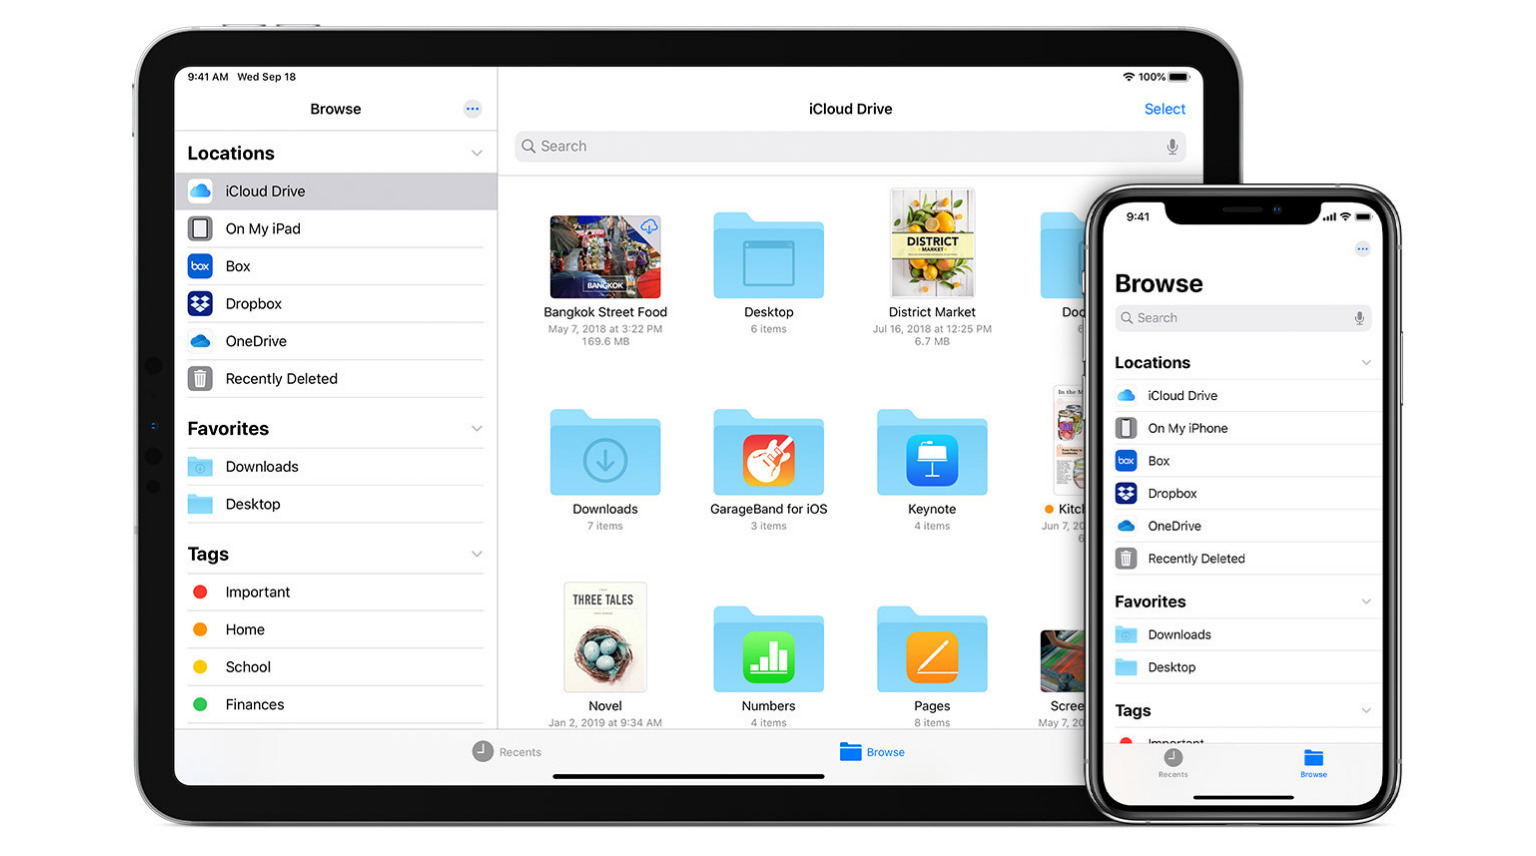
Method 3: Using iCloud Drive
If you’re looking for a convenient and hassle-free way to sync your iPad and iPhone, using iCloud Drive is an excellent option. iCloud Drive allows you to store files, documents, and data in the cloud and access them from any of your Apple devices, including your iPad and iPhone.
Here’s how you can use iCloud Drive to sync your iPad and iPhone:
- Enable iCloud Drive: Open the Settings app on both your iPad and iPhone, and tap on your Apple ID at the top. Then, select “iCloud” and toggle on the “iCloud Drive” option. This will enable iCloud Drive on both devices, allowing them to sync with each other.
- Ensure iCloud Drive syncing is enabled: Once you’ve enabled iCloud Drive, make sure that syncing is enabled for the apps and files you want to sync. Open the Settings app on your iPad and iPhone, go to “iCloud” and then “iCloud Drive”. Here, you can choose which apps and files you want to sync by toggling them on or off.
- Syncing app data: Certain apps, such as Pages, Numbers, and Keynote, automatically sync their data using iCloud Drive. When you make changes to a document on your iPad, it will automatically sync to your iPhone, and vice versa. You can access your synced documents from the respective apps on both devices.
- Syncing photos and videos: To sync your photos and videos using iCloud Drive, enable the “iCloud Photos” option on both your iPad and iPhone. This will upload your photos and videos to iCloud, allowing you to access them from either device. Any changes you make, such as deleting or editing a photo, will sync across both devices.
- Syncing other files: If you have other files that you want to sync between your iPad and iPhone, you can do so by using iCloud Drive. Simply save the files to your iCloud Drive folder on one device, and they will automatically appear in the iCloud Drive folder on the other device. You can open and edit these files from either device.
Using iCloud Drive provides a seamless and efficient way to sync your iPad and iPhone. By enabling iCloud Drive, ensuring syncing is enabled for your desired apps and files, and taking advantage of the automatic syncing capabilities of certain apps, photos, and other files, you can easily keep your devices in sync and access your data from anywhere.
Method 4: Using Third-Party Apps
If you’re looking for an alternative method to sync your iPad and iPhone, using third-party apps can be a great option. These apps offer additional features and flexibility, allowing you to customize your syncing preferences to meet your specific needs.
One popular app for syncing your iPad and iPhone is Google Drive. With Google Drive, you can easily store and access your files, photos, and videos across your devices, making it simple to keep everything in sync. Simply download the app on both your iPad and iPhone, sign in with your Google account, and enable syncing. You can then choose which files and folders to sync, ensuring that you have access to your important content on both devices.
Another reliable option is Dropbox. Dropbox offers seamless syncing between your iPad and iPhone, allowing you to access your files and documents wherever you go. After installing the app on both devices and signing in to your Dropbox account, you can select the files and folders you want to sync. Any changes made to the synced files will automatically be updated across all your devices, ensuring that you stay up to date.
Microsoft OneDrive is another popular choice for syncing your iPad and iPhone. With OneDrive, you can store and sync your files, photos, and documents effortlessly. Simply download the app on both devices, sign in with your Microsoft account, and enable syncing. You can then choose which files and folders to sync, and any changes made will be mirrored across your devices. OneDrive also offers additional features like file sharing and collaboration, making it a versatile option for syncing your devices.
If you’re looking for a more comprehensive solution, iMazing is worth considering. iMazing is a powerful iOS management tool that allows you to sync and manage your iPhone and iPad data with ease. It offers advanced features like complete backup and restore, app management, file transfer, and more. With iMazing, you have full control over your device’s data and can customize your syncing preferences according to your requirements.
No matter which third-party app you choose, make sure to explore its features and compatibility with your iPad and iPhone. Consider factors like ease of use, storage capacity, syncing options, and additional features to determine the best app for your needs.
Using third-party apps to sync your iPad and iPhone provides a great alternative to iCloud or iTunes. These apps can offer more flexibility, additional features, and customizable syncing options, allowing you to have greater control over your devices. Whether you prefer Google Drive, Dropbox, OneDrive, or iMazing, these apps can make syncing your devices a seamless and hassle-free experience.
Syncing your iPad and iPhone is a seamless process that allows you to keep your devices connected and up-to-date. By following the simple steps outlined in this article, you can ensure that your data, apps, and settings are synced accurately and efficiently. Whether you need to transfer files, sync contacts, or share documents, the synchronization process makes it easy to stay organized and connected across your devices.
With just a few clicks, you can seamlessly transfer data between your iPad and iPhone, allowing you to access your files, photos, and information wherever you go. By leveraging the power of syncing, you can create a cohesive digital ecosystem that enhances productivity and convenience. Keep your devices in sync to stay on top of your tasks, maximize efficiency, and enhance your overall mobile experience.
FAQs
1. Q: How do I sync my iPad and iPhone?
A: To sync your iPad and iPhone, you can enable iCloud sync or use iTunes. With iCloud sync, make sure both devices are signed in to the same Apple ID and iCloud is enabled. Then, go to Settings > [your name] > iCloud on both devices and toggle on the apps and data you want to sync. Alternatively, you can use iTunes by connecting your devices to a computer using a USB cable and selecting the “Sync” option.
2. Q: Can I sync specific data or apps between my iPad and iPhone?
A: Yes, you can choose which data and apps to sync between your iPad and iPhone. When using iCloud sync, you can toggle on or off specific apps and data categories in the iCloud settings. For iTunes sync, you can select the specific apps, music, photos, or other data you want to sync in the iTunes application on your computer.
3. Q: Do I need an internet connection to sync my iPad and iPhone?
A: While using iCloud sync, an active internet connection is required for the devices to communicate with each other and sync data. However, if you choose to use iTunes to sync your iPad and iPhone, an internet connection is not necessary during the syncing process itself, but you will need internet access to download any updates or new content.
4. Q: Is there any limit to the amount of data I can sync between my iPad and iPhone?
A: The limit of data you can sync between your iPad and iPhone depends on the storage capacity of each device and the available space. If you’re using iCloud sync, you may encounter storage limitations based on your iCloud storage plan. However, if you choose to sync via iTunes, the available storage on your computer will determine the limit.
5. Q: Will syncing my iPad and iPhone delete any existing data?
A: No, syncing your iPad and iPhone will not delete any existing data on either device. It will only merge the data that needs to be synced, such as contacts, calendars, photos, and app data. However, it’s always a good idea to create a backup of your devices before performing any syncing operations to ensure the safety of your data.