
Are you struggling to transfer your photos from your Android phone to your PC? Don’t worry, we’ve got you covered! In this article, we will guide you through the simple and efficient steps to transfer your treasured memories from your Android phone to your PC. With the increasing importance of digital photos in our lives, it is crucial to have a seamless way to transfer and store them without losing any quality or risking their security. Whether you want to backup your photos, edit them on a larger screen, or simply free up space on your phone, transferring them to your PC is the ideal solution. So let’s dive in and learn how to transfer your photos from an Android phone to a PC!
Inside This Article
- Method 1: Using a USB Cable
- Method 2: Using Google Photos
- Method 3: Using a File Transfer App
- Method 4: Using a Cloud Storage Service
- Conclusion
- FAQs
Method 1: Using a USB Cable
One of the easiest and most straightforward methods to transfer your photos from an Android phone to a PC is by using a USB cable. This method allows you to directly connect your phone to your computer and transfer the files quickly and efficiently.
To get started, you will need a USB cable that is compatible with your Android phone. Most modern Android phones use a USB Type-C or micro USB cable, so make sure you have the correct one for your phone.
Here are the steps to transfer your photos using a USB cable:
- Connect your Android phone to your PC using the USB cable.
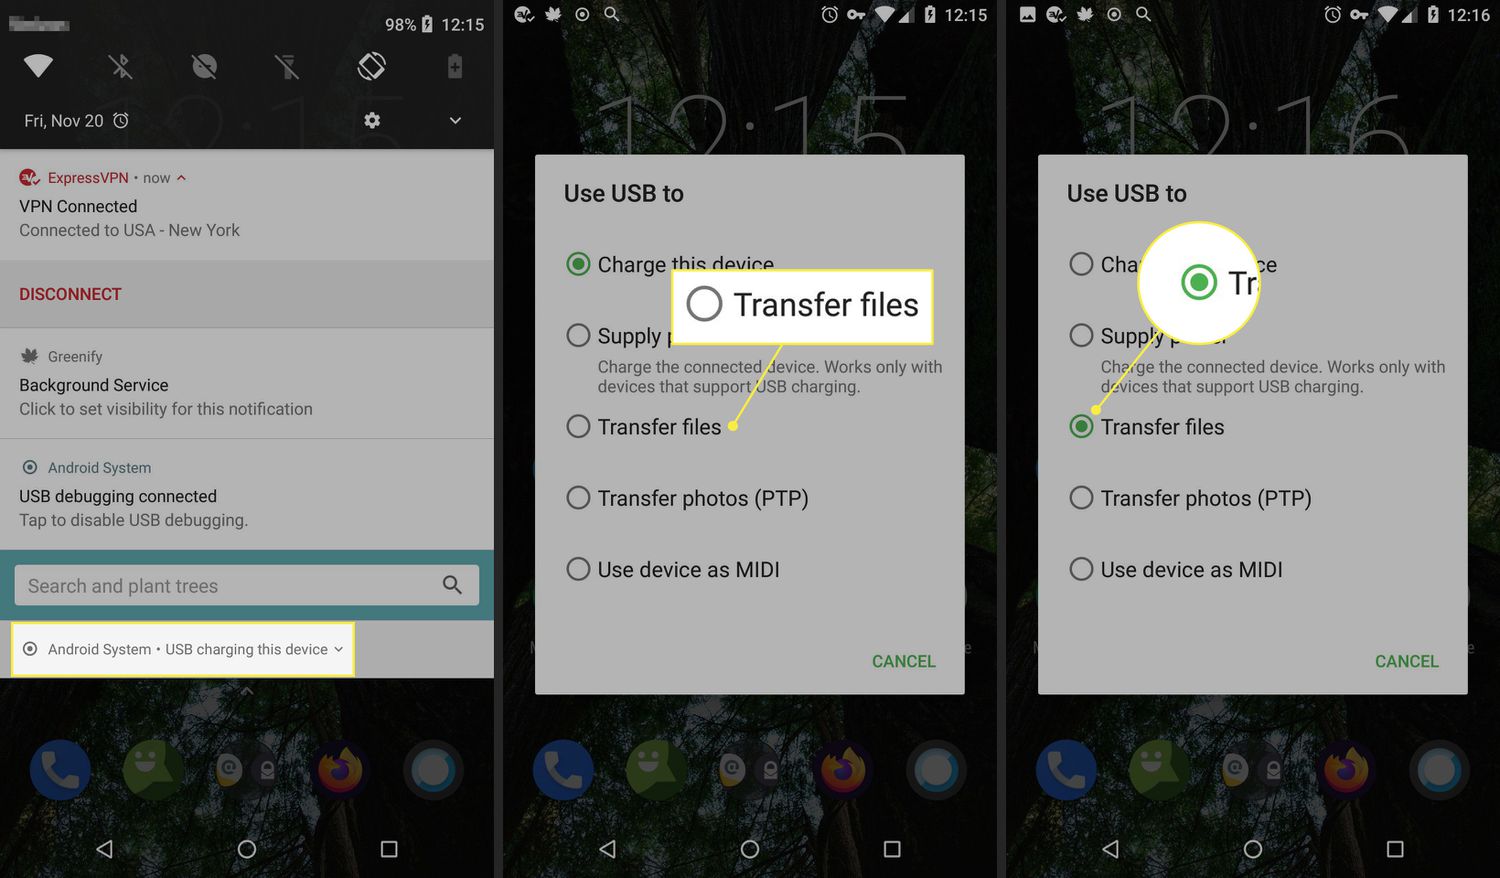
- On your phone, select the option to “Transfer files” or “Transfer photos” when prompted for the USB connection mode. This will allow your PC to access the files on your phone.
- On your PC, open File Explorer (Windows) or Finder (Mac).
- Locate your Android device, which will be listed as a removable storage device.
- Double-click on your Android device to open it.
- Navigate to the folder where your photos are stored on your phone. Typically, they are located in the “DCIM” or “Pictures” folder.
- Once you have found the desired photos, simply drag and drop them into a folder on your PC to transfer them.
It is important to note that the exact steps may vary slightly based on your specific Android device and the operating system of your PC. However, the general concept remains the same – connect your phone to your computer using a USB cable, select the appropriate USB connection mode, and transfer the photos from your phone to your PC.
Using a USB cable is a convenient method for transferring photos as it does not require an internet connection and allows for a direct and secure transfer of files. Additionally, it provides you with full control over the transfer process, allowing you to select the specific photos you want to transfer.
Now that you know how to transfer your photos using a USB cable, you can easily backup your pictures, organize them on your PC, or share them with others without any hassle.
Method 2: Using Google Photos
If you want a convenient and hassle-free way to transfer your photos from an Android phone to a PC, Google Photos is an excellent option. Google Photos is a cloud-based service that allows you to store, organize, and share your photos and videos. Here is a step-by-step guide on how to transfer your photos using Google Photos:
- Install Google Photos: If you don’t already have the Google Photos app on your Android phone, head to the Google Play Store and download it. Make sure you sign in to your Google account or create a new one if needed.
- Upload your Photos: Open the Google Photos app and tap on the three horizontal lines in the top-left corner to open the menu. Select “Settings” and then “Backup & sync.” Toggle the switch to “On” to enable automatic backup of your photos and videos to your Google account.
- Access your Photos on PC: Once your photos are backed up, you can access them on your PC by visiting the Google Photos website (photos.google.com). Sign in with the same Google account used on your Android phone.
- Select and Download: Browse through your Google Photos library and select the photos you want to transfer to your PC. You can choose individual photos or select multiple photos by holding down the Ctrl key while clicking on each photo. After selecting the photos, click on the three vertical dots in the top-right corner and choose “Download” to save the photos to your PC.
Using Google Photos to transfer your photos offers several advantages. Firstly, it automatically backs up your photos, ensuring that your precious memories are safe and accessible from any device with an internet connection. Secondly, you can organize your photos into albums and easily search for specific images using Google’s powerful image recognition technology. Lastly, Google Photos provides unlimited free storage for high-quality photos and videos, making it a cost-effective solution for transferring and storing your media files.
By following these simple steps, you can quickly and easily transfer your photos from your Android phone to your PC using Google Photos. Say goodbye to using cables or third-party apps and enjoy the convenience of cloud-based photo storage!
Method 3: Using a File Transfer App
If you’re looking for a convenient way to transfer your photos from your Android phone to a PC, using a file transfer app is a great option. These apps are designed specifically for transferring files between devices wirelessly, eliminating the need for bulky cables or intricate setup processes. Here are the steps to transfer your photos using a file transfer app:
1. Download and install a file transfer app on both your Android phone and PC. There are several popular options available, such as Xender, SHAREit, and Send Anywhere.
2. Open the file transfer app on your Android phone and select the photos you want to transfer. Most apps allow you to browse and select specific files or entire folders.
3. Look for the option to connect or create a connection. Depending on the app, you may need to enable Wi-Fi or Bluetooth on both devices to establish a connection.
4. On your PC, open the file transfer app and choose the option to receive files. The app should detect your Android phone on the same network and display it as a connected device.
5. Once the connection is established, select the destination folder on your PC where you want to save the transferred photos.
6. On your Android phone, tap the “Send” or “Transfer” button to initiate the file transfer process. The app will then start transferring the selected photos to your PC.
7. Wait for the transfer to complete. The time required may vary depending on the size of the photos and the speed of your network connection.
8. Once the transfer is finished, you can close the file transfer app on both your Android phone and PC.
Using a file transfer app provides a hassle-free way to quickly transfer your photos from your Android phone to your PC. These apps offer fast and reliable file transfers, allowing you to conveniently access and manage your photos on a larger screen.
It’s worth noting that the specific steps may vary slightly depending on the file transfer app you choose to use. However, the general process remains the same across different apps, making it a straightforward solution for transferring photos.
Now that you know how to use a file transfer app, you can easily and wirelessly transfer your photos from your Android phone to your PC with just a few simple steps.
Method 4: Using a Cloud Storage Service
If you want a convenient way to transfer your photos from your Android phone to your PC, using a cloud storage service is a great option. With a cloud storage service, you can store your photos securely online and access them from any device with an internet connection. Here’s how to do it:
Step 1: Choose a Cloud Storage Service
There are several popular cloud storage services available, such as Google Drive, Dropbox, and OneDrive. Choose the service that suits your needs and sign up for an account if you don’t have one already.
Step 2: Install the Cloud Storage App on Your Android Phone
Visit the Google Play Store or the app store for your chosen cloud storage service and download the app on your Android phone. Once installed, sign in to your cloud storage account using your credentials.
Step 3: Upload Your Photos to the Cloud
Open the cloud storage app on your Android phone and navigate to the folder or location where your photos are stored. Select the photos you want to transfer by tapping on them, or choose the “Select All” option if you want to upload all the photos. Then, tap on the upload button, usually represented by an arrow pointing upward.
Step 4: Access Your Photos on Your PC
On your PC, open a web browser and visit the website of the cloud storage service you’re using. Sign in to your account if prompted. You should see your uploaded photos in the designated folder or location. You can then download the photos to your PC by selecting them and choosing the “Download” or “Save” option.
Step 5: Organize and Manage Your Photos
Once you’ve transferred your photos to your PC, you can organize them into folders, rename them, or even edit them using photo editing software. This allows you to have better control and access to your photos.
Using a cloud storage service to transfer your photos from your Android phone to your PC is a simple and efficient method. It provides a seamless way to access and manage your photos across different devices. Give it a try and free up space on your phone while keeping your precious memories safe and easily accessible.
Conclusion
Transferring photos from your Android phone to a PC can be a seamless and convenient process if you follow the right steps. By utilizing the various methods discussed in this article, such as using a USB cable, cloud storage services, or specialized software, you can easily transfer your precious memories to your computer for safekeeping or sharing.
Remember to choose the method that best suits your needs and preferences. Whether you prefer the simplicity of a USB cable or the flexibility of cloud storage, ensuring that your files are backed up and easily accessible is essential.
Now that you are equipped with the knowledge and techniques to transfer your photos, you can take control of your memories and free up valuable space on your Android phone. So go ahead, start organizing and preserving your photos on your computer today!
FAQs
1. How do I transfer photos from my Android phone to my PC?
Transferring photos from your Android phone to your PC is a simple process. You can do it using a USB cable, cloud storage services, or by using specialized software. Here are the steps to transfer photos using a USB cable:
– Connect your Android phone to your PC using a USB cable.
– On your phone, swipe down from the top of the screen and tap on the notification that says “USB charging this device.”
– Select the “File Transfer” or “Transfer Files” option.
– Open “File Explorer” or “Windows Explorer” on your PC.
– Locate your phone under the “Devices and Drives” section.
– Open your phone’s storage and navigate to the “DCIM” or “Pictures” folder.
– Copy and paste the photos you want to transfer onto your PC.
– Once the transfer is complete, safely disconnect your phone from the PC.
2. Can I transfer photos wirelessly from my Android phone to my PC?
Yes, you can transfer photos wirelessly from your Android phone to your PC. One way to do this is by using cloud storage services like Google Drive or Dropbox. Here’s how you can transfer photos wirelessly using Google Drive:
– Install the Google Drive app on your Android phone and sign in with your Google account.
– Open the Google Drive app and tap on the “+” icon to create a new folder or select an existing folder to upload your photos.
– Tap on the “Upload” button and select the photos you want to transfer.
– Once the photos are uploaded, open Google Drive on your PC and sign in with the same Google account.
– Locate the folder that contains the photos and download them to your PC.
3. Do I need any special software to transfer photos from my Android phone to my PC?
No, you don’t necessarily need any special software to transfer photos from your Android phone to your PC. However, using software like Android File Transfer or Windows Photos Companion can make the process more convenient. These programs allow for easy and efficient transfer of photos between your Android phone and PC.
4. What if I want to transfer photos from my Android phone to my Mac?
If you want to transfer photos from your Android phone to your Mac, you can use the Android File Transfer software. Here’s how:
– Connect your Android phone to your Mac using a USB cable.
– Download and install the Android File Transfer software from the official website.
– Open the Android File Transfer software on your Mac.
– Navigate to the “DCIM” or “Pictures” folder on your Android phone using the software.
– Select the photos you want to transfer and drag them to the desired location on your Mac.
5. Can I transfer photos from my Android phone to my PC without a USB cable?
Yes, you can transfer photos from your Android phone to your PC without a USB cable. One way to do this is by using apps or services that allow wireless transfer, such as AirDroid or Pushbullet. These apps allow you to transfer photos, as well as other files, between your Android phone and PC over a Wi-Fi network.