
You got your iPad to watch a movie or browse the web, but it does not unlock after several attempts. The iPad tells you it is disabled and must connect to iTunes, and you cannot input your passcode. Before you fret, we are here to save the day. We will share the ways to make your iPad accessible again.
Also read: iPad stuck on Apple logo? Unfreeze It via These Fixes
Inside This Article
Reasons Your iPad is Disabled and Must Connect to iTunes

But first, let us quickly pinpoint the root cause. Why is your iPad no longer accessible? What disabled it?
If you haven’t ever gotten your iPad passcode wrong multiple times, it is no wonder you have no idea why your iPad is disabled and telling you to connect to iTunes. Successive failed passcode attempts usually trigger that state. If not, someone else tried to guess your passcode many times. Rarely, though, it can just be a hiccup of the gadget.
Sometimes, your disabled iPad will not tell you to connect to iTunes. Instead, it will say that you should wait a bit and try again. If this is the case, you can still try to unlock it after a while like you usually do. But if not, read on.
5 Best Solutions for a Disabled iPad

Let us now get to the gist of this guide, the best solutions. Try the following fixes now:
1. Connect to iTunes for iPad Restoration
When your iPad shows “iPad is disabled, connect to iTunes”, do what it says. Link the iPad to iTunes (or alternatively, Finder). That is so that you can make it enter Recovery mode and restore it to its working state. Here’s the exact process you should follow:
If you restore your iPad, you will lose your files on it. The said contents will only be recoverable if you have an iTunes backup or copy of your files kept using other means.
1. Force your iPad to enter Recovery mode, so you can start restoring it later on.
Latest iPads that lack a home button: On your iPad that’s already linked to a PC, long-press the top button and one volume button. Move the onscreen slider to the right once you see it. When the gadget is already off, long-press the top button again and stop when you see this screen below.

Old iPads that integrate a home button: On your iPad that’s not yet linked to a PC, long-press the top button. Next, flick the slider’s toggle to the right to initiate shutdown. Once the gadget is off, long-press the home button as you connect the iPad to your PC and until the former displays the black screen shown above.
2. Access iTunes or Finder and pick your iPad from the device icon or side menu.

3. Once you see the available actions, hit Restore.
4. Wait for restoration to finish (about 15 minutes).
5. Choose to recover your iPad backup.
*If there is no backup on iTunes, set up your iPad as a new device (and restore your backup from another source, if any).
Afterward, the iPad won’t be in a disabled state anymore and won’t ask for a passcode.
2. Hard Reset Your iPad
An iPad that is disabled might not connect to iTunes. Say, your iPad exited Recovery mode on its own and cannot go back into the mode even if you make it try again. That is common; even other iPad users are searching for fixes outside iTunes due to this.
If you find yourself in the exact scenario, there is still hope. Try hard resetting your iPad. You only need the physical buttons; therefore, you don’t have to use the disabled screen to make your iPad rest a bit and wake up in a recovered state. This also won’t erase personal data. The app and system memory is what will be affected. Follow these steps if you want to:
1. Perform the correct pressing sequence, depending on your iPad model.
Latest iPads that lack a home button: Click the volume down button once (this should be fast), and do the same for the volume up button. Next, hold down the on/off button.
Old iPads that integrate a home button: Long-press the home and on/off buttons at once. Disregard the onscreen slider if it shows up.
2. Stop pressing as soon as the gadget displays the Apple logo.
3. Let the iPad switch off and wake up again.
4. Once the iPad restarts, enter your passcode to unlock it.
Being able to do the last step is a sign that the hard reset already remedied the problem. You will not see “iPad is disabled, connect to iTunes” anymore.
3. Connect to iCloud for iPad Restoration
Is your iPad still disabled and not letting you connect to iTunes? If so, try again but on iCloud instead. iCloud restoration has the same benefits as iTunes restoration. It will reset your iPad to fix the issue, although you will need a backup should you want to restore your files. If this is the solution of your choice, refer to our walkthrough:
The iPad that is disabled and asking you to connect to iTunes should be online. It also needs the Find My feature activated for this.
1. Access the iCloud homepage on your PC or another device.

2. Enter the Apple ID associated with the iPad you want to restore.
3. Head to the iCloud Apps section.
4. Press the icon for Find My iPhone.
5. Press your iPad’s name from the All Devices tab.
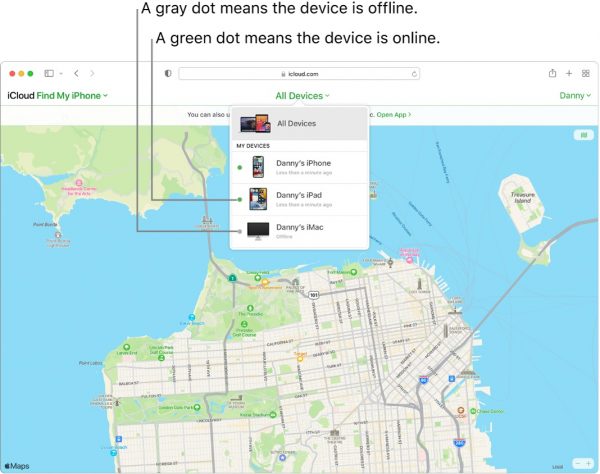
6. Go for the option that lets you erase the iPad’s contents.
Once the iPad is in a clean state, you can restore your backup or move on and use your iPad as a new tablet PC without a set passcode.
4. Try Third-Party Passcode Bypass Software
With more advanced software nowadays, you can bypass your disabled iPad’s passcode without needing to connect to iTunes or iCloud.
Paid or free, they’re easy to use. You usually only need to connect the iPad to the computer that has the software, select the iPad actions you want to do via the program’s clickable tiles, provide some device details if required, and hit the Remove passcode option.
If you have no idea what to start checking out, here are a few big names in the market: Tenorshare 4uKey and Passfab iPhone Unlocker. Besides bypassing your passcode quickly, both can work across Apple devices. That is because even the iPhone can be disabled like your iPad if it constantly detects an incorrect passcode.
Just a reminder, though. Always check if the software is safe (free from computer viruses) before getting one.
5. Ask for Help from Apple Support
If you do not like relying on third-party services, it might be better for you to seek help from Apple personnel. Apple Support is only a few clicks away. You can get advice from the customer help team via the official website or the iOS app.
iPad Disabled? Fix it With or Without iTunes
When your iPad is disabled and needs to connect to iTunes, you can do what it says right away. That will help you regain access to your gadget. However, the iTunes solution isn’t always perfect. Sometimes, the iPad won’t even connect to iTunes or iTunes won’t work in the first place. On the bright side, you can now fix your disabled iPad with or without iTunes through our guide. Do follow our walkthroughs above to solve the problem hassle-free.
Is your iPad touch screen unresponsive at the same time? If yes, see our guide to fixing an iPad touch screen that’s not working!