
Are you running out of storage space on your computer due to your extensive iTunes music library? Don’t worry, there’s a solution! Transferring your entire iTunes library to an external hard drive can free up valuable space on your computer while still allowing you to access all your favorite songs and playlists.
In this article, we will guide you through the process of transferring your iTunes library to an external hard drive. Whether you’re a novice or a tech-savvy individual, we’ve got you covered, with step-by-step instructions and tips to ensure a seamless transfer.
By the end of this article, you’ll be able to confidently move your iTunes library to an external hard drive, giving you more room on your computer without sacrificing your music collection. So let’s dive in and get your iTunes library transferred to an external hard drive today!
Inside This Article
- Understanding iTunes Library
- Reasons to Transfer Music to an External Hard Drive
- Step-by-Step Guide to Transferring Music to an External Hard Drive
- Tips for Efficiently Managing an iTunes Library on an External Hard Drive
- Conclusion
- FAQs
Understanding iTunes Library
When it comes to managing your music collection on your computer, iTunes is one of the most popular choices. But what exactly is the iTunes Library? In simple terms, it is a database that holds all of your music files, playlists, and other media content. It acts as a central hub where you can organize, stream, and sync your music across multiple devices.
The iTunes Library is stored locally on your computer and typically takes up a significant amount of disk space. It includes not only the audio files themselves but also metadata like song titles, artist names, album artwork, and more. This metadata is crucial for organizing and categorizing your music, making it easy to find and enjoy your favorite tracks.
One important thing to note is that the iTunes Library is not limited to just music. It can also store other media types like movies, TV shows, podcasts, and audiobooks. This makes it a versatile tool for managing all your digital media content in one place.
When you first install and open iTunes, it automatically creates a default library for you. However, you also have the option to create multiple libraries or switch between libraries if you have multiple iTunes accounts or want to keep your music separate for different purposes.
Overall, understanding the iTunes Library is essential for effectively managing your music collection. Now that you have a grasp of what it is and what it contains, you can explore the different ways to optimize your library storage and management, such as transferring your music to an external hard drive.
Reasons to Transfer Music to an External Hard Drive
If you are an avid music lover or a professional music producer, you may find that your iTunes library is expanding at a rapid pace. As your collection grows, you might face challenges in maintaining enough storage space on your computer’s internal hard drive. This is where transferring your music to an external hard drive becomes a practical solution.
There are several compelling reasons why you should consider moving your music collection to an external hard drive. Let’s explore some of them:
1. Free up space on your computer: Transferring your music files to an external hard drive frees up valuable space on your computer’s internal storage. This is especially important if you have a large collection of high-quality audio files or if you use your computer for other tasks that require ample storage.
2. Keep your music safe and secure: Computers are prone to hardware failures, crashes, or accidental deletions. By storing your music on an external hard drive, you create a backup of your entire collection. This ensures that even if something happens to your computer, your music remains safe and easily recoverable.
3. Easy accessibility: Having your music library stored on an external hard drive allows you to access your collection from any computer or device with a USB port. This means you can enjoy your music on multiple devices without the need for cumbersome syncing or transferring files between devices.
4. Portability: An external hard drive is portable, allowing you to carry your entire music library with you wherever you go. Whether you’re traveling, DJing at a party, or simply want to listen to your favorite tunes on a different computer, an external hard drive ensures that your music is always within reach.
5. Organization and management: Transferring your music to an external hard drive provides an opportunity to reorganize and manage your collection more efficiently. You can create custom folders, sort your music by genre or artist, and even add descriptive metadata to each file. This enables you to find and play your desired tracks more easily.
6. Future-proofing: As technology advances, the size of music files and formats may change. By transferring your music to an external hard drive now, you ensure that you can easily adapt to new formats or upgrade to larger storage capacities in the future without having to re-download or re-purchase your entire music collection.
Step-by-Step Guide to Transferring Music to an External Hard Drive
Transferring your music from your iTunes library to an external hard drive is a great way to free up space on your computer while still keeping your music collection accessible. Here’s a step-by-step guide to help you through the process:
- Connect your external hard drive: Begin by connecting your external hard drive to your computer. Make sure it is properly recognized and mounted so that you can access it.
- Open iTunes: Launch iTunes on your computer. If it doesn’t open automatically, you can locate and open it from your applications folder or taskbar.
- Access the iTunes preferences: From the menu bar at the top of the screen, click on “iTunes” and select “Preferences” (on Windows, select “Edit” and then “Preferences”).
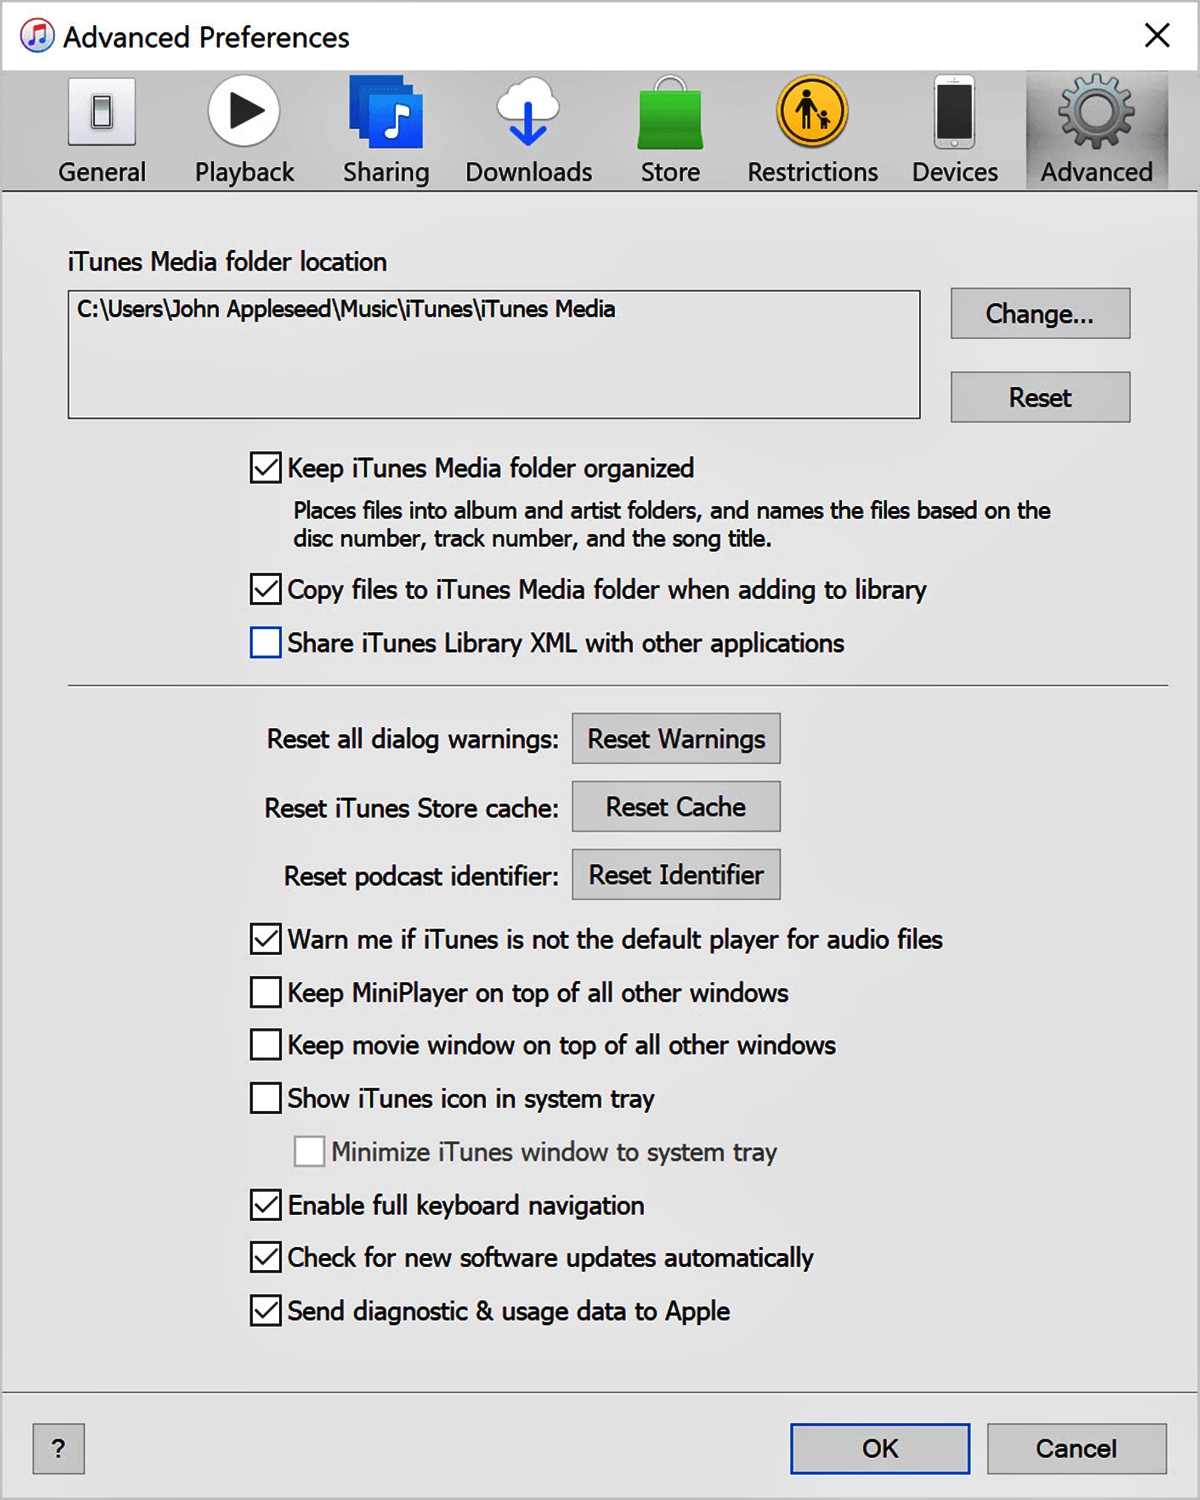
- Go to the Advanced tab: In the Preferences window, click on the “Advanced” tab at the top. This is where you’ll find settings related to your iTunes library.
- Change the iTunes media folder location: Look for the “iTunes Media folder location” option and click on the “Change” button next to it. Select the external hard drive as the new location for your iTunes media folder.
- Copy your music to the external hard drive: Once you’ve changed the iTunes media folder location, click on the “File” menu in iTunes and select “Library”. From there, choose “Organize Library” and check the box that says “Consolidate files”. This will copy all your music to the external hard drive.
- Wait for the transfer to complete: Depending on the size of your music library, the transfer process may take some time. Make sure to keep your computer and external hard drive connected until the transfer is complete.
- Verify the transfer: Once the transfer is done, you can double-check that your music has been successfully copied to the external hard drive. You can browse through the external hard drive and look for the iTunes media folder to ensure all your music files are there.
- Test with iTunes: To make sure your transferred music is accessible, disconnect your computer from the external hard drive and try opening iTunes. Your music should still be visible and playable through iTunes despite being stored on the external hard drive.
- Enjoy your music from the external hard drive: Now that your music is safely stored on the external hard drive, you can enjoy your collection without worrying about taking up space on your computer.
Transferring your music to an external hard drive is a straightforward process that can help you optimize your computer’s storage space. By following these step-by-step instructions, you’ll be able to easily transfer your music and have it accessible through iTunes. Remember to regularly backup your external hard drive to ensure the safety of your music collection.
Tips for Efficiently Managing an iTunes Library on an External Hard Drive
Managing your iTunes library on an external hard drive can be a convenient way to save space on your computer’s internal storage while still enjoying your favorite music. To make the most of this setup, here are some valuable tips for efficiently managing your iTunes library on an external hard drive:
- Organize your music files: Before transferring your music to an external hard drive, take the time to organize your files properly. Create a logical folder structure with clear categories, such as genres, artists, or albums. This will make it easier to locate and manage your music files later on.
- Use descriptive file names: Give your music files meaningful names that accurately reflect the song title, artist, and album. This will help you quickly identify and find specific songs, especially when browsing through a large iTunes library.
- Keep your iTunes library organized: When using an external hard drive, it’s essential to maintain a well-organized iTunes library. Make sure to set the iTunes preferences to point to the location of your music files on the external drive. This ensures that any new songs you add to your library are automatically saved on the external hard drive.
- Regularly backup your iTunes library: Just like any other important data, it’s crucial to backup your iTunes library regularly. Create a backup schedule, either manually or using backup software, to ensure that your music collection is protected in case of any unexpected data loss or hardware failure.
- Consider using cloud storage: In addition to an external hard drive, you can also consider utilizing cloud storage services to back up and access your iTunes library from anywhere. Services like iCloud or Google Drive can be a convenient and secure way to store your music files and sync them across multiple devices.
- Remove duplicate songs: Over time, it’s common to accumulate duplicate songs in your iTunes library. These duplicates take up unnecessary storage space and can make it harder to find the songs you actually want to listen to. Use iTunes’ built-in feature or third-party software to scan and remove duplicate tracks.
- Update metadata and album artwork: Take the time to update and correct the metadata of your music files. This includes song titles, album names, artists, and album artwork. Having accurate and complete metadata will help you quickly find and enjoy your music, especially when using music player apps or devices.
- Keep your iTunes software updated: Regularly check for updates to the iTunes software and install them when available. Updates often include bug fixes, performance improvements, and new features that can enhance your experience with managing and playing your iTunes library.
- Use playlists to organize your music: Playlists are a great way to create custom collections of songs based on your mood, genre preference, or specific occasions. Take advantage of iTunes’ playlist feature to curate and organize your music in a way that suits your personal preferences.
- Utilize smart playlists and automatic syncing: Take advantage of iTunes’ smart playlist feature to create dynamic playlists based on specific criteria, such as favorite songs, most played tracks, or recently added songs. Additionally, explore the option of automatically syncing your playlists with your portable music devices for a seamless and updated music experience on the go.
By following these tips, you can efficiently manage your iTunes library on an external hard drive, ensuring easy access to your favorite music while optimizing storage space on your computer. Enjoy a streamlined and organized music collection that is accessible from anywhere, at any time.
Conclusion
In conclusion, transferring your iTunes library to an external hard drive is a practical and efficient solution for managing your music collection. Not only does it free up valuable space on your computer, but it also provides a backup option to protect your music in case of computer crashes or data loss. By following the steps outlined in this article, you can easily move your entire iTunes library to an external hard drive without losing any of your precious music files. Remember to always safely eject the hard drive before disconnecting it from your computer to avoid any potential data corruption. So go ahead, take control of your iTunes library and enjoy your music hassle-free.
FAQs
1. Can I transfer my entire iTunes library to an external hard drive?
Yes, you can transfer your entire iTunes library to an external hard drive. By doing so, you can free up space on your computer and have your music accessible from any device with the hard drive connected.
2. How do I transfer my iTunes library to an external hard drive?
To transfer your iTunes library to an external hard drive, you can simply locate the iTunes folder on your computer, copy it to the external hard drive, and then point iTunes to the new location. This can be done by changing the iTunes library location in the iTunes preferences.
3. Are there any specific requirements for the external hard drive I should use?
When choosing an external hard drive for your iTunes library, consider the storage capacity based on the size of your library. It is also recommended to opt for a drive with fast data transfer speeds, such as USB 3.0 or Thunderbolt, to ensure smooth playback of your music files.
4. What happens to my iTunes library on the computer after transferring it to an external hard drive?
After transferring your iTunes library to an external hard drive, a copy of your library remains on the computer. However, you can remove the library from your computer’s internal storage to free up space and prevent duplicate copies of media files.
5. Can I access my iTunes library on different devices with the external hard drive?
Yes, you can access your iTunes library on different devices with the external hard drive. Simply connect the hard drive to the device and open iTunes. Make sure the iTunes preferences are set to use the external hard drive as the library location for seamless access to your music files.