
Are you looking to change your wireless network from public to private in Windows 10? If so, you’ve come to the right place. By making this switch, you can enhance the security of your network and ensure that only trusted devices have access to it. Changing your network type from public to private is a crucial step in safeguarding your personal information from potential threats. In this article, we will provide you with step-by-step instructions on how to change your wireless network from public to private in Windows 10. We’ll guide you through the process and highlight various settings that need to be adjusted. So, let’s dive in and get started on making your network more secure!
Inside This Article
- Step 1: Open Network Settings
- Step 2: Change Network Profile to Private
- Step 3: Confirm Network Profile Change
- Step 4: Restart Network Services (Optional)
- Conclusion
- FAQs
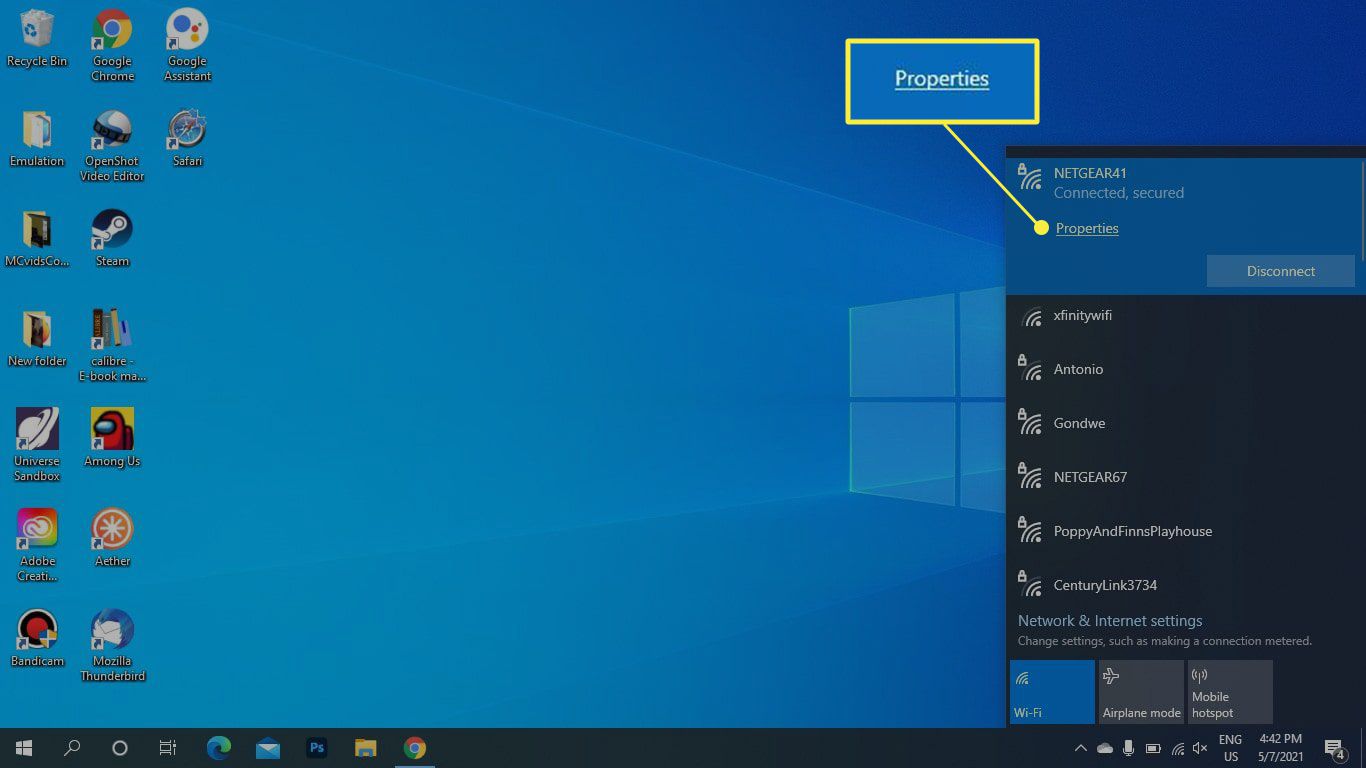
Step 1: Open Network Settings
To change your wireless network from public to private on Windows 10, you’ll need to start by opening the Network settings. This can be done through the Settings app, the Control Panel, or even the taskbar. Let’s explore a few different methods:
Method 1: Using the Settings app
To open Network settings via the Settings app, follow these steps:
- Click on the Start button located on the taskbar and select the Settings icon (shaped like a gear) to open the Settings app.
- Within the Settings app, click on the “Network & Internet” option.
- On the left side of the Network & Internet settings, select “Wi-Fi” (or “Ethernet” if you are using a wired connection).
- On the right side, click on the Wi-Fi network you are connected to.
Method 2: Using the Control Panel
If you prefer accessing Network settings through the Control Panel, follow these steps:
- Press the Windows key + X on your keyboard to open the Power User menu.
- Select “Control Panel” from the menu.
- In the Control Panel window, click on “Network and Internet”.
- Next, click on “Network and Sharing Center”.
- From the left side of the Network and Sharing Center window, click on “Change adapter settings”.
Method 3: Using the taskbar
If you find it more convenient, you can quickly open Network settings right from the taskbar:
- Locate the network icon on the taskbar, which looks like a computer monitor with signal bars.
- Right-click on the network icon.
- In the context menu, select “Open Network & Internet settings”.
Regardless of the method you choose, you will now be at the Network settings screen, ready to proceed to the next steps to change your network profile to private.
Step 2: Change Network Profile to Private
When it comes to securing your wireless network, one important step is to change the network profile from public to private. By doing this, you can ensure that your network is only accessible to trusted devices and users. To change the network profile to private on Windows 10, follow these simple steps:
- Open the “Network and Internet Settings” on your Windows 10 device.
- Click on the “Wi-Fi” tab on the left-hand side.
- Under “Network profile,” you will see the current profile type, which is likely set to “Public.” Click on it to open additional options.
- A dropdown menu will appear, displaying the available network profiles. Select “Private” to change the profile type.
- Once you have selected the “Private” profile, the changes will be applied immediately. Your wireless network is now set to private, ensuring enhanced security.
Changing the network profile to private is an essential step in safeguarding your wireless network. It allows you to control and restrict access to your network, preventing unauthorized users from connecting. By making your network private, you are effectively adding an extra layer of security to your devices and personal data.
Step 3: Confirm Network Profile Change
After selecting the network and accessing the network settings, the next step is to confirm the network profile change. This step is crucial to ensure that your wireless network is properly switched from public to private in Windows 10.
1. Once you are in the network settings, locate the “Network profile” section. This will display the current network profile set for the selected network.
2. To confirm the profile change, click on the drop-down menu next to the network profile and select “Private.” This will change the network profile from public to private.
3. After selecting “Private,” you may notice a prompt asking you to confirm the network profile change. This dialog box is an additional security measure to prevent unauthorized access to your network. Confirm the change by clicking “Yes” or “OK” to proceed.
4. Once you have confirmed the network profile change, the selected network will be marked as a private network. This means that your device will now recognize the network as secure and allow greater access and sharing options.
5. It is important to note that changing the network profile to private may require you to reconnect to the network for the changes to take effect. Simply disconnect and reconnect to the network to ensure that the new network profile settings are applied.
By confirming the network profile change to private, you will enjoy increased security and flexibility in accessing and sharing resources on your Windows 10 device.
Step 4: Restart Network Services (Optional)
If you are facing any issues with your network connection after changing the network profile from public to private on Windows 10, you can try restarting the network services. Although this step is optional, it can often help resolve common network problems.
Here’s how you can restart the network services:
- Press the Windows key and type “services” in the search box. Click on “Services” from the search results.
- In the Services window, scroll down and locate the following services:
- Network Location Awareness
- Network List Service
- Network Store Interface Service
- Network Connections
- Right-click on each of the services mentioned above and select “Restart” from the context menu.
- Wait for the services to restart. Once they have successfully restarted, close the Services window.
- Restart your computer to apply the changes.
After restarting the network services and your computer, check if the network connection is functioning properly. This step refreshes the network configuration and can help resolve any issues that may have occurred during the change in network profile.
Note: If the network connection issue persists, you may need to troubleshoot further or seek assistance from a network technician or your internet service provider.
Remember, restarting network services is an optional step and should only be performed if you are experiencing issues with your network connection. If everything is working fine after changing the network profile to private, there is no need to restart the network services.
Conclusion
Changing your wireless network from public to private on Windows 10 is a straightforward process that can greatly enhance the security and privacy of your connection. By following the simple steps outlined in this guide, you can ensure that your network is no longer accessible to unauthorized users and potential threats.
Remember to regularly review and update your network settings to maintain a safe and secure wireless environment. Keeping your network private not only safeguards your personal data but also prevents unwanted access and potential attacks.
Whether you are using a home network or connecting to public Wi-Fi, it is essential to prioritize your network’s privacy and security. By taking the time to adjust your network settings, you can enjoy seamless online browsing without compromising your personal information.
Now that you have a clear understanding of how to change your wireless network from public to private on Windows 10, you can take the necessary steps to protect your data and enjoy a worry-free browsing experience.
FAQs
Q: How can I change my wireless network from public to private in Windows 10?
A: To change your wireless network from public to private in Windows 10, you can follow these steps:
- Click on the Wi-Fi icon in the system tray and select “Network & Internet settings”.
- In the Settings app, click on “Wi-Fi” in the sidebar.
- Under “Related settings”, click on “Change connection properties”.
- Scroll down to the “Network profile” section and click on the dropdown menu.
- Select “Private” to change the network from public to private.
- Restart your computer to apply the changes.
Q: Why should I change my wireless network from public to private?
A: Changing your wireless network from public to private provides additional security and allows you to access devices and files on your local network more easily. In public network mode, certain network sharing features are disabled to protect your computer from potential vulnerabilities. By switching to private network mode, you can enable file sharing, printer sharing, and network discovery, making it easier to collaborate with others and access your devices and data within your network.
Q: Can I change the network profile for both Wi-Fi and Ethernet connections?
A: Yes, you can change the network profile for both Wi-Fi and Ethernet connections. The steps to change the network profile are the same for both connection types. Simply follow the steps mentioned earlier in the answer to the first question, and you will be able to change the network profile of your Wi-Fi and Ethernet connections from public to private or vice versa.
Q: Will changing the network profile affect my network security?
A: Changing the network profile from public to private or vice versa does not directly impact network security. However, it is important to note that public networks have stricter security settings enabled by default to protect your computer from potential threats. By switching to the private network profile, you may be enabling certain network sharing features that could potentially expose your computer or devices to vulnerabilities. Therefore, it is crucial to always maintain proper security measures such as using a reliable firewall, keeping your operating system and antivirus software up to date, and practicing safe browsing habits.
Q: Can I change the network profile for a specific network only?
A: Yes, you can change the network profile for a specific network only. Windows 10 allows you to individually set the network profile for each network you connect to. This means that you can have different network profiles for different Wi-Fi networks or Ethernet connections. To change the network profile for a specific network, follow the steps mentioned earlier in the answer to the first question while connected to that specific network.