
Are you tired of being tethered to an ethernet cable? Do you want to enjoy the convenience of being able to connect your laptop to the internet wirelessly? Connecting your laptop to a wireless internet network is easier than you might think. With just a few simple steps, you can free yourself from the limitations of wired connections and enjoy the flexibility of accessing the internet from anywhere within your Wi-Fi range. Whether you’re at home, in a coffee shop, or at a friend’s house, connecting your laptop to wireless internet opens up a world of possibilities. In this article, we will guide you through the process of connecting your laptop to a wireless internet network, ensuring that you can stay connected and productive no matter where you are.
Inside This Article
- Purpose of the Article
- Prerequisites for Connecting Laptop to Wireless Internet
- Step-by-Step Guide on How to Connect Laptop to Wireless Internet
- Troubleshooting Common Connection Issues
- Conclusion
- FAQs
Purpose of the Article
In today’s digital age, being able to connect your laptop to a wireless internet connection is essential. Whether you’re at home, in a coffee shop, or traveling, having the ability to access the internet wirelessly gives you the freedom to work, browse, and stay connected wherever you go. The purpose of this article is to provide you with a comprehensive guide on how to connect your laptop to a wireless internet network.
We will walk you through the step-by-step process, from checking the prerequisites to troubleshooting common connection issues. By following this guide, you can overcome any obstacles that might arise and ensure a smooth and reliable internet connection on your laptop.
Our aim is to make this article accessible and easy to understand, even for those who are not tech-savvy. You don’t need to be an IT expert to successfully connect your laptop to a wireless network. With our guidance, you will have the knowledge and confidence to navigate through the settings and options required for a successful connection.
Whether you’re a student needing to access online resources, a professional requiring internet access for work-related tasks, or simply someone who wants to browse the web or stream videos, this article will equip you with the necessary information to get connected.
So, if you’re ready to untether your laptop and enjoy the freedom of wireless internet, let’s dive into the prerequisites and step-by-step instructions to connect your laptop to a wireless network.
Prerequisites for Connecting Laptop to Wireless Internet
Before you can connect your laptop to a wireless internet network, there are a few prerequisites you need to fulfill. Here are some key requirements to ensure a successful connection:
1. A laptop with built-in Wi-Fi capability: Make sure your laptop has a wireless network adapter. Most modern laptops come with built-in Wi-Fi, but if yours doesn’t, you will need to purchase a USB Wi-Fi adapter.
2. An active internet service provider (ISP) subscription: You must have an active internet subscription from an ISP. This can be a cable broadband, DSL, or fiber optic connection. Contact your ISP for the necessary details and ensure that your subscription is active.
3. A wireless internet network: Ensure that there is an available wireless network in your vicinity. This could be a public Wi-Fi network or a private network set up by you or someone else. You will need the network name (SSID) and password to connect.
4. Network access permission: If you are connecting to a private wireless network, make sure you have the necessary permission to access it. Obtain the network credentials from the network owner or administrator.
5. Updated drivers and software: Before attempting to connect, ensure that your laptop’s Wi-Fi drivers and operating system are up to date. This can help avoid compatibility issues and ensure a smooth connection process.
6. Power source: Connect your laptop to a power source to ensure that it does not run out of battery during the connection process. Connecting to a wireless network can consume power and drain the battery faster.
By fulfilling these prerequisites, you will be well-prepared to connect your laptop to a wireless internet network. Once these requirements are met, you can proceed with the step-by-step guide to establish a successful connection.
Step-by-Step Guide on How to Connect Laptop to Wireless Internet
Connecting your laptop to a wireless internet network provides the convenience of browsing the web, streaming videos, and accessing online resources without the hassle of tangled cables. Whether you’re a student, a professional, or simply someone who enjoys staying connected, here is a step-by-step guide on how to connect your laptop to a wireless internet network.
1. Ensure your laptop has a wireless network adapter: Before attempting to connect to a wireless network, ensure that your laptop has a built-in wireless network adapter or an external USB wireless adapter. Most modern laptops come equipped with a wireless adapter, but if yours doesn’t, you can easily purchase and install a USB adapter.
2. Turn on your laptop’s wireless capabilities: Locate the physical wireless switch on your laptop. It is often located on the side or front of the device. Slide or press the switch to turn on the wireless capabilities of your laptop. If your laptop doesn’t have a physical switch, check the function keys (usually labeled with an antenna icon) and press the corresponding key combination to enable Wi-Fi.
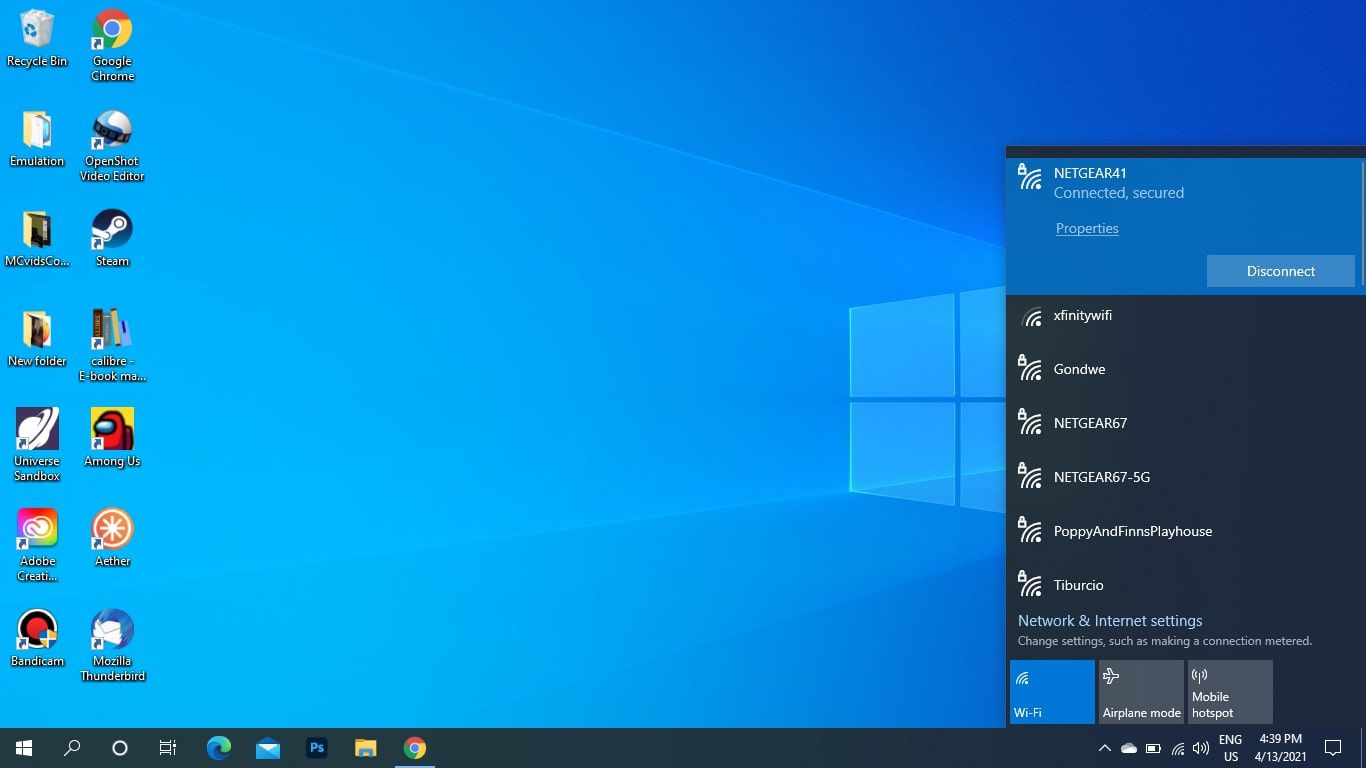
3. Find available wireless networks: Once your laptop’s wireless capabilities are turned on, navigate to the network icon on your taskbar (usually located on the bottom right corner of the screen). Click on the network icon to open the network menu and select “Open Network & Internet settings” or a similar option.
4. Access the Wi-Fi settings: In the network settings window, click on the “Wi-Fi” tab to access the Wi-Fi settings. In this section, you will see a list of available wireless networks in your vicinity. Wait for a few seconds for the list to populate.
5. Select a wireless network: From the list of available networks, choose the wireless network you want to connect to. Make sure to select a network that you have permission to access, such as your home network or a public Wi-Fi hotspot. If you don’t see your desired network, click on the “Refresh” button to rescan for available networks.
6. Connect to the wireless network: Once you’ve selected a network, click on the “Connect” button to establish a connection. If the network is password-protected, you will be prompted to enter the network security key or password. Type in the security key and click “Connect” to proceed.
7. Verify your connection: After entering the correct security key, your laptop will attempt to connect to the wireless network. Wait for a few moments while your laptop establishes a connection. Once connected, the network icon in the taskbar will indicate a successful connection.
8. Test your internet connection: To ensure that your laptop is successfully connected to the wireless network, open a web browser and visit a website of your choice. If the website loads without any issues, congratulations! You have successfully connected your laptop to a wireless internet network.
9. Secure your network connection: Lastly, it’s important to ensure the security of your wireless network. Set a strong and unique password for your Wi-Fi network and consider enabling additional security features such as network encryption and MAC address filtering to prevent unauthorized access.
By following these step-by-step instructions, you will be able to connect your laptop to a wireless internet network effortlessly. Stay connected and enjoy the freedom of wireless browsing!
Troubleshooting Common Connection Issues
Connecting your laptop to wireless internet can sometimes be a breeze, but there are times when you might encounter some connection issues. Don’t worry, though! We’ve got you covered with some common troubleshooting tips to help you get back online in no time.
1. Check your Wi-Fi signal: The first thing to do is to ensure that you are within range of a strong Wi-Fi signal. If you are too far away from the router, try moving closer to improve the signal strength.
2. Restart your laptop: It may seem like a simple solution, but sometimes restarting your laptop can resolve connectivity issues. Restarting clears any temporary glitches and refreshes the system, giving it a clean start.
3. Verify the network password: Double-check that you are typing the correct password for your Wi-Fi network. Passwords are case-sensitive, so make sure your caps lock is off and be mindful of any special characters or numbers.
4. Update your wireless driver: Outdated or incompatible wireless drivers can cause connectivity problems. Visit the manufacturer’s website to download and install the latest driver for your wireless adapter.
5. Disable the firewall: Sometimes, the firewall settings on your laptop can prevent it from connecting to the internet. Temporarily disable your firewall and check if it resolves the issue. Remember to re-enable it after troubleshooting.
6. Reset the router: If you are unable to connect to the internet with any device, try resetting your router. Locate the reset button on the back of the router and hold it down for about 10 seconds. This will restore the router to its default settings.
7. Check for interference: Other devices or appliances, such as cordless phones or microwaves, can interfere with your Wi-Fi signal. Move these devices away from the router or switch to a less congested Wi-Fi channel.
8. Clear DNS cache: DNS cache stores information about previously visited websites, and if it becomes corrupt, it can lead to connection issues. Open the Command Prompt (Windows) or Terminal (Mac) and type the command “ipconfig/flushdns” to clear the DNS cache.
9. Contact your internet service provider (ISP): If you have exhausted all troubleshooting steps and are still unable to connect to the internet, it’s time to reach out to your ISP. They may be experiencing network issues or can provide further guidance to resolve the problem.
By following these troubleshooting tips, you should be able to resolve common connection issues and experience uninterrupted wireless internet connectivity on your laptop.
Conclusion
Connecting your laptop to a wireless internet network is essential for staying connected and productive on the go. By following the steps outlined in this article, you can easily connect your laptop to a wireless network and enjoy all the benefits of internet access wherever you are.
Remember to ensure that your laptop has a built-in Wi-Fi card or a compatible external Wi-Fi adapter, and that you have the correct network name and password. Additionally, be sure to position your laptop within range of the wireless router to maintain a strong and stable connection.
In today’s digital age, having a reliable and secure internet connection is crucial. With the knowledge you now possess, you can confidently connect your laptop to a wireless network and enjoy seamless internet access and all the opportunities it brings.
FAQs
1. How do I connect my laptop to a wireless internet network?
To connect your laptop to a wireless internet network, follow these steps:
- Ensure that your laptop has a wireless network adapter installed.
- From your laptop’s system tray, locate the wireless network icon (usually represented by bars or a signal icon).
- Click on the wireless network icon to open a list of available networks.
- Select the network you want to connect to from the list.
- If the network requires a password, enter it when prompted.
- Once connected, your laptop should display a notification confirming the successful connection to the wireless network.
2. Can I connect my laptop to any wireless network?
In most cases, you can connect your laptop to any wireless network as long as you have the necessary credentials (such as a password, if required) and the network is within range. However, some networks may have restrictions or require additional permissions for connection. It’s always recommended to connect to secure and trusted networks to ensure the safety of your data.
3. How can I improve the wireless signal strength on my laptop?
To improve the wireless signal strength on your laptop, you can try the following tips:
- Position your laptop closer to the wireless router or access point.
- Avoid obstructions, such as walls or furniture, that can interfere with the signal.
- Update your laptop’s wireless network drivers to the latest version.
- Consider using a wireless range extender or a mesh network system to expand your network coverage.
- Optimize the positioning and placement of your wireless router for better signal distribution.
- Minimize interference from other devices, such as microwaves or cordless phones, that operate on the same frequency.
4. How can I troubleshoot wireless connection issues on my laptop?
If you are experiencing wireless connection issues on your laptop, you can try the following troubleshooting steps:
- Restart your laptop and the wireless router.
- Ensure that the wireless adapter on your laptop is enabled.
- Check if other devices can connect to the wireless network to determine if the problem is specific to your laptop.
- Run the built-in network troubleshooter on your laptop, which can help identify and resolve common connection problems.
- Update your laptop’s wireless network drivers to the latest version.
- Reset the wireless router to its factory settings and reconfigure it.
5. Can I connect my laptop to a wireless network without a password?
In most cases, you will need a password to connect your laptop to a wireless network that is secure and encrypted, such as WPA2. However, some public or open networks may not require a password for connection. It is important to exercise caution when connecting to open networks, as they may not provide secure connections and could potentially expose your data to unauthorized access.