
Are you a Mac user who wants to clear browsing data? Whether you want to improve your browsing speed, protect your privacy, or free up storage space on your Mac, clearing browsing data is essential. In this article, we will guide you through the process of clearing browsing data on your Mac, step by step. From clearing your browser history, cookies, and cache to managing saved passwords and autofill data, we’ve got you covered. We’ll also provide you with some helpful tips and tricks along the way to optimize your browsing experience on your Mac. So, let’s dive in and learn how to clear browsing data on your Mac like a pro!
Inside This Article
- What is Browsing Data on Mac?
- Why is it important to clear Browsing Data?
- How to Clear Browsing Data on Mac:
- Step 1: Open the Safari browser
- # Step 2: Access the Preferences menu
- Step 3: Select the Privacy tab
- Step 4: Choose the option “Remove All Website Data”
- # Step 5: Confirm the action
- Additional Tips for Clearing Browsing Data on Mac:
- # Tip 1: Customize the types of data to be cleared
- # Tip 2: Set up automatic deletion of browsing data
- # Tip 3: Clear browsing data for other browsers (e.g., Chrome, Firefox)
- Conclusion
- FAQs
What is Browsing Data on Mac?
Browsing data on Mac refers to the information that is collected and stored by your web browser as you browse the internet. This data includes your browsing history, cookies, cache files, download history, saved passwords, and other site-specific data. Essentially, it is a record of your online activities and interactions.
Whenever you visit a website, your browser automatically stores certain data to help improve your browsing experience. This can include information such as the web pages you visit, the time and date of your visits, and even your preferences on those websites. While browsing data can be useful for various purposes, it can also accumulate over time and potentially compromise your privacy.
In addition to your browsing history, cookies play a significant role in collecting and storing data. Cookies are small text files that websites place on your computer to remember information about your visits and preferences, allowing for a more personalized browsing experience. However, they can also track your online activities and be used for targeted advertising.
Overall, browsing data on Mac consists of various elements that contribute to your browsing experience and help websites deliver customized content. However, it’s important to be aware of the potential privacy implications and take steps to manage and clear this data as needed.
Why is it important to clear Browsing Data?
Clearing browsing data on your Mac is an essential practice that helps maintain the performance and security of your device. When you browse the internet, your browser collects various types of data, including cookies, cache files, browsing history, and form data. While this data can enhance your browsing experience by remembering your preferences and speeding up page loading times, it can also accumulate over time and potentially cause issues.
Here are some key reasons why it is important to regularly clear browsing data on your Mac:
- Protect your privacy: Browsing data can contain sensitive information, such as login credentials, personal details, and browsing habits. By clearing your browsing data, you prevent this information from being accessible to unauthorized individuals or malicious entities.
- Free up storage space: Browsing data, especially cache files, can take up a significant amount of storage space on your Mac. By removing unnecessary data, you can reclaim valuable storage space, ensuring your Mac performs optimally.
- Improve browser performance: As you browse the internet, your browser accumulates cache files and cookies that can slow down its performance over time. By clearing this data, you can improve the speed and responsiveness of your browser.
- Prevent conflicts and errors: Outdated or conflicting data in your browsing history or cookies can sometimes cause issues when interacting with websites. Clearing your browsing data can help resolve these conflicts and prevent errors, ensuring a smoother browsing experience.
- Start fresh: Clearing your browsing data allows you to start with a clean slate. This means websites won’t have any previous data about your visits, ensuring a more private and unbiased browsing experience.
Overall, regularly clearing your browsing data is a proactive step to protect your privacy, improve system performance, and ensure a smooth and secure browsing experience. It allows you to maintain control over your personal information and optimize your device’s resources for better performance.
How to Clear Browsing Data on Mac:
If you’re using a Mac and want to clear your browsing data, you’ve come to the right place. Clearing your browsing data is important for several reasons, such as maintaining your privacy, freeing up storage space, and improving browser performance. In this article, we will guide you through the steps to clear browsing data on your Mac.
Step 1: Open the Safari browser
The first step is to launch the Safari browser on your Mac. Safari is the default browser in macOS, and it’s located in the dock or the Applications folder.
Step 2: Access the Preferences menu
Once you have opened Safari, click on the “Safari” option in the menu bar at the top of the screen. A drop-down menu will appear, and from there, select “Preferences.
Step 3: Select the Privacy tab
In the Preferences window, you will see several tabs at the top. Click on the “Privacy” tab, which is represented by a padlock icon.
Step 4: Choose the option “Remove All Website Data”
Within the Privacy tab, you will find various options related to your browsing data. To clear all of your browsing data, click on the “Remove All Website Data” button. This will delete all cookies, cache, and other information associated with the websites you have visited.
Step 5: Confirm the action
Once you click on “Remove All Website Data,” a confirmation window will appear asking you to confirm the action. Make sure to read the message and understand that clearing your browsing data will log you out of websites and remove any saved data. If you’re sure you want to proceed, click on the “Remove Now” button.
Additional Tips for Clearing Browsing Data on Mac:
Tip 1: Customize the types of data to be cleared
If you want more control over the types of data to be cleared, you can click on the “Manage Website Data” button within the Privacy tab. This will allow you to selectively remove data for specific websites.
Tip 2: Set up automatic deletion of browsing data
To ensure that your browsing data remains clear regularly, you can enable the “Remove history items” setting within the History tab. This will delete your browsing history, cookies, and cache after a specified time period.
Tip 3: Clear browsing data for other browsers (e.g., Chrome, Firefox)
If you are using a different browser like Google Chrome or Mozilla Firefox, the process of clearing browsing data might be slightly different. Explore the browser’s preferences or settings menu to find the option to clear browsing data or visit the browser’s support website for specific instructions.
Step 1: Open the Safari browser
To begin the process of clearing your browsing data on your Mac, you’ll need to open the Safari browser. Safari is the default web browser on Apple devices and offers a user-friendly interface for browsing the internet.
Here’s how you can open Safari on your Mac:
- Click on the blue Safari icon located in your Dock at the bottom of your screen. Alternatively, you can click on the magnifying glass icon in the top-right corner of your screen and type “Safari” in the search bar. Then, click on the Safari app from the search results.
- Once Safari is open, you’ll see the familiar browser window with the address bar at the top and the toolbar below it.
Safari provides a seamless and intuitive browsing experience, making it the go-to choice for many Mac users. By opening Safari, you’re now ready to delve into the process of clearing your browsing data and improving your browsing performance.
# Step 2: Access the Preferences menu
After opening the Safari browser, the next step to clear browsing data on your Mac is to access the Preferences menu. The Preferences menu allows you to customize various settings in Safari, including those related to privacy and browsing data.
To access the Preferences menu, you can either click on “Safari” in the menu bar at the top of your screen and select “Preferences” from the drop-down menu, or you can use the keyboard shortcut “Command,” and the comma key (Command+,) to bring up the Preferences window.
Once you have opened the Preferences window, you will see several tabs at the top. These tabs represent different categories of settings in Safari. To clear your browsing data, you need to navigate to the “Privacy” tab. Click on the “Privacy” tab to proceed.
By accessing the Preferences menu and navigating to the Privacy tab, you are now ready to take the next steps to clear your browsing data on your Mac.
Step 3: Select the Privacy tab
After opening the Safari browser and accessing the Preferences menu, it’s time to navigate to the Privacy tab. This tab is where you can find the options related to clearing your browsing data on your Mac.
Once you are in the Preferences menu, you will see a row of tabs at the top of the window. Click on the “Privacy” tab, which is usually the third or fourth tab from the left.
In the Privacy tab, you’ll find various options for managing your browsing data. These options allow you to customize how Safari handles cookies, website data, and other privacy-related settings.
This tab is where you will find the “Remove All Website Data” option, which is essential for clearing your browsing data. By selecting this option, you will be able to remove all stored website data, including cookies, cache files, and browsing history.
It’s important to note that clearing your browsing data will sign you out of websites and may affect your browsing experience. Make sure to consider any login credentials or preferences you may have saved before proceeding with this step.
Once you have selected the Privacy tab and familiarized yourself with the various options, you are ready to move on to the next step in clearing your browsing data on your Mac.
Step 4: Choose the option “Remove All Website Data”
After accessing the Privacy tab in the Safari Preferences menu, you will see various options for managing your browsing data. One of the most effective ways to clear this data is by choosing the “Remove All Website Data” option.
By selecting this option, Safari will remove all stored data related to websites you have visited, including browsing history, cookies, cached files, and more. This ensures a fresh start and helps protect your privacy.
When you click on “Remove All Website Data,” a confirmation dialog box will appear, asking if you want to proceed with the deletion. Ensure that you have reviewed the list of data to be removed and that it aligns with your intentions.
Keep in mind that clearing all website data may cause certain websites to forget your preferences, such as saved login credentials or site preferences. However, it can also help resolve issues like slow browsing or conflicts with certain websites.
Once you have considered the implications, go ahead and click on the “Remove Now” button in the confirmation dialog box. Safari will then initiate the process of clearing all website data from your Mac.
It’s important to note that clearing website data may take some time, depending on the amount of data accumulated. Be patient and avoid interrupting the process to ensure a thorough deletion.
After the process is complete, you will have successfully cleared all website data from your Safari browser on your Mac. Enjoy a clean browsing experience, knowing that your privacy is protected!
# Step 5: Confirm the action
After selecting the option to remove all website data, a confirmation prompt will appear on your screen. This is an important step as it ensures that you do not accidentally clear your browsing data.
In the confirmation prompt, you will typically be asked to verify if you want to remove all website data. Make sure to read the prompt carefully and double-check your decision before proceeding. If you are certain that you want to clear your browsing data, click on the “Remove Now” or “Clear Data” button.
Keep in mind that once you confirm the action, all your browsing data, including cookies, cache, history, and other related information, will be permanently deleted. This cannot be undone, so make sure to proceed with caution.
It may take a few moments for the browser to process and clear the browsing data. Once it is complete, you will usually receive a notification or see a confirmation message confirming that the action has been successfully executed.
By confirming the action, you have successfully cleared your browsing data on your Mac. This will help protect your privacy, free up storage space, and potentially improve the performance of your browser.
Remember that clearing your browsing data is a regular maintenance task that you should perform periodically to ensure the smooth functioning of your Mac and to maintain your online privacy.
Now that you have cleared your browsing data, you can continue using your Mac and Safari browser with a clean slate, knowing that your sensitive information is secure and your browsing history is no longer accessible.
Additional Tips for Clearing Browsing Data on Mac:
While following the steps mentioned above will help you clear your browsing data on Safari, there are a few additional tips that can enhance your browsing experience on Mac:
Tip 1: Customize the types of data to be cleared: In the Privacy tab of Safari preferences, you have the option to choose which types of browsing data you want to clear. By default, all data including cookies, cache, and browsing history are selected. However, you can uncheck specific options if you want to retain certain information. This allows you to have more control over what gets deleted.
Tip 2: Set up automatic deletion of browsing data: To save time and ensure that your browsing data is regularly cleared, you can set up automatic deletion. In the Safari preferences, go to the General tab and click on the “Remove history items” dropdown menu. From here, you can choose a time frame for the automatic deletion of browsing history. This feature is particularly useful if you want to keep your browsing history clean without having to manually clear it every time.
Tip 3: Clear browsing data for other browsers: While Safari is the default browser on a Mac, many users also have other browsers installed, such as Google Chrome or Mozilla Firefox. To clear browsing data on these browsers, you’ll need to follow a different set of steps. For example, in Chrome, you can access the browsing data settings by going to Preferences > Privacy and Security > Clear Browsing Data. Make sure to familiarize yourself with the procedures specific to each browser, especially if you use multiple browsers on your Mac.
By utilizing these additional tips, you can enhance your browsing privacy and optimize the performance of your Mac. Remember to periodically clear your browsing data to maintain a clutter-free and secure browsing experience.
# Tip 1: Customize the types of data to be cleared
When clearing your browsing data on Mac, you have the option to customize the types of data that you want to clear. This allows you to have more control over your privacy and personal preferences. By customizing the types of data to be cleared, you can ensure that only the information you want to remove is deleted, while keeping the rest intact.
To customize the types of data to be cleared, follow these steps:
- Step 1: Open the Safari browser on your Mac.
- Step 2: Access the Preferences menu by clicking on “Safari” in the menu bar and selecting “Preferences” from the drop-down menu.
- Step 3: In the Preferences window, click on the “Privacy” tab.
- Step 4: Under the “Cookies and website data” section, click on the “Manage Website Data” button.
- Step 5: In the Website Data window, you’ll see a list of websites that have stored data on your Mac. To customize the types of data to be cleared, you can either:
- Select specific websites: Use the search bar or scroll through the list to find the websites whose data you want to remove. Check the boxes next to the websites you want to clear and click on the “Remove” button.
- Remove all data: If you prefer to remove all browsing data, click on the “Remove All” button.
- Step 6: Once you have selected the websites or cleared all data, click on the “Done” button to exit the Website Data window.
By customizing the types of data to be cleared, you can choose to only remove data from specific websites, allowing you to keep your preferences and settings intact for other websites. This way, you have greater control over your online privacy while minimizing any inconvenience.
It’s important to note that these steps are specific to the Safari browser on Mac. If you’re using a different browser like Chrome or Firefox, the process may vary slightly.
# Tip 2: Set up automatic deletion of browsing data
Clearing your browsing data regularly can be quite a hassle, especially if you’re someone who frequently uses your Mac for internet browsing. However, there is an easy solution to this problem – setting up automatic deletion of browsing data. By doing so, you can ensure that your browsing history, cookies, and cache are regularly cleared without any manual intervention.
Setting up automatic deletion of browsing data may slightly vary depending on the browser you are using. Let’s take a look at how you can do it for Safari, the default browser on your Mac:
Step 1: Open the Safari browser on your Mac.
Step 2: Access the Preferences menu. You can do this by clicking on “Safari” in the top menu bar and selecting “Preferences.”
Step 3: Select the “Privacy” tab from the Preferences menu.
Step 4: In the Privacy tab, you will find an option that says “Remove history items.” By default, it is set to “After one year.” Click on this option to choose a more frequent deletion interval, such as “After one day” or “After one week.”
Step 5: It’s important to note that this setting will only apply to future browsing data. To delete your existing browsing data, you can click on the “Manage Website Data” button and remove the data manually.
That’s it! You have now set up automatic deletion of browsing data on Safari. This ensures that your browser history, cookies, and cache will be cleared according to the specified time interval, keeping your browsing experience clean and private.
It’s worth mentioning that other popular browsers like Google Chrome and Mozilla Firefox also offer similar options to automatically delete browsing data. The process may differ slightly, but you can usually access these settings through the browser’s preferences or settings menu.
By setting up automatic deletion of browsing data, you can save yourself the trouble of manually clearing your history and cache. This not only helps maintain your privacy but also ensures smoother browsing performance by keeping your browser optimized.
So why not take a few moments to configure automatic deletion of browsing data on your Mac? It’s a simple yet effective way to keep your browsing experience clean and hassle-free.
Now that you know how to set up automatic deletion of browsing data on your Mac, let’s move on to the next tip to further optimize your browsing experience.
# Tip 3: Clear browsing data for other browsers (e.g., Chrome, Firefox)
Clearing browsing data is not limited to just the Safari browser on your Mac. If you also use other popular web browsers like Chrome or Firefox, it is important to know how to clear browsing data on those as well. Here’s how you can do it:
For Google Chrome:
1. Open Google Chrome on your Mac.
2. Click on the three dots icon in the top-right corner of the browser window to open the Chrome menu.
3. Hover over the “More tools” option in the menu, then select “Clear browsing data”.
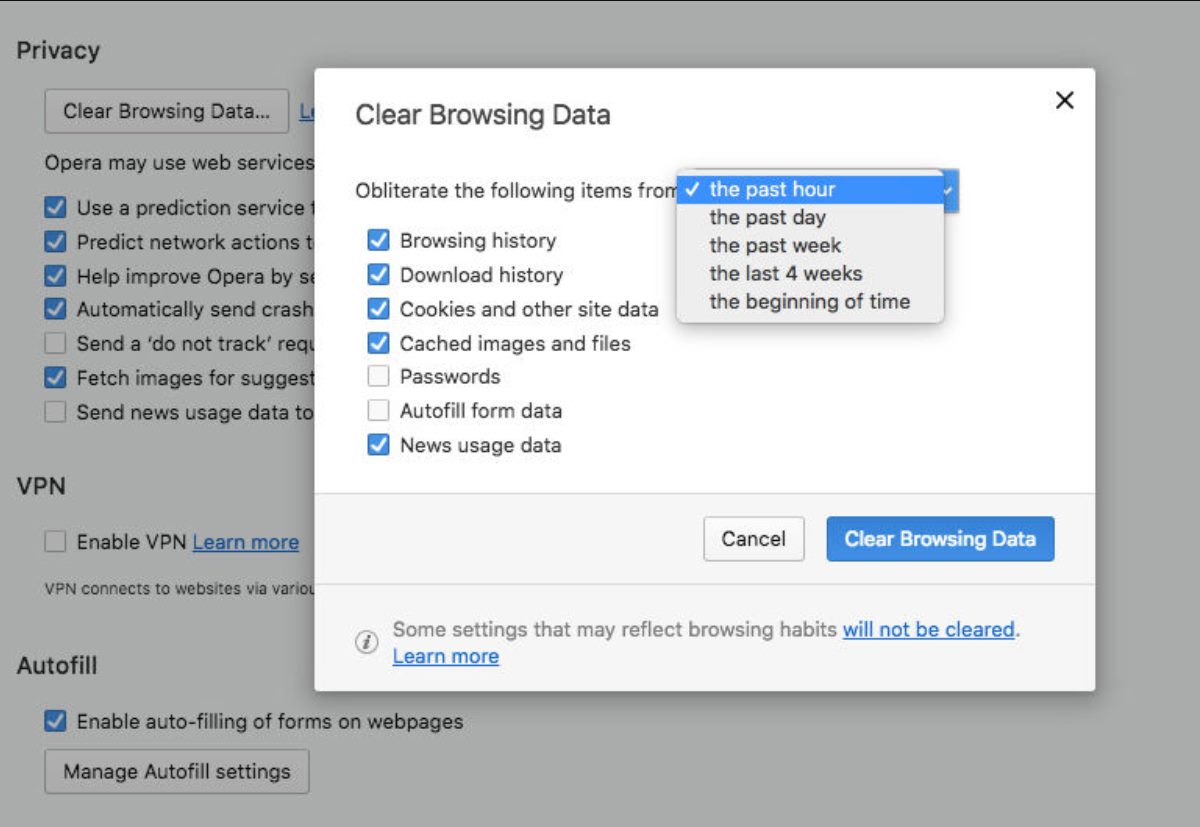
4. In the Clear browsing data window, you can choose the time range for which you want to clear the data. Select “All time” to erase all browsing history.
5. Tick the checkboxes for the types of data you want to clear, such as browsing history, cookies, cached images and files, and more.
6. Click on the “Clear data” button to remove the selected browsing data from Chrome.
For Mozilla Firefox:
1. Open Mozilla Firefox on your Mac.
2. Click on the three lines icon in the top-right corner of the browser window to open the Firefox menu.
3. Select “Options” from the menu.
4. In the left sidebar, click on the “Privacy & Security” tab.
5. Scroll down to the “Cookies and Site Data” section and click on the “Clear Data” button.
6. Tick the checkboxes for the types of data you want to clear, such as cookies, cache, and offline website data.
7. Click on the “Clear” button to remove the selected browsing data from Firefox.
By following these steps, you can ensure that your browsing data is cleared not only from Safari but also from other commonly used browsers like Chrome and Firefox. It is recommended to regularly clear your browsing data to maintain your privacy and optimize the performance of your Mac.
Conclusion
In conclusion, knowing how to clear browsing data on Mac is essential for maintaining privacy, optimizing performance, and troubleshooting browser issues. Whether you use Safari, Chrome, Firefox, or any other web browser, the process may vary slightly, but the general steps remain the same. By regularly clearing your browsing data, you can remove temporary files, cookies, and other cached information that can accumulate over time.
Clearing your browsing data also helps protect your personal information from being accessed by unauthorized individuals. It allows you to start with a clean slate and enjoy a faster, more secure browsing experience. Remember to choose the appropriate time range and select the data you want to clear based on your needs.
Now that you have a clear understanding of how to clear browsing data on Mac, take the time to periodically perform this task to keep your internet activities private and your browser running smoothly.
FAQs
1. Why should I clear browsing data on my Mac?
Clearing browsing data on your Mac is important for several reasons. It helps protect your privacy by removing your browsing history, cookies, and cached files that can contain sensitive information. It also helps to free up disk space and improve the overall performance of your Mac.
2. How do I clear browsing data on my Mac?
To clear browsing data on your Mac, follow these steps:
- Open the Safari browser on your Mac.
- Click on “History” in the menu bar at the top of the screen.
- Select “Clear History…” from the drop-down menu.
- Choose the time range for which you want to clear the browsing data.
- Click on “Clear History” to confirm.
3. Will clearing browsing data delete my saved passwords?
When you clear browsing data, your saved passwords will not be deleted. However, if you have selected “Remove saved names and passwords” in Safari preferences, clearing browsing data will also remove your saved passwords.
4. Can I selectively clear browsing data for specific websites?
Yes, you can selectively clear browsing data for specific websites on your Mac. Here’s how:
- Open Safari and click on “Safari” in the menu bar.
- Select “Preferences” from the drop-down menu.
- Go to the “Privacy” tab.
- Click on “Manage Website Data…”
- You will see a list of websites with stored data. Select the websites you want to remove and click “Remove” or “Remove All”.
5. Can I automatically clear browsing data on my Mac?
Yes, you can set up Safari to automatically clear browsing data on your Mac. Follow these steps:
- Open Safari and click on “Safari” in the menu bar.
- Select “Preferences” from the drop-down menu.
- Go to the “General” tab.
- Under the “Remove history items” section, select the time interval for automatic cleaning.
- Close the Preferences window.
These FAQs should help you understand the importance of clearing browsing data on your Mac and guide you through the steps to do so effectively.