
Are you looking to enhance your web browsing experience on your iPhone, iPad, or Mac? One way to achieve this is by creating a Safari profile. A Safari profile allows you to personalize your web browsing settings and preferences, making for a more tailored and efficient experience. Whether you want to customize your bookmarks, manage your browsing history, or enable certain features like Reader Mode or iCloud Tabs, creating a Safari profile gives you the freedom to make Safari work exactly the way you want it to. In this article, we will guide you through the simple steps to create a Safari profile on your iOS device or Mac, so you can take full advantage of this powerful web browser.
Inside This Article
- Enable Safari Profile on iPhone
- Set Up Safari Profile on iPad
- Create a Safari Profile on Mac
- Customize Safari Profile Settings
- Conclusion
- FAQs
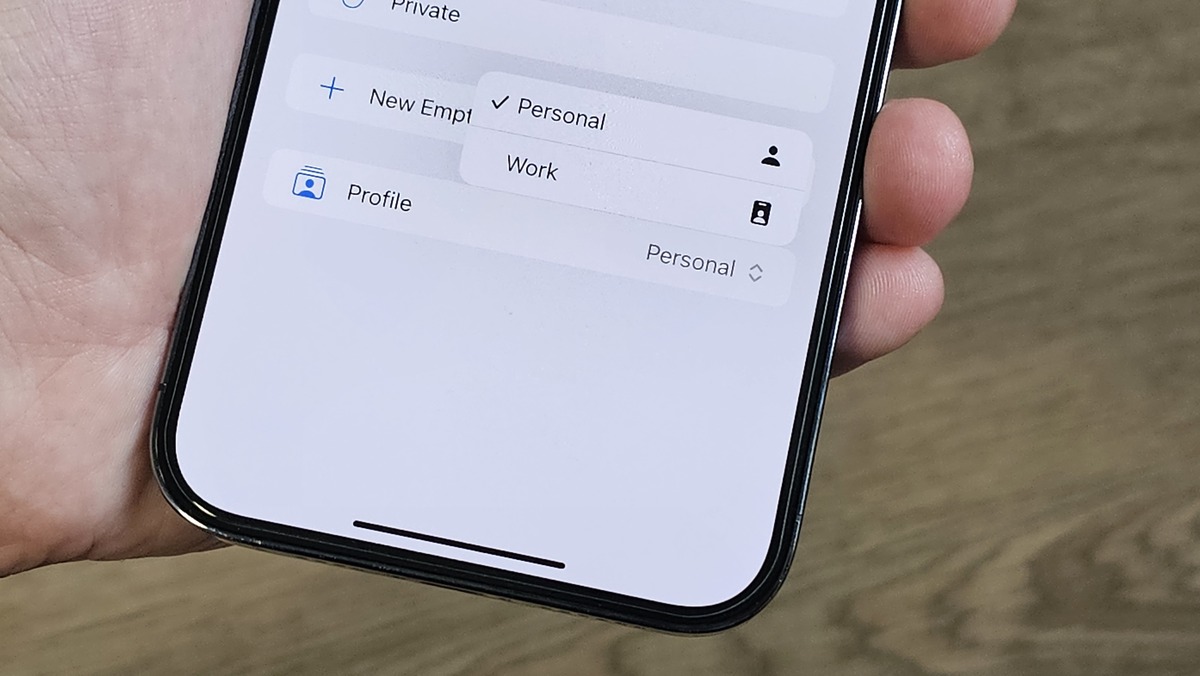
Enable Safari Profile on iPhone
Creating a Safari profile on your iPhone allows you to personalize your browsing experience and sync your data across multiple devices. Here’s how you can enable Safari profiles on your iPhone:
1. Open the “Settings” app on your iPhone and scroll down to find “Safari”. Tap on it to open the Safari settings.
2. In the Safari settings, scroll down and look for the “Safari Profiles” option. Tap on it to access the profiles settings.
3. If you don’t have any profiles set up yet, you will see a blank page with a button that says “Create New Profile”. Tap on it to create a new Safari profile.
4. You will be prompted to enter a name for your new profile. Choose a name that helps you identify the purpose or theme of the profile, such as “Work”, “Personal”, or “Research”.
5. Once you’ve entered the name, you can customize the settings for your Safari profile. You have the option to enable or disable features like AutoFill, Passwords, and iCloud Tabs for this specific profile.
6. After customizing the settings, tap on “Save” to create the Safari profile.
7. Once the profile is created, you can switch to it by going back to the Safari settings and tapping on “Safari Profiles”. Here, you will see a list of all the profiles you have created. Simply tap on the profile you want to use.
8. When you switch to a different profile, you will notice that the settings and preferences associated with that profile are applied to Safari. This includes things like bookmarks, history, and saved passwords.
By enabling Safari profiles on your iPhone, you can easily switch between different browsing experiences tailored to your needs. Whether you’re browsing for work, personal use, or specific projects, Safari profiles make it convenient to organize your data and preferences.
Set Up Safari Profile on iPad
Setting up a Safari profile on your iPad is a convenient way to personalize your browsing experience and sync your settings across multiple devices. Whether you want to save your favorite websites, customize your privacy settings, or organize your bookmarks, creating a Safari profile allows you to do it all with ease.
To get started, follow these simple steps:
- Open Settings: On your iPad’s home screen, tap on the “Settings” icon to access the device settings.
- Scroll down and tap Safari: In the Settings menu, scroll down until you find the “Safari” option. Tap on it to access the Safari settings.
- Sign in with your Apple ID: Under the Safari settings, you will see the option to sign in with your Apple ID. Tap on it and enter your Apple ID login credentials.
- Enable Safari sync: Once signed in, you will find the option to enable Safari sync. Toggle the switch to the “On” position to start syncing your Safari data.
- Customize your Safari settings: After enabling Safari sync, you can customize various settings according to your preferences. You can choose to enable or disable features like “Block Pop-ups,” “Fraudulent Website Warning,” and more.
- Manage Safari data: Under the Safari settings, you will also find options to manage your browsing history, cookies, and website data. You can clear your history, and control how Safari handles cookies and website data for a personalized experience.
- Organize your bookmarks: To keep your favorite websites easily accessible, you can organize your bookmarks in Safari. Simply tap on the “Bookmarks” icon and select “Edit” to add, delete, or rearrange your bookmarks as needed.
By setting up a Safari profile on your iPad, you can enjoy a seamless browsing experience across all your Apple devices. Your bookmarks, browsing history, and other personalized settings will be synced, making it easier to switch between devices without any hassle.
So, take a few minutes to create your Safari profile on your iPad and unlock the full potential of Safari’s features and customization options.
Create a Safari Profile on Mac
Creating a Safari profile on your Mac allows you to personalize and manage your browsing experience. By using a Safari profile, you can save your bookmarks, history, preferences, and other customizations in a separate profile, distinct from the default Safari settings. This is particularly useful if you share your Mac with others or if you want to have different profiles for work and personal browsing.
To create a Safari profile on your Mac, follow these simple steps:
- Open Safari on your Mac by clicking on the Safari icon in the dock or by searching for it in Spotlight.
- In the top menu bar, click on “Safari” and then choose “Preferences” from the drop-down menu.
- A new window will open. Click on the “Profiles” tab.
- Next, click on the “+” button at the bottom left corner of the window to add a new profile.
- Give your profile a name that is descriptive and easy to remember. For example, you can name it “Work,” “Personal,” or “Family.”
- Optionally, you can assign an icon to your profile by clicking on the current icon and selecting a new image from your computer.
- Choose the settings and preferences you want for this profile. You can customize the homepage, enable or disable extensions, specify default search engines, and more.
- Click on the “Create” button to finish creating your Safari profile.
Once you have created a Safari profile on your Mac, you can easily switch between profiles by following these steps:
- Click on the Safari menu in the top menu bar.
- Hover your cursor over the “Profiles” option.
- A list of all your created profiles will appear. Simply click on the profile you want to switch to.
Switching between profiles allows you to have different browsing settings and preferences at your fingertips. You can have separate profiles for work-related research, personal browsing, or any other specific needs you may have.
It’s worth noting that when you switch profiles, all the browsing data and customizations associated with that profile will be loaded, providing a seamless and personalized browsing experience.
With Safari profiles on your Mac, you can have greater control over your internet browsing and keep your personal and work-related activities separate. Try creating and using different profiles to discover how they can enhance your online experience.
Customize Safari Profile Settings
When it comes to personalization and customization, Safari offers a range of settings that allow you to tailor your browsing experience to suit your preferences. Whether you’re using Safari on your iPhone, iPad, or Mac, you can easily customize your Safari profile settings. Let’s explore how you can make Safari truly your own.
1. Extensions: Safari allows you to enhance your browsing experience by adding extensions. These are small software programs that can add extra functionality to Safari, such as ad-blockers, password managers, and productivity tools. To customize your Safari profile settings, navigate to the Safari preferences menu and click on the “Extensions” tab. From here, you can browse and install extensions that suit your needs.
2. Appearance: You can also customize the appearance of Safari to match your style. In the Safari preferences menu, go to the “General” tab and select your preferred theme. You can choose between the default light mode or the dark mode, which is easier on the eyes and perfect for browsing at night. Additionally, Safari allows you to customize the font, font size, and page zoom settings to ensure optimal readability.
3. Privacy and Security: Protecting your privacy and security while browsing the web is crucial. Safari offers robust privacy settings that allow you to control how websites track your activity and manage your saved passwords. In the Safari preferences menu, go to the “Privacy” tab to configure your privacy settings. You can enable or disable features like blocking cross-site tracking, preventing camera and microphone access, and managing website data. Take advantage of these settings to safeguard your online privacy.
4. Tab Settings: Safari provides several options to customize your tab settings for a streamlined browsing experience. In the Safari preferences menu, go to the “Tabs” tab to access these settings. You can choose whether to open new links in the background or foreground, enable tab previews, and decide how to handle closing tabs. These settings help you organize and navigate your open tabs more efficiently.
5. Favorites and Bookmarks: Safari allows you to personalize your browsing experience by customizing your favorites and bookmarks. You can easily add, remove, and organize your favorite websites and bookmarks for quick access. In the Safari toolbar, click on the “+” icon to add the current page to your favorites or bookmarks. To manage your favorites and bookmarks, go to the “Bookmarks” menu and select “Edit Bookmarks.” From here, you can rearrange, delete, and import/export your bookmarks.
By customizing your Safari profile settings, you can tailor your browsing experience to align with your preferences. Whether it’s adding useful extensions, adjusting appearance settings, enhancing privacy and security, optimizing tab management, or organizing your favorites and bookmarks, Safari offers a range of customization options. Explore these settings and make Safari truly yours.
Conclusion
Creating a Safari profile on your iPhone, iPad, or Mac can greatly enhance your web browsing experience. With a customized profile, you can personalize your settings, sync your data across devices, and enjoy a seamless browsing experience tailored to your preferences. Whether you want to have separate profiles for work and personal use, or you simply want to have different profiles for different purposes, Safari makes it easy to create and manage multiple profiles.
By following the steps outlined in this article, you can create a Safari profile in no time. Remember to optimize your profile settings according to your needs, such as enabling or disabling certain features and ensuring that your bookmarks and history are automatically synced. With a Safari profile, you can take control of your browsing experience and enjoy the convenience and flexibility it offers.
So, go ahead and create your Safari profile today to unleash the full potential of your browsing on iPhone, iPad, and Mac!
FAQs
1. Can I create a Safari profile on my iPhone?
Yes, you can create a Safari profile on your iPhone. By setting up a profile, you can personalize your browsing experience and sync it across multiple devices.
2. How do I create a Safari profile on my iPad?
To create a Safari profile on your iPad, open Safari and tap on the “Bookmarks” icon at the top of the screen. From there, tap on “Edit” and then “Add Profile.” Follow the on-screen prompts to set up your profile and customize your preferences.
3. Can I create multiple Safari profiles on my Mac?
Yes, you can create multiple Safari profiles on your Mac. This is especially useful if you share your device with others or if you want to have separate profiles for different purposes, such as work and personal use. To create a new profile, go to Safari preferences, click on “Profiles,” and then click on the “+” button to add a new profile.
4. Can I sync my Safari profiles across all my devices?
Yes, you can sync your Safari profiles across all your devices. This allows you to have the same bookmarks, history, and preferences available on all of your Apple devices. To enable syncing, go to your device’s iCloud settings and make sure that Safari is turned on in the iCloud preferences.
5. Can I customize my Safari profile settings?
Yes, you can customize your Safari profile settings to suit your preferences. You can adjust settings such as search engine preferences, default homepage, blocking pop-ups, managing cookies, and much more. To access these settings, go to Safari preferences and select the “Profiles” tab.