
Google Sheets is a powerful tool that allows users to create, edit, and organize data in a spreadsheet format. One of the key features offered by Google Sheets is data validation, which allows you to set specific rules and conditions for data input. This ensures the accuracy and integrity of your data, preventing errors and inconsistencies.
Counting data validation in Google Sheets can be useful for analyzing the frequency of certain types of data or evaluating the compliance of the input data with the validation rules. In this article, we will explore how to count data validation in Google Sheets, providing you with step-by-step instructions and helpful tips to make the process seamless and efficient.
Inside This Article
- Overview
- Setting up Data Validation in Google Sheets
- Counting Validated Data Entries
- Counting Invalid Data Entries
- Conclusion
- FAQs
Overview
Google Sheets is a powerful tool that allows users to create spreadsheets, analyze data, and collaborate with others. One useful feature of Google Sheets is data validation, which allows users to define rules for the type of data that can be entered in a specific cell or range of cells. This ensures data accuracy and consistency, reducing errors and improving data quality. In this article, we will explore how to count data entries in Google Sheets using data validation.
Setting up data validation in Google Sheets is a straightforward process. You can apply data validation rules to one or multiple cells, limiting the data entry options based on criteria you define. For example, you can set up a data validation rule that only allows numerical data within a specific range, or restrict the input to a list of pre-defined options.
To set up data validation, select the cell or range of cells where you want to apply the validation, then click on the “Data” menu in the Google Sheets toolbar and choose “Data validation.” From there, you can select the type of validation rule you want to apply and configure the details based on your requirements.
Now that you have set up data validation in your Google Sheets, you may be wondering how to count the number of validated entries. Well, Google Sheets provides built-in functions that allow you to perform calculations based on specific criteria such as data validation. The COUNTIFS function is particularly useful for this purpose.
The COUNTIFS function allows you to count the number of cells that meet multiple criteria. To count the validated entries, you can use the COUNTIFS function in combination with the criteria corresponding to your data validation rule. For example, if you have a data validation rule that only allows numbers greater than 10, you can create a COUNTIFS formula that counts the cells that contain numbers and are greater than 10.
On the other hand, if you want to count the invalid data entries, you can subtract the count of validated entries from the total count of data entries in the range. This will give you the count of cells that do not meet the validation criteria. You can use the COUNT function to get the total count of data entries in the range, and then subtract the count of validated entries using the formula COUNT – COUNTIFS.
Setting up Data Validation in Google Sheets
Google Sheets is a powerful tool that allows you to organize and analyze data with ease. One valuable feature offered by Google Sheets is data validation, which allows you to define the type of data that can be entered into a specific cell or range of cells. By setting up data validation, you can ensure data accuracy and prevent errors in your spreadsheets. Here’s how to do it:
1. Select the range of cells where you want to apply data validation. You can do this by clicking and dragging your mouse over the desired cells or by manually entering the cell range in the format “A1:B10”.
2. Go to the “Data” menu and select “Data validation” from the dropdown menu.
3. In the data validation dialog box, you can choose from various criteria to restrict the type of data that can be entered. For example, you can set it to allow only whole numbers, decimals, dates, or even specific text or list values.
4. Customize the error message that will be displayed if invalid data is entered. This can help guide users to input the correct data format.
5. Optionally, you can add a custom formula to further validate the data. This can be useful if you need to set up more complex validation rules based on specific conditions.
6. Click “Save” to apply the data validation settings to the selected range of cells.
Once data validation is set up, any data entered into the cells will be automatically validated according to your specified criteria. If a user tries to enter data that does not meet the validation rules, an error message will be displayed, and the data will not be accepted.
Data validation in Google Sheets is a powerful tool that can help you maintain data integrity and accuracy in your spreadsheets. By setting up data validation, you can save time and avoid potential errors when working with large datasets.
Counting Validated Data Entries
Data validation is a powerful tool in Google Sheets that allows you to control and limit the type of data entered into a cell. It helps ensure data accuracy and consistency in your spreadsheets. Once you have set up data validation rules, you might find it useful to count the number of validated data entries.
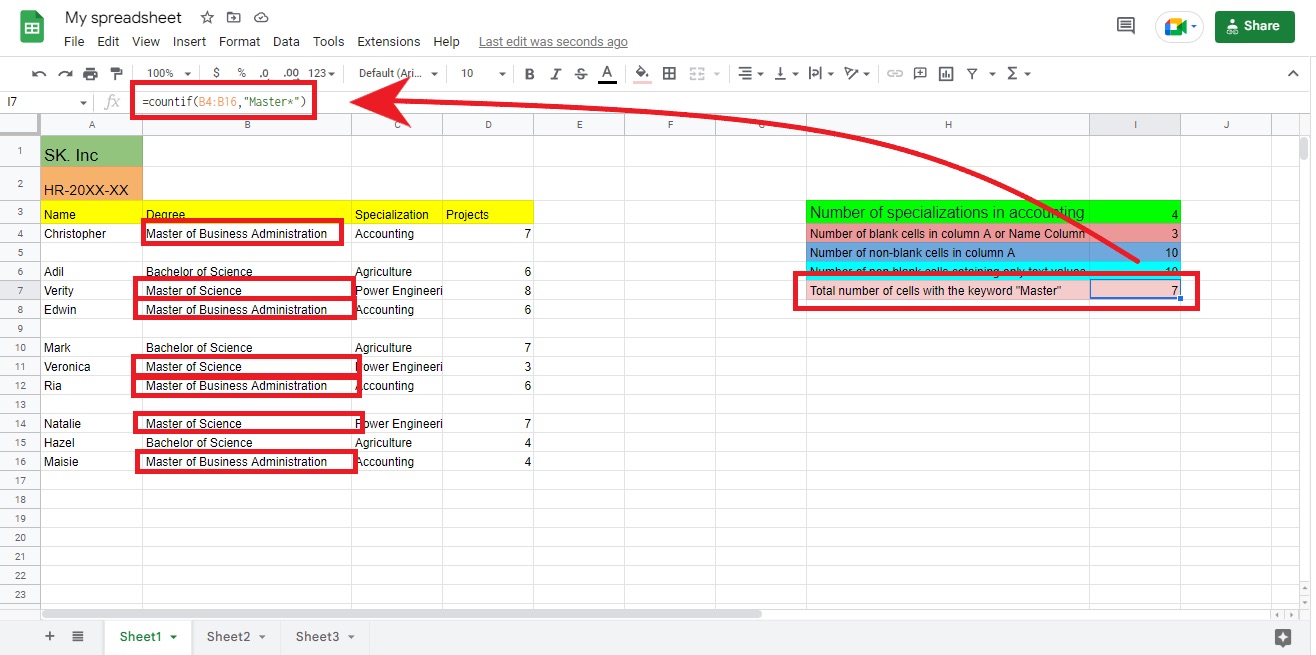
One way to count the number of validated data entries is by using the COUNTIF function in Google Sheets. This function allows you to count cells that meet specific criteria. In our case, we want to count cells that have passed the data validation rules.
Here’s an example to illustrate how to use the COUNTIF function to count validated data entries:
- Start by selecting a cell where you want the count result to appear.
- Type the following formula: =COUNTIF(range, “criteria”)
- Replace ‘range’ with the range of cells where you have applied data validation.
- Replace ‘criteria’ with the validation criteria that the cells must meet.
- Press Enter to get the count result.
For instance, if you have applied data validation to a range of cells in column A to only allow whole numbers between 1 and 10, you can use the following formula:
=COUNTIF(A:A, “>=1”) – COUNTIF(A:A, “>10”)
This formula counts the number of cells in column A that are greater than or equal to 1 and subtracts the number of cells that are greater than 10, giving you the count of validated data entries between 1 and 10.
Remember to adjust the range and criteria in the formula based on your specific data validation rules.
By using the COUNTIF function, you can easily track and count the number of validated data entries in your Google Sheets. This provides you with valuable information and insights into the accuracy and integrity of your data.
Counting Invalid Data Entries
Counting invalid data entries in Google Sheets can help you identify and resolve any issues with the data you have entered. It allows you to quickly identify inconsistencies or errors in your spreadsheet, ensuring the accuracy of your data. Here’s how you can count invalid data entries using Data Validation in Google Sheets:
1. Open your Google Sheets document and select the range of cells where you have applied data validation.
2. Go to the Data menu and select Validation.
3. In the Criteria section, choose the type of data validation you have applied, such as text, number, or checkbox.
4. In the Show validation help text dropdown menu, choose the option Invalid data.
5. Click on the Save rules button to apply the changes.
Now, you will see the total count of invalid data entries in the range of cells you selected. This count will be displayed at the bottom-right corner of your Google Sheets document.
By counting the invalid data entries, you can easily identify any data that does not meet the specified criteria. This can be particularly useful when working on projects that require accurate and consistent data.
Moreover, this feature can save you time and effort by allowing you to quickly identify and fix any errors or inconsistencies in your data. By ensuring that your data is valid and error-free, you can make more informed decisions and have confidence in the reliability of your data analysis.
Now that you know how to count invalid data entries in Google Sheets, take advantage of this feature to maintain the integrity of your spreadsheets and improve the quality of your data.
In conclusion, data validation in Google Sheets is a powerful tool that allows users to ensure the accuracy and integrity of their data. By setting up validation rules, users can define the acceptable range of values for a specific cell or range of cells. This helps to prevent incorrect data entry and enforce data consistency. Additionally, data validation provides error alerts and data validation rules can be customized to meet specific requirements.
Whether you are a data analyst, a business professional, or a student, understanding how to count data validation in Google Sheets can greatly enhance your productivity and efficiency. By following the steps outlined in this article, you can easily implement data validation and use the COUNTIF function to count the number of validated cells.
So why wait? Start utilizing the power of data validation in Google Sheets today and take control of your data with confidence and accuracy.
FAQs
1. What is data validation in Google Sheets?
Data validation is a feature in Google Sheets that allows you to set specific rules and restrictions for the data entered into cells. This helps to ensure data accuracy, consistency, and prevents errors in your spreadsheet.
2. How do I enable data validation in Google Sheets?
To enable data validation in Google Sheets, follow these steps:
1. Select the range of cells where you want to apply data validation.
2. Click on the “Data” tab in the menu bar.
3. Choose “Data validation” from the dropdown menu.
4. In the data validation window, you can set the criteria and rules for the data that can be entered into the selected range of cells.
3. What types of data validation criteria can I set?
Google Sheets offers several types of data validation criteria, including:
– Number: Allows you to set minimum and maximum values, as well as choose specific number formats.
– Text: Allows you to set character length limits, choose specific text formats, or create custom formulas.
– Date: Allows you to set date range limits and choose specific date formats.
– List: Allows you to create dropdown menus with predefined options for users to select from.
– Custom: Allows you to create custom formulas or conditions based on your specific requirements.
4. Can I apply data validation to existing data in Google Sheets?
Yes, you can apply data validation to existing data in Google Sheets. However, keep in mind that any data that does not meet the validation criteria will be flagged as an error. You can choose to show warnings or prevent users from entering invalid data.
5. Can I remove data validation from a range of cells in Google Sheets?
Yes, you can remove data validation from a range of cells in Google Sheets. To do this, follow these steps:
1. Select the range of cells from which you want to remove data validation.
2. Click on the “Data” tab in the menu bar.
3. Choose “Data validation” from the dropdown menu.
4. In the data validation window, click on the “Remove validation” button.