
In today’s increasingly digital world, having quick and easy access to data is essential for professionals in various industries. Civil 3D, a popular software used in the civil engineering field, offers powerful tools for creating and analyzing data. However, navigating through large datasets can sometimes be time-consuming.
That’s where data shortcuts come in. Data shortcuts allow users to create a reference to a set of data, enabling them to access and use it in multiple drawings without duplication. By utilizing data shortcuts in Civil 3D, professionals can streamline their workflow, save valuable time, and ensure data consistency across different projects.
In this article, we will guide you through the process of creating a data shortcut in Civil 3D, providing step-by-step instructions and highlighting the benefits and best practices to help you maximize your efficiency and productivity.
Inside This Article
- Step 1: Opening Civil 3D
- Step 2: Creating a New Project
- Step 3: Importing Data
- Step 4: Creating a Data Shortcut
- Step 5: Accessing the Data Shortcut
- Step 6: Updating the Data Shortcut
- Step 7: Using the Data Shortcut in Civil 3D
- Step 8: Managing Data Shortcuts
- Step 9: Deleting a Data Shortcut
- Conclusion
- FAQs
Step 1: Opening Civil 3D
Before you can start creating a data shortcut in Civil 3D, you need to first open the software. Civil 3D is a powerful design and analysis tool used by civil engineers and designers to efficiently design infrastructure projects.
To open Civil 3D, you can either double-click on the shortcut icon on your desktop or find it in the list of installed programs in your computer’s Start menu. Once you open the software, you’ll be greeted with the Civil 3D startup screen, where you can either create a new project or open an existing one.
Opening Civil 3D may take a few moments, especially if you have a large project or if your computer’s resources are being used by other processes. Once the software is open, you’ll have access to a wide range of tools and features to help you with your civil engineering projects.
Before proceeding to the next step, make sure you have a good understanding of the project you’re working on and the site conditions you’ll be dealing with. This will help you navigate through the software more efficiently and ensure you are using the right tools and settings for your specific project.
Now that you have opened Civil 3D, you’re one step closer to creating a data shortcut and harnessing the full potential of this powerful software. Let’s move on to the next step and start creating a new project in Civil 3D.
Step 2: Creating a New Project
Creating a new project in Civil 3D is an essential step before you can start working on your design. This process allows you to define the settings and parameters specific to your project, ensuring that you have a clean and organized workspace.
To create a new project, follow these simple steps:
- Open Civil 3D and click on the New Project button on the startup screen. Alternatively, you can go to the File menu and select New Project.
- In the New Project dialog box that appears, you will be prompted to enter a name for your project. Choose a descriptive name that reflects the nature of your project.
- Next, you need to specify the location where you want to save your project files. Click on the Browse button and navigate to the desired directory.
- Once you have entered the project name and selected the folder, click on the OK button to create the project.
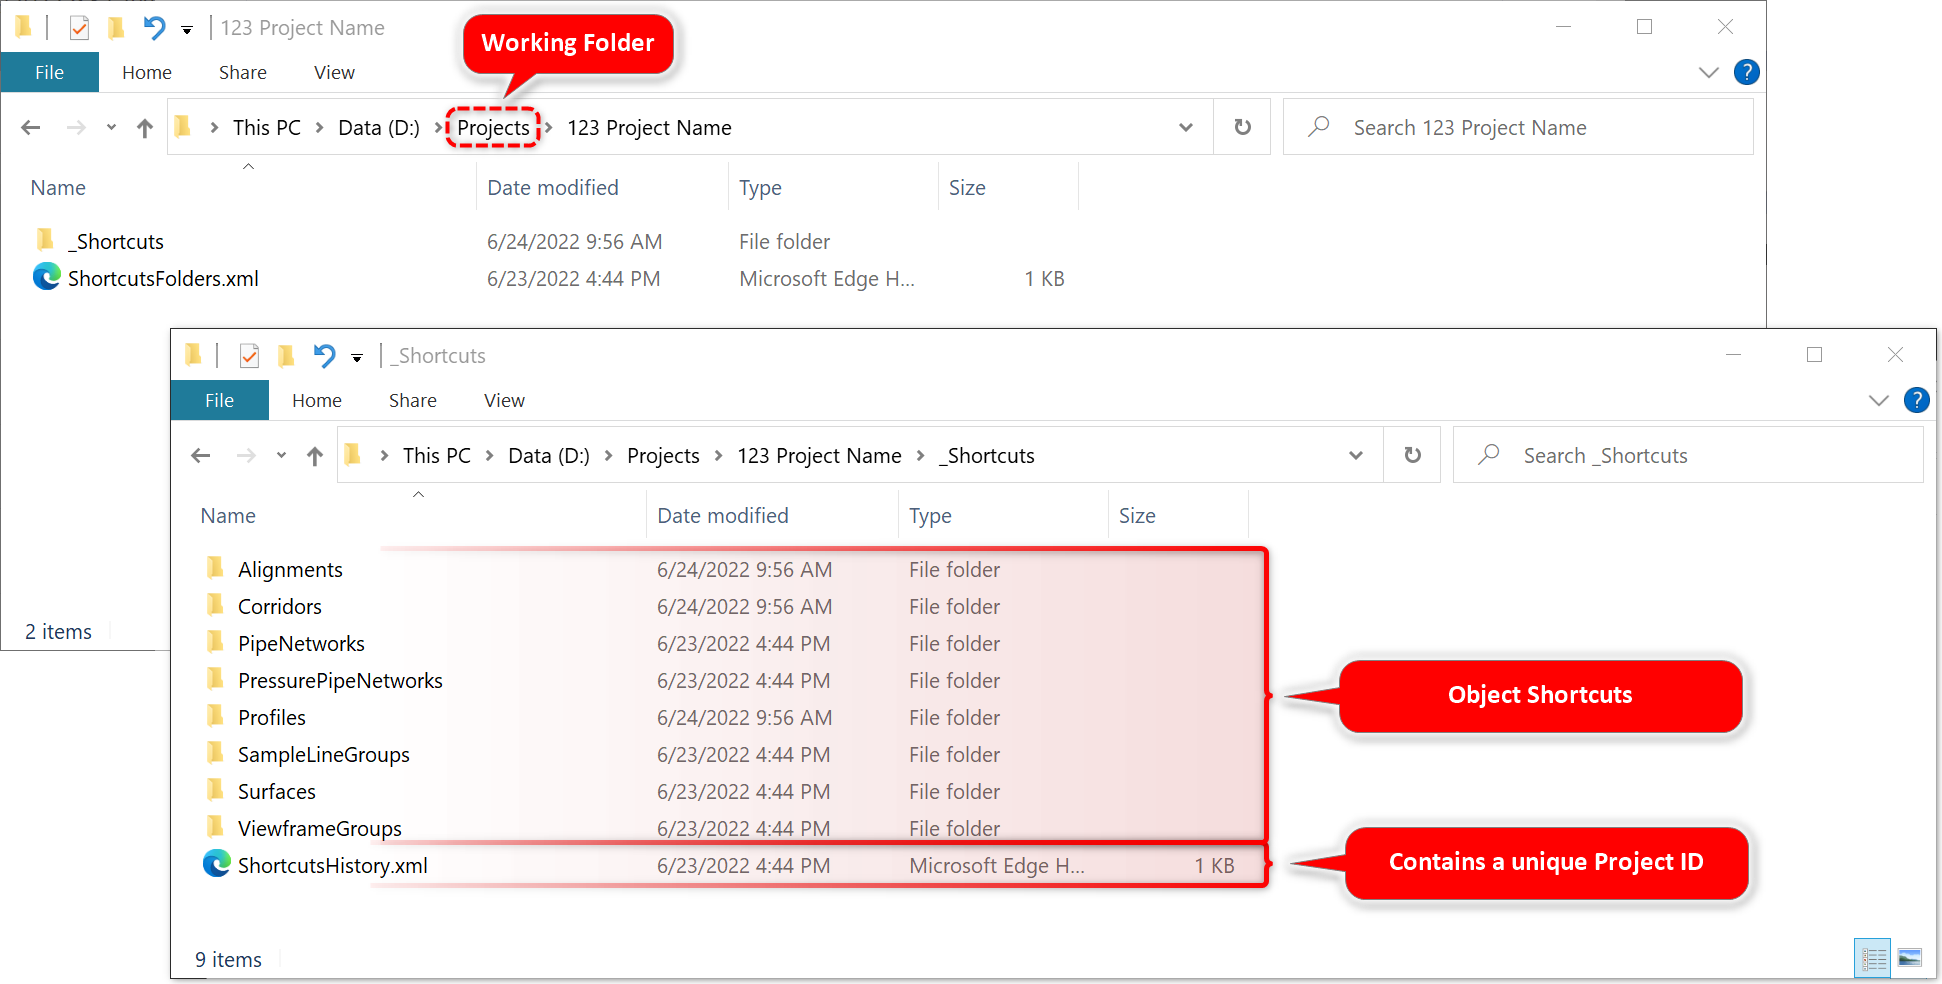
Upon completing these steps, Civil 3D will create a new project folder in the specified location and set it as the active project. Within this folder, you will find various subfolders that contain the project files, such as drawings, templates, and data shortcuts.
It is worth mentioning that creating a new project ensures that your design work is properly organized, as you can save different versions of your design files within the project folder. This allows for easy collaboration with other team members and simplifies the management of project files.
Once you have created a new project, you can start importing the necessary data and begin working on your design in Civil 3D. In the next step, we will explore the process of importing data into your project.
Step 3: Importing Data
Importing data is a crucial step in creating a data shortcut in Civil 3D. By importing data, you can bring in the necessary files and information needed to create and manage the shortcuts effectively. In this step, we will guide you through the process of importing data into your Civil 3D project.
To begin, launch Civil 3D and open your project. Make sure you have the necessary permissions and access to import data. Once you have opened your project, navigate to the “Manage” tab in the ribbon and click on the “Data Shortcuts” button.
Within the Data Shortcuts window, you will find a variety of options and tools related to managing your data shortcuts. To import data, click on the “Import” button located in the upper right corner of the window.
When the Import Data dialog box appears, you will have the choice to import various types of data, such as alignments, surfaces, networks, and more. Select the type of data you want to import and click “OK” to proceed.
Next, you will be prompted to browse for the file or folder containing the data you wish to import. Civil 3D supports a wide range of file formats, so make sure you have the appropriate files ready for import. Once you have selected the file or folder, click “Open” to begin the import process.
Civil 3D will then import the selected data into your project. The time it takes to import the data may vary depending on the size and complexity of the files being imported. Once the data import is complete, you will receive a notification indicating that the import was successful.
After importing the data, it is recommended to review and verify that the imported data is accurate and meets your project requirements. You can do this by navigating to the appropriate tools and functions in Civil 3D to view and analyze the imported data.
It’s important to note that importing data is not a one-time process. As your project evolves and new data becomes available, you may need to import additional files or update existing data. Civil 3D provides tools and options to manage and update your imported data efficiently.
By following the steps outlined in this section, you will be able to successfully import data into Civil 3D and lay the foundation for creating and managing data shortcuts effectively.
Step 4: Creating a Data Shortcut
Creating a data shortcut in Civil 3D is a straightforward process that allows you to reference and share data across different projects. Data shortcuts are useful when working on complex projects with multiple team members, as they provide a way to maintain consistency and collaboration.
To create a data shortcut, follow these simple steps:
1. Open Civil 3D: Launch Civil 3D on your computer and open the project where you want to create the data shortcut.
2. Navigate to the Prospector tab: In the Civil 3D interface, locate the Prospector tab in the Toolspace panel. Click on it to access the Prospector tab.
3. Expand the Data Shortcuts category: Within the Prospector tab, you will find various categories. Look for the Data Shortcuts category and expand it by clicking on the arrow next to it.
4. Right-click on Data Shortcuts: Once you have expanded the Data Shortcuts category, right-click on it to open a context menu. From the menu, select “Create Data Shortcut Set…”
5. Select the desired objects: In the Data Shortcut Set dialog box, you will see a list of available objects that can be included in the data shortcut set. Check the boxes next to the objects you want to include.
6. Choose a location: Specify the location where you want to save the data shortcut set. You can either choose an existing folder or create a new one.
7. Set a name for the data shortcut set: Enter a suitable name for the data shortcut set. This name should ideally reflect the content or purpose of the data included in the set.
8. Click on “OK”: Once you have selected the objects and set the location and name, click on the “OK” button to create the data shortcut set.
Congratulations! You have successfully created a data shortcut in Civil 3D. This shortcut will now be available for you to reference and use in other projects.
Creating data shortcuts is a powerful feature that streamlines the workflow and ensures consistency across multiple projects. It allows team members to work on different parts of a project simultaneously while maintaining access to the same data.
Now that you have created a data shortcut, you can easily access and use it in Civil 3D by following the steps outlined in the next section.
Step 5: Accessing the Data Shortcut
Once you have created a data shortcut in Civil 3D, accessing it is a breeze. Here’s how you can do it:
1. First, open Civil 3D on your computer.
2. In the Civil 3D interface, navigate to the “Prospector” tab, located on the ribbon at the top of the screen.
3. Click on the “Data Shortcuts” button in the “Prospector” tab. This will open the data shortcuts window.
4. In the data shortcuts window, you will see a list of all the data shortcuts that you have created. Locate the data shortcut you want to access.
5. Once you have located the desired data shortcut, you have two options to access it:
- Option 1: Double-click on the data shortcut. This will automatically open the associated drawing and load the referenced data into your Civil 3D workspace.
- Option 2: Right-click on the data shortcut and select “Open.” This will also open the associated drawing and load the referenced data.
6. After selecting your preferred option, the drawing with the referenced data will be opened in Civil 3D. You can then start using and working with the data as needed.
7. It is worth noting that when accessing a data shortcut, any changes made to the referenced data will automatically update in the drawing that is using the shortcut. This ensures that your drawing always stays up-to-date with the latest changes.
By following these simple steps, you can easily access the data shortcut in Civil 3D and begin utilizing the referenced data in your projects. This feature enhances the efficiency and collaboration within your design team, allowing you to work seamlessly with shared data.
Step 6: Updating the Data Shortcut
Updating the data shortcut is an essential part of working with Civil 3D. As project data and information are continuously evolving and changing, it’s crucial to ensure that your data shortcuts remain up-to-date.
To update a data shortcut in Civil 3D, follow the steps below:
- Open Civil 3D and navigate to the Project tab.
- Select the Data Shortcuts option from the Workspace panel.
- A dialog box will appear showing the list of existing data shortcuts. Choose the data shortcut that you want to update.
- Right-click on the selected data shortcut and choose the Update option from the context menu.
- A progress bar will appear, indicating the update process. Depending on the size and complexity of the data, this process may take some time.
- Once the update is complete, you will receive a notification confirming the successful update of the data shortcut.
Updating the data shortcut ensures that you have the most recent version of shared data, reducing the risk of working with outdated or conflicting information. It allows you to collaborate seamlessly with other team members and ensures project consistency.
It’s important to note that when updating a data shortcut, Civil 3D will retrieve the latest version of the shared data from the referenced source. Therefore, it’s crucial to have a stable and reliable connection to the network or storage location where the data resides.
Additionally, it’s good practice to communicate with your team members before updating a data shortcut to avoid any potential conflicts. Since other users may also be accessing and modifying the shared data, coordination and cooperation are key to maintaining data integrity.
Regularly updating your data shortcuts in Civil 3D will ensure that your project remains on track, with the most recent and accurate information at your fingertips. By keeping your data shortcuts up-to-date, you will save time, minimize errors, and enhance collaboration within your team.
Step 7: Using the Data Shortcut in Civil 3D
Once you have created a data shortcut in Civil 3D, you can start using it in your projects. Using a data shortcut allows you to access and work with shared data efficiently, saving you time and effort. In this step, we will guide you on how to use the data shortcut in Civil 3D effectively.
To use the data shortcut in Civil 3D, follow these steps:
- Open the Civil 3D software on your computer.
- Click on the “Open” command or navigate to File > Open.
- In the Open dialog box, browse to the project where you have the data shortcut saved.
- Select the project file (.dwg) and click “Open.”
- Once the project is opened, go to the Prospector tab on the right side of the interface.
- In the Prospector tab, find the “Data Shortcuts” section.
- Expand the Data Shortcuts section to see the available data shortcuts in the project.
- Select the specific data shortcut you want to use.
- Right-click on the selected data shortcut and choose “Add Data Shortcut to Drawing.”
- The selected data shortcut is now added to your drawing, and you can access the shared data it represents.
Now that you have added the data shortcut to your drawing, you can start utilizing the shared data in your Civil 3D project. The data shortcut acts as a link between your drawing and the original data source, ensuring that any updates made to the shared data are reflected in your project in real-time.
You can work with the data shortcut by performing various tasks such as:
- Viewing the data: You can easily view the content of the data shortcut by navigating to the respective folder in the Prospector tab.
- Modifying the data: If you have the necessary permissions, you can make changes to the shared data through the data shortcut.
- Creating new objects using the shared data: You can use the shared data as a base to create new design elements such as alignments, profiles, or surfaces.
- Referencing the data: You can reference the shared data in other drawings or projects for collaboration purposes.
Using the data shortcut in Civil 3D provides a streamlined workflow, ensuring that you and your team can work on the latest and most up-to-date data. By leveraging the power of data shortcuts, you can enhance collaboration, improve accuracy, and save time in your Civil 3D projects.
In the next step, we will discuss how to properly manage your data shortcuts to avoid any conflicts or issues.
Step 8: Managing Data Shortcuts
Once you have created data shortcuts in Civil 3D, it is important to know how to manage them effectively. Managing data shortcuts allows you to organize your project files, control access to data, and ensure the accuracy and consistency of your design data.
Here are some tips and techniques for managing data shortcuts in Civil 3D:
- Create a folder structure: To keep your data shortcuts organized, it is recommended to create a logical folder structure that reflects the hierarchy of your project. This will make it easier to locate and manage data shortcuts in the future.
- Utilize naming conventions: Assign meaningful and consistent names to your data shortcuts. This will help you identify the purpose and content of each shortcut, making it easier to manage and reference them.
- Set access permissions: In a collaborative project environment, it is important to control who can access and modify the data shortcuts. Utilize the access permissions feature in Civil 3D to ensure that only authorized users can make changes to the shortcuts.
- Regularly check for updates: It is a good practice to periodically check for updates to the referenced data in your shortcuts. This ensures that you are working with the most up-to-date information and helps avoid inconsistencies or outdated data.
- Create backups: To protect your data and avoid any accidental loss, create backups of your data shortcuts regularly. This will ensure that you have a copy of the data in case of any unforeseen issues or errors.
- Monitor file links: Keep an eye on the file links between your project and the data shortcuts. If any file links are broken or missing, it can lead to errors or missing data. Regularly check and update these links to maintain the integrity of your project.
- Document changes: Whenever you make changes to the data shortcuts or their referenced data, make sure to document those changes. This will help you keep track of the modifications and provide a clear history of the project.
By following these tips and techniques, you can effectively manage your data shortcuts in Civil 3D. This will help streamline your workflow, improve collaboration, and ensure the accuracy of your design data throughout the project lifecycle.
Step 9: Deleting a Data Shortcut
When you no longer need a data shortcut in Civil 3D, you can easily delete it to free up space and keep your project organized. Deleting a data shortcut involves a few simple steps. Follow the instructions below to delete a data shortcut:
- Open Civil 3D and navigate to the project where the data shortcut is located.
- In the Prospector tab, expand the Data Shortcuts group.
- Locate the data shortcut you want to delete.
- Right-click on the data shortcut and select “Delete”.
- A confirmation dialog box will appear asking if you want to delete the data shortcut. Click “Yes” to proceed.
- The data shortcut will be deleted from the project.
It is important to note that deleting a data shortcut will remove it from the current project, but it will not delete the actual referenced data. The referenced data will still exist in its original location.
If you accidentally delete a data shortcut and need to recover it, you can try using the “Recover Shortcut” option. To access this option, right-click on the Data Shortcuts group in the Prospector tab and select “Recover Shortcut”. This feature can help you restore accidentally deleted data shortcuts.
Deleting unused data shortcuts is a good practice to keep your Civil 3D projects organized and maintain a clean data environment. By regularly managing your data shortcuts, you can ensure efficient project workflows and avoid clutter.
Conclusion
Creating a data shortcut in Civil 3D can greatly improve efficiency and collaboration within your project. By utilizing this feature, you can easily share design data and maintain a consistent and up-to-date project environment.
Throughout this article, we have covered the step-by-step process of creating a data shortcut, from understanding the concept to implementing it in your Civil 3D project. Remember to follow the best practices and guidelines to ensure successful data sharing and synchronization.
Whether you are working on a large-scale project with a team of designers or collaborating with external consultants, data shortcuts provide a streamlined workflow and eliminate the need for manual file sharing and updating. By implementing this feature, you can save time, reduce errors, and improve overall project efficiency.
So, take advantage of Civil 3D’s data shortcut functionality and experience the benefits it offers in terms of efficient data management and collaboration. Start integrating data shortcuts into your workflows and enhance your project’s productivity and success.
FAQs
1. What is a data shortcut in Civil 3D?
A data shortcut in Civil 3D is a way to reference and share design data between different projects. It allows you to access and utilize information from one project in another, streamlining the design process and improving collaboration.
2. How do I create a data shortcut in Civil 3D?
To create a data shortcut, you need to follow these steps:
– Open the project in which you want to create a data shortcut.
– Select the desired data, such as a surface, alignment, or drawing object.
– Right-click on the selected data and choose “Create Data Shortcut” from the context menu.
– Specify the location and name for the data shortcut file.
– Click “Save” to create the data shortcut.
3. Can I create a data shortcut between different versions of Civil 3D?
Unfortunately, data shortcuts are specific to a version of Civil 3D. You cannot create a data shortcut between different versions of the software. The data shortcut file created in one version cannot be directly used in another version.
4. Can I edit the data referenced by a data shortcut?
Yes, you can edit the data referenced by a data shortcut. When you make changes to the original data, such as modifying a surface or alignment, those changes will be automatically reflected in all projects that reference the data shortcut.
5. How can I manage data shortcuts in Civil 3D?
Civil 3D provides several tools to manage data shortcuts effectively. These tools allow you to view and modify data shortcut settings, resolve data shortcut conflicts, and update referenced data. You can access the data shortcut management tools from the Prospector or Toolspace in the Civil 3D interface.