
If you are facing connectivity issues or experiencing slow internet speeds on your Windows 10 device, one of the solutions might be to update your wireless driver. The wireless driver is responsible for enabling your device to connect to Wi-Fi networks and ensuring smooth and stable wireless communication.
Updating your wireless driver can not only improve your internet speed and connection stability, but it can also fix any compatibility issues or bugs that may be present in the older version. However, many users may be unsure about how to update their wireless driver in Windows 10.
In this article, we will guide you through the process of updating your wireless driver in Windows 10, providing you with step-by-step instructions and helpful tips to ensure a successful driver update.
Inside This Article
- Why Update Your Wireless Driver
- Methods to Update Wireless Driver on Windows 10
- Method 1: Update Wireless Driver Using Device Manager
- Method 2: Update Wireless Driver Through Windows Update
- Method 3: Update Wireless Driver Manually
- Method 4: Update Wireless Driver Using Third-Party Software
- Conclusion
- FAQs
Why Update Your Wireless Driver
Updating your wireless driver is crucial for several reasons. Here are some compelling reasons why you should keep your wireless driver up to date:
1. Improved Performance: Updating your wireless driver can significantly improve the performance of your wireless network connection. It can optimize the driver’s functionality, resulting in faster and more stable internet speeds.
2. Enhanced Security: Outdated drivers can be vulnerable to security threats. Updates often include security patches that help protect your network from potential vulnerabilities and keep your personal information safe.
3. Compatibility: Updating your wireless driver ensures that it remains compatible with the latest hardware and software advancements. This allows you to take advantage of new features and functionalities offered by your wireless devices or operating system.
4. Bug Fixes: Like any software, wireless drivers can have bugs that affect their performance. Updating the driver helps fix these bugs, resulting in a more stable and reliable wireless connection.
5. Support for New Technologies: Wireless technology is evolving rapidly, with new standards and protocols constantly being introduced. Updating your driver ensures that it can support these new technologies, allowing you to leverage the latest advancements in wireless connectivity.
6. Optimized Battery Life: By updating your wireless driver, you can optimize power consumption. This is especially important for laptops and mobile devices, as an updated driver can help extend battery life.
Overall, updating your wireless driver is essential to enjoy a reliable and efficient wireless network connection. It ensures better performance, enhanced security, compatibility with the latest technologies, bug fixes, and improved battery life.
Methods to Update Wireless Driver on Windows 10
If you’re experiencing issues with your wireless internet connection on your Windows 10 device, it might be time to update your wireless driver. Updating the driver ensures that your device can communicate effectively with your wireless adapter, leading to improved performance and stability.
There are several methods you can use to update your wireless driver on Windows 10. In this article, we will explore four different approaches:
- Updating the wireless driver using Device Manager
- Updating the wireless driver through Windows Update
- Updating the wireless driver manually
- Updating the wireless driver using third-party software
Method 1: Update Wireless Driver Using Device Manager
Device Manager is a built-in utility in Windows 10 that allows you to manage and update drivers for your hardware devices. To update your wireless driver using Device Manager, follow these steps:
- Open Device Manager by pressing the Windows key + X and selecting “Device Manager” from the menu.
- Expand the “Network adapters” category.
- Right-click on your wireless adapter and select “Update driver.”
- Choose the option to search automatically for updated driver software.
- Follow the on-screen instructions to complete the driver update process.
Method 2: Update Wireless Driver Through Windows Update
Windows Update is another method you can use to update your wireless driver. Here’s how to do it:
- Open the Windows Start menu and click on “Settings.”
- Select “Update & Security.”
- Click on “Windows Update” in the left-hand menu.
- Click on “Check for updates.”
- If any updates are available, Windows will automatically download and install them, including any available driver updates for your wireless adapter.
- Restart your computer if prompted.
Method 3: Update Wireless Driver Manually
If you prefer to take a more hands-on approach, you can manually update your wireless driver. Here’s how:
- Identify the make and model of your wireless adapter. You can usually find this information on the manufacturer’s website or by checking the documentation that came with your device.
- Visit the manufacturer’s website and navigate to the driver download section.
- Search for the latest driver for your specific wireless adapter model and operating system (Windows 10 in this case).
- Download the driver and save it to a location on your computer.
- Open Device Manager and locate your wireless adapter under “Network adapters.”
- Right-click on your wireless adapter and select “Update driver.”
- Select the option to browse your computer for driver software.
- Navigate to the location where you saved the downloaded driver and select it.
- Follow the on-screen instructions to complete the driver installation process.
Method 4: Update Wireless Driver Using Third-Party Software
If you’re not comfortable with manually updating your wireless driver, you can use third-party software that automates the process. There are various driver update tools available, such as Driver Booster, Driver Easy, and Snappy Driver Installer. These tools can scan your system, identify outdated drivers, and automatically download and install the latest drivers for your wireless adapter.
Keep in mind that while third-party software can be convenient, it’s important to download from reputable sources and exercise caution to avoid installing any unwanted or malicious software.
By following these methods, you can easily update your wireless driver on Windows 10 and enjoy improved wireless connectivity and performance. Choose the method that suits you best and stay connected hassle-free!
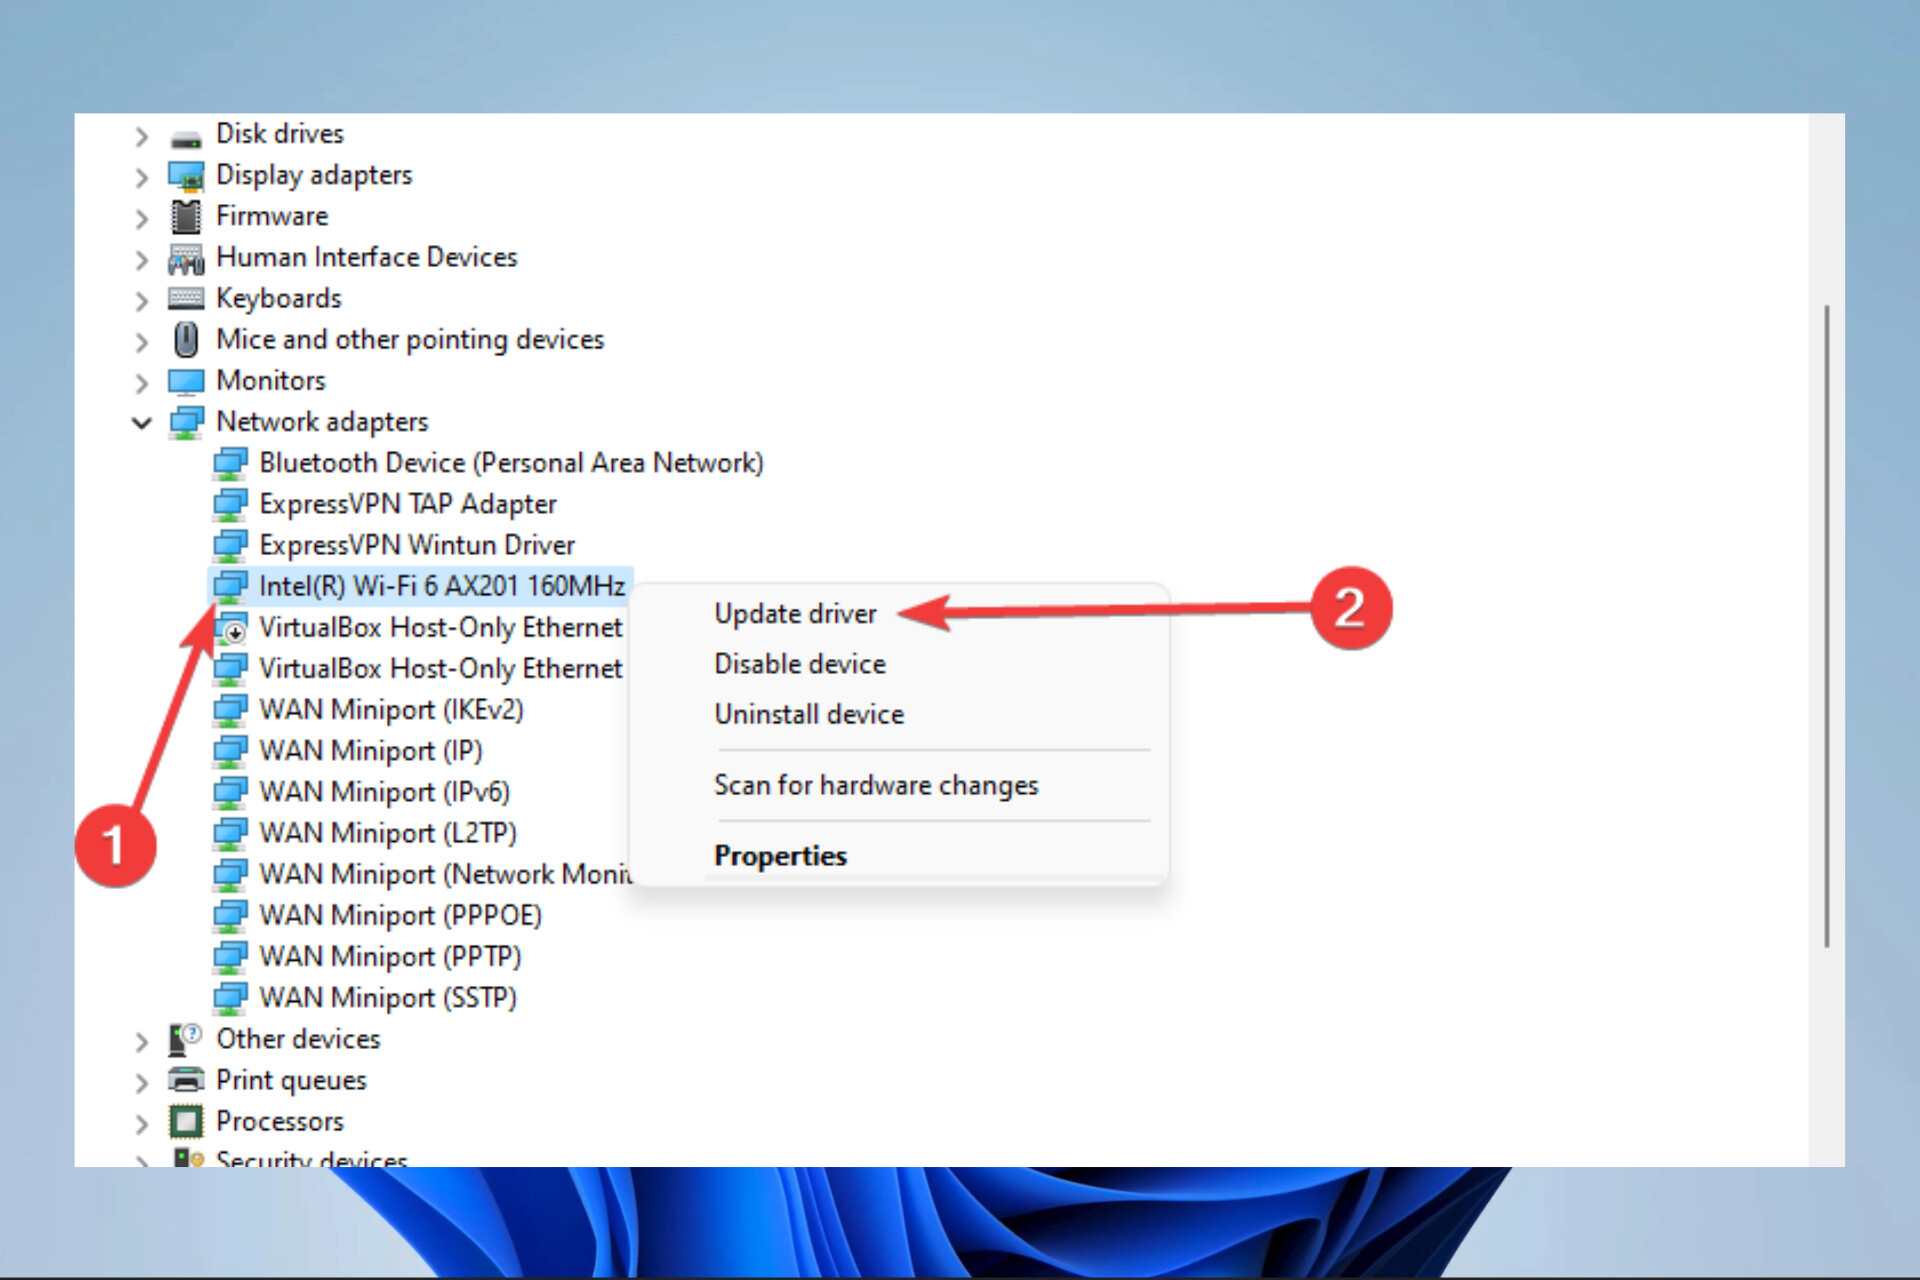
Method 1: Update Wireless Driver Using Device Manager
The Device Manager is a built-in Windows tool that allows you to manage hardware devices on your computer, including updating drivers. Here’s how you can update your wireless driver using the Device Manager:
Step 1: Open the Device Manager by pressing the Windows key + X on your keyboard and selecting “Device Manager” from the menu that appears. Alternatively, you can search for “Device Manager” in the Windows search bar and click on the corresponding result.
Step 2: In the Device Manager window, expand the “Network adapters” category by clicking on the arrow next to it.
Step 3: Locate your wireless adapter from the list of devices under the “Network adapters” category. It is usually named something like “Wireless LAN Adapter” or “Wi-Fi.” Right-click on the wireless adapter and select “Update driver” from the context menu.
Step 4: In the update driver wizard, you have two options. You can either choose to search automatically for updated driver software or browse your computer for driver software.
Option 1: If you select the “Search automatically for updated driver software” option, Windows will connect to the internet and search for the latest driver for your wireless adapter. If a newer driver is found, it will be automatically downloaded and installed on your computer.
Option 2: If you have already downloaded the latest driver for your wireless adapter from the manufacturer’s website, you can choose the “Browse my computer for driver software” option. This allows you to manually select the downloaded driver file and install it on your computer.
It’s important to note that if Windows does not find an updated driver for your wireless adapter, it means that your device is already running the latest driver version available.
Step 5: Once the driver installation process is complete, restart your computer to apply the changes. Your wireless adapter driver should now be updated to the latest version.
Updating your wireless driver can help improve the stability and performance of your wireless connection. If you are experiencing connectivity issues or slow internet speeds, updating the driver might resolve the problem. It’s recommended to periodically check for driver updates to ensure your wireless adapter is running optimally.
Method 2: Update Wireless Driver Through Windows Update
If you’re using Windows 10, you can easily update your wireless driver through the Windows Update feature. Windows Update is a built-in service that automatically downloads and installs updates, including drivers, for your system. Here’s how you can use Windows Update to update your wireless driver:
- Open the Start menu and click on “Settings”.
- In the Settings window, click on “Update & Security”.
- In the Update & Security window, select “Windows Update” from the left navigation menu.
- Click on the “Check for updates” button to allow Windows to check for available updates.
- If a new update for your wireless driver is found, it will be listed under the “Optional updates” section.
- Click on the “View optional updates” link.
- Scroll down to the “Driver updates” section and look for your wireless driver.
- Check the box next to the wireless driver update and click on the “Install” button.
- Wait for Windows to download and install the driver update.
- Once the update is installed, restart your computer to apply the changes.
Windows Update is a reliable method to update your wireless driver, as it ensures that you’re getting the latest driver version directly from Microsoft. However, it’s important to note that sometimes the driver updates offered through Windows Update may not be the most up-to-date or compatible with your specific wireless adapter. If you experience any issues after updating your driver through Windows Update, you may need to consider alternative methods, such as updating the driver manually or using third-party software.
Now that you know how to update your wireless driver through Windows Update, you can easily ensure that your device has the latest driver version for optimal performance and stability.
Method 3: Update Wireless Driver Manually
If the automatic methods fail to update your wireless driver on Windows 10, you can choose to update it manually. Although this method requires a bit more technical knowledge, it allows you to have more control over the process. Here’s how you can update your wireless driver manually:
- First, you need to identify the make and model of your wireless adapter. To do this, press the Windows key + X and select “Device Manager” from the menu. In the Device Manager window, expand the “Network adapters” category to see the list of adapters installed on your system.
- Locate your wireless adapter from the list and right-click on it. Select “Properties” from the context menu.
- In the Properties window, navigate to the “Driver” tab. Here, you will find information about the currently installed driver version.
- Visit the website of the wireless adapter’s manufacturer and look for the “Support” or “Downloads” section. Search for the latest driver version available for your specific adapter model and make sure it is compatible with Windows 10.
- Download the driver installation package from the manufacturer’s website. Make sure to choose the correct version for your operating system, i.e., the 32-bit or 64-bit.
- Once the driver package is downloaded, locate the file and double-click on it to initiate the installation process.
- Follow the on-screen instructions to complete the installation. Restart your computer if prompted to do so.
- After the restart, check if the wireless driver has been successfully updated by going back to the Device Manager, locating your wireless adapter, and checking the driver version on the “Driver” tab.
Updating your wireless driver manually ensures that you have the latest version specifically designed for your adapter model. It can help resolve connectivity issues, improve performance, and add new features. However, it’s worth noting that manually updating drivers can be time-consuming and requires caution to ensure compatibility and proper installation.
If you’re not comfortable with manually updating your wireless driver or encounter any difficulties during the process, it’s recommended to seek assistance from a knowledgeable friend, IT professional, or the customer support of your wireless adapter manufacturer.
Method 4: Update Wireless Driver Using Third-Party Software
If you’re looking for a more convenient and automated way to update your wireless driver on Windows 10, using third-party software can be a great option. These tools are designed to scan your system for outdated drivers, including wireless drivers, and then download and install the latest versions with just a few clicks. Here’s how you can update your wireless driver using third-party software:
1. Research and choose a reliable driver update software: There are several reputable driver update software available online, such as “Driver Booster” or “Driver Easy.” Do some research and read user reviews to find the one that suits your needs.
2. Download and install the software: Visit the official website of the chosen driver update software and download the setup file. Once downloaded, run the installer and follow the on-screen instructions to install the software on your computer.
3. Launch the software and scan for outdated drivers: Open the driver update software and initiate a scan of your system. The software will detect all the outdated drivers, including your wireless driver, and provide a comprehensive list.
4. Select and update the wireless driver: Look for the wireless driver in the list of outdated drivers and select it. Choose the option to update the driver, and the software will automatically download and install the latest version for you.
5. Restart your computer: After the driver update is complete, it’s recommended to restart your computer to ensure that the changes take effect.
Using third-party software can save you time and effort as it takes care of the whole update process. However, it’s essential to choose a reliable and trustworthy driver update software to avoid any potential issues or malware. Remember to regularly update your wireless driver using this method to ensure optimal performance and stability of your wireless connection.
Conclusion
In conclusion, keeping your wireless drivers updated is crucial for a smooth and seamless experience on your Windows 10 device. By following the steps outlined in this guide and staying on top of driver updates, you can enhance your wireless connectivity, improve performance, and address any compatibility issues that may arise.
Updating your wireless driver on Windows 10 is a relatively simple process that can be done through multiple methods, such as using the Device Manager or downloading the latest driver from the manufacturer’s website. Remember to choose the appropriate driver version for your specific wireless adapter or card.
Regularly updating your wireless driver ensures that you have access to the latest features, security enhancements, and bug fixes. It can also help resolve any connectivity issues you may be experiencing. By taking the time to update your wireless driver, you can optimize your wireless network and enjoy a more reliable and efficient browsing experience.
So, take control of your wireless driver updates today and unlock the full potential of your Windows 10 device’s wireless connectivity.
FAQs
Q: How do I update my wireless driver in Windows 10?
Updating your wireless driver in Windows 10 is a straightforward process. Here’s how you can do it:
1. Press the Windows key + X on your keyboard and select “Device Manager” from the list.
2. In the Device Manager window, expand the “Network adapters” category.
3. Right-click on your wireless adapter and select “Update Driver”.
4. Choose the option to search automatically for updated driver software.
5. Windows will then search for and install the latest driver for your wireless adapter.
6. Once the driver installation is complete, restart your computer for the changes to take effect.
Updating your wireless driver can help improve your wireless connection and resolve any compatibility issues you may be experiencing.
Q: Do I need to update my wireless driver regularly?
While it is not necessary to update your wireless driver regularly, it is recommended to periodically check for updates. Driver updates can bring performance improvements, bug fixes, and enhanced compatibility with the latest software and devices. Keeping your wireless driver up to date ensures that you have the best possible experience with your wireless connection.
Q: How can I check if my wireless driver is up to date?
To check if your wireless driver is up to date, follow these steps:
1. Press the Windows key + X on your keyboard and select “Device Manager” from the list.
2. In the Device Manager window, expand the “Network adapters” category.
3. Locate and right-click on your wireless adapter.
4. Select “Properties” from the drop-down menu.
5. In the Properties window, go to the “Driver” tab.
6. Here, you will see the driver version and the date it was installed.
7. Compare this information with the latest driver version available on the manufacturer’s website to determine if your driver is up to date.
Q: What should I do if I encounter issues after updating my wireless driver?
If you encounter issues after updating your wireless driver, try the following troubleshooting steps:
1. Restart your computer: Sometimes, a simple restart can resolve driver-related issues.
2. Roll back the driver: If the issues started after updating the driver, you can revert to the previous version. To do this, go to the Device Manager, right-click on your wireless adapter, select “Properties,” go to the “Driver” tab, and click on “Roll Back Driver.”
3. Uninstall and reinstall the driver: If rolling back the driver doesn’t work, uninstall the driver from the Device Manager and then reinstall it. To do this, right-click on your wireless adapter in the Device Manager, select “Uninstall device,” and follow the on-screen instructions. After uninstalling, restart your computer and let Windows automatically reinstall the driver.
4. Contact customer support: If the above steps don’t resolve the issues, it’s recommended to reach out to the manufacturer’s customer support for further assistance.
Q: Can I update my wireless driver through Windows Update?
Yes, you can update your wireless driver through Windows Update. Windows Update automatically checks for updated drivers and installs them if available. To update your driver through Windows Update, follow these steps:
1. Press the Windows key + I on your keyboard to open the Settings app.
2. Go to “Update & Security”.
3. Click on “Windows Update” in the left-hand menu.
4. Click on “Check for updates”.
5. If a new driver is available for your wireless adapter, it will be listed under “Optional updates”. Select it and click “Download and install”.
6. Windows will then download and install the updated driver for your wireless adapter. Restart your computer for the changes to take effect.