
Are you tired of the generic name of your wireless router? Do you want to give it a more personalized touch? Renaming your wireless router not only adds a personalized touch to your home network, but it can also make it easier for you to identify your network when multiple options are available. In this article, we will guide you through the process of renaming your wireless router, step by step. Whether you want to give it a creative name, display your sense of humor, or simply make it more identifiable, we’ve got you covered. So, let’s get started on the journey to renaming your wireless router and making your home network truly unique!
Inside This Article
- Point 1: Understanding the Importance of Renaming a Wireless Router
- Point 2: Steps to Access the Router’s Settings
- Point 3: Renaming the Wireless Router
- Point 4: Configuring the New Wireless Router Name
- Conclusion
- FAQs
Point 1: Understanding the Importance of Renaming a Wireless Router
When it comes to setting up a wireless network, one of the essential tasks is renaming the wireless router. Many people often overlook the significance of this step, but it plays a crucial role in your network security and overall user experience.
First and foremost, renaming your wireless router helps to enhance your network’s security. Most routers come with a default name provided by the manufacturer, such as “Linksys” or “Netgear.” These default names are well-known and can make it easier for potential hackers to identify and target your network. By renaming your router, you make it harder for them to gain unauthorized access, as the default name is no longer visible.
Moreover, renaming your wireless router allows you to personalize your network. By choosing a unique and memorable name, you can add a personal touch and reflect your individuality. Whether you want to use a witty name or incorporate your family name, the choice is yours. This customization not only adds a sense of fun but also makes it easier for you and your household members to identify and connect to your network in a crowded environment.
Additionally, renaming your wireless router can help you differentiate between different networks in a multi-router setup. In cases where you have multiple routers in your home or office, giving each router a unique name can prevent confusion and streamline your network management. It ensures that you connect to the right router and avoid any interference or performance issues that may arise from connecting to the wrong one.
Overall, renaming your wireless router is a simple yet essential step in setting up your network. It not only enhances your network security but also allows for personalization and simplifies network management. So, before you overlook this task, take a few extra minutes to give your wireless router a unique and meaningful name that reflects your personality and helps you stay secure in the digital world.
Point 2: Steps to Access the Router’s Settings
Accessing the settings of your wireless router allows you to make changes and configurations, including renaming the router. Here are the steps to access the router’s settings:
1. Connect your device to the wireless network. Ensure that you are connected to the router whose settings you want to access. This can be done by connecting your device to the Wi-Fi network using the provided credentials.
2. Open a web browser. Launch your preferred web browser such as Google Chrome, Mozilla Firefox, or Safari.
3. Enter the router’s IP address. To access the router’s settings, you’ll need to enter the router’s IP address into the browser’s address bar. The IP address is a series of numbers separated by periods. Common IP addresses for routers include 192.168.0.1 or 192.168.1.1. Check the router’s user manual or look for a sticker on the router itself to find the correct IP address.
4. Enter the login credentials. Once you have entered the router’s IP address, you will be redirected to a login page. Enter the username and password for the router’s settings. If you haven’t changed the default login credentials, consult the router’s manual or look for the default username and password on the router itself.
5. Access the router’s settings. After you have successfully logged in, you will be presented with the router’s settings interface. This interface may vary depending on the make and model of your router, but it typically provides access to various configuration options.
6. Navigate to the wireless settings. Within the router’s settings interface, locate the section related to wireless settings. This section may be labeled as “Wireless,” “Wi-Fi settings,” or something similar.
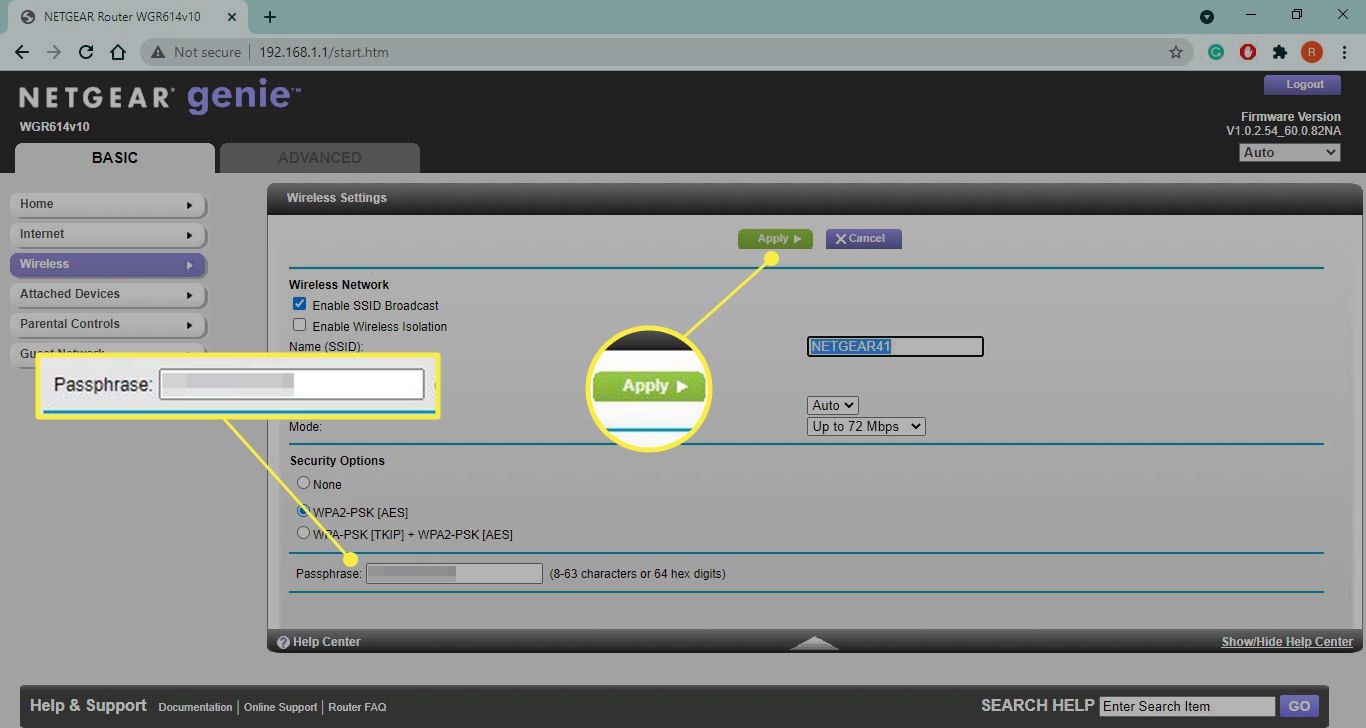
7. Locate the network name (SSID) field. In the wireless settings section, you will find a field labeled “Network Name” or “SSID” (Service Set Identifier). This is where you can change the name of your wireless network.
8. Rename the router. Enter the desired name for your wireless network in the network name (SSID) field. Be creative and choose a name that reflects your personal preferences or makes it easier for you to identify your network among others.
9. Save the changes. After you have entered the new router name, look for a “Save” or “Apply” button within the settings interface. Click on the button to save the changes made to the router’s settings.
And that’s it! You have successfully accessed the router’s settings and renamed your wireless network. Remember to reconnect your devices to the newly named network and enjoy the benefits of a personalized network name!
Point 3: Renaming the Wireless Router
Renaming your wireless router is a simple yet important step in securing your Wi-Fi network and personalizing it to your liking. By changing the default name set by the manufacturer, you can make it easier for you and your family to identify and connect to your network. Below, we will guide you through the steps to rename your wireless router.
Step 1: Access the router’s settings
In order to rename your wireless router, you need to access its settings. To do this, you will need to open a web browser and enter the IP address of your router in the address bar. This IP address is typically mentioned in the router’s manual or can be found on the router’s label. Once you’ve entered the IP address, press Enter and you will be directed to the router’s login page.
Step 2: Enter the router’s login credentials
On the login page, you will need to enter the username and password for your router. Again, this information can be found in the router’s manual or on the router’s label. It’s important to note that the default username and password are often set to “admin” or left blank. However, it’s highly recommended to change these default credentials for security reasons.
Step 3: Locate the wireless settings
Once you’ve successfully logged into the router’s settings, you will need to find the wireless settings section. This section might be labeled differently depending on the router’s brand and model, but it is usually located under the “Wireless” or “Network” tab. Look for an option related to the wireless network name or SSID (Service Set Identifier).
Step 4: Rename the wireless router
Within the wireless settings section, you will find a field where you can enter the new name for your wireless router. Choose a name that is unique and easy to remember, but avoid using any personal information that could potentially be used for hacking attempts. You can get creative and use a combination of letters, numbers, and symbols to make it even more secure.
Step 5: Save the settings
After entering the new name for your wireless router, don’t forget to save the settings. Look for a “Save” or “Apply” button at the bottom of the page, and click on it to save the changes you’ve made. The router will then apply the new name to your wireless network.
It’s important to note that after renaming your wireless router, you and your devices will need to reconnect to the network using the new name. Make sure to update the network name on all your connected devices to ensure a seamless experience.
By following these simple steps, you can easily rename your wireless router and make it more personalized and secure. Take the time to choose a unique and memorable name for your network, and enjoy a hassle-free Wi-Fi experience.
Point 4: Configuring the New Wireless Router Name
Once you have successfully renamed your wireless router, the next step is to configure the new name. This ensures that your devices can easily identify and connect to the network.
To configure the new wireless router name, follow these simple steps:
- Access the router’s settings: Open your preferred web browser, type the default IP address of your router into the address bar, and press Enter. You will be prompted to enter your router’s username and password.
- Navigate to the wireless settings: Once you have logged in to your router’s settings, look for the “Wireless” or “Network” tab. Click on it to access the wireless configuration options.
- Locate the SSID field: The SSID field contains the current name of your wireless network. Look for this field within the wireless settings page.
- Enter the new name: In the SSID field, delete the existing name and enter the new name that you have chosen for your wireless router. Ensure that the new name is unique and easy to remember.
- Save your changes: After entering the new name, scroll down to the bottom of the page and look for the “Save” or “Apply” button. Click on it to save your changes.
- Reconnect your devices: Once the changes are saved, your wireless router will restart, and the new name will be applied. You will need to reconnect your devices to the updated network by selecting the new name from the list of available networks in their Wi-Fi settings.
It is important to note that some routers may have slightly different steps or terminology for configuring the wireless router name. However, the general process remains the same across most routers.
By configuring the new wireless router name, you ensure that your network is easily identifiable and distinguishable from other nearby networks. This can help enhance the security and convenience of your wireless connection.
Conclusion
Renaming your wireless router is a simple and effective way to enhance the security and personalize your network. By following the steps outlined in this article, you can easily change the default name of your router to something unique and memorable. Not only does this help prevent unauthorized access to your network, but it also adds a personal touch to your Wi-Fi experience.
Remember to choose a strong and secure password for your router to further protect your network. Additionally, consider enabling encryption and regularly updating the firmware to keep your router up to date with the latest security patches.
With the flexibility to choose a new router name, you can showcase your creativity and make a statement. So go ahead and give your wireless network a refresh by renaming your wireless router today!
FAQs
1. Can I change the name of my wireless router?
Yes, you can definitely change the name of your wireless router. It is a simple process that can be done through the router’s settings page.
2. Why would I want to rename my wireless router?
There are several reasons why you might want to rename your wireless router. Firstly, the default name assigned by the manufacturer may not be unique, and renaming it can help you easily identify your network. Additionally, renaming your router can enhance security by making it more difficult for unauthorized users to identify and access your network.
3. How do I rename my wireless router?
To rename your wireless router, you will need to access the router’s settings page. This can usually be done by typing the router’s IP address into your web browser. Once you have accessed the settings page, navigate to the wireless settings section and look for an option to change the SSID (the network name). Enter your desired name and save the settings.
4. Are there any considerations or best practices when renaming my wireless router?
When renaming your wireless router, it is best to choose a name that is unique and easy to remember. Avoid using personal information or sensitive details in the name for security purposes. Additionally, keep in mind that the SSID name is visible to others in the vicinity, so it’s a good idea to avoid using any offensive or inappropriate terms.
5. Do I need to restart my router after renaming it?
In most cases, renaming your wireless router does not require you to restart the device. However, it is recommended to reconnect your devices to the network with the new name to ensure a smooth transition. Simply disconnect from the old network name and connect to the new one using the new SSID.