
Setting a password for your wireless router is a crucial step in ensuring the security of your network. With the increasing reliance on wireless connections, it is more important than ever to protect your personal information and prevent unauthorized access to your network. One popular brand of wireless routers is TP-Link, known for its reliability and user-friendly interface.
In this article, we will guide you through the process of setting a password for your TP-Link wireless router. Whether you are a tech-savvy individual or a beginner, our step-by-step instructions will make it easy for you to secure your network and keep your data safe. So, let’s dive in and learn how to set a password for your TP-Link wireless router!
Inside This Article
- Getting Started
- Configuring Basic Settings
- Creating a Strong Wi-Fi Password
- Applying Password Changes
- Troubleshooting Common Password-Related Issues
- Getting Started: Checking the Router Model and Version, Connecting the Router to Your Computer or Device, Accessing the Router’s Web Interface
- Configuring Basic Settings
- Creating a Strong Wi-Fi Password
- Applying Password Changes – Saving the new settings on the router – Reconnecting devices using the new Wi-Fi password – Troubleshooting common password-related issues
- Conclusion
- FAQs
How to Set Password For Wireless Router Tp Link
Setting a password for your TP-Link wireless router is an essential step in securing your network and protecting your data. By ensuring that only authorized devices can connect to your network, you can prevent unauthorized access and potential security breaches. In this article, we will guide you through the process of setting a password for your TP-Link wireless router.
Getting Started
Before you can set a password for your TP-Link wireless router, you need to gather some information and connect to the router’s web interface.
First, check the model and version of your TP-Link router. You can usually find this information on the bottom or back of the router.
Next, connect your router to your computer or device using an Ethernet cable or via Wi-Fi. Make sure you have a stable internet connection.
Once you are connected, open a web browser and enter your router’s default IP address in the address bar. This address is typically “192.168.0.1” or “192.168.1.1”. Press Enter to access the router’s web interface.
Configuring Basic Settings
After accessing the router’s web interface, you can proceed to configure basic settings, including changing the default administrator username and password.
It is important to change the default credentials to prevent unauthorized access to your router’s settings. Look for the “Administration” or “System Tools” section in the web interface, where you can change the administrator username and password.
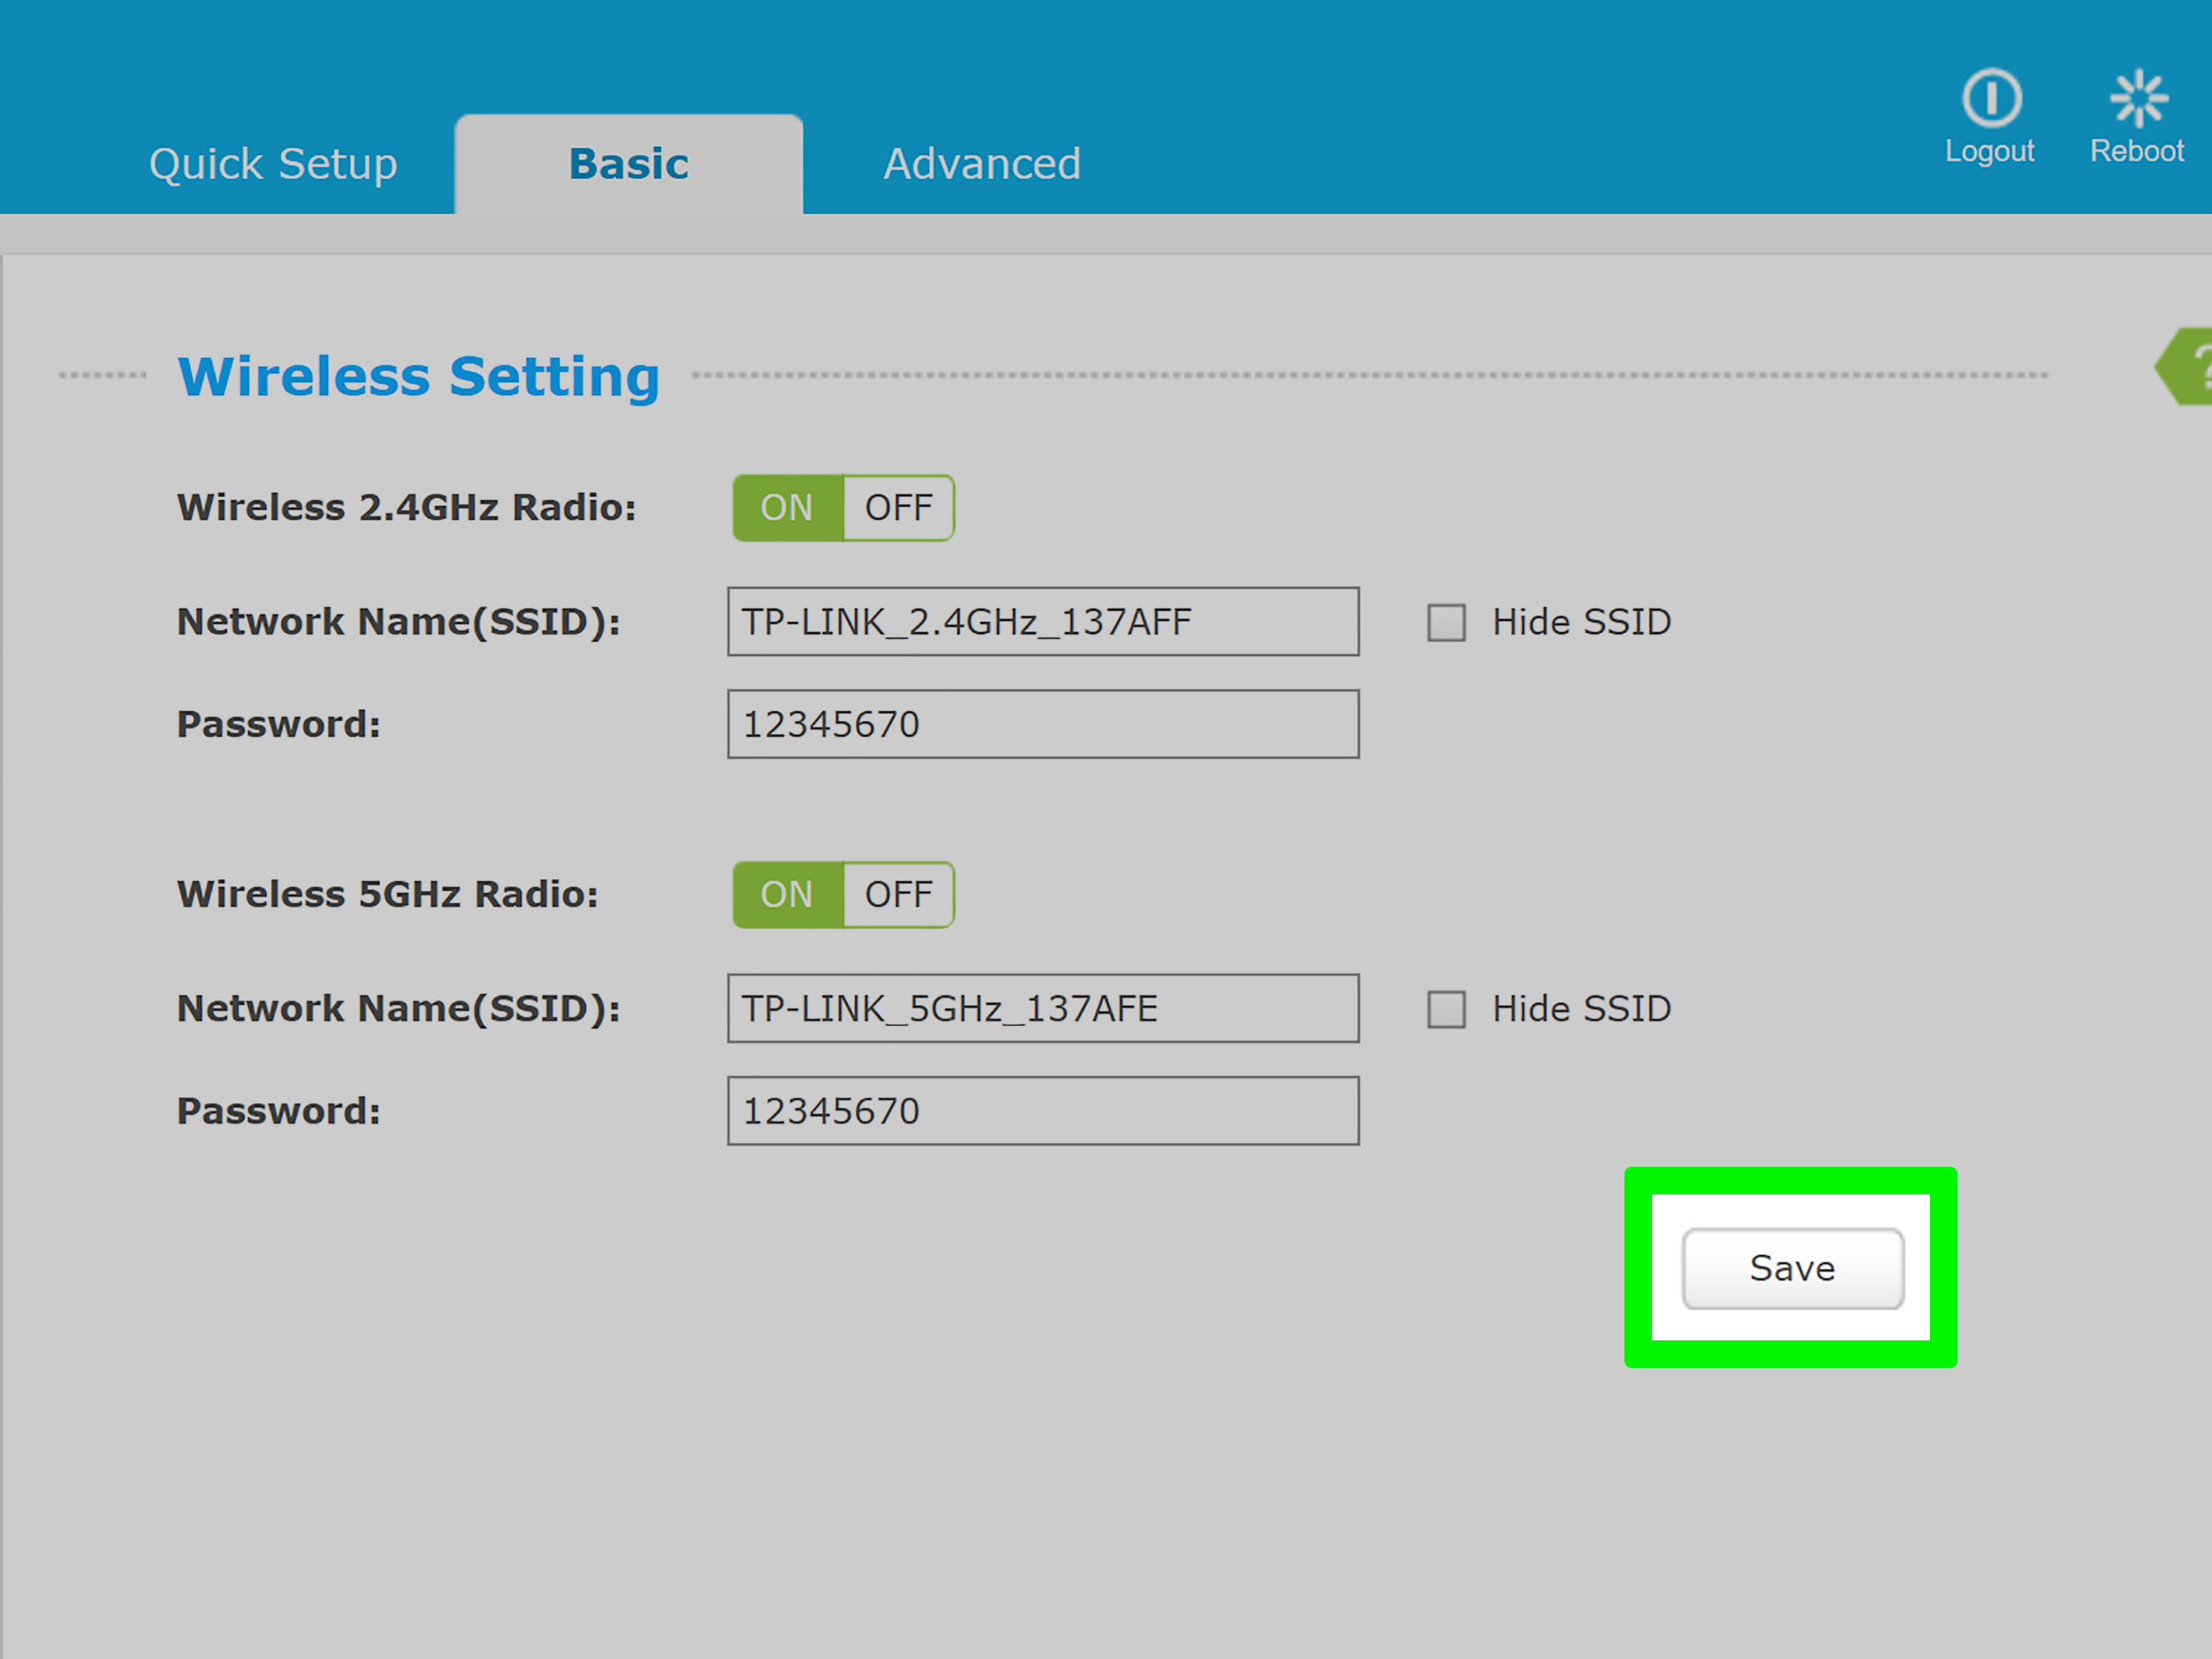
In addition, you may want to set up a new network name (SSID) for your wireless network. This will make it easier for you to identify and connect to your network. Navigate to the “Wireless” or “Network Settings” section and enter a new SSID of your choice.
To enhance the security of your wireless network, enable wireless encryption. Look for the “Wireless Security” or “Security” section, where you can select the encryption method (WPA/WPA2) and enter a passphrase. Remember to choose a strong and unique passphrase for your network.
Creating a Strong Wi-Fi Password
When creating a password for your TP-Link wireless router, it’s important to choose a strong and secure one. A strong password helps protect your network from unauthorized access and potential security threats.
Avoid using common words or personal information that can be easily guessed. Instead, use a combination of uppercase and lowercase letters, numbers, and symbols. This makes it harder for hackers to crack your password.
Consider using a password manager to generate a random and complex password. These tools can help you create and securely store unique passwords for all your devices and accounts.
It is also recommended to change your Wi-Fi password regularly. This helps ensure that even if someone manages to obtain your password, they will only have access for a limited time.
Applying Password Changes
After you have set a new password for your TP-Link wireless router, make sure to save the changes in the router’s web interface. Look for the “Apply” or “Save” button to save your settings.
Once the settings are saved, you will need to reconnect your devices using the new Wi-Fi password. Go to your device’s Wi-Fi settings, select your network, and enter the new password when prompted.
If you encounter any issues or have trouble connecting to your network after changing the Wi-Fi password, you can try power cycling your router and devices. Simply unplug the power cables, wait for a few seconds, then plug them back in and try connecting again.
Troubleshooting Common Password-Related Issues
If you forget your TP-Link router’s password or are unable to access the web interface, you may need to perform a factory reset. Most TP-Link routers have a small reset button that can be pressed using a paperclip or pin. Consult your router’s user manual for specific instructions on performing a factory reset.
Keep in mind that performing a factory reset will erase all your settings, so it’s important to have a backup of any important configurations.
Another common issue is entering the wrong password when connecting to your network. Double-check the password you have entered, ensuring that it matches the one you set for your TP-Link router.
If you continue to experience issues with your password or network connectivity, you may want to reach out to TP-Link’s customer support for further assistance.
By following these steps and setting a strong password for your TP-Link wireless router, you can ensure the security of your network and enjoy a safe and reliable internet connection.
Getting Started: Checking the Router Model and Version, Connecting the Router to Your Computer or Device, Accessing the Router’s Web Interface
If you’re new to setting up a wireless router, getting started can seem a bit overwhelming. However, with a little guidance, you’ll be up and running in no time. The first step is to familiarize yourself with the router model and version you’re working with. This information is crucial for accessing the correct instructions and firmware updates specific to your device.
To check the router model and version, locate the label on the back or bottom of the router. Look for a model number, such as “TP-Link Archer C7,” and a version number, such as “V1” or “V2.” Make a note of these details for future reference.
Once you have identified the router model and version, it’s time to physically connect the router to your computer or device. Start by turning off your computer’s Wi-Fi connection and connecting an Ethernet cable from the computer to one of the LAN ports on the back of the router.
If you’re using a wireless device, such as a smartphone or tablet, you can skip the Ethernet cable connection and proceed directly to the next step.
After making the necessary connections, open a web browser on your computer or device. In the address bar, type the default IP address for your TP-Link router (usually 192.168.0.1 or 192.168.1.1) and press Enter. This will take you to the router’s web interface, where you can access and configure its settings.
Once you’ve successfully accessed the router’s web interface, you’re ready to proceed with setting up a password for your wireless network. This will help secure your network from unauthorized access and protect your personal information.
Configuring Basic Settings
When setting up a wireless router, it is crucial to configure the basic settings to ensure optimal security and functionality. This includes logging in to the router’s web interface, changing the default administrator username and password, setting up a new network name (SSID), and enabling wireless encryption (WPA/WPA2).
Logging in to the router’s web interface
Before you can make any changes to the router settings, you need to access the router’s web interface. To do this, open a web browser and enter the default IP address of your router in the address bar. This address can usually be found in the router’s documentation or on the bottom of the router itself. Once you have entered the IP address, press Enter and you will be directed to the login page of the router.
Changing the default administrator username and password
It is highly recommended to change the default administrator username and password for your router to prevent unauthorized access. By default, routers use generic login credentials, making them vulnerable to security breaches. In the router’s web interface, locate the settings for changing the administrator username and password. Choose a unique and strong combination of username and password that only you can remember.
Setting up a new network name (SSID)
The network name, also known as the SSID (Service Set Identifier), is the name that identifies your wireless network. It is important to choose a unique and memorable SSID to differentiate your network from others nearby. In the router’s web interface, look for the wireless settings section where you can change the SSID. Remember to avoid using personal information or easily guessable names to enhance the security of your Wi-Fi network.
Enabling wireless encryption (WPA/WPA2)
Wireless encryption is a crucial security measure that helps protect your network from unauthorized access. It encrypts the data transmitted between your devices and the router, making it unreadable to anyone without the encryption key. In the router’s web interface, navigate to the wireless security settings and select either WPA or WPA2 as the encryption method. Choose a strong passphrase for the encryption key, consisting of a combination of letters, numbers, and symbols.
Creating a Strong Wi-Fi Password
Creating a strong Wi-Fi password is essential for protecting your wireless network from unauthorized access and ensuring the security of your personal data. A weak password can put your network at risk of being hacked, leading to potential privacy breaches and compromised devices.
When choosing a secure password for your wireless network, it’s important to consider several factors. Firstly, the password should be long enough to make it difficult for someone to guess or crack. Experts generally recommend using a minimum of 12 characters, but longer passwords are even better.
In addition to length, using a combination of letters, numbers, and symbols can significantly enhance the strength of your password. A mix of upper and lower case letters, along with numbers and special characters, creates a more complex and harder-to-guess password. For example, instead of using a common word like “password,” you can create a stronger password by using a combination of letters, numbers, and symbols like “P@ssw0rd!”.
Another important aspect of creating a strong Wi-Fi password is to avoid using easily guessable information such as your name, birthdate, or address. Hackers can easily guess these details and gain unauthorized access to your network. Instead, opt for a random combination of characters that have no personal significance.
Lastly, it’s a good practice to change your Wi-Fi password regularly. By changing it every few months, you can further enhance the security of your network and reduce the chances of anyone being able to figure out your password.
Remember that creating a strong Wi-Fi password is crucial in today’s digital age, where the number of connected devices continues to grow. By following these tips and implementing a strong password for your wireless network, you can ensure the security and privacy of your personal information.
Applying Password Changes – Saving the new settings on the router – Reconnecting devices using the new Wi-Fi password – Troubleshooting common password-related issues
Once you have successfully set up a new password for your TP-Link wireless router, the next step is to apply the changes by saving the new settings on the router. This ensures that the password is updated and will be required for future connections.
To save the new settings, go to the router’s web interface and navigate to the administration or settings page. Look for the option to save or apply changes. Click on this option to save the new password and any other settings you may have modified.
Once you have saved the new settings, it’s time to reconnect your devices using the updated Wi-Fi password. This is necessary because all devices that were previously connected to the router will be disconnected when the password is changed. Here’s how you can reconnect your devices:
- On your device, go to the Wi-Fi settings.
- Locate your TP-Link network in the list of available networks.
- Click on the network and enter the new Wi-Fi password when prompted.
- Wait for your device to connect to the network. Once connected, you should be able to access the internet as usual.
If you encounter any issues during the reconnection process or after changing the Wi-Fi password, don’t worry. Here are some common password-related issues and troubleshooting steps you can take:
- Incorrect password: Double-check that you have entered the new Wi-Fi password correctly. Remember that passwords are case-sensitive.
- Forgotten password: If you forget the new password, you may need to reset your TP-Link router to its factory default settings. Refer to the user manual or TP-Link’s website for instructions on how to perform a reset.
- Device compatibility: In some cases, certain devices may not support the security protocol or encryption type you have set on your TP-Link router. Try changing the security settings to a different protocol (e.g., from WPA2 to WPA) and see if that resolves the issue.
- Router firmware update: Updating the firmware of your TP-Link router can help resolve compatibility or security-related issues. Visit TP-Link’s website and check for any available firmware updates for your specific router model.
By following these steps and troubleshooting techniques, you should be able to successfully apply password changes, reconnect your devices, and overcome any password-related issues that may arise with your TP-Link wireless router.
Setting a password for your TP-Link wireless router is a crucial step in securing your network and protecting your personal information from unauthorized access. By following the steps outlined in this article, you can easily create a strong and unique password that will help prevent unauthorized users from connecting to your network.
Remember, a strong password should contain a combination of uppercase and lowercase letters, numbers, and special characters. It is also important to change your password regularly and avoid using common phrases or easily guessable information.
Once you have set a password for your TP-Link wireless router, you can have peace of mind knowing that your network is secured and your data is protected. So don’t delay, take the time to set a strong password today and enjoy a secure and reliable wireless network.
FAQs
1. How do I set a password for my TP-Link wireless router?
To set a password for your TP-Link wireless router, you can follow these steps:
- Connect your computer to the router using an Ethernet cable or connect to its Wi-Fi network.
- Open a web browser and enter the default IP address for your TP-Link router in the address bar. This is usually http://192.168.0.1 or http://192.168.1.1.
- Enter the default username and password for your router. The default login credentials can be found in the router’s manual or on the bottom of the router itself.
- Once you are logged in, look for the Wireless or Wi-Fi settings. From there, you can find the option to set a password.
- Choose a strong and unique password for your Wi-Fi network and save the changes.
2. What is the importance of setting a password for my wireless router?
Setting a password for your wireless router is crucial for several reasons:
- It helps prevent unauthorized access to your Wi-Fi network.
- It protects your personal and sensitive information from being accessed by strangers.
- It ensures that only authorized devices can connect to your network, reducing the risk of bandwidth theft and network congestion.
- It safeguards your internet connection from being used for illegal activities by outsiders.
3. Can I change the password for my TP-Link router?
Yes, you can change the password for your TP-Link router. Once you are logged into the router’s settings, navigate to the Wireless or Wi-Fi settings and locate the password field. From there, you can enter a new password of your choice and save the changes. Remember to choose a strong and unique password to enhance the security of your network.
4. How often should I change the password for my wireless router?
It is good practice to change the password for your wireless router periodically for enhanced security. Experts recommend changing it at least once every few months or if you suspect any unauthorized access to your network. Regularly updating your password reduces the risk of potential security breaches and ensures your network remains secure.
5. What are some tips for creating a strong Wi-Fi password?
Here are some tips for creating a strong Wi-Fi password:
- Use a combination of uppercase and lowercase letters, numbers, and special characters.
- Avoid using easily guessable information like birthdates, names, or common dictionary words.
- Make it at least 8-12 characters long.
- Consider using a passphrase or a combination of random words to make it more secure.
- Ensure it is not used for any other online accounts to prevent potential security risks.