
Are you tired of the default notification sound on your Android device? Well, you’re in luck! In this article, we will show you how to change the notification sound on your Android device. Whether you want to set a custom tone for your text messages, emails, or social media alerts, we’ve got you covered.
Customizing your notification sound can not only make it easier to identify specific notifications but also add a personal touch to your device. With Android’s flexibility and extensive customization options, changing the notification sound is a breeze.
From selecting pre-installed tones to using your favorite song or sound clip, we will explore various methods to help you customize your device’s notification alerts. So, let’s dive in and discover how you can give your Android device a distinct and personalized sound experience!
Inside This Article
- Preparing the Notification Sound Files
- Changing the Default Notification Sound on Android
- Changing the Notification Sound for Specific Apps
- Customizing Notification Sounds for Individual Contacts
- Conclusion
- FAQs
Preparing the Notification Sound Files
Changing the notification sound on your Android device can be a fun way to personalize your device and add a touch of personality to your notifications. Before you can change your notification sound, you need to have the sound files ready. Here’s a step-by-step guide on how to prepare the notification sound files:
- Choose the desired sound: The first step is to choose the sound you want to use as your notification sound. It can be a preset sound on your device or a custom sound of your choice.
- File format: Ensure that the sound file is in a compatible format for your Android device. Most Android devices support common audio formats like MP3, WAV, and OGG.
- File length: Keep in mind that shorter sound files work better as notification sounds. Aim for a length of around 5-15 seconds to ensure that the sound is audible and doesn’t get cut off.
- Trimming the sound: If the sound file is longer than desired, you can use an audio editing tool or app to trim it down to the desired length. This will help create a seamless and concise notification sound.
- Renaming the file: Once you have the sound file ready, it is a good idea to rename it with a descriptive name. This will make it easier to locate and select the sound when changing your notification settings.
- Transferring the sound file: Transfer the sound file to your Android device. You can do this by connecting your device to your computer via USB and copying the file to the appropriate folder, such as the “Notifications” folder.
By following these steps, you can ensure that you have the necessary notification sound files prepared and ready to be used on your Android device. Once the sound files are ready, you can proceed to change the default notification sound or assign specific sounds to different apps or contacts.
Changing the Default Notification Sound on Android
Are you tired of the same old notification sound on your Android device? Luckily, changing the default notification sound is a simple process that will allow you to personalize your device and add a touch of uniqueness to your alerts. Here’s how you can do it:
- Open the “Settings” app on your Android device. This can usually be found in the app drawer or by swiping down the notification panel and tapping on the gear icon.
- Scroll down and select “Sound & Vibration” or “Sound” depending on your device’s settings.
- In the “Sound” menu, look for the “Notification sound” option. Tap on it.
- You will be presented with a list of pre-installed notification sounds on your device. You can tap on any sound to listen to a preview.
- Select the sound that you want to set as the default notification sound. Once you’ve made your choice, tap the back button or the “Done” button to save the changes.
That’s it! The next time you receive a notification, it will play the newly selected default sound. You can repeat these steps anytime you want to change your default notification sound.
Remember that the steps may slightly vary depending on the version of Android and the device you are using. If you can’t find the exact options mentioned above, try visually similar settings or consult your device’s user manual for guidance.
Changing the default notification sound is a quick and easy way to personalize your Android device and make it stand out from the crowd. Whether you prefer a soothing melody or an energetic tune, the choice is yours! Experiment with different sounds until you find the perfect one that fits your style and personality.
It’s worth noting that some Android devices may allow you to add custom notification sounds to the list. If you have a specific sound file that you want to use, you may be able to do so by placing the sound file in the appropriate folder on your device. Consult your device’s documentation or perform a quick online search to find the location of the notification sounds folder.
So go ahead, have some fun, and give your Android device a new and exciting notification sound that reflects your personal taste.
Changing the Notification Sound for Specific Apps
Android offers the flexibility to customize notification sounds for specific apps. This allows you to easily differentiate between notifications from different apps and personalize your alert preferences.
To change the notification sound for specific apps on Android, follow these steps:
- Open the Settings app on your Android device.
- Scroll down and find the “Apps” or “Applications” option, then tap on it.
- Select the app for which you want to change the notification sound.
- On the app settings page, find and tap on the “Notifications” or “App notifications” option.
- Look for the notification category you want to customize (e.g., “General notifications”, “Message notifications”, etc.).
- Tap on the notification category to access its settings.
- On the notification settings page, locate and tap on the “Sound” option.
- Choose the desired notification sound from the list or browse for a custom sound file.
- Save your changes and exit the settings.
With these steps, you can now assign unique notification sounds to specific apps on your Android device. Whether you want a subtle sound for your messaging app or an attention-grabbing sound for social media notifications, you have the freedom to choose what works best for you.
It’s worth noting that the availability of notification sound customization may vary between different Android versions and device models. If you don’t find the exact options mentioned, explore similar settings or consult your device’s user manual or online support resources for specific instructions.
By personalizing the notification sounds for specific apps, you can enhance your overall user experience and stay informed without even looking at your device.
Customizing Notification Sounds for Individual Contacts
Have you ever wished you could easily differentiate notification sounds based on the sender? Well, on Android, you can! By customizing notification sounds for individual contacts, you can instantly know who’s reaching out to you without even looking at your phone. Here’s how you can do it:
- Launch the Contacts app on your Android device.
- Select the contact you want to customize the notification sound for.
- Tap on the edit icon, usually represented as a pencil or a notepad.
- Scroll down and look for the option that says “Notification Sound” or something similar. It might be under the “Customize” section.
- Tap on the “Notification Sound” option.
- A list of available notification sounds will appear. Choose the one you want to assign to that contact.
- After selecting the desired notification sound, tap on “Save” or a similar option to confirm your changes.
From now on, whenever you receive a notification from that specific contact, you will hear the customized sound you assigned to them. It’s a handy way to identify who’s trying to get in touch with you, even when your phone is on silent or in your pocket.
Customizing notification sounds for individual contacts can be especially useful in scenarios where you need to prioritize certain contacts, such as family members, close friends, or work colleagues. By assigning unique notification sounds to each of them, you can stay informed and respond promptly to important messages while filtering out less urgent notifications.
This feature not only adds a touch of personalization to your Android device but also enhances your overall user experience. It eliminates the need to constantly check your phone or rely solely on visual cues to determine the sender. Instead, you can effortlessly recognize who’s trying to reach you based on the unique sound assigned to that contact.
Remember, the process may slightly vary depending on the Android version or the specific customized user interface implemented by your device manufacturer. However, the general steps outlined above should give you a good starting point to customize notification sounds for individual contacts.
So, why not make your Android device even more personalized and user-friendly? Start customizing notification sounds for your most important contacts today and never miss an important message again.
Conclusion
In conclusion, changing the notification sound on your Android device is a simple yet effective way to personalize your mobile experience. With just a few taps, you can replace the default sound with something that reflects your personality and style.
Not only does changing the notification sound add a touch of personalization, but it can also enhance your productivity and efficiency. By customizing different notification sounds for different apps or contacts, you can easily distinguish between important notifications and less urgent ones without even looking at your phone.
Furthermore, with a wide variety of options available, you can choose from a range of pre-installed notification sounds or even use your own custom sound. This allows you to truly make your Android device feel unique and tailored to your preferences.
So why settle for the standard default sound? Take advantage of the ability to change your notification sound and make your Android device truly yours. Personalize your mobile experience, stay organized, and make a statement with your favorite notification sound. It’s time to make your Android device stand out from the crowd.
FAQs
1. How do I change the notification sound on Android?
To change the notification sound on your Android device, follow these steps:
- Go to the Settings app on your Android device.
- Scroll down and tap on “Sound & vibration” or “Sound.”
- Tap on “Notification sound” or “Default notification sound.”
- You’ll see a list of notification sounds. Tap on the sound you want to use.
- If you want to use a custom notification sound, tap on “Add” or “Choose from files” (depending on your device) to select the sound file from your device’s storage.
- Once you have selected the sound, it will become the new default notification sound on your Android device.
2. Can I use my own custom notification sound?
Yes, you can use your own custom notification sound on Android. When you reach the step where you can select a notification sound, tap on “Add” or “Choose from files” and select the sound file from your device’s storage. Make sure the sound file is in a compatible format, such as MP3 or WAV. Once selected, the custom sound will be set as your default notification sound.
3. Do all Android apps have the option to change notification sounds?
Not all Android apps have the option to change notification sounds. It depends on the app’s programming and the developer’s decision to include this feature. Most popular apps like messaging apps, social media apps, and email apps usually provide the option to customize notification sounds. However, smaller or less frequently updated apps may not have this feature.
4. Can I assign different notification sounds to different apps on Android?
Yes, you can assign different notification sounds to different apps on Android. Here’s how:
- Go to the Settings app on your Android device.
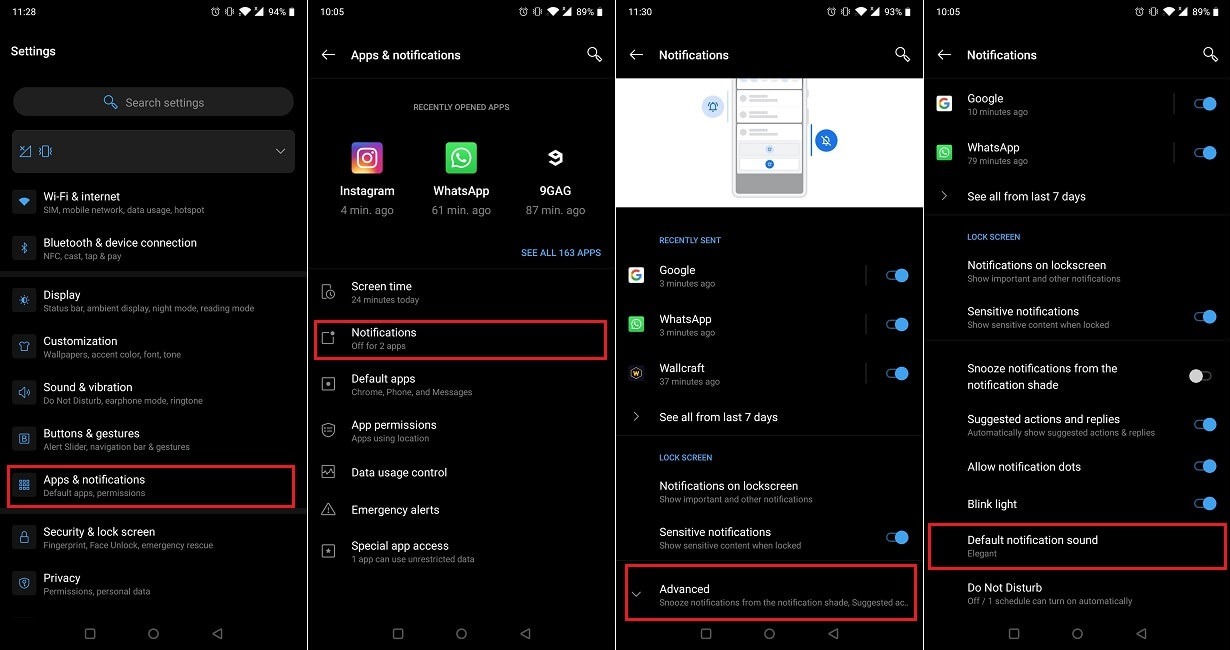
- Scroll down and tap on “Apps & notifications” or “Applications,” depending on your device.
- Tap on the app you want to customize the notification sound for.
- Tap on “Notifications” or “App notifications.”
- Scroll down to find the specific notification category you want to change the sound for, such as “Messages” or “Emails.”
- Tap on the notification category.
- Tap on “Sound” or “Notification sound” and select the sound you want to assign to that app’s notifications.
5. Is it possible to disable notification sounds on Android?
Yes, you can disable notification sounds on Android. Here’s how:
- Go to the Settings app on your Android device.
- Scroll down and tap on “Sound & vibration” or “Sound.”
- Tap on “Default notification sound.”
- Scroll to the top of the list and select “Silent” or “None.”
This will disable all notification sounds on your Android device. Keep in mind that you will still receive notifications, but you won’t hear any sound when they arrive.