
In today’s fast-paced world, our smartphones have become an integral part of our lives. With the multitude of apps and services available on Android devices, it’s no surprise that notifications can quickly start to overwhelm us. Whether it’s constant email alerts, social media updates, or app notifications, it’s easy to feel bombarded. But fear not, as there are ways to regain control over your notification settings. In this article, we will explore how to stop notifications on Android, giving you the freedom to focus on what matters most without being interrupted by incessant pings and buzzes. So, let’s dive in and discover how to tame the notification jungle on your Android device!
Inside This Article
- How To Stop Notifications On Android
- Turn Off Notifications For Specific Apps
- Adjust Notification Settings Per App
- Use Do Not Disturb Mode
- Disable Persistent Notifications
- Conclusion
- FAQs
How To Stop Notifications On Android
Notifications can be a double-edged sword. While they keep us informed about important updates and events, they can also be a constant source of distractions. If you find yourself overwhelmed with notifications on your Android device, don’t worry – there are several ways to regain control and stop notifications from taking over your screen.
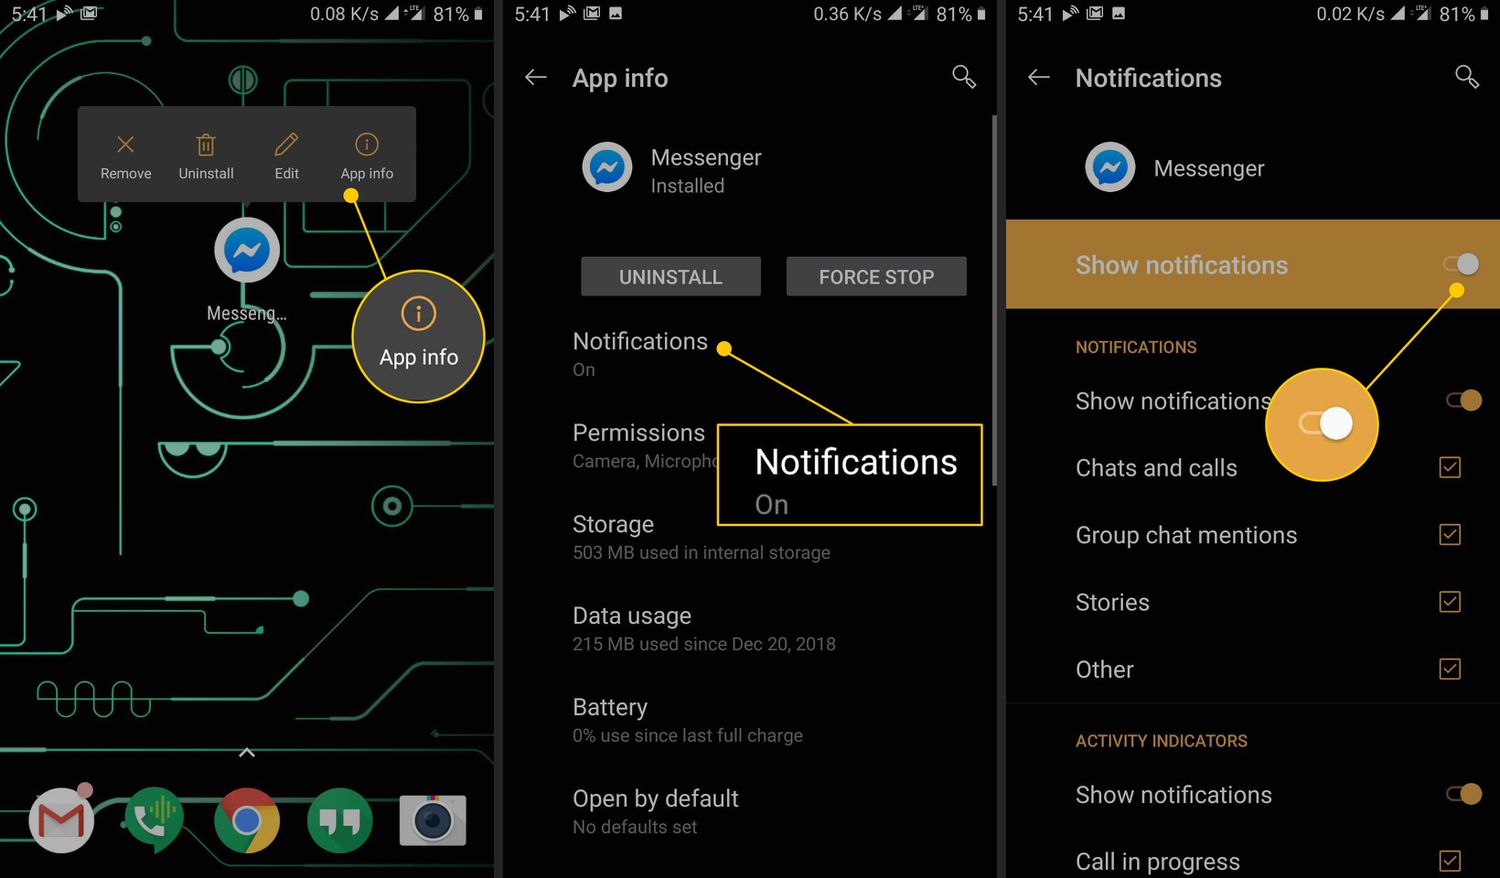
Turn Off Notifications For Specific Apps
If you only want to silence notifications from specific apps, Android makes it easy to do so. Simply follow these steps:
- Go to your device’s Settings.
- Scroll down and tap on “Apps & notifications” or “Apps.”
- Select the app you want to modify the notification settings for.
- Tap on “Notifications.”
- You will see a list of different notification options for the app. Toggle off the ones you want to disable, such as “Show notifications” or “Lock screen.”
By disabling notifications for specific apps, you can customize which ones you want to hear from and prevent the ones that are not essential from interrupting your daily routine.
Adjust Notification Settings Per App
Android provides granular control over notification settings, allowing you to tailor them to your specific preferences. Here’s how you can do it:
- Head to your device’s Settings.
- Scroll down and tap on “Apps & notifications” or “Apps.”
- Select the app you want to adjust the notification settings for.
- Tap on “Notifications.”
- You will find various notification categories or channels that the app uses. Tap on each category to customize its behavior. For example, you can choose to turn off sound for one category and enable vibration for another.
With this level of control, you can fine-tune the notification settings for each app, ensuring that you only receive the alerts that matter most to you.
Use Do Not Disturb Mode
If you want to temporarily silence all notifications on your Android device, the Do Not Disturb (DND) mode is the way to go. Here’s how you can enable it:
- Swipe down from the top of your screen to access the Quick Settings panel.
- Swipe down again to see all the available options.
- Look for the Do Not Disturb icon, which resembles a circle with a line through it. Tap on it to enable DND mode.
- You can also access DND mode through your device’s Settings. Go to “Sound” or “Sound & vibration,” then tap on “Do Not Disturb.”
- Once in DND mode, you can choose to allow certain notifications to come through, such as alarms or priority calls.
This feature is especially useful when you need uninterrupted focus or when you’re in a meeting or sleeping and don’t want to be bothered by notifications.
Disable Persistent Notifications
Some apps have persistent notifications that remain visible in the status bar, even when not actively using the app. These notifications can be annoying and clutter up your screen. Here’s how to disable them:
- Go to your device’s Settings.
- Scroll down and tap on “Apps & notifications” or “Apps.”
- Select the app that has a persistent notification.
- Tap on “Notifications.”
- Find the specific persistent notification category and toggle it off.
By disabling persistent notifications, you can declutter your status bar and have a more streamlined user experience.
With these methods, you can take back control of your Android device and prevent notifications from becoming a constant distraction. Whether you prefer to turn off notifications for specific apps, adjust settings per app, use Do Not Disturb mode, or disable persistent notifications, Android offers the flexibility you need to tailor your notification experience to your liking.
Turn Off Notifications For Specific Apps
If you find yourself bombarded with notifications from certain apps on your Android device, you can easily turn them off to regain control over your device’s notifications. Here’s how:
1. Open the Settings app on your Android device.
2. Scroll down and tap on “Apps & Notifications” or “Apps” depending on the Android version you are using.
3. You will see a list of all the installed apps on your device. Scroll through the list and find the app for which you want to disable notifications.
4. Tap on the app to open its settings.
5. Look for the “Notifications” option and tap on it.
6. On the next screen, you will see various notification categories for that app. By default, they are set to “On.” Tap on each category to turn off the notifications individually.
7. Once you have turned off the notifications for the desired categories, exit the settings.
Now, you won’t receive any notifications from the specific app you have chosen to disable. This method allows you to customize your notification experience and focus on the apps that are truly important to you.
Adjust Notification Settings Per App
One of the benefits of using an Android device is the ability to customize your notification settings for each individual app. This allows you to have more control over the types and frequency of notifications you receive, ensuring that you only get alerted for the things that truly matter to you.
To adjust the notification settings per app, follow these steps:
- Go to the Settings app on your Android device.
- Scroll down and tap on Apps or Applications (the name may vary depending on your device).
- Find and tap on the app for which you want to adjust the notification settings.
- Once you’re on the app’s settings page, look for Notifications or a similar option and tap on it.
- You will now see a list of notification categories or channels for that particular app.
- Tap on a category to customize its notification settings. You may have options like Sound, Vibration, or Lock Screen visibility.
- Adjust the settings according to your preferences. You can choose to enable or disable the sound, vibration, and other notification-related features.
By customizing the notification settings per app, you can minimize distractions and only receive notifications from the apps that are most important to you. For example, you might want to receive notifications for incoming calls and text messages, but disable notifications for social media apps or news apps that tend to be more frequent.
It’s important to note that the steps outlined above may vary slightly depending on the version of Android and the device manufacturer. However, the general process remains the same across most Android devices.
Take some time to explore the notification settings for each app on your Android device and tailor them to your preferences. This will help you create a more personalized and streamlined notification experience.
Use Do Not Disturb Mode
Do Not Disturb mode is a handy feature on Android that allows you to silence notifications and minimize disruptions during specific times or events. With this mode enabled, you can have uninterrupted focus, enjoy a peaceful night’s sleep, or keep distractions at bay during important meetings.
To activate Do Not Disturb mode, follow these simple steps:
- Swipe down from the top of your screen to access the notification panel.
- Swipe again to reveal the quick settings menu.
- Tap on the Do Not Disturb icon, represented by a bell with a diagonal line through it.
- Choose the desired Do Not Disturb mode option:
- Priority only: This mode allows you to receive notifications only from selected contacts or specific apps, while muting all others.
- Alarms only: With this mode, only alarms will sound, and all other notifications will be silenced.
- Total silence: This mode blocks all notifications and sounds entirely. Not even alarms will ring.
- Select the duration for which you want to enable Do Not Disturb mode.
- You can also customize settings further by accessing the “Settings” menu and adjusting options like allowing calls from specific contacts or configuring automatic rules for specific times or events.
While Do Not Disturb mode is active, you can still manually check your notifications by swiping down from the top of the screen, but they will not generate sounds or vibrations to disrupt your current activity or peace of mind.
Do Not Disturb mode is a fantastic tool for managing your notifications and maintaining focus when you need it most. Whether you’re studying, working, or simply wanting some uninterrupted downtime, this mode has got you covered.
Disable Persistent Notifications
If you’re tired of those persistent notifications that seem to haunt your Android device, you’ll be relieved to know that there are ways to disable them. Persistent notifications are those that stay in your notification panel even after you’ve dismissed them, often appearing at the top of the list. While some notifications are useful, persistent ones can be distracting and clutter your screen. To regain control over your notifications, follow these steps:
1. Swipe down from the top of your screen to access the notification panel.
2. Look for the persistent notification that you want to disable.
3. Long-press on the notification until you see an option menu appear.
4. Tap on the “App info” or “Details” option, which will take you to the app’s settings page.
5. In the app settings, look for the “Notifications” section.
6. Depending on your device and Android version, you may see a toggle switch to disable notifications for that specific app. If not, you might need to go through the notification channels or categories to find the option to disable the persistent notifications.
7. Once you’ve found the option, simply toggle it off to disable the persistent notifications for that app.
8. Repeat the process for any other apps that have persistent notifications.
By following these steps, you’ll be able to regain control over your notification panel and eliminate those pesky persistent notifications that can be a constant source of distraction. It’s important to note that by disabling the persistent notification for an app, you may miss out on important alerts or updates. Therefore, make sure to carefully consider the notifications you choose to disable.
Keep in mind that the steps above may vary slightly depending on your Android device model and software version. If you can’t find the specific settings mentioned above, try exploring the app’s settings or consult your device’s user manual or online support resources for more guidance.
Conclusion
Android smartphones have revolutionized the way we stay connected and informed. With advanced features and a plethora of apps, it’s no wonder that notifications can become overwhelming at times. However, by following the steps outlined in this article, you can regain control over your device and stop notifications from becoming a constant source of distraction.
Remember, the key is to assess your notifications and customize them to suit your needs. Whether it’s muting app notifications, managing priority alerts, or using Do Not Disturb mode, Android provides ample options to tailor notifications to your preferences.
So, take the time to explore the notification settings on your Android device and optimize them to create a more streamlined and focused experience. By doing so, you can stay connected without being overwhelmed by constant interruptions, allowing you to make the most of your smartphone and enjoy a more productive and balanced digital life.
FAQs
1. How can I stop notifications on my Android device?
To stop notifications on your Android device, follow these steps:
- Open the Settings app on your device.
- Scroll down and tap on “Apps” or “Applications”, depending on your device.
- Find the app for which you want to disable notifications and tap on it.
- Look for the “Notifications” or “App notifications” option and tap on it.
- You will see a list of notification categories for the app. Toggle the switch next to each category to turn off notifications.
- If you want to completely disable notifications for the app, toggle off the “Allow Notifications” switch at the top.
- Repeat these steps for any other apps from which you want to stop receiving notifications.
2. Can I customize notifications on my Android device?
Yes, you can customize notifications on your Android device to suit your preferences. To do this:
- Open the Settings app on your device.
- Scroll down and tap on “Apps” or “Applications”.
- Select the app for which you want to customize notifications.
- Tap on “Notifications” or “App notifications”.
- Here, you can choose specific notification categories to customize, such as sound, vibration, importance level, and more.
- Make your desired changes to the notification settings for the selected app.
- Repeat these steps for any other apps you want to customize notifications for.
3. How do I temporarily disable notifications on Android?
If you want to temporarily disable notifications on your Android device, you can enable the “Do Not Disturb” mode. Follow these steps:
- Swipe down from the top of your screen to access the notification shade.
- Swipe down again to reveal the quick settings panel.
- Swipe left or right to find the “Do Not Disturb” option and tap on it.
- You can choose to enable “Total silence” or “Alarms Only” mode, depending on your preference.
- You can also customize the “Do Not Disturb” settings by going to Settings > Sound & vibration > Do Not Disturb.
4. Are there any apps that can help manage notifications on Android?
Yes, there are several apps available on the Google Play Store that can help you manage notifications on your Android device. Some popular apps include:
- “Notification Manager” – allows you to easily control notifications for each app installed on your device.
- “Shush! Ringer Restorer” – automatically silences your device during specified time intervals or when in certain locations.
- “Notific” – provides a highly customizable notification experience with features like custom sounds, snooze, and pop-up reply options.
5. Will disabling notifications affect the functionality of my apps on Android?
Disabling notifications for an app on Android will only stop you from receiving notifications from that app. It will not affect the overall functionality of the app itself. You will still be able to use the app normally and access its features and content. However, keep in mind that disabling notifications may affect your ability to stay updated on activities or important information related to the app.