
Adding contacts to your iPhone’s Contacts app is a simple process that allows you to stay organized and connected with your friends, family, and colleagues. With just a few taps, you can save someone’s name, phone number, email address, and more, making it easier than ever to reach out to them when you need to. Whether you’ve just gotten a new iPhone or simply want to brush up on your contact management skills, this article will guide you through the step-by-step process of adding a contact to the Contacts app on your iPhone. So, let’s get started and ensure that you have all the necessary information at your fingertips!
Inside This Article
- # How to Add a Contact to the Contacts App on Your iPhone
- Adding a Contact from the Phone App
- Manually Adding a Contact in the Contacts App
- Importing Contacts from Another Source
- Adding a Contact from an Email or Message
- Conclusion
- FAQs
# How to Add a Contact to the Contacts App on Your iPhone
Adding a contact to your iPhone is a simple and convenient way to keep track of important phone numbers, email addresses, and other essential information. The Contacts app allows you to easily store and manage your contacts, ensuring that you have all the necessary details at your fingertips.
If you want to add a contact directly from the Phone app, follow these easy steps:
- Open the Phone app on your iPhone.
- Tap the “Contacts” tab at the bottom of the screen.
- Tap the “+” icon in the top-right corner of the screen.
- Enter the contact’s information, such as their name, phone number, and email address.
- Tap “Done” to save the contact.
If you prefer to manually add a contact in the Contacts app, here’s what you need to do:
- Open the Contacts app on your iPhone.
- Tap the “+” icon in the top-right corner of the screen.
- Enter the contact’s details, such as their name, phone number, email address, and any additional information you want to include.
- Scroll down to add more fields, such as a job title or home address.
- Tap “Done” to save the contact.
If you have contacts stored in another source, such as your email account or a cloud storage service, you can easily import them to your iPhone’s Contacts app. Here’s how:
- Open the Settings app on your iPhone.
- Scroll down and tap the “Passwords & Accounts” option.
- Tap “Add Account” and select the email or cloud storage service where your contacts are stored.
- Follow the on-screen prompts to sign in to your account and grant access to your contacts.
- Once your account is set up, your contacts will be automatically imported to the Contacts app on your iPhone.
Lastly, if you receive a phone number or email address in an email or message, you can quickly add it to your Contacts app with just a few taps:
- Open the email or message containing the contact information.
- Tap and hold the phone number or email address.
- From the options that appear, choose “Add to Contacts” or “Create New Contact.”
- Enter any additional details for the contact, if necessary.
- Tap “Done” to save the contact to your Contacts app.
By following these simple steps, you can easily add contacts to the Contacts app on your iPhone, ensuring that you have all the necessary contact information readily available.
Adding a Contact from the Phone App
If you receive a phone call or message from someone whose contact information you don’t have saved, you can easily add them to your iPhone’s contacts directly from the Phone app. This is a quick and convenient way to keep all your important contacts organized and accessible.
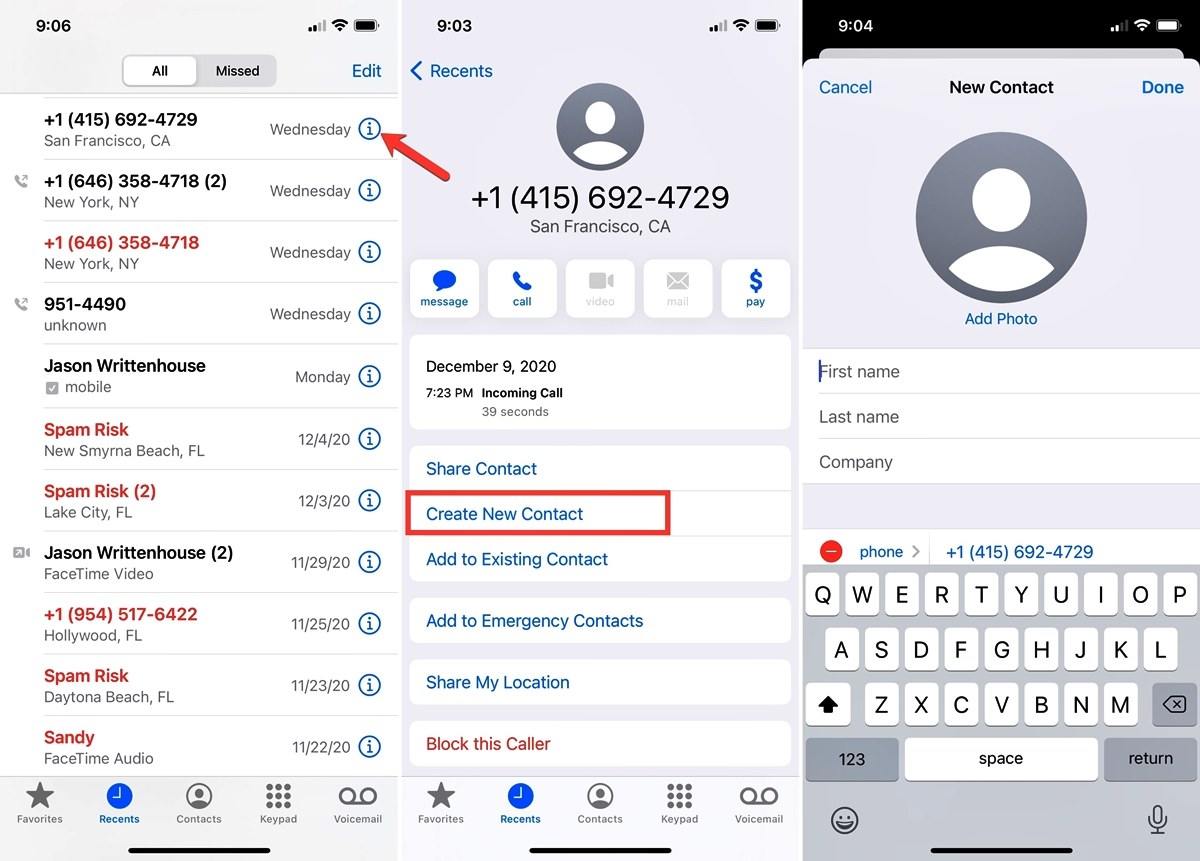
To add a contact from the Phone app, follow these simple steps:
- Open the Phone app on your iPhone.
- In the “Recents” or “Favorites” tab, find the phone number or contact that you want to add.
- Tap on the “i” (info) icon next to the phone number or contact’s name.
- Scroll down to the bottom of the contact details page.
- Tap on the “Create New Contact” option.
- Enter the contact information, such as their name, phone number, email address, and any other details you find necessary.
- Tap “Done” to save the contact.
Once you have followed these steps, the contact will be added to your iPhone’s Contacts app, and you can easily find and access it from there. This makes it convenient to call or message the person without having to search for their number again in the future.
Manually Adding a Contact in the Contacts App
Adding a contact manually in the Contacts app on your iPhone is a straightforward process. Follow these steps to add a new contact:
- Open the Contacts app on your iPhone. You can find the app on your home screen.
- Tap on the “+” (plus) icon, usually located in the top-right corner of the screen. This will open a blank contact form.
- Enter the contact’s details. Start by adding their first and last name in the respective fields. You can also add their job title, company, and any relevant notes.
- Scroll down to add contact information such as phone numbers, email addresses, and physical addresses. To add a phone number, tap on the “+ Add Phone” button, and choose the type of number (mobile, home, work, etc.). Enter the number in the provided field and tap “Done” to save it.
- To add an email address, tap on the “+ Add Email” button, enter the email address, and tap “Done” to save it.
- Similarly, you can add other contact details such as physical addresses, birthdays, anniversaries, and more.
- Optionally, you can assign a photo to the contact by tapping on the placeholder image and selecting a photo from your phone’s photo library.
- Once you have entered all the necessary details, tap “Done” in the top-right corner to save the contact.
That’s it! You have successfully added a contact manually in the Contacts app on your iPhone. The contact will be saved in your phone’s address book and will be accessible from various apps such as the Phone app, Messages app, and more.
Importing Contacts from Another Source
If you have contacts stored in another source, such as a SIM card, Google account, or another phone, you can easily import them to the Contacts app on your iPhone. This makes it convenient to have all your contacts in one place without the hassle of manually entering each one.
To import contacts from another source, follow these steps:
- Go to the “Settings” app on your iPhone.
- Scroll down and tap on “Contacts.”
- Select the option “Import SIM Contacts” if you have contacts saved on your SIM card. This will copy them to your iPhone’s Contacts app.
- If you want to import contacts from a Google account, tap on “Accounts” and select your Google account. Turn on the toggle next to “Contacts” to sync and import the contacts associated with that account.
- In case you have contacts on another phone, you can use the “Transfer Contacts” feature. It allows you to transfer contacts wirelessly or by using a cable between your iPhone and the other device. Follow the on-screen instructions to complete the transfer.
Once the importing process is complete, you can open the Contacts app on your iPhone to view and access all the imported contacts. They will be automatically organized alphabetically by last name.
It’s important to note that when importing contacts, the contact information such as names, phone numbers, and email addresses will be transferred. However, additional data such as contact groups, notes, and contact photos may not be imported depending on the source.
By using the import feature, you can quickly and easily consolidate your contacts from various sources into the Contacts app on your iPhone. This ensures that you have all your important contacts readily available whenever you need them, without the hassle of manual entry.
Adding a Contact from an Email or Message
Adding a contact from an email or message on your iPhone is a quick and convenient way to save someone’s information without having to manually type it in. Here’s how you can do it:
- Open the email or message that contains the contact information.
- Tap and hold on the phone number or email address within the message.
- A popup menu will appear with various options. Look for the “Add to Contacts” option and tap on it.
- The Contacts app will open, and you’ll see a screen with the contact details pre-filled.
- Review the information and make any necessary edits or additions.
- Tap on the “Save” button at the top right corner of the screen to save the contact.
By following these steps, you can easily add a contact from an email or message to the Contacts app on your iPhone. This method saves you time and effort compared to manually entering the contact details, especially if the information is already provided in the email or message.
The Contacts app on your iPhone is a powerful tool for managing and organizing your contacts. It not only allows you to store and access contact information but also provides various features for easy communication and collaboration. By following the steps outlined in this article, you can quickly add a new contact to your Contacts app, ensuring that you have all the necessary information readily available.
Whether you’re adding a new friend, a colleague, or a family member, the process is straightforward and user-friendly. Simply open the Contacts app, tap on the “+” icon, fill in the required details like name, phone number, and email address, and save the contact. You can even add additional information such as a profile picture, notes, and social media profiles.
With your contacts securely stored in the Contacts app, you’ll enjoy seamless communication and easy access to important information whenever you need it. Take advantage of this essential feature of your iPhone to stay connected and organized with all your contacts.
FAQs
Q: How do I add a contact to the Contacts app on my iPhone?
A: To add a contact to the Contacts app on your iPhone, follow these steps:
1. Open the Contacts app on your iPhone.
2. Tap on the “+” (plus) sign located in the top-right corner of the screen.
3. Enter the contact’s name, phone number, and any other relevant information.
4. Optional: You can assign the contact to a specific group or add a photo.
5. Tap “Done” to save the contact.
Q: Can I add multiple phone numbers and email addresses to a single contact?
A: Yes, you can add multiple phone numbers and email addresses to a single contact on your iPhone. When adding or editing a contact, simply tap on the respective fields (phone number or email address) and enter the desired information. You can add as many phone numbers and email addresses as needed for a contact.
Q: How do I delete a contact from the Contacts app?
A: To delete a contact from the Contacts app on your iPhone, follow these steps:
1. Open the Contacts app and find the contact you want to delete.
2. Tap on the contact to open their details.
3. Scroll down to the bottom of the screen and tap on the “Edit” button.
4. Scroll to the bottom again and tap on the “Delete Contact” option.
5. Confirm the deletion by tapping on the “Delete Contact” button.
Q: Is it possible to merge duplicate contacts on the iPhone?
A: Yes, you can merge duplicate contacts on the iPhone by using the built-in “Merge Contacts” feature. Here’s how to do it:
1. Open the Contacts app on your iPhone.
2. Find the duplicate contacts that you want to merge.
3. Tap on the first contact to open their details.
4. Tap on the “Edit” button in the top-right corner of the screen.
5. Scroll down to the bottom and tap on the “Link Contacts” option.
6. Select the other duplicate contacts that you want to merge with this contact.
7. Tap on the “Link” button to merge the contacts.
Q: Can I create groups to organize my contacts on the iPhone?
A: Yes, you can create groups to organize your contacts on the iPhone. Here’s how to do it:
1. Open the Contacts app on your iPhone.
2. Tap on the “Groups” button in the top-left corner of the screen.
3. Tap on “Create New Group”.
4. Enter a name for the group.
5. Tap on “Save” to create the group.
6. To add contacts to the group, go back to the Contacts tab and edit a contact. In the “Add to” section, select the newly created group. Repeat this process for other contacts you want to add to the group.