
Are you tired of missing important emails because they get lost in your crowded inbox? If you’re an iPhone user, there’s a simple solution to ensure you never miss a priority message again: setting up VIP mail. VIP mail allows you to designate specific contacts as VIPs, giving their messages special attention and ensuring they stand out in your inbox.
In this article, we’ll guide you through the step-by-step process of setting up VIP mail on your iPhone. Whether you’re a business professional receiving important emails or a casual user who wants to stay up-to-date with messages from loved ones, VIP mail is a valuable tool to have in your email management arsenal.
Inside This Article
- # How to Set Up VIP Mail on iPhone
- Enable VIP Mail Notifications
- Add Contacts to VIP List
- Customize VIP Mail Alerts
- Manage VIP Mail Settings
- Conclusion
- FAQs
# How to Set Up VIP Mail on iPhone
If you’re tired of being bombarded by email notifications and want to prioritize messages from important contacts, setting up VIP Mail on your iPhone is the way to go. The VIP Mail feature allows you to create a special inbox for your VIP contacts, ensuring that you never miss an important email again. In this article, we will guide you through the process of setting up VIP Mail on your iPhone.
Enable VIP Mail Notifications
The first step in setting up VIP Mail is to enable VIP Mail notifications. To do this, follow these steps:
- Open the “Settings” app on your iPhone.
- Scroll down and tap on “Notifications”.
- Scroll down and select “Mail”.
- Tap on “VIP”.
- Toggle the switch next to “Allow Notifications”.
Once you have enabled VIP Mail notifications, you are ready to start adding contacts to your VIP list.
Add Contacts to VIP List
To add contacts to your VIP list, you can either do it directly from your Mail app or from your Contacts app. Here are two ways to add contacts to your VIP list:
- From the Mail app:
- Open the Mail app on your iPhone.
- Open an email from the contact you want to add to the VIP list.
- Tap on the sender’s name or email address at the top of the email.
- Tap on “Add to VIP” to add the contact to your VIP list.
- From the Contacts app:
- Open the Contacts app on your iPhone.
- Search for and select the contact you want to add to the VIP list.
- Tap on “Edit” in the top right corner of the screen.
- Scroll down and tap on “Add to VIP”.
Once you have added contacts to your VIP list, their emails will automatically be filtered into the VIP Mailbox.
Customize VIP Mail Alerts
If you want to further customize your VIP Mail alerts, such as changing the sound or enabling different types of notifications, follow these steps:
- Open the “Settings” app on your iPhone.
- Scroll down and tap on “Notifications”.
- Scroll down and select “Mail”.
- Tap on “VIP”.
- In this section, you can customize the alert style, sounds, badges, and other notification settings.
- Once you have made your desired changes, simply exit the Settings app.
Manage VIP Mail Settings
To manage your VIP Mail settings, such as adding or removing contacts from the VIP list, follow these steps:
- Open the Mail app on your iPhone.
- Tap on the “VIP” mailbox located at the top of your mailbox list.
- Tap on the “i” icon next to the VIP contact.
- Here you can manage options like adding or removing the contact from the VIP list, customizing email alerts, and more.
- Make the desired changes and then tap “Done” to save your settings.
By following these simple steps, you can easily set up and manage VIP Mail on your iPhone. Enjoy the convenience of prioritizing emails from your important contacts and staying organized with your inbox!
Enable VIP Mail Notifications
If you want to ensure that you never miss important emails from specific contacts on your iPhone, enabling VIP Mail notifications is the way to go. With this feature, you can set up a VIP list and receive special alerts whenever an email arrives from someone on that list.
Here’s a step-by-step guide on how to enable VIP Mail notifications:
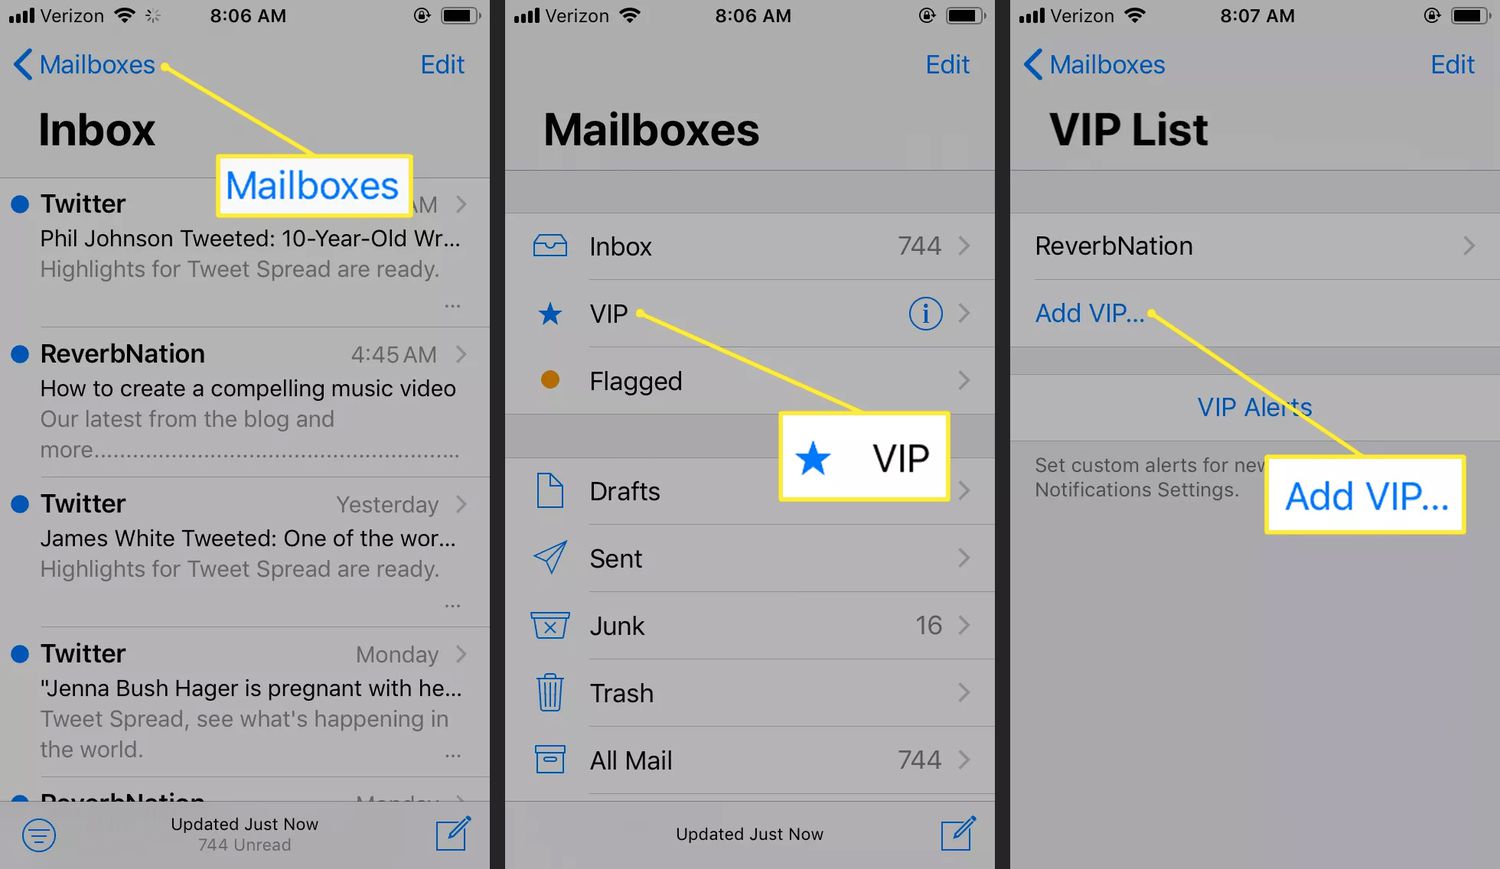
- Open the Mail app on your iPhone.
- Tap on the “Mailboxes” button located at the top-left corner of the screen.
- Scroll down and select the “VIP” mailbox.
- Once you’re in the VIP mailbox, tap on the “Add VIP” button.
- A list of your contacts will appear. Choose the contact you want to add to the VIP list by tapping on their name.
- After selecting a contact, you can choose to receive notifications for emails from them by toggling the “VIP Alerts” switch.
- Once you’ve finished adding contacts to the VIP list, tap on the “Done” button.
That’s it! You have successfully enabled VIP Mail notifications on your iPhone. Now, whenever you receive an email from any of the contacts on your VIP list, you will receive a special alert for it.
Enabling VIP Mail notifications can be a game-changer, especially if you receive a high volume of emails on a daily basis. It ensures that you never miss important messages from your important contacts.
Add Contacts to VIP List
If you receive a lot of emails and want to ensure that you never miss an important message, adding contacts to your VIP list on your iPhone is a great way to stay organized. VIP (very important person) mail allows you to prioritize emails from specific contacts, ensuring that you receive notifications and alerts for their messages. Here’s how you can add contacts to your VIP list:
To get started, open the “Mail” app on your iPhone and navigate to your inbox. Tap on an email from the contact you want to add to your VIP list to open it.
Next, tap on the sender’s name or email address at the top of the email. A small menu will appear with different options, including “Add to VIP”. Tap on “Add to VIP” to add the contact to your VIP list.
Once you have added a contact to your VIP list, their emails will be marked with a star icon in your inbox, making them easy to spot among your other emails. Additionally, any notifications or alerts for emails from VIP contacts will be prioritized, ensuring that you never miss an important message.
To view your VIP list, go back to the main inbox screen in the “Mail” app and tap on the “VIP” mailbox located in the top left corner. This will display all of the emails from your VIP contacts in one convenient location.
If you ever want to remove a contact from your VIP list, simply follow these steps again and tap on “Remove from VIP” instead of “Add to VIP”. This will remove the contact from your VIP list and their emails will no longer be marked with a star icon or receive priority notifications.
By adding contacts to your VIP list on your iPhone, you can ensure that you never miss an important email from your most important contacts. Stay organized and stay on top of your inbox with this simple and effective feature.
Customize VIP Mail Alerts
When it comes to managing your VIP emails on your iPhone, customization is key. By customizing your VIP mail alerts, you can ensure that you never miss an important message from your most valued contacts. Here are a few simple steps to help you personalize your VIP mail notifications:
1. Open the Settings app on your iPhone and scroll down to “Mail”. Tap on it to access the Mail settings.
2. Under the Mail settings, locate and tap on “Notifications”. This is where you can customize your mail alerts.
3. Tap on “VIP” to access the VIP mail notification settings specifically.
4. Here, you have the option to choose how you want to be notified when receiving an email from a VIP contact. You can choose from options like “Banner”, “Alerts”, or “None”.
5. Select your preferred notification style by tapping on it. You can also customize the alert sound for VIP emails by tapping on “Sounds” and selecting the desired sound.
6. In addition to the visual and auditory alerts, you can also enable or disable the “Badge App Icon”, which displays the number of unread VIP emails on the Mail app icon.
7. Once you have made your desired changes, simply exit the Settings app.
With these customization options, you can tailor your VIP mail alerts to suit your preferences and ensure that you are always promptly notified when a VIP contact sends you an email. Whether it’s a business colleague, a family member, or a close friend, you’ll never miss an important message.
Manage VIP Mail Settings
After setting up VIP Mail on your iPhone and adding contacts to your VIP list, you may want to further personalize and manage your VIP mail settings. Here are a few key options you can explore:
1. Notification Style: You can choose how you want to be alerted when receiving VIP emails. To access this setting, go to Settings on your iPhone, then select Notifications. Scroll down and locate Mail, tap on it, and then select VIP.
2. VIP Mail Tone: Feel free to customize the sound you hear when receiving VIP emails. To do this, go to Settings, select Sounds & Haptics, and then tap on Ringtone or Text Tone. Scroll down to find Vibration and set your preferred tone.
3. Banner Style: You have the option to choose how VIP mail notifications appear on your lock screen or notification center. Head to Settings, select Notifications, scroll down and tap on Mail, and then select VIP. From there, you can choose the banner style that suits your preference.
4. VIP Mail Badge: If you wish to see a badge icon on the Mail app indicating the number of unread VIP emails, you can toggle this feature on or off. To do this, go to Settings, select Notifications, scroll down to Mail, then tap on VIP, and toggle the Badge App Icon option.
5. VIP Mail Alerts: You can additionally manage how VIP email alerts appear. You can choose to have them displayed as banners, in the notification center, or simply have the alerts shown silently in the notification center. To adjust this setting, go to Settings, select Notifications, find Mail, tap on it, and then select VIP.
6. Unsubscribe from VIP Mail: If you no longer wish to receive VIP email notifications, you can easily remove individuals from your VIP list. Open the Mail app on your iPhone, go to your VIP mailbox, swipe left on the email from the contact you want to remove, and tap on the “x” button.
7. Organize VIP Mail: To keep your VIP emails organized, you can create a separate mailbox dedicated to your VIP contacts. In the Mail app, tap on “Edit” on the top right corner, then select “New Mailbox”. Give the mailbox a name and choose the location where you want it to be placed.
By exploring and managing these VIP mail settings, you can personalize your iPhone’s email experience and ensure you never miss important messages from your VIP contacts.
Conclusion
Setting up VIP Mail on your iPhone can greatly enhance your email experience by ensuring that you never miss important messages from your VIP contacts. By following the simple steps outlined in this guide, you can easily configure VIP Mail and enjoy the benefits of having your VIP emails organized and easily accessible in a dedicated inbox.
With VIP Mail, you can prioritize your communications and stay informed about critical emails, be it from your boss, clients, or loved ones. The ability to customize notifications and have a separate mailbox for VIP emails provides convenience and efficiency, allowing you to quickly respond to important messages while filtering out less urgent ones.
So why wait? Take a moment to set up VIP Mail on your iPhone and streamline your email management. Stay connected and in control of your inbox with this handy feature and make sure that you never miss an important message again.
FAQs
1. Can I set up VIP Mail on my iPhone?
Yes, you can easily set up VIP Mail on your iPhone. By following a few simple steps, you can ensure that emails from your important contacts are easily distinguished and given priority.
2. What is VIP Mail?
VIP Mail is a feature on the iPhone that allows you to highlight specific contacts or email addresses, ensuring that their emails are easily identifiable and appear in a separate VIP mailbox. This feature makes it easier to stay organized and prioritize important messages.
3. How do I add VIP contacts on my iPhone?
To add VIP contacts on your iPhone, follow these steps:
a. Open the Mail app.
b. Find an email from the contact you want to add as a VIP.
c. Tap on the contact’s name or email address.
d. Tap “Add to VIP” in the options that appear.
e. The contact will now be added to your VIP list.
4. How do I customize VIP alerts?
To customize VIP alerts on your iPhone, follow these steps:
a. Go to Settings on your iPhone.
b. Scroll down and tap on “Mail”.
c. Tap on “Notifications”.
d. Scroll down to find “VIP”.
e. Tap on “VIP” and customize the alerts, including sounds, banners, and lock screen notifications to your preference.
5. Can I change the VIP mailbox settings on my iPhone?
Yes, you can change the VIP mailbox settings on your iPhone. To do this, follow these steps:
a. Open the Mail app.
b. Go to the VIP mailbox.
c. Tap on the “i” icon at the top right corner.
d. Here, you can change settings like the alert style, show on lock screen, and more.