
Are you looking to create PDF files on your iPad? Look no further! In this comprehensive guide, we will walk you through the steps to create PDF files using your iPad. Whether you need to convert documents, images, or web pages into PDF format, your iPad can serve as a powerful tool to accomplish this task. With the help of various apps and built-in features, you can easily create professional-looking PDF files right on your iPad. Say goodbye to the hassle of printing and scanning documents just to have them in PDF format. Let’s dive in and explore the methods and applications that will enable you to create PDF files effortlessly on your iPad!
Inside This Article
- Method 1: Using the Files App
- Method 2: Using a PDF Converter App
- Method 3: Using the Print Option
- Method 4: Using a PDF Editor App
- Conclusion
- FAQs
Method 1: Using the Files App
Creating a PDF on your iPad can be done easily using the built-in Files app. The Files app is a versatile tool that allows you to manage and organize your files on your iPad. Here’s how you can create a PDF using the Files app:
Step 1: Open the document or file that you want to convert to PDF. It can be a Word document, a webpage, or even an image.
Step 2: Tap the “Share” button, which is represented by a square with an upward arrow. This will open a menu of sharing options.
Step 3: Scroll through the sharing options until you find the “Print” option. Tap on it to proceed.
Step 4: In the Print menu, pinch outwards with two fingers on the preview image to open it in a new window.
Step 5: Once the preview image opens in a new window, tap the “Share” button again, represented by a square with an upward arrow.
Step 6: In the sharing options, scroll down and find the “Save to Files” option. Tap on it to continue.
Step 7: Choose a location in the Files app where you want to save the PDF. You can create a new folder or select an existing one.
Step 8: Tap the “Save” button to create the PDF. The file will be saved in the selected location as a PDF document.
That’s it! You have successfully created a PDF using the Files app on your iPad. You can now easily access and share the PDF document at any time.
Method 2: Using a PDF Converter App
If you’re looking for a quick and convenient way to create PDF files on your iPad, using a PDF converter app is a great option. These apps are designed to convert various file formats into PDFs, making it easy to save and share your documents. Follow these steps to create a PDF using a PDF converter app:
1. Start by downloading a reputable PDF converter app from the App Store. There are several options available, such as Adobe Acrobat Reader, PDF Expert, or PDF Converter by Readdle.
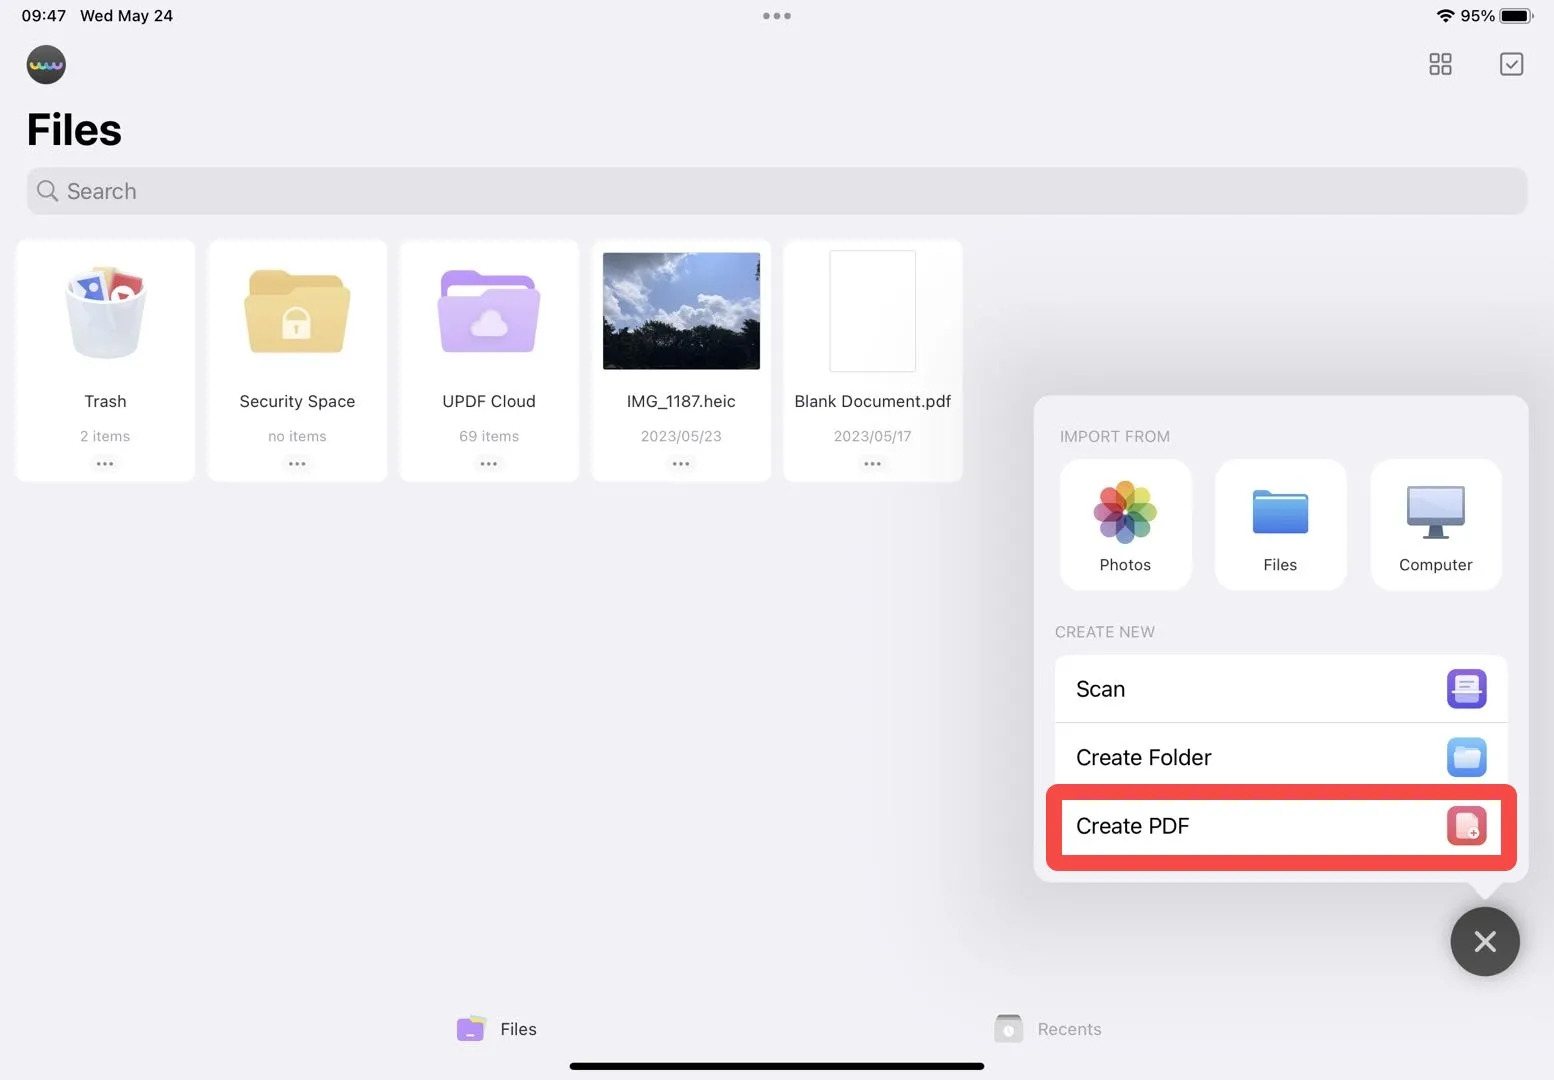
2. Once the app is installed, open it and locate the “Convert” or “Create PDF” feature. This functionality may be found in different places within each app, so explore the options until you find the appropriate feature.
3. After selecting the “Convert” or “Create PDF” option, you will likely be prompted to choose the file or document you wish to convert. This can be a previously saved file on your iPad or a document from cloud storage services like iCloud, Google Drive, or Dropbox.
4. Once you have selected the file, the PDF converter app will begin the conversion process. This may take a few moments, depending on the size and complexity of the document.
5. Once the conversion is complete, the PDF converter app will usually provide you with options to name and save the newly created PDF file. You can choose a location on your iPad or save it directly to a cloud storage service for easy access from other devices.
6. Congratulations! You have successfully created a PDF file using a PDF converter app on your iPad. You can now view, share, or print the PDF as needed.
PDF converter apps offer a simple and efficient way to convert various file formats into PDFs. They are particularly useful when you need to preserve the formatting, layout, and content of a document. Whether you want to convert Word documents, Excel spreadsheets, PowerPoint presentations, or even images into PDFs, a PDF converter app is a valuable tool to have on your iPad.
Please note that the steps outlined above may vary slightly depending on the PDF converter app you choose. It’s always a good idea to refer to the app’s documentation or support resources for specific instructions.
Method 3: Using the Print Option
If you’re looking to create a PDF on your iPad, using the print option can be a convenient method. Follow these simple steps to convert any document or webpage into a PDF file:
1. Open the document or webpage you want to convert into a PDF on your iPad.
2. Tap on the “Share” button or look for the three dots in the top corner, depending on the app or browser you’re using.
3. From the options presented, select the “Print” option.
4. In the print preview screen, pinch your fingers together on the preview image to view it in full-screen mode.
5. Now, with the full-screen preview displayed, you can access the sharing options by tapping the share button on the top-right corner of the screen.
6. A share sheet will appear with various options. Look for the “Create PDF” option and tap on it.
7. A PDF preview of the document or webpage will be generated. You can make any necessary adjustments, such as selecting specific pages or adding annotations, before saving the PDF.
8. Finally, tap on the “Done” button located on the top-left corner of the screen to save the PDF to your iPad.
And there you have it! By utilizing the print option, you can easily create PDF files directly on your iPad without the need for any additional apps or converters.
It’s important to note that the availability of the print option may vary depending on the app or website you’re using. Additionally, some apps may have their own unique method of accessing the print feature. So, if you don’t find the print option right away, look for the share or export option instead and explore the available settings.
Creating PDFs using the print option is a convenient and efficient way to convert various types of content into a portable and universally compatible format.
Method 4: Using a PDF Editor App
Another effective way to create PDFs on your iPad is by using a PDF editor app. These apps offer advanced features that allow you to edit, annotate, and convert documents into PDF format. Here’s how you can use a PDF editor app to create PDFs:
1. Install a PDF editor app: Begin by searching for and downloading a reliable PDF editor app from the App Store. Some popular options include Adobe Acrobat Reader, PDF Expert, and GoodNotes.
2. Open the app: Launch the PDF editor app on your iPad once it’s installed. You may need to create an account or sign in before you can access the features.
3. Import your document: Locate the document you want to convert into a PDF. Most PDF editor apps provide options to import files from cloud storage services like iCloud, Dropbox, or Google Drive. Alternatively, you can directly import files from other apps like the Files app or email attachments.
4. Customize the PDF: Once you’ve imported the document, you can make various customization changes. These may include cropping or rotating pages, inserting or deleting pages, changing the order of pages, and adding annotations or signatures.
5. Save as PDF: After making the desired changes, tap on the “Save” or “Export” option. Select the PDF format as the output format. Depending on the app, you may have additional options to adjust settings such as image quality or compression level.
6. Choose the destination: Select the location where you want to save the PDF file. You can save it locally on your iPad or export it to a cloud storage service or other apps.
7. Confirm and save: Review the settings and tap on the “Save” or “Export” button to create the PDF. The app will process the document and generate a PDF file based on your customizations.
Using a PDF editor app gives you greater control over the final output. With the ability to edit and annotate documents, you can also create more professional-looking PDFs with added value.
Remember, the specific steps may vary slightly depending on the PDF editor app you choose. It’s always a good idea to explore the app’s features and settings for a more personalized PDF creation experience.
Conclusion
Creating a PDF on your iPad is a simple and convenient process that can help you stay organized and efficient. Whether you need to convert a document, image, or webpage into a PDF, there are several apps available that can streamline the process and provide you with professional-looking results.
By utilizing apps like Adobe Acrobat, PDF Converter, or Apple’s built-in functionality, you can easily convert files to PDF format, make necessary edits, and share them with ease. With the ability to annotate, sign, and password protect your PDFs, you can ensure the security and integrity of your sensitive documents.
The widespread use of iPads in both personal and professional settings makes the ability to create PDFs a valuable skill. Whether you need to digitize important documents, share information with colleagues, or simply save web content for future reference, knowing how to create PDFs on your iPad will undoubtedly enhance your productivity and organization.
So, get started today and take advantage of the numerous benefits that creating PDFs on your iPad has to offer!
FAQs
1. Can I create a PDF on my iPad?
Yes, you can create PDFs on your iPad using various methods. There are several apps available in the App Store that allow you to convert documents, images, webpages, and other files into PDF format. Additionally, many productivity apps, such as Apple Pages and Microsoft Word, offer built-in PDF exporting options.
2. Which app is best for creating PDFs on an iPad?
There are several excellent apps for creating PDFs on an iPad, each with its own set of features and user interface. Some popular options include Adobe Acrobat Reader, PDFelement, and Microsoft Office. The best app for you will depend on your specific needs and preferences, so it’s worth trying out a few different ones to see which works best for you.
3. Can I annotate or edit the PDFs I create on my iPad?
Yes, many PDF creation apps for iPad also offer a range of annotation and editing features. These can include options for highlighting text, adding notes, inserting images, and even signing documents electronically. So, if you need to make any changes or additions to your PDFs, you can easily do so on your iPad using these apps.
4. How can I share the PDFs I create on my iPad?
Sharing PDFs created on an iPad is straightforward. Most apps provide options for sharing the PDFs via email, text message, or through cloud storage platforms like Dropbox or iCloud. You can also use the “Share” feature available on your iPad to send the PDF directly to other apps or even print it if needed.
5. Can I password protect the PDFs I create on my iPad?
Yes, many PDF creation apps for iPad offer the option to password protect your PDFs. This is an excellent feature if you want to ensure that only authorized individuals can access the document. You can set a password for opening the PDF or even restrict certain actions like printing or copying text. This provides an added layer of security for your sensitive documents.