
Are you tired of missing important calls on your Android device? Adding a call on Android can be a useful feature to have when you need to bring another person into an ongoing conversation or conference call. Whether you’re on a business call or talking to friends and family, knowing how to add a call can help make your conversations more dynamic and convenient.
In this article, we will guide you step-by-step on how to add a call on Android, explore the different methods available, and provide useful tips to enhance your calling experience on your Android device. So, let’s dive in and learn how to seamlessly add a call to your ongoing conversations!
Inside This Article
- Overview
- Step 1: Open the Phone App
- Step 2: Dial the Number
- Step 3: Make the Call
- Troubleshooting Tips
- Conclusion
- FAQs
Overview
Adding a call on your Android smartphone is a simple and convenient way to connect with someone. Whether you need to make a conference call or simply want to add another person to an ongoing conversation, Android offers a seamless process to easily add a call. In this article, we will guide you through the steps to add a call on your Android device, ensuring that you never miss out on important conversations or opportunities to connect with others.
Adding a call on Android is a versatile feature that allows you to communicate efficiently and effectively. Whether you are making plans with friends, conducting a business meeting, or simply catching up with loved ones, being able to include multiple participants in a conversation can enhance the overall calling experience.
With just a few taps, you can add a call on your Android phone and have a hassle-free, multi-party conversation. This feature is particularly useful when you need to bridge the communication gap between different individuals or departments, making collaboration and coordination a breeze.
Step 1: Open the Phone App
Opening the phone app on your Android device is the first step to making a call. This app is usually preinstalled on your phone and can be easily accessed from the home screen or the app drawer. Locate the phone icon, which typically resembles a telephone receiver.
If you cannot find the phone app on your home screen, you can swipe up or down to access the app drawer. In the app drawer, scroll through the list of installed apps until you find the phone app icon.
Once you have located the phone app, simply tap on it to open it. This will launch the dialer screen, where you can enter the phone number you wish to call.
Please note that the location of the phone app may vary slightly depending on the device model and the custom Android skin or launcher you are using. However, the app is usually easy to find and accessible with just a few taps.
Step 2: Dial the Number
Once you have opened the Phone App on your Android device, it’s time to dial the number you want to call. Follow these simple steps to ensure a smooth dialing process:
- 1. Enter the number manually: If you know the phone number you want to call, simply use the keypad on your Android device to manually enter the digits. Take your time and double-check the number to avoid any dialing errors.
- 2. Use the contacts list: If the number you want to call is saved in your contacts list, you can easily find it by selecting the “Contacts” option in the Phone App. Scroll through your contacts or use the search bar to locate the desired number, and then tap on it to initiate the call.
- 3. Try the call history: Another way to dial a number is by checking your call history. The Phone App keeps a record of all incoming, outgoing, and missed calls. If the number you want to call is in your call history, simply tap on it to make the call.
- 4. Take advantage of autocomplete: Many Android devices offer autocomplete suggestions while you type a number. This feature can be quite handy, especially when you frequently call the same contacts. By predicting the number you are trying to dial, autocomplete can save you time and effort.
- 5. Utilize voice dialing: Most Android devices come equipped with voice dialing capabilities. All you need to do is activate the voice assistant, such as Google Assistant, and say something like “Call John” or “Dial 555-1234.” The device will process your voice command and initiate the call accordingly.
Remember, when dialing a number, ensure that you have the correct country or area code if necessary. Double-checking the digits before making the call will ensure that you reach the intended recipient.
Step 3: Make the Call
After dialing the number, it’s time to make the call on your Android phone. Once you have entered the desired number using the phone keypad or selected a contact from your address book, you will see a call button prominently displayed on the screen.
Simply tap the call button to initiate the call. In most cases, the call will start ringing on the other end, and you will be connected to the person you are trying to reach.
During the call, you will see relevant information displayed on the screen, such as the call duration, speakerphone option, and the ability to add another call or put the current call on hold.
If you wish to end the call, you can simply tap the end call button, typically represented by a red phone icon. This will disconnect the call and take you back to the phone app screen.
It’s important to note that the exact appearance and placement of these buttons may vary slightly depending on the specific Android phone model or the version of the operating system you are using. However, the general process of making a call remains the same across different devices.
Now that you know how to make a call on your Android phone, you can easily communicate with friends, family, and colleagues whenever you need to. Simply follow the steps outlined in this guide, and you’ll be making calls like a pro in no time.
Troubleshooting Tips
Encountering issues while making or receiving calls on your Android device can be frustrating. However, with a few troubleshooting tips, you can resolve common problems and get back to making smooth, uninterrupted calls. Here are some solutions to consider:
1. Check your network connection: A stable and reliable network connection is essential for making calls. Ensure that your device is connected to a strong network signal, either through Wi-Fi or mobile data.
2. Restart your device: Sometimes, a simple restart can fix minor software glitches that may be affecting your call functionality. Press and hold the power button on your Android device, then select the “Restart” option to reboot your device.
3. Check your call settings: Ensure that your call settings are properly configured. Go to the “Phone” or “Call” app on your Android device, and navigate to the settings menu. Check for any restrictions or call blocking features that may be enabled.
4. Clear the cache of the Phone app: Cached data can sometimes interfere with the performance of the Phone app. Clear the cache by going to Settings > Apps > Phone. Select the Phone app, then tap on “Storage” or “Clear Cache.”
5. Update your Android operating system: Keeping your Android device updated with the latest software version can address compatibility issues that may affect call functionality. Go to Settings > System > Software Update to check for any available updates.
6. Try using a different dialer app: If the default Phone app is not working properly, consider using a different dialer app from the Google Play Store. There are various options available that may provide better call functionality.
7. Remove and reinsert the SIM card: Sometimes, issues with the SIM card can disrupt call services. Turn off your Android device, remove the SIM card, wait for a few seconds, then reinsert it correctly. Power on your device and check if the call problem is resolved.
8. Reset network settings: Resetting the network settings on your Android device can resolve network-related issues that may impact call quality. Go to Settings > System > Reset > Reset Network Settings. Note that this will remove all saved Wi-Fi networks and Bluetooth pairings.
If the above troubleshooting steps do not solve your calling issues, it may be worthwhile to reach out to your mobile network provider or seek assistance from an authorized Android service center. They can help diagnose and resolve any hardware or network-related problems that may be affecting your calls.
Conclusion
Adding a call on Android is a simple and essential feature that allows us to stay connected with our contacts. Whether you need to make a phone call, join a conference call, or even merge calls for a group conversation, Android provides various methods to ensure you can easily manage your calls.
Through the native Phone app, you can quickly initiate calls by manually dialing a number or selecting a contact from your phonebook. Additionally, you can make use of third-party calling apps for added features and functionalities.
With the flexibility of Android, you have the freedom to customize your call settings, block unwanted calls, and even record important conversations. By exploring these options, you can enhance your calling experience and make the most out of your Android device.
So next time you need to add a call on your Android, don’t hesitate to follow the steps outlined in this article. Stay connected, communicate effortlessly, and enjoy the convenience that Android offers for all your calling needs.
FAQs
Q: How can I add a call on Android?
A: Adding a call on Android is a straightforward process. Simply follow these steps:
- Open the Phone app on your Android device.
- Tap on the Contacts icon or navigate to the “Contacts” tab.
- Select the contact you wish to call.
- Once the contact’s details are visible, tap on the phone icon or the “Call” button.
- The call will be initiated and you’ll be connected to the selected contact.
Q: Can I add multiple calls at the same time on Android?
A: No, currently Android doesn’t support adding multiple calls simultaneously. You can only make one call at a time on an Android device. If you want to add another call, you need to end or put the current call on hold before making a new call.
Q: Is it possible to add a call while on an ongoing call?
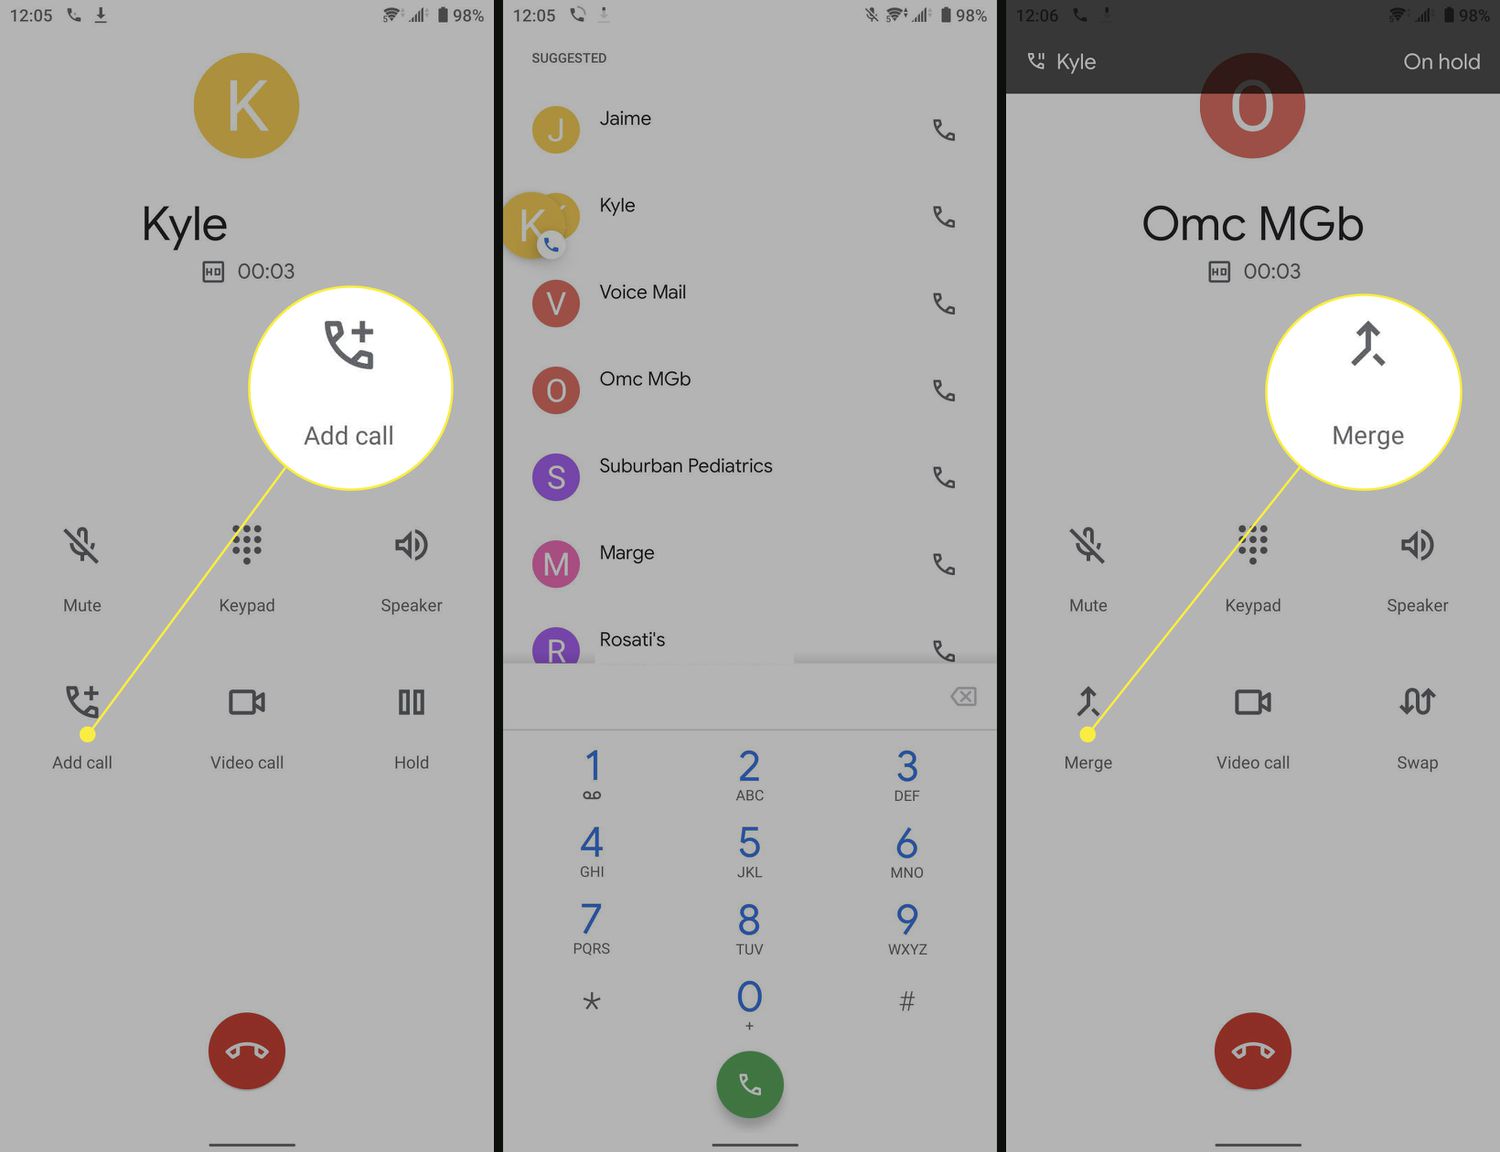
A: Yes, Android devices offer the option to add a call while you’re already on a call. To do so, follow these steps:
- During the ongoing call, tap on the “Add call” button. This button is usually represented by a “+” symbol or by an icon with two phones.
- You’ll be taken back to the Phone app, where you can select a contact to make the additional call.
- Once you’ve selected the contact, tap on the phone icon or the “Call” button to initiate the second call.
- You’ll now be connected to both calls and can switch between them or merge them into a conference call, depending on your device’s capabilities.
Q: Can I add a call using third-party apps on Android?
A: Yes, there are several third-party apps available on the Google Play Store that offer advanced call management features, including the ability to add calls. These apps provide additional functionalities beyond the built-in Phone app, such as call recording, call blocking, and caller ID. Some popular third-party call management apps for Android include Truecaller, CallApp, and Hiya.
Q: Are there any limitations to adding calls on Android?
A: While adding calls on Android is a useful feature, it’s important to note that the ability to add calls may vary based on your Android device and the version of Android you’re using. Some older or budget devices may not support this feature. Additionally, your network carrier might have specific limitations or restrictions on adding calls, such as conference call limitations or additional charges for adding calls. It’s always a good idea to check with your device manufacturer or network carrier for any specific limitations or requirements.