
In this technology-driven age, our smartphones have become an integral part of our lives. With the iPhone 7 being one of the most popular devices, it is crucial to ensure that all the important data and files are securely backed up. Whether you want to protect your photos, videos, contacts, or app data, backing up your iPhone 7 is the best way to safeguard against potential data loss or device damage.
In this comprehensive guide, we will walk you through the steps to backup your iPhone 7 effectively. From using iCloud to iTunes, we will explore different methods and provide valuable tips to ensure a successful backup process. So, if you want to learn how to safeguard your precious data and have peace of mind knowing it’s safe, keep reading!
Inside This Article
- Why Backup Your iPhone 7?
- Methods for Backing Up iPhone 7
- Using iCloud
- Using iTunes
- Using Third-Party Backup Apps
- Using AirDrop
- Conclusion
- FAQs
Why Backup Your iPhone 7?
Backing up your iPhone 7 is essential to ensure the safety and security of all your valuable data, including contacts, photos, videos, messages, and apps. While it may seem like an unnecessary step, there are several reasons why backing up your iPhone 7 is highly recommended:
1. Protection against Data Loss: Accidents can happen anytime, such as iPhone damage or theft. If you haven’t backed up your iPhone 7, you risk losing all your important data forever. Regular backups provide a safety net, allowing you to restore your data to a new device or after a reset.
2. Upgrading to a New iPhone: If you plan to upgrade to a newer iPhone model, having a backup ensures a smooth transition. You can easily transfer all your data from the old device to the new one, avoiding the hassle of manually reconfiguring settings, reinstalling apps, and transferring files.
3. Protecting Your Memories: Your iPhone 7 holds precious memories in the form of photos, videos, and messages. By backing up your device, you ensure that these memories are safeguarded even if your phone gets damaged or lost. Losing these irreplaceable moments can be devastating, but with a backup, you can always retrieve them.
4. Safeguarding Important Contacts and App Data: Your iPhone 7 contains a wealth of personal and professional contacts. Losing them can lead to inconvenience and difficulty in reconnecting. Additionally, backing up your iPhone 7 ensures that app data, such as game progress, notes, and preferences, is preserved, allowing you to pick up right where you left off.
5. Peace of Mind: The simple act of backing up your iPhone 7 can provide peace of mind. Knowing that your data is safe and accessible gives you the confidence to explore new features, update your device, or even experiment with new apps, without the fear of losing your valuable information.
With these compelling reasons in mind, it’s clear that backing up your iPhone 7 is not only a smart choice, but also a necessary one. Now that you understand why it’s important, let’s explore the different methods you can use to backup your iPhone 7.
Methods for Backing Up iPhone 7
Backing up your iPhone 7 is essential to ensure that your data, including contacts, photos, videos, and app data, is safe and easily retrievable in case of any mishaps or device malfunctions. Thankfully, there are several methods available to back up your iPhone 7, giving you peace of mind and the ability to restore your device effortlessly.
Here are four reliable and convenient methods for backing up your iPhone 7:
- Using iCloud: Apple’s iCloud service provides a seamless way to back up your iPhone 7 wirelessly. Simply go to the Settings app on your device, tap on your name, select “iCloud,” and toggle on the “iCloud Backup” option. Make sure you are connected to a Wi-Fi network and have enough iCloud storage space. Your iPhone will automatically back up the data to iCloud whenever it is plugged in, locked, and connected to Wi-Fi.
- Using iTunes: If you prefer to back up your iPhone 7 to your computer, iTunes is a reliable option. Connect your iPhone 7 to your computer using a USB cable and open iTunes. Click on the iPhone icon in the upper left corner, go to the “Summary” tab, and click on “Back Up Now.” iTunes will create a full backup of your iPhone 7, including all your data and settings.
- Using Third-Party Backup Apps: There are several third-party backup apps available on the App Store that offer additional features and flexibility. These apps allow you to back up your iPhone 7 to cloud storage services like Google Drive, Dropbox, or OneDrive. Simply install the preferred backup app on your iPhone 7, follow the instructions to set up an account, and initiate the backup process. These apps often provide options for selective backups and easy restoration.
- Using AirDrop: AirDrop is a convenient method for quickly transferring files between Apple devices. While it may not be a comprehensive backup solution, it can be handy for backing up specific files or transferring data to another device temporarily. To use AirDrop, ensure that both the sending and receiving devices have AirDrop enabled. Open the file you want to back up on your iPhone 7, tap on the share button, select the AirDrop icon, and choose the target device. The selected file will be transferred wirelessly to the recipient device.
By utilizing these methods, you can easily back up your iPhone 7 and have peace of mind knowing that your valuable data is safe and accessible for future use. Choose the method that best suits your preferences and needs, and make it a regular habit to back up your device to ensure a seamless and worry-free iPhone experience.
Using iCloud
One of the easiest and most convenient ways to backup your iPhone 7 is by using iCloud. iCloud is Apple’s cloud storage service that allows you to store your data securely and access it from any Apple device.
To backup your iPhone 7 using iCloud, follow these simple steps:
- Connect your iPhone 7 to a Wi-Fi network.
- Go to “Settings” and tap on your name at the top of the screen.
- Select “iCloud” from the list of options.
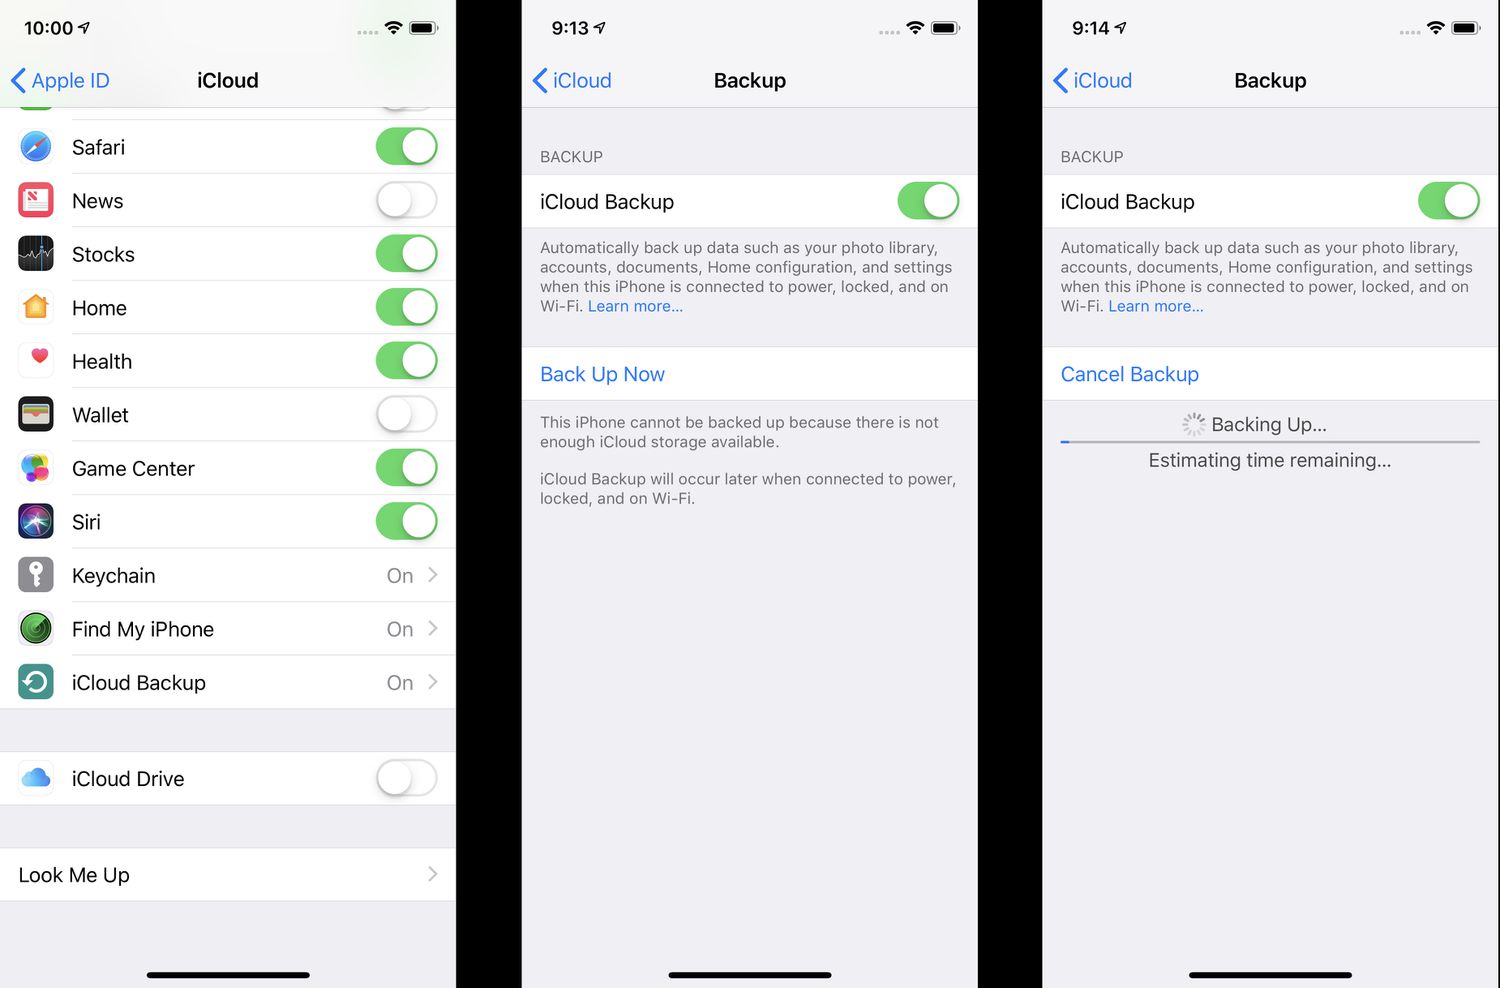
- Scroll down and tap on “iCloud Backup”.
- Toggle on the “iCloud Backup” switch.
- Tap on “Back Up Now” to initiate the backup process.
It is important to note that your iPhone 7 will need to be connected to a Wi-Fi network and have enough storage space available on your iCloud account to successfully backup your data.
Once the backup process is complete, your iPhone 7 will automatically back up its data to iCloud on a regular basis, as long as it is connected to Wi-Fi and charging.
By using iCloud to backup your iPhone 7, you can easily restore your data to a new iPhone or recover any lost or deleted data.
Additionally, iCloud also allows you to sync your contacts, calendars, notes, and other data across multiple devices, providing a seamless and integrated experience.
Overall, using iCloud as a backup method for your iPhone 7 ensures that your data is safe, easily accessible, and can be recovered in case of any unforeseen events or device issues.
Using iTunes
Another method to backup your iPhone 7 is by using iTunes. iTunes is a free application developed by Apple that allows you to manage, sync, and backup your iPhone. Here’s how you can backup your iPhone 7 using iTunes:
- Ensure that you have the latest version of iTunes installed on your computer. You can download and install the latest version from the Apple website.
- Connect your iPhone 7 to your computer using the Lightning cable.
- Open iTunes on your computer. If prompted, enter your passcode on your iPhone and trust the computer if asked.
- Select the device icon that appears in the top left corner of the iTunes window.
- In the Summary tab, under the Automatically Back Up section, choose “This computer”.
- If you want to encrypt your backup to include sensitive information such as passwords, Health data, and website history, select the “Encrypt iPhone backup” option and create a memorable password. Make sure to remember this password as you won’t be able to restore your backup without it.
- Click on the “Back Up Now” button to initiate the backup process. Wait for the backup to complete.
- Once the backup is finished, you can verify the backup by going to Edit (Windows) or iTunes (Mac) > Preferences > Devices. You should see the date and time of the latest backup associated with your iPhone 7.
It’s important to note that iTunes backups include your device settings, app data, home screen layouts, and other important information. However, it does not include content synced from your computer, such as music, movies, and TV shows, which can be re-synced from your iTunes library.
Backing up your iPhone 7 regularly using iTunes is a good practice to ensure that your data is safe and can be restored in case of any unexpected issues or the need for a new device. Keep in mind that iTunes backups are stored on your computer, so it’s essential to have enough storage space available to accommodate the backup files.
Using Third-Party Backup Apps
While iCloud and iTunes are built-in solutions for backing up your iPhone 7, you also have the option to use third-party backup apps. These apps provide additional features and flexibility in managing and securing your phone’s data.
One popular third-party backup app is iMazing. With iMazing, you can create a complete backup of your iPhone 7 including photos, contacts, messages, and more. It also allows you to selectively restore specific files or transfer them to a new device. The app offers a user-friendly interface and is compatible with both Windows and Mac operating systems.
If you prefer a cloud-based solution, Google Photos is worth considering. While primarily designed for managing photos, it can also backup videos and other files from your iPhone. It offers unlimited storage for high-quality photos (limited storage for original quality) and provides an easy way to access your backed-up content on any device with an internet connection.
Another option is Dropbox. This popular cloud storage platform allows you to back up and sync your iPhone 7 files across multiple devices. It offers various storage plans, including a free tier with limited storage space. Dropbox provides seamless integration with other apps and offers robust security features to protect your data.
For those concerned about privacy and security, Syncios provides a reliable solution. It allows you to backup and restore data including photos, videos, contacts, and more. Syncios offers a straightforward interface and supports both Windows and Mac platforms.
Other noteworthy third-party backup apps include PhoneView, AnyTrans, and iExplorer. These apps provide additional features, such as file management and data transfer, making them useful tools for iPhone 7 users.
Before choosing a third-party backup app, it’s important to do your research and read user reviews to ensure that it meets your specific needs and preferences. Additionally, consider the cost of the app, any subscription plans, and the level of customer support provided.
Using AirDrop
Another convenient method for backing up your iPhone 7 is by using AirDrop. AirDrop is a built-in feature on iPhones that allows you to wirelessly transfer files between Apple devices. Here’s how to use AirDrop to backup your iPhone 7:
1. Make sure AirDrop is enabled on both devices: Go to the Control Center by swiping up from the bottom of the screen (or swipe down from the top-right corner on iPhone X or newer models). Press and hold the network settings card, then tap on the AirDrop icon. Select “Everyone” or “Contacts Only” to allow AirDrop transfers.
2. On the sending device, go to the app or file you want to backup, such as photos, videos, or documents.
3. Tap the share button, which is usually represented by a square with an upward arrow. Note that the location of this button may vary depending on the app you are using.
4. From the list of available sharing options, locate and tap on the AirDrop icon.
5. On the receiving iPhone 7, a notification will appear with the name of the sending device and the file being transferred. Accept the transfer by tapping “Accept” or “Save” to store it in the appropriate app or folder.
6. Repeat the process for each file or app you want to backup using AirDrop.
It’s important to note that AirDrop is suitable for smaller file transfers and may not be ideal for backing up your entire iPhone 7. However, it can be handy for quickly sending photos, videos, or individual files between devices or sharing them with others.
Remember to regularly backup your iPhone 7 using a combination of methods like iCloud, iTunes, or third-party apps to ensure the safety of your valuable data.
Conclusion
Backing up your iPhone 7 is a crucial step to ensure the safety and security of your valuable data. By following the steps outlined in this article, you can easily create a backup of your iPhone 7 and have peace of mind knowing that your files, photos, contacts, and settings are protected.
Remember to regularly update and maintain your backups to avoid any potential data loss. Whether you choose to use iCloud or iTunes, both methods offer reliable and convenient ways to back up your iPhone 7. Additionally, exploring the option of third-party backup solutions can provide even more flexibility and customization.
Don’t wait until it’s too late – take action now and back up your iPhone 7. The process is simple, and the benefits far outweigh any potential inconvenience. Safeguard your memories, documents, and personal information by making regular backups a part of your routine. Trust me, you’ll be glad you did!
FAQs
Q: Why is it important to backup my iPhone 7?
A: It is crucial to backup your iPhone 7 to prevent data loss in the event of accidental damage, loss, or theft of your device. Backing up your iPhone ensures that you have a secure copy of all your important data, including contacts, photos, videos, messages, and app data, which can be easily restored to a new device or recovered in case of any mishap.
Q: How can I backup my iPhone 7?
A: There are several ways to backup your iPhone 7. You can use iCloud, Apple’s cloud-based backup system, by going to Settings > [Your Name] > iCloud > iCloud Backup, and then enabling the iCloud Backup option. You can also use iTunes on your computer to create a backup by connecting your iPhone 7 via USB and selecting the “Back Up Now” option in the device summary screen.
Q: How much iCloud storage do I need to backup my iPhone 7?
A: The amount of iCloud storage you need depends on the size of your iPhone 7 data. iCloud offers 5GB of free storage, but this may not be sufficient if you have a large number of photos, videos, or other data on your device. If you need more storage, you can consider upgrading to a higher storage plan available from Apple.
Q: Can I backup my iPhone 7 to a computer without iTunes?
A: Yes, you can backup your iPhone 7 to a computer without using iTunes. There are third-party software options available, such as iMazing, AnyTrans, or EaseUS MobiMover, that allow you to backup and manage your iPhone data on your computer. These software offer more flexibility and additional features compared to iTunes.
Q: How often should I backup my iPhone 7?
A: It is recommended to backup your iPhone 7 regularly to ensure that your data is always up to date. You can choose to backup your device daily, weekly, or monthly, depending on your usage and the importance of the data you have on your iPhone. It’s a good practice to set up automatic backups to ensure that you don’t forget to backup regularly.