
If you’re an avid iPhone user and love watching videos on your device, you might sometimes find yourself faced with the need to adjust the video quality. Whether you want to conserve data while streaming videos on the go or you simply want to optimize the viewing experience based on your network connection, being able to change the video quality on your iPhone is a valuable skill to have.
In this article, we will guide you through the steps to change the video quality on your iPhone. Whether you’re using the latest iPhone model or have an older version, we’ve got you covered. With our easy-to-follow instructions, you’ll be able to tailor the video quality to your liking and enjoy a seamless viewing experience on your iPhone.
Inside This Article
- Overview
- Method 1: Change Video Quality in Settings
- Method 2: Change Video Quality in the Camera App
- Method 3: Change Video Quality in Third-Party Video Apps
- Conclusion
- FAQs
Overview
When it comes to capturing memories and moments on your iPhone, it’s important to have control over the video quality. Whether you want to preserve storage space or achieve the best possible video resolution, knowing how to change the video quality on your iPhone is essential. In this article, we will explore different methods you can use to adjust the video quality on your device.
With the ability to record 4K videos and even higher resolutions on the latest iPhone models, you have the flexibility to capture stunning videos that showcase every detail. However, shooting videos in higher resolutions can take up a substantial amount of storage space on your device. By reducing the video quality, you can free up storage and ensure that you have enough space to capture all your precious moments.
Additionally, lowering the video quality can also be useful when you need to share or upload videos online. High-resolution videos can be large in file size, resulting in longer upload times and potential issues with compatibility. By adjusting the video quality to a more suitable resolution, you can streamline the sharing process and make it easier for others to enjoy your videos.
Now, let’s dive into the different methods you can use to change the video quality on your iPhone.
Method 1: Change Video Quality in Settings
If you’re looking to change the video quality on your iPhone, one of the most straightforward ways to do so is through the Settings menu. Here’s a step-by-step guide to help you out:
1. Open the “Settings” app on your iPhone. It’s the gray icon with gears on your home screen.
2. Scroll down and tap on “Camera”. It’s usually located in the second or third section of the Settings menu.
3. Under the “Camera” settings, you’ll find “Record Video”. Tap on it.
4. You’ll see a list of video resolution options. The available options will vary depending on the model of your iPhone. Choose the desired quality level for your videos.
5. Once you’ve selected the desired video quality, simply exit the Settings app. The changes you made will be saved automatically.
It’s important to note that changing the video quality in the Settings app will affect all future recordings with the camera app on your iPhone. If you prefer to change the video quality on a per-video basis, you may want to consider using the camera app’s built-in settings instead.
Now that you know how to change the video quality in Settings, you can capture high-quality videos that suit your preferences. Whether you want to conserve storage space by recording in lower quality or showcase your creativity with higher resolution videos, the choice is yours.
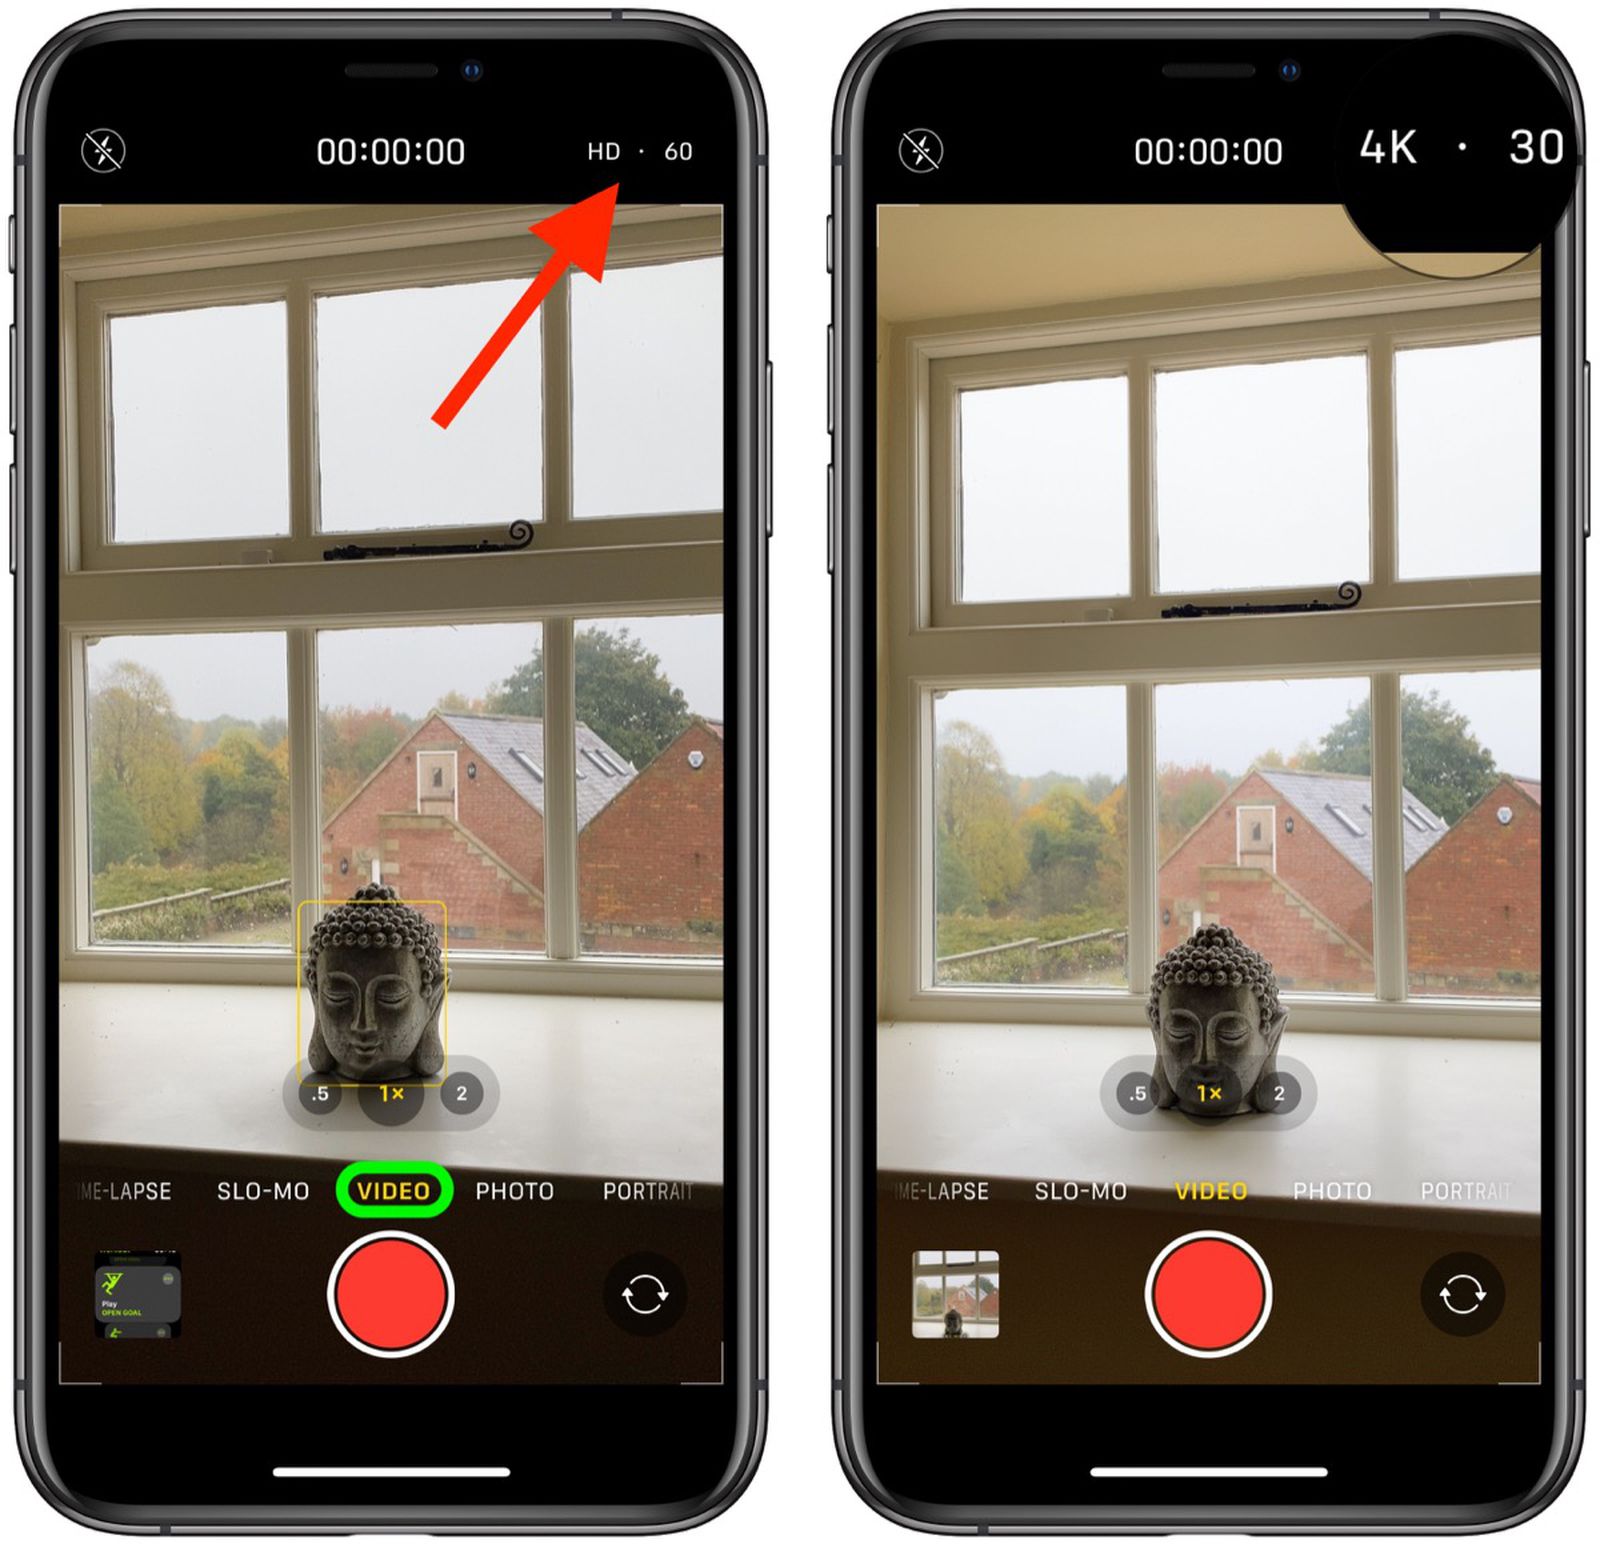
Method 2: Change Video Quality in the Camera App
If you want to change the video quality directly from the Camera app on your iPhone, you’re in luck! Apple has made it easy for users to adjust the video quality settings right from the camera interface. Here’s how you can do it:
1. Open the Camera app on your iPhone by tapping on the camera icon from your home screen or swiping to the right from the lock screen.
2. Once you’re in the Camera app, you’ll see several options at the top of the screen, including Photo, Video, Portrait, and more. Tap on the “Video” option to switch to video recording mode.
3. Before you start recording, look for the “Settings” gear icon located either at the top or bottom right corner of the screen. Tap on it to access the Camera app settings.
4. Inside the camera settings, you’ll find various options to customize your video recording experience. Look for the “Video Quality” or “Quality” option and tap on it.
5. A pop-up window will appear, presenting you with different video quality options. You can choose from multiple options such as 720p HD at 30 fps, 1080p HD at 30 fps, or even 4K at 60 fps, depending on your device’s capabilities. Select the desired video quality by tapping on it.
6. Once you’ve selected the video quality, simply exit the settings by tapping on the back arrow or anywhere outside the pop-up window.
7. You’re now ready to start recording videos in the selected video quality. Press the capture button to begin recording, and the camera app will automatically record the video in the chosen quality.
That’s it! You have successfully changed the video quality in the Camera app on your iPhone. Feel free to experiment with different video quality settings to find the one that suits your needs best.
Method 3: Change Video Quality in Third-Party Video Apps
If you’re looking for more advanced video settings and options, third-party video apps can offer additional flexibility. Many popular apps, such as iMovie, Adobe Premiere Rush, and Filmora, allow you to adjust video quality settings to suit your specific needs. Here’s how you can do it:
- Step 1: Launch the third-party video app on your iPhone. If you don’t have one installed, head to the App Store and download the app of your choice.
- Step 2: Import the video that you want to edit or change the quality of. Most apps provide options to import videos from your iPhone’s camera roll or other storage locations.
- Step 3: Once you have imported the video, look for the video quality settings or options within the app. This may be located in the app’s settings menu or in the video editing interface.
- Step 4: Depending on the app you are using, you may have various video quality options available. These can include resolution settings, bitrate adjustments, and compression settings.
- Step 5: Select the video quality settings that best align with your preferences and requirements. Keep in mind that higher video quality settings may result in larger file sizes and may require more storage space.
- Step 6: Once you have adjusted the video quality settings, save or export the video with the new settings applied. The exported video will now have the updated video quality based on your preferences.
It’s worth noting that the specific steps to change video quality in third-party video apps may vary depending on the app you are using. However, most apps offer intuitive interfaces and settings that make it easy to customize the video quality according to your needs.
By using third-party video apps, you can unleash your creativity and have more control over the quality of your videos. Whether you’re editing a professional project or simply want to enhance the visual appeal of your footage, these apps offer a wide range of tools and customization options.
Remember to explore different apps and experiment with various video quality settings to find the perfect balance between file size and image clarity. With the right app and careful adjustments, you can take your iPhone videos to the next level!
The ability to change video quality on your iPhone allows you to have control over your viewing experience. Whether you want to conserve data, optimize playback for a slow internet connection, or enjoy the highest resolution possible, adjusting the video quality settings is a simple and effective solution. With just a few taps, you can switch between different quality options and tailor your video playback to your specific needs.
By following the steps mentioned in this guide, you can easily change the video quality on your iPhone and enjoy a seamless streaming experience. Whether you’re watching videos on popular platforms like YouTube, Netflix, or Amazon Prime Video, knowing how to adjust video quality will ensure that you can adapt to any situation, whether it be preserving data or indulging in high-definition content.
So, take advantage of the flexibility and convenience of your iPhone and tweak the video quality settings to suit your preferences. Enjoy your videos in the best possible way, whether you’re in a low connectivity area or craving a high-resolution feast for your eyes.
FAQs
Here are answers to some frequently asked questions about changing video quality on iPhone:
-
Can I change the video quality on my iPhone?
Yes, you can change the video quality on your iPhone. The device offers various options to adjust the video quality based on your preferences and needs.
-
How do I change the video quality on my iPhone?
To change the video quality on your iPhone, follow these steps:
- Open the Settings app on your iPhone.
- Scroll down and tap on “Camera” or “Photos & Camera”, depending on your iOS version.
- Under “Record Video” or “Camera”, you’ll find different resolution options to select from. Choose the desired video quality by selecting the appropriate resolution.
- Exit the settings and start recording videos with the new video quality setting.
-
What video quality options are available on iPhone?
iPhone offers several video quality options, typically ranging from 720p to 4K resolution. The availability of specific options may vary depending on the iPhone model and iOS version.
-
Does changing video quality affect storage space on my iPhone?
Yes, changing the video quality on your iPhone can affect the storage space. Higher video quality means larger file sizes and thus more storage required. If you choose higher resolution options, it is important to consider the available storage capacity on your device.
-
Can I change the video quality of existing videos on my iPhone?
No, you cannot change the video quality of existing videos on your iPhone. The video quality setting applies to new videos recorded after the adjustment is made. If you want to change the quality of existing videos, you will need to use a video editing app or software.