
Twitch is a popular streaming platform that allows users to watch and interact with live content creators. While many users enjoy watching Twitch on their computers, there is also a growing number of people who prefer to watch on their mobile devices. Whether you’re on the go or simply find it more convenient, watching Twitch on your mobile phone can be a great way to stay connected with your favorite streamers.
One of the key features that Twitch offers on mobile devices is the ability to clip moments from a stream. This allows users to capture and share their favorite moments with others. In this article, we will discuss how to clip on Twitch Mobile, step by step, so you can easily highlight and share those memorable moments while watching on your mobile phone.
Inside This Article
- Getting Started with Twitch Mobile
- Setting Up Your Stream on Twitch Mobile
- Streaming with Twitch Mobile – Preparing for the Stream: Choosing a Location and Ensuring a Stable Internet Connection – Setting up your Stream Layout and Camera Options – Going Live: Initiating your Twitch Mobile Stream – Interacting with Viewers and Managing Stream Chat
- Enhancing your Twitch Mobile Stream
- Conclusion
- FAQs
Getting Started with Twitch Mobile
Are you ready to delve into the world of mobile streaming on Twitch? The first step is to download and install the Twitch Mobile app on your device. Whether you’re an iOS or Android user, you can find the app in the respective app stores. Just search for “Twitch” and tap on the download button.
Once you have the app installed, it’s time to create your Twitch account. Launch the app and click on the “Sign Up” button to get started. Follow the on-screen instructions to provide your desired username, password, and email address. Additionally, you may need to verify your account through email or phone.
With your Twitch account set up, it’s time to explore the Twitch Mobile interface. When you launch the app, you’ll be greeted with a home feed showcasing live streams from the channels you follow. Use the navigation bar at the bottom to access different sections such as Browse, Following, and Notifications.
Adjusting the settings on your Twitch Mobile app can greatly enhance your streaming experience. Click on your profile picture in the top-left corner of the screen, then tap on “Settings.” Here, you can customize various aspects such as video quality, chat settings, notification preferences, and more.
By downloading and installing the Twitch Mobile app, creating an account, exploring the interface, and adjusting settings, you are now ready to embark on your mobile streaming journey with Twitch. Get ready to engage with your viewers and share your amazing content with the world!
Setting Up Your Stream on Twitch Mobile
Streaming on Twitch Mobile is a fantastic way to connect with your audience while on the go. Before you start streaming, it’s essential to properly set up your stream to ensure a seamless and engaging experience. In this section, we’ll guide you through the process of enabling and configuring various stream options, setting up a stream title and category, adjusting stream quality and bitrate, and managing stream chat and notifications.
Enabling and Configuring Stream Options
When you start streaming on Twitch Mobile, you have the flexibility to customize your stream options according to your preferences. To begin, open the Twitch Mobile app and navigate to the settings menu. Here, you can enable features like chat overlays, stream alerts, and microphone options. Take the time to explore the available options and choose the settings that align with your streaming style.
Setting up a Stream Title and Category
A catchy and descriptive stream title is essential for attracting viewers to your stream. You can set up your stream title on Twitch Mobile by tapping on the broadcast icon and selecting “Set Title.” Make sure your title clearly represents the content you’ll be streaming and grabs the attention of potential viewers. Additionally, choose the most relevant category for your stream to make it easier for users to find you.
Adjusting Stream Quality and Bitrate
To offer the best viewing experience to your audience, it’s important to adjust the stream quality and bitrate settings. On Twitch Mobile, you can access these settings by tapping on the broadcast icon and selecting “Stream Configuration.” Experiment with different quality options and bitrates to find the balance between a smooth stream and optimal visual and audio quality. Keep in mind that higher quality settings might require a stronger internet connection.
Managing Stream Chat and Notifications
Engaging with your viewers through chat is a crucial aspect of streaming on Twitch Mobile. Ensure that you have the stream chat enabled so that you can easily communicate with your audience and address any questions or comments. You can also manage notifications to receive alerts when users follow your channel or interact with your stream. This way, you can stay connected with your community and provide them with a more interactive experience.
By following these steps to set up your stream on Twitch Mobile, you’ll be well-equipped to deliver an engaging stream and connect with your audience while streaming on the go. Enjoy the flexibility and convenience of Twitch Mobile as you share your content and connect with viewers from anywhere.
Streaming with Twitch Mobile – Preparing for the Stream: Choosing a Location and Ensuring a Stable Internet Connection – Setting up your Stream Layout and Camera Options – Going Live: Initiating your Twitch Mobile Stream – Interacting with Viewers and Managing Stream Chat
Streaming on Twitch Mobile allows you to connect with your audience anytime, anywhere. Before you go live, it’s important to prepare by choosing the right location and ensuring a stable internet connection.
When it comes to choosing a location for your stream, consider a space that is well-lit with minimal background noise and distractions. Find a spot that reflects your brand or the content you plan to share. A clutter-free, visually appealing environment can elevate the quality of your stream.
In addition to the physical environment, having a stable internet connection is crucial. Check your network strength and make sure you have a reliable Wi-Fi or cellular data connection. A strong and consistent connection will ensure smooth streaming without interruptions.
Once you’ve prepared your location and confirmed your internet connection, it’s time to set up your stream layout and camera options. Twitch Mobile provides various layout options, allowing you to showcase your screen or capture your camera feed while streaming.
Experiment with different layout options to find the one that best suits your content. Whether you’re sharing gameplay, a creative process, or a live tutorial, choose a layout that maximizes the visibility of your main content and minimizes any distractions.
Furthermore, consider the camera options available on Twitch Mobile. Depending on your device, you may have the ability to switch between front and rear cameras, adjust exposure, or apply filters to enhance the visual quality of your stream.
When everything is set up just the way you want it, it’s time to go live! Initiating your Twitch Mobile stream is as simple as tapping a few buttons. Make sure you’ve given your stream enough time to start up and stabilize before engaging with your viewers.
Interacting with viewers and managing stream chat is an essential part of the Twitch experience. Engage with your audience by responding to comments, answering questions, and acknowledging their support. Keep an eye on the chat and be active in creating a welcoming and interactive environment.
Managing stream chat can be done directly from the Twitch Mobile app. Utilize moderation features to block or time out users if necessary, ensuring a positive and respectful community vibe. You can also enable chat notifications to stay updated on viewer interaction even when you’re not actively looking at the chat window.
Streaming with Twitch Mobile offers immense opportunities for content creators to connect with their audience on the go. By preparing for the stream, setting up your layout and camera options, going live, and interacting with viewers, you can create an engaging and successful streaming experience.
Enhancing your Twitch Mobile Stream
When it comes to streaming on Twitch mobile, there are several ways to take your stream to the next level and provide a visually appealing and professional experience for your viewers. Here are some tips on how to enhance your Twitch mobile stream:
Utilizing Stream Overlays and Alerts
Stream overlays and alerts can add a professional touch to your Twitch mobile stream. Overlays are graphics or animations that are displayed on top of your gameplay or webcam footage, while alerts are notifications that pop up on the screen when certain events occur, such as new followers or donations. These visual elements can be customized to match your personal branding and add a visually engaging aspect to your stream.
Incorporating External Microphones and Audio Sources
The audio quality of your Twitch mobile stream is just as important as the video quality. By using an external microphone, you can significantly improve the sound of your stream and provide a clearer and more professional audio experience for your viewers. Additionally, you can incorporate external audio sources, such as music or sound effects, to add more depth and atmosphere to your stream.
Adding Camera Filters and Effects for a Professional Look
Enhancing the visual appeal of your Twitch mobile stream can be done through the use of camera filters and effects. These filters can alter the brightness, contrast, and color saturation of your webcam footage, providing a more polished and professional look. Additionally, you can experiment with different effects, such as blurring the background or adding borders, to make your stream visually appealing and unique.
Customizing Stream Thumbnails and Channel Art
Customizing your stream thumbnails and channel art is essential for creating a cohesive and visually appealing brand on Twitch. Stream thumbnails are small images that represent your stream and are displayed on your channel page or in search results. By creating eye-catching thumbnail images, you can attract more viewers and make your stream stand out. Similarly, channel art, such as banners and profile pictures, can be customized to reflect your branding and create a visually appealing channel page.
By utilizing stream overlays and alerts, incorporating external microphones and audio sources, adding camera filters and effects, and customizing stream thumbnails and channel art, you can enhance your Twitch mobile stream and provide a professional and visually engaging experience for your viewers.
Conclusion
In conclusion, clipping on Twitch Mobile is a valuable feature that enables users to capture and share their favorite gaming moments on the go. Whether you’re playing your favorite mobile game or streaming a live event, the ability to easily clip and share highlights enhances the overall Twitch experience. With just a few taps, users can create memorable clips, showcase their skills, and engage with their audience in real-time.
As the popularity of mobile gaming continues to surge, it’s becoming increasingly important for Twitch to cater to the needs of its mobile users. The clip feature on Twitch Mobile allows gamers to capture and share their best gaming moments, creating a more immersive and interactive community.
So, if you’re a Twitch Mobile user looking to make the most out of your streaming experience, be sure to take advantage of the clipping feature. With just a few simple steps, you’ll be able to capture and share your most epic and entertaining gaming moments with the world.
FAQs
1. Can I clip on Twitch using my mobile phone?
Yes, you can! Twitch has a mobile app that allows you to clip and share moments from your favorite streams on the go. Keep reading to learn how to clip on Twitch mobile.
2. How do I clip on Twitch using the mobile app?
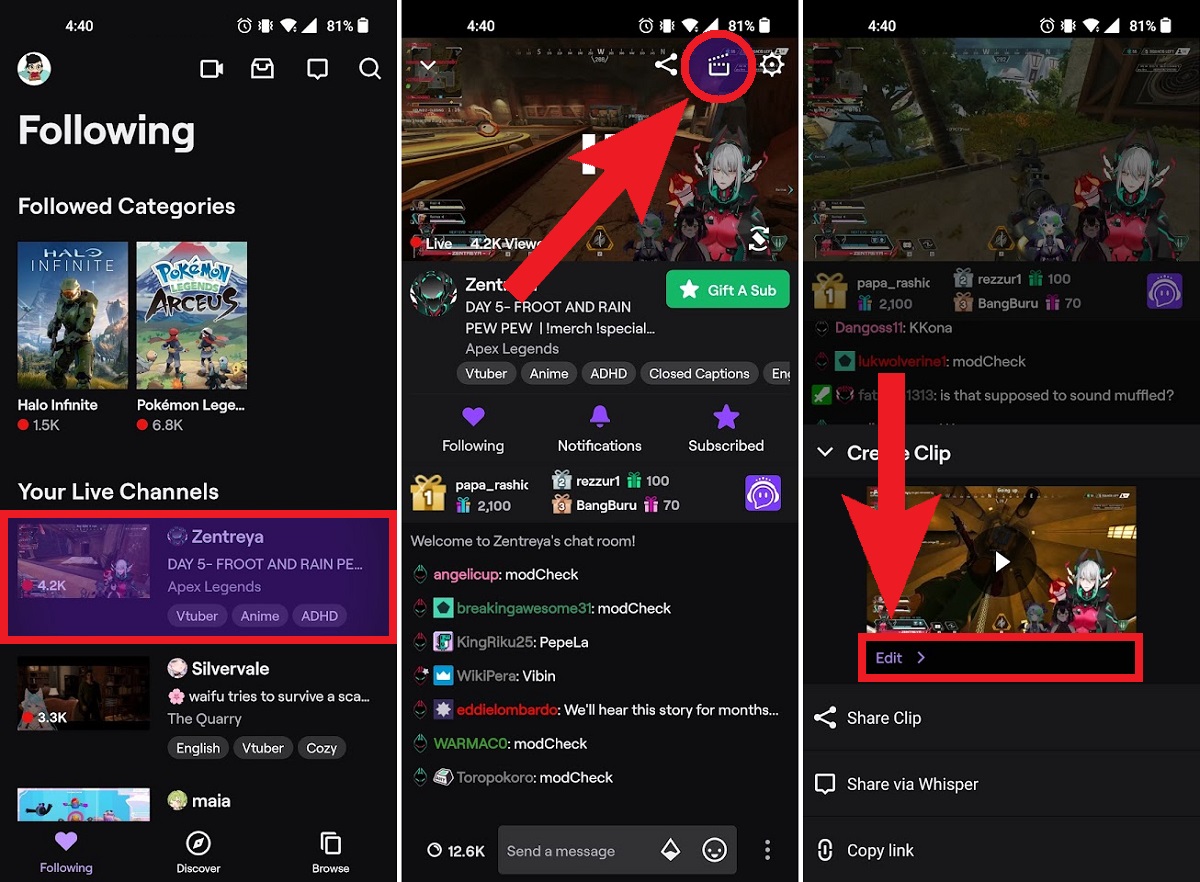
To clip on Twitch using the mobile app, follow these steps:
- Open the Twitch mobile app on your smartphone.
- Select the stream you want to clip from.
- Tap the screen to reveal the video player controls.
- Look for the scissors icon or the “Clip” button, usually located at the bottom right corner of the video player.
- Tap on the scissors icon or the “Clip” button to start creating your clip.
- Adjust the clip duration by dragging the start and end markers on the video timeline.
- Once you’re satisfied with the clip, give it a title, add any optional tags or messages, and tap “Create Clip” or similar.
- Your clip will be saved and ready to share with your friends and followers!
3. Can I edit my Twitch clips on my mobile phone?
While you can create clips on your mobile phone, the editing capabilities of the Twitch mobile app are limited. To perform advanced editing tasks like adding overlays, transitions, or effects to your clips, it is recommended to transfer them to a desktop computer with video editing software.
4. How long can Twitch clips be on mobile?
The length of Twitch clips on mobile is determined by the streamer. By default, a clip can range from a minimum duration of 5 seconds to a maximum duration of 60 seconds. Streamers also have the option to set their own clip length limits within this range.
5. Can I delete a clip on Twitch mobile?
Yes, you can delete a clip on Twitch mobile. To delete a clip, follow these steps:
- Open the Twitch mobile app on your smartphone.
- Navigate to your profile by tapping on the profile icon.
- Go to the “Clips” section, which displays all the clips you have created.
- Find the clip you want to delete and tap on it to open it.
- Look for the three-dot menu icon or the “…” button usually located at the top right corner of the clip page.
- Tap on the menu icon or the “…” button to reveal more options.
- Select the “Delete Clip” option.
- Confirm the deletion when prompted.
- Your clip will be permanently deleted from Twitch.