
In today’s digital age, staying connected is more important than ever. And when it comes to mobile connectivity, Android smartphones have become an essential part of our lives. Whether you are making calls, sending texts, browsing the internet, or using various mobile apps, a reliable and fast mobile network connection is crucial. In this article, we will explore how to connect to a mobile network on an Android device, ensuring that you can stay connected and enjoy all the benefits of mobile technology. Whether you’re a tech-savvy individual or just getting started with your Android phone, we’ve got you covered with step-by-step instructions and helpful tips to make the process seamless and hassle-free. Let’s dive in and discover the various methods to connect to a mobile network on your Android device.
Inside This Article
- Step 1: Accessing Network Settings
- Step 2: Selecting Mobile Networks
- Step 3: Enabling Mobile Data
- Step 4: Connecting to a Mobile Network
- Troubleshooting
- Conclusion
- FAQs
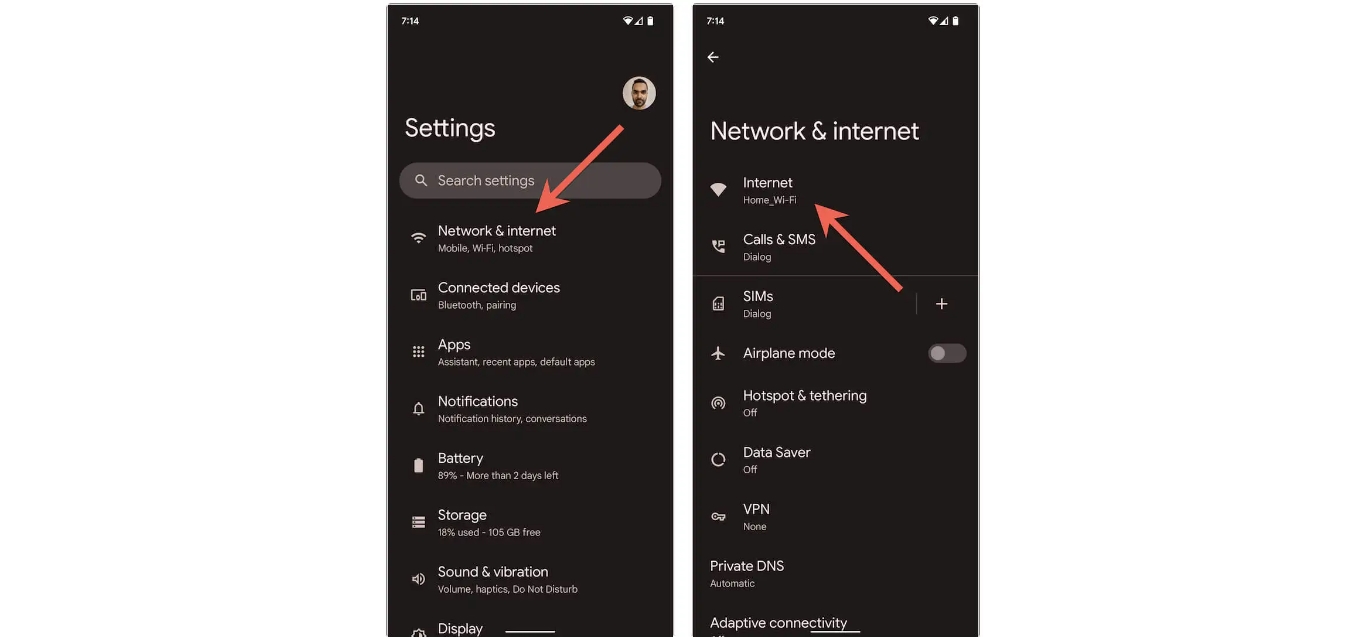
Step 1: Accessing Network Settings
Accessing the network settings on your Android device is the first step to connect to a mobile network. These settings can vary slightly depending on the make and model of your phone, but the general process remains the same. Here’s how you can access network settings on your Android device:
1. Open the Settings app on your phone. You can usually find it in the app drawer or by swiping down from the top of the screen and tapping the gear icon.
2. Scroll down and look for the “Network & Internet” or “Connections” option. Tap on it to proceed.
3. In some devices, you may find the “Mobile Networks” option directly in the main settings menu. However, if you don’t see it there, look for “Data usage” or “Cellular networks” and tap on it.
4. Once you’re in the network settings, you can access various options related to mobile networks, including mobile data, roaming, APN settings, and more.
Now that you’ve successfully accessed the network settings on your Android device, you’re ready to proceed to the next step to connect to a mobile network.
Step 2: Selecting Mobile Networks
Once you have accessed the network settings on your Android device, the next step is to select the mobile network that you want to connect to. Here’s how you can do it:
1. Look for the option called “Mobile Networks” or “Network Operators” in the network settings menu. It is usually located under the “Connections” or “Wireless & Networks” section.
2. Tap on the “Mobile Networks” option to open the network selection menu.
3. In the network selection menu, you will see a list of available mobile networks. These networks are usually displayed with their respective names or carrier labels, such as “AT&T,” “Verizon,” or “T-Mobile.”
4. If you want your device to automatically select the best available network, you can enable the “Automatic” or “Auto” option. This will allow your device to automatically switch between different networks based on signal strength and availability.
5. If you prefer to manually select a specific network, disable the “Automatic” or “Auto” option. You will then be able to see a list of all the available networks in your area.
6. Carefully review the list of available networks and choose the one that you wish to connect to. Keep in mind factors such as network coverage, signal strength, and the reputation of the carrier.
7. Once you have selected the desired network, your Android device will attempt to connect to it. This may take a few moments as the device establishes a connection with the network.
8. Once the connection is established, you should see the network name or carrier label displayed in the status bar of your device. This indicates that you have successfully connected to the selected mobile network.
Remember, the availability of mobile networks may vary depending on your location and the network providers in your area. It is always a good idea to check for any specific requirements or restrictions set by your carrier before connecting to a mobile network.
Step 3: Enabling Mobile Data
Enabling mobile data on your Android device allows you to connect to the internet using your cellular network. This feature is crucial for accessing online content, browsing the web, using social media, and using various mobile apps on the go.
Here’s how you can enable mobile data on your Android device:
- Open the “Settings” app on your Android device. You can usually find this app on your home screen or in the app drawer.
- Scroll down and tap on the “Network & Internet” option.
- From the list of options, tap on “Mobile network” or “Data usage” depending on your Android version.
- You will see a toggle switch next to “Mobile data” or “Use mobile data.” Tap on the switch to enable it. If the switch is already turned on, it means that mobile data is already enabled on your device.
- Once enabled, your Android device will connect to the mobile network and you will be able to access the internet using your cellular data.
It’s worth mentioning that enabling mobile data may consume your cellular data allowance depending on your mobile plan. Keep an eye on your data usage to avoid exceeding your limits and incurring additional charges.
If you experience any issues with enabling mobile data, make sure that your SIM card is inserted correctly and that you have a valid mobile data plan with your network provider. Additionally, check if you have any data restrictions or data-saving features enabled in your device settings that may prevent mobile data from being enabled.
Enabling mobile data on your Android device is essential for staying connected and enjoying the full range of features and functionalities on your phone. Once enabled, you can take advantage of fast and reliable internet access wherever you go.
Step 4: Connecting to a Mobile Network
Once you have accessed the mobile network settings and enabled mobile data on your android device, the final step is to connect to a mobile network. Follow the instructions below to successfully connect to a mobile network:
1. Go to the “Mobile Networks” menu in the network settings. This can typically be found under the “Settings” app on your Android device.
2. In the “Mobile Networks” menu, you will find an option called “Network Operators” or “Choose Network.” Tap on this option to proceed.
3. Your device will now search for available mobile networks in your area. This process may take a few moments, so be patient.
4. Once the search is complete, a list of available mobile networks will be displayed on your screen. These networks are the ones that your device has detected in your vicinity. Some networks might require a SIM card from a specific provider for connection.
5. Tap on the network that you wish to connect to. This will initiate the connection process.
6. Your device will now attempt to connect to the selected mobile network. This might take a few moments, depending on the network and signal strength.
7. Once the connection is established, you will see a confirmation message or an indicator displaying that you are now connected to the mobile network.
8. At this point, you can start using data services, such as browsing the internet, making calls, sending text messages, and using applications that require an internet connection.
Remember, depending on your mobile plan, there might be certain restrictions or data limitations in place. Ensure that you are aware of these limitations to avoid unexpected charges or additional fees.
If you encounter any issues during the connection process, try the following troubleshooting steps:
- Restart your device and try connecting again.
- Ensure that you have a valid SIM card inserted in your device.
- Check if your network provider is experiencing any service outages in your area.
- Double-check your network settings to ensure everything is configured correctly.
- If all else fails, contact your network provider for further assistance.
By following these steps and troubleshooting tips, you should be able to successfully connect to a mobile network on your Android device. Enjoy your mobile connectivity and stay connected wherever you go!
Troubleshooting
If you’re experiencing issues with connecting to a mobile network on your Android device, don’t worry! There are a few troubleshooting steps you can take to resolve the problem. Here are some common solutions:
- Check your network coverage: Make sure you’re in an area with proper network coverage. Sometimes, weak signals or network outages can prevent your device from connecting to a mobile network. Move to a different location or check with your service provider if you suspect network coverage issues.
- Restart your device: Sometimes, a simple restart can fix connection issues. Turn off your Android device, wait for a few seconds, and then turn it back on. This can refresh the device’s network settings and establish a new connection to the mobile network.
- Enable and disable airplane mode: Toggling the airplane mode on and off can sometimes help in resolving network connectivity problems. Swipe down from the top of your screen to access the quick settings menu, then tap on the “Airplane mode” icon. Wait for a few seconds and disable airplane mode by tapping on the icon again.
- Check your APN settings: APN (Access Point Name) settings play a crucial role in connecting your device to the mobile network. Sometimes, incorrect or outdated APN settings can prevent your device from connecting. To check and update your APN settings, go to “Settings” > “Network & Internet” > “Mobile network” > “Advanced” > “Access Point Names.” Ensure that the APN settings provided by your service provider are accurate.
- Reset network settings: Resetting your device’s network settings can resolve various network-related issues, including problems connecting to a mobile network. To reset network settings, go to “Settings” > “System” > “Advanced” > “Reset options” > “Reset Wi-Fi, mobile & Bluetooth.” Keep in mind that this will also remove saved Wi-Fi networks and Bluetooth pairings, so you’ll need to reconnect to them.
- Update your device’s software: Outdated software can sometimes cause compatibility issues and impact network connectivity. Check for any available software updates for your Android device by going to “Settings” > “System” > “System Update” and install any pending updates. Ensure that you have a stable internet connection to download and install the updates.
- Contact your service provider: If none of the above solutions work, it’s best to reach out to your service provider for further assistance. They can help troubleshoot the issue and provide specific instructions based on your network provider and device model.
By following these troubleshooting steps, you should be able to resolve most mobile network connectivity issues on your Android device. However, if the problem persists, it may indicate a hardware problem, and it’s recommended to visit an authorized service center for further evaluation and repair.
Conclusion
Connecting to the mobile network on your Android device is a crucial step in staying connected and getting the most out of your phone. Whether you’re using a SIM card from your service provider or connecting to a Wi-Fi network, having a stable and reliable connection is essential for making calls, sending messages, and accessing the internet.
By following the steps outlined in this article, you should now have a better understanding of how to connect to the mobile network on your Android device. Remember to ensure that you have a compatible SIM card, check your network settings, and troubleshoot any issues that may arise. With a smooth and uninterrupted connection, you’ll be able to enjoy all the features and capabilities of your Android phone to the fullest.
So, go ahead and explore the endless possibilities that come with being connected to the mobile network on your Android device. Stay connected, stay informed, and stay in touch with the world!
FAQs
1. How do I connect to a mobile network on Android?
To connect to a mobile network on Android, follow these steps:
- Go to the settings menu on your Android device.
- Scroll down and tap on “Network & internet”.
- Tap on “Mobile network” or “Cellular network” depending on the Android version.
- Toggle the “Mobile data” switch to turn it on.
- If necessary, tap on “Network operators” to select the desired network manually.
2. What should I do if I can’t connect to a mobile network on Android?
If you are unable to connect to a mobile network on your Android device, try the following troubleshooting steps:
- Make sure the mobile data is enabled in your settings.
- Restart your device and check if the issue persists.
- Remove and reinsert the SIM card to ensure it’s properly inserted.
- Check if you have sufficient network coverage in your area.
- Contact your mobile service provider for further assistance.
3. How do I switch between mobile networks on Android?
To switch between mobile networks on Android, follow these steps:
- Go to the settings menu on your Android device.
- Scroll down and tap on “Network & internet”.
- Tap on “Mobile network” or “Cellular network” depending on the Android version.
- Tap on “Preferred network type” or “Network mode”.
- Select the desired network type from the available options.
4. Can I manually select a network operator on Android?
Yes, you can manually select a network operator on Android by following these steps:
- Go to the settings menu on your Android device.
- Scroll down and tap on “Network & internet”.
- Tap on “Mobile network” or “Cellular network” depending on the Android version.
- Tap on “Network operators”.
- Tap on “Search networks” or select the desired network operator from the list.
5. Why do I need to connect to a mobile network on Android?
Connecting to a mobile network on Android allows you to access mobile data services and make or receive calls and text messages. It enables you to stay connected to the internet and communicate with others, whether through messaging apps, voice calls, or browsing the web.