
Welcome to the ultimate guide for finding, managing, and canceling subscriptions on your iPhone! In this fast-paced digital age, it’s easy to accumulate a number of subscriptions for various services and applications. From streaming platforms to fitness apps, the convenience they offer can quickly become overwhelming – and costly. But fear not! In this comprehensive article, we will walk you through the steps to identify and track all your subscriptions, making it easier for you to manage your expenses. We’ll also provide you with simple and effective methods to cancel those subscriptions that are no longer serving your needs. With our expert tips and tricks, you’ll regain control over your subscriptions and save some hard-earned cash. So let’s dive in and take charge of your iPhone subscription jungle!
Inside This Article
- Finding Subscriptions on iPhone
- Managing Subscriptions on iPhone
- Canceling Subscriptions on iPhone
- Best Practices for Subscriptions on iPhone
- Conclusion
- FAQs
Finding Subscriptions on iPhone
Finding and managing subscriptions on your iPhone has never been easier. With the latest updates and features, Apple has made it simple for users to view and keep track of their subscriptions. Whether it’s a streaming service, a magazine subscription, or a fitness app, locating your subscriptions on your iPhone is a breeze.
To find your subscriptions, start by opening the App Store on your iPhone. Tap on your profile picture in the top right corner of the screen. This will take you to your account settings.
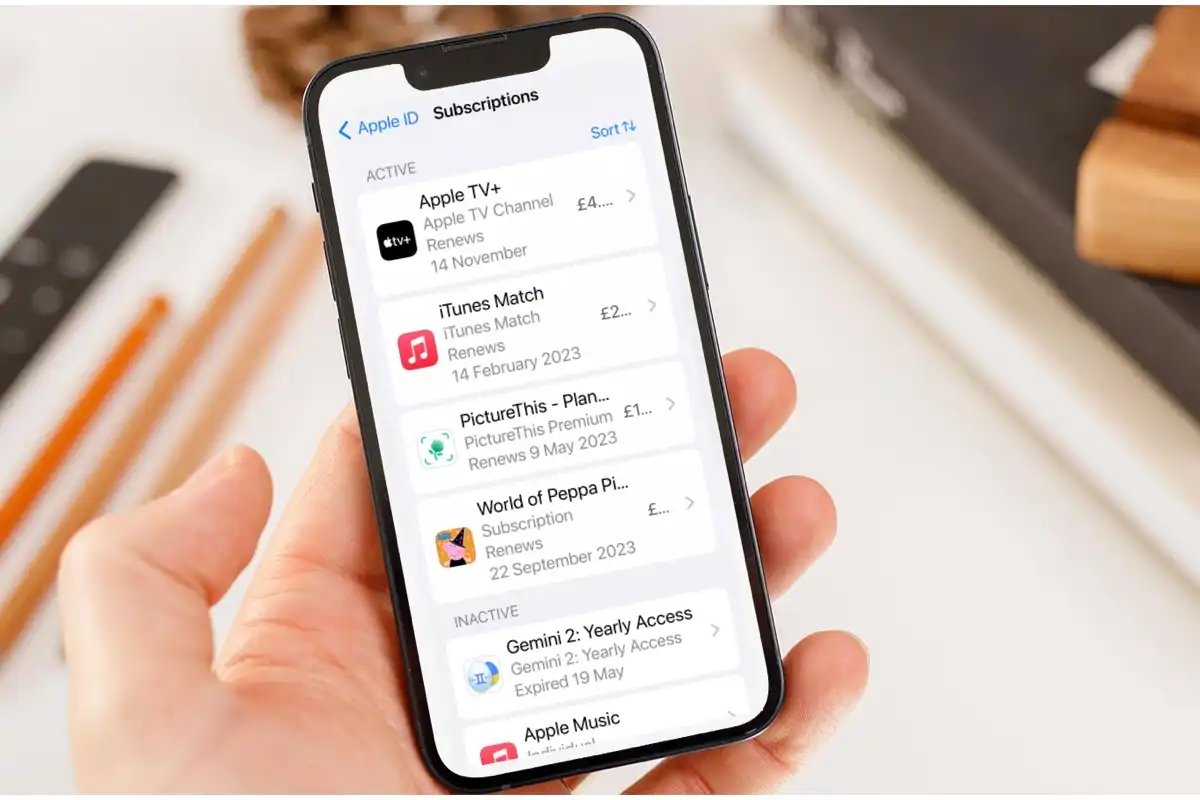
Once you’re in your account settings, scroll down and tap on the “Subscriptions” option. Here you will see a list of all your active subscriptions. Each subscription will display the name of the service, the price, and the renewal date. To view more details about a specific subscription, simply tap on it.
If you have a long list of subscriptions and need to quickly locate a specific one, you can use the search bar at the top of the screen. Just type in the name of the subscription you’re looking for, and the results will narrow down accordingly.
In addition to the App Store, you can also find your subscriptions in the Settings app on your iPhone. Open the Settings app, and tap on your Apple ID at the top of the screen. Then, tap on “Subscriptions” to see your active subscriptions.
With these easy steps, you can effortlessly find your subscriptions on your iPhone. Stay organized and in control of your recurring payments by regularly checking your subscriptions and making any necessary changes.
Managing Subscriptions on iPhone
Managing your subscriptions on iPhone is a breeze, thanks to the intuitive interface and built-in features. Whether you want to keep track of your existing subscriptions or make changes to your subscription settings, iPhone offers a seamless experience. Here are some simple steps to help you effectively manage your subscriptions:
1. Accessing Your Subscriptions: To access your subscriptions, open the “Settings” app on your iPhone and tap on your Apple ID at the top of the screen. From there, select “Subscriptions” to view a list of all the subscriptions associated with your Apple ID.
2. Reviewing Your Subscriptions: Once you’re on the Subscriptions page, you’ll see a comprehensive list of all the active and expired subscriptions. Review each subscription to ensure you’re aware of the services or apps you’re currently subscribed to.
3. Modifying Your Subscriptions: If you want to make changes to your subscriptions, such as upgrading or downgrading plans, tap on the subscription you want to modify. From here, you can select different plans or options based on the available offerings. Follow the prompts to complete the modification process.
4. Enabling or Disabling Auto-Renewal: If you wish to enable or disable auto-renewal for a specific subscription, go to the subscription’s settings page and toggle the “Auto-Renewal” option. Turning off auto-renewal ensures that you won’t be charged for the subscription once the current billing period ends.
5. Adding or Restoring Subscriptions: If you want to add a new subscription, tap on the “Add Subscription” button at the bottom of the Subscriptions page. You can browse through the available subscription offerings and follow the steps to subscribe to a service or app. If you had previously canceled a subscription and want to restore it, you’ll find the “Restore” option next to the canceled subscription.
6. Managing Subscriptions Through App Store: In addition to managing subscriptions through the Settings app, you can also manage them through the App Store. Simply open the App Store, tap on your profile picture, and select “Subscriptions” from the menu. Here, you’ll have the same options to review, modify, cancel, or add subscriptions.
7. Setting a Subscription Reminder: If you want to keep track of your subscription renewals, you can set a reminder. Tap on the subscription you want to set a reminder for, and enable the “Remind Me” option. You can choose between options like weekly, monthly, or yearly reminders to ensure you never miss a payment or renewal.
By following these simple steps, you can efficiently manage your subscriptions on your iPhone and have better control over your digital services and app payments. Take a few moments to review your subscriptions regularly to ensure you’re only paying for the services you truly need and use.
Canceling Subscriptions on iPhone
Canceling subscriptions on your iPhone is a straightforward process that can be done in just a few steps. Whether you no longer need a subscription or want to switch to a different service, here’s how you can cancel subscriptions on your iPhone:
1. Open the Settings app on your iPhone and tap on your Apple ID at the top of the screen.
2. Tap on “Subscriptions” to view all the subscriptions associated with your Apple ID.
3. You will see a list of active subscriptions. Select the subscription you want to cancel.
4. Tap on the “Cancel Subscription” option at the bottom of the screen.
5. Confirm your decision by tapping “Confirm” when prompted. The subscription will be canceled at the end of the current billing period.
6. After canceling, the subscription will no longer auto-renew, and you will not be billed for it in the future.
It’s important to note that canceling a subscription does not entitle you to a refund for any unused portion of the subscription. You will continue to have access to the subscription’s content or features until the current billing period ends.
If you change your mind and decide to reactivate a canceled subscription, you can easily do so by following the same steps and selecting “Renew Subscription” instead of canceling.
By keeping track of your subscriptions and canceling those you no longer need, you can maintain better control over your monthly expenses and ensure you’re only paying for services that bring value to your life.
Best Practices for Subscriptions on iPhone
When it comes to managing subscriptions on your iPhone, it’s important to follow some best practices that can help you make informed decisions and ensure a smooth user experience. Here are some key tips to keep in mind:
1. Regularly Review Your Subscriptions: Take the time to review the subscriptions you have on your iPhone periodically. This will help you stay aware of the services you are paying for and determine if they are still worth it. You might discover subscriptions that you no longer need or use, allowing you to save money.
2. Know Your Renewal Dates: It’s crucial to be aware of when your subscriptions are set to renew. This will help you avoid unexpected charges and give you the opportunity to cancel or modify any subscriptions before they are automatically renewed.
3. Utilize Notifications: Make sure you have notifications enabled for subscription renewals. This will ensure that you receive a reminder when a subscription is about to renew, giving you the chance to review it and make any necessary changes.
4. Keep Track of App Updates: Some subscription-based apps undergo regular updates that not only add features but also sometimes change the subscription pricing or terms. Stay informed about app updates to stay up-to-date with any changes that may impact your subscriptions.
5. Be Cautious with Free Trials: Free trials can be a great way to test out a service before committing to a subscription. However, be cautious and make sure to cancel the trial before it ends if you don’t wish to continue. Otherwise, you may get automatically charged once the trial period is over.
6. Research Pricing Options: Take the time to research and compare pricing options for similar services before subscribing. You might find better deals or discounts elsewhere, allowing you to make an informed decision and get the most value for your money.
7. Read Terms and Conditions: Before subscribing to any service, it’s essential to read and understand the terms and conditions. This will ensure that you are aware of any cancellation policies, refund policies, or other important information that may affect your subscription experience.
8. Consider Family Sharing: If you have family members who also use iPhones, consider utilizing the Family Sharing feature. This allows you to share subscriptions with your family members, saving money by avoiding multiple individual subscriptions.
9. Manage Subscriptions in Settings: Instead of relying solely on the App Store, take advantage of the Subscription management feature in your device settings. This provides a centralized location where you can view, manage, and cancel subscriptions, giving you more control and convenience.
10. Keep an Eye on In-App Purchases: In addition to subscriptions, keep track of any in-app purchases you make. Some apps offer additional content or features for a fee. Monitoring and managing these purchases will help you stay on top of your expenses and ensure you are not charged for anything unintentionally.
By following these best practices, you can effectively navigate and manage your subscriptions on your iPhone, ensuring that you have control over your finances and experience seamless user experience.
Managing and canceling subscriptions on your iPhone can be a breeze with the right knowledge and tools. In this article, we have explored the various methods you can use to find, manage, and cancel subscriptions on your iPhone. Whether it’s through the Settings app, the App Store, or third-party apps, you now have the power to stay in control of your subscriptions.
Remember to regularly review your subscription list to ensure you only pay for the services you use and enjoy. By keeping track of your subscriptions, you can avoid unnecessary charges and free up your budget for other things. Additionally, taking advantage of features like subscription management services and notifications can help you stay organized and save money.
With the step-by-step instructions and tips provided in this guide, you can confidently manage your subscriptions and have a better understanding of how they work on your iPhone. So take control of your subscriptions today and make your iPhone experience even more streamlined and cost-effective.
FAQs
FAQ 1: How do I find my subscriptions on iPhone?
FAQ 2: Can I manage my subscriptions directly from my iPhone?
FAQ 3: What should I do if I want to cancel a subscription on my iPhone?
FAQ 4: Will I still have access to the content if I cancel a subscription on my iPhone?
FAQ 5: What happens if I delete an app but forget to cancel the subscription?