
In today’s digital age, many of us rely on subscription-based services to access various digital content and features. While these subscriptions can enhance our mobile experience, sometimes it becomes necessary to cancel them to manage our expenses or explore other options. If you’re an iPhone user and find yourself wondering how to cancel subscriptions on your device, look no further. In this article, we will guide you through the process of canceling subscriptions on your iPhone, ensuring that you have the necessary knowledge to navigate your subscriptions with ease. Whether it’s a music streaming service, a fitness app, or a news subscription – we’ve got you covered. So, without further ado, let’s dive in and discover how to cancel subscriptions on iPhone.
Inside This Article
- How Do I Cancel Subscriptions On iPhone
- Overview
- Method 1: Canceling Subscriptions Through App Store Settings
- Method 2: Canceling Subscriptions Through Subscription Management
- Conclusion
- FAQs
How Do I Cancel Subscriptions On iPhone
Are you looking to cancel a subscription on your iPhone but unsure of the process? Don’t worry, we’ve got you covered! In this article, we will guide you through three different methods to cancel subscriptions on your iPhone. Whether you want to cancel a subscription through the App Store settings, subscription management, or device settings, we’ve got the steps laid out for you.
Method 1: Canceling Subscriptions Through App Store Settings
If you want to cancel a subscription on your iPhone through the App Store settings, follow these steps:
- Open the App Store on your iPhone.
- Tap on your profile picture located in the top right corner of the screen.
- Scroll down and tap on “Subscriptions.”
- Here you will find a list of your active subscriptions. Tap on the subscription you want to cancel.
- Tap on the “Cancel Subscription” option and confirm your cancellation when prompted.
Method 2: Canceling Subscriptions Through Subscription Management
If you prefer to manage your subscriptions directly, follow these steps:
- Go to the Settings app on your iPhone.
- Tap on your Apple ID at the top of the screen.
- Select the “Subscriptions” option.
- Here you will see a list of your active subscriptions. Tap on the subscription you wish to cancel.
- Tap on the “Cancel Subscription” option and confirm your cancellation when prompted.
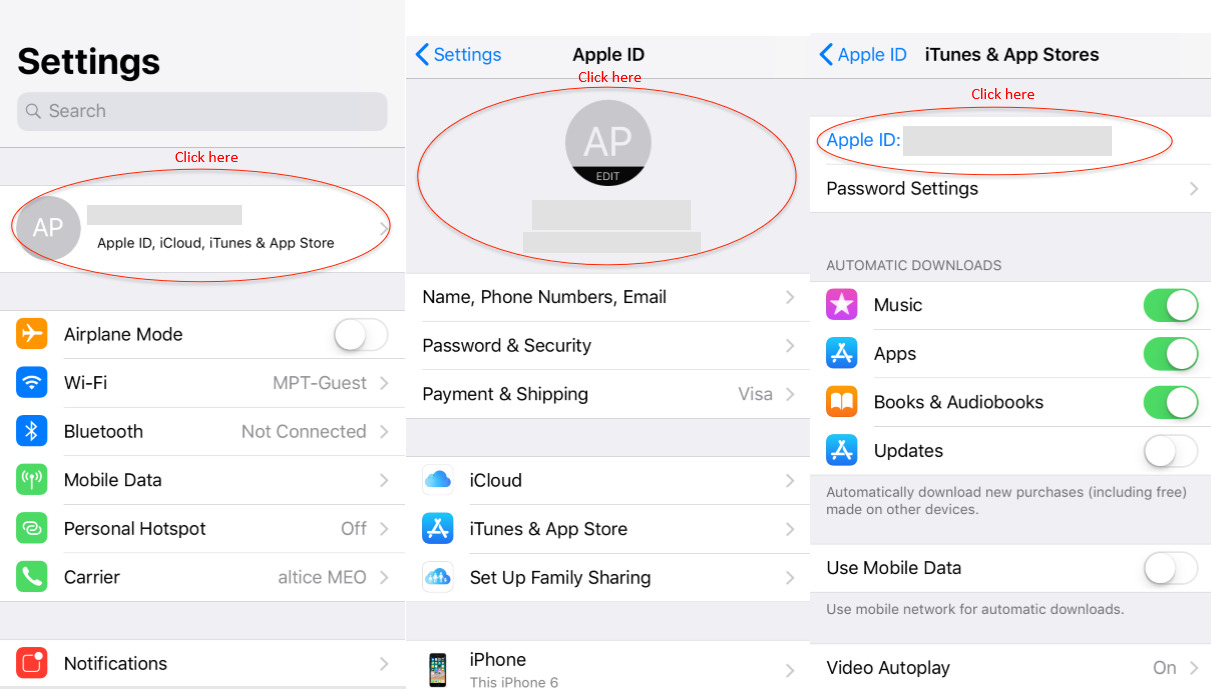
Method 3: Canceling Subscriptions Through Settings
If you prefer to cancel your subscriptions directly through the iPhone’s settings, follow these steps:
- Go to the Settings app on your iPhone.
- Scroll down and tap on “iTunes & App Store.”
- Tap on your Apple ID at the top of the screen.
- Select the “View Apple ID” option and authenticate if required.
- Scroll down and tap on “Subscriptions.”
- Choose the subscription you want to cancel.
- Tap on the “Cancel Subscription” option and confirm your cancellation when prompted.
Whichever method you choose, make sure to follow the prompts and confirm your cancellation. Keep in mind that canceling a subscription will prevent any further charges, but it will not refund any previous payments.
Now that you know how to cancel subscriptions on your iPhone using different methods, you can easily manage your subscriptions and avoid any unwanted charges. Take control of your subscriptions and enjoy a clutter-free experience on your iPhone!
Overview
This section provides a brief introduction to the article, explaining the purpose of the content and giving an overview of the different methods to cancel subscriptions on an iPhone.
Subscriptions have become a common way to access premium content, services, and features on various iPhone apps. However, there may come a time when you no longer wish to continue with a subscription and want to cancel it. Whether it’s a fitness app, music streaming service, or productivity tool, canceling a subscription on an iPhone is a relatively straightforward process.
In this article, we will explore three different methods to cancel subscriptions on your iPhone. By providing multiple options, we ensure that you can find the one that works best for your specific situation and app preferences.
The first method involves canceling subscriptions through the App Store settings. This method provides a centralized location to manage and cancel all your subscriptions in one place. By following a few simple steps, you can easily navigate to the subscription section and cancel the subscriptions you no longer wish to continue.
The second method utilizes the Subscription Management feature. This feature allows you to view a list of all your active subscriptions directly from your iPhone settings. It provides detailed information about each subscription and allows you to easily cancel them with just a few taps.
The third method involves canceling subscriptions directly through the settings menu on your iPhone. This method offers a more streamlined approach, allowing you to access the subscription section without having to navigate through multiple app or store settings. It provides a quick and efficient way to cancel subscriptions in a matter of seconds.
Regardless of the method you choose, it’s important to note that canceling a subscription on your iPhone does not automatically delete the app from your device. It simply stops the recurring payments and access to the premium features or content provided by the app. You can still use the free features of the app or choose to uninstall it completely if you no longer have a use for it.
In the following sections, we will provide step-by-step instructions for each of the methods mentioned above, ensuring that you have the necessary guidance to cancel any unwanted subscriptions on your iPhone.
Now that we have provided an overview of the different methods to cancel subscriptions on an iPhone, let’s dive into the first method: Canceling Subscriptions Through App Store Settings.
Method 1: Canceling Subscriptions Through App Store Settings
In this section, we will explore the first method to cancel subscriptions on an iPhone through the App Store Settings. Follow these simple steps to easily cancel your subscription:
- Unlock your iPhone and go to the home screen.
- Locate and tap on the App Store icon to open the App Store.
- Once you’re in the App Store, tap on your profile picture or initials located in the top right corner of the screen.
- A menu will appear, and you will need to select “Subscriptions” from the available options.
- You will now be redirected to the Subscriptions page, which displays a list of all the active subscriptions linked to your Apple ID.
- Scroll through the list and find the subscription you wish to cancel. Tap on it to open the subscription details.
- Within the subscription details, you will find the option to “Cancel Subscription”. Tap on it to proceed with the cancellation process.
- Confirm the cancellation when prompted. Once confirmed, your subscription will be canceled, and you won’t be billed for it further.
It’s important to note that canceling a subscription through the App Store settings doesn’t delete the app from your device. It simply stops future billing for the specific subscription.
Now that you’re familiar with the first method, let’s move on to the next method to cancel subscriptions on your iPhone.
Method 2: Canceling Subscriptions Through Subscription Management
This section describes the second method to cancel subscriptions on an iPhone. It explains how to access the Subscription Management page, view a list of active subscriptions, and cancel the chosen subscription.
One of the easiest ways to manage and cancel your subscriptions on an iPhone is through the Subscription Management feature. Here’s how you can do it:
- Open the “Settings” app on your iPhone’s home screen.
- Scroll down and tap on your Apple ID, located at the top of the screen.
- In the Apple ID menu, tap on “Subscriptions”.
- You will now see a list of all your active subscriptions. Choose the one you wish to cancel.
- Tap on the subscription you want to cancel.
- On the subscription details page, you will find the option to cancel the subscription. Tap on “Cancel Subscription”.
- A confirmation prompt will appear. Tap on “Confirm” to complete the cancellation process.
By following these steps, you can easily cancel your subscriptions through the Subscription Management feature on your iPhone. It provides a clear and straightforward way to view all your active subscriptions and cancel them as needed.
It is important to note that canceling a subscription through the Subscription Management feature will only prevent future charges. You will still have access to the subscription until the current billing period ends. After that, you will no longer be billed for the subscription.
This method is especially useful for users who have multiple subscriptions and want to have a centralized view of their active subscriptions. It eliminates the need to navigate through different apps to cancel each subscription individually.
Additionally, the Subscription Management feature allows you to easily reactivate a canceled subscription whenever you need it again. Simply navigate to the same menu and select the subscription you want to resume. This can be a convenient option if you temporarily paused a subscription and decided to continue using it at a later date.
Overall, the Subscription Management feature offers a user-friendly way to manage and cancel subscriptions on your iPhone. It gives you more control over your subscriptions, ensuring you only pay for the services you truly need.
Conclusion
Canceling subscriptions on your iPhone is a straightforward process that can be done in just a few simple steps. Whether you want to unsubscribe from a trial period that turned into a paid subscription or you no longer have a use for a certain app, knowing how to cancel subscriptions is essential to manage your finances and declutter your device.
Remember to regularly check your subscriptions and review their terms to ensure you are not being charged for services you no longer use. Taking the time to cancel unnecessary subscriptions can save you money in the long run, allowing you to allocate those funds towards more important endeavors.
By following the steps outlined in this article, you can easily cancel subscriptions on your iPhone and regain control over your app purchases. Stay organized, be mindful of your subscriptions, and enjoy a clutter-free app experience.
FAQs
1. How do I cancel subscriptions on iPhone?
To cancel subscriptions on your iPhone, follow these steps:
– Open the Settings app on your iPhone.
– Tap on your name at the top of the Settings screen.
– Select “Subscriptions” from the list of options.
– You will see a list of all your active subscriptions. Choose the subscription you want to cancel.
– Tap on “Cancel Subscription” and confirm your decision when prompted.
– Your subscription will now be cancelled, and you will no longer be billed for it.
2. Can I cancel subscriptions directly from the respective app?
In most cases, you can cancel subscriptions directly from the respective app. Locate the app on your iPhone, open it, and look for an option to manage or cancel your subscription within the app’s settings or account settings. However, keep in mind that not all apps provide this feature, and in such cases, you will need to follow the steps outlined in the first FAQ.
3. What happens to my data and access to content after canceling a subscription?
When you cancel a subscription, you will typically lose access to any premium or paid features of the app or service associated with the subscription. Additionally, any data or content tied to the subscription may be removed or inaccessible. It’s essential to back up any important data or download any content you wish to keep before canceling a subscription.
4. Will I receive a refund if I cancel a subscription?
Whether you receive a refund after canceling a subscription depends on the specific app or service’s refund policy. Some may provide a partial or full refund for unused portions of the subscription period, while others may not offer any refunds at all. It’s advisable to review the terms and conditions or contact customer support for the app or service in question to understand their refund policy.
5. Can I still use the app or service after canceling a subscription?
In most cases, you will still be able to use the app or service after canceling a subscription. However, you will no longer have access to premium or paid features unless you resubscribe. It’s important to note that some apps or services may restrict certain functionalities or limit access to content for users with canceled subscriptions. Check the app’s documentation or contact support for more information.