
Are you tired of being bombarded with notifications from apps on your iPhone? Do you want to regain control over your device and unsubscribe from apps that you no longer use or find valuable? Well, you’re in luck! In this article, we will guide you through the process of unsubscribing from apps on your iPhone. Whether it’s those pesky games, productivity apps, or social media platforms that have lost their appeal, we will show you how to efficiently remove them from your device. So sit back, relax, and get ready to reclaim your iPhone’s home screen with our step-by-step instructions. Let’s dive in!
Inside This Article
- Methods for Unsubscribing from Apps on iPhone
- Canceling App Subscriptions through the App Store
- Managing and Canceling Subscriptions through the Settings App
- Using iTunes on a Computer to Unsubscribe from App Subscriptions
- Contacting Apple Support for Assistance with App Subscriptions
- Conclusion
- FAQs
Methods for Unsubscribing from Apps on iPhone
Unwanted app subscriptions can be a hassle, but thankfully, there are several methods to help users unsubscribe from apps on their iPhone. Let’s explore the different options available:
1. Canceling app subscriptions through the App Store:
If you want to unsubscribe from an app, one of the simplest ways is to do it through the App Store. Here’s how:
- Open the App Store on your iPhone.
- Tap on your profile picture in the top right corner to access your account settings.
- Scroll down and tap on “Subscriptions”.
- A list of all your active subscriptions will be displayed. Tap on the one you want to cancel.
- On the subscription page, you’ll find the option to cancel or modify your subscription. Tap on “Cancel Subscription” to unsubscribe from the app.
2. Managing and canceling subscriptions through the Settings app:
Another way to unsubscribe from app subscriptions is by using the Settings app on your iPhone:
- Go to the “Settings” app on your iPhone.
- Scroll down and tap on “iTunes & App Store”.
- Tap on your Apple ID at the top of the screen, then select “View Apple ID”.
- Authenticate with Face ID, Touch ID, or your Apple ID password, if prompted.
- Under the “Subscriptions” section, tap on “Manage”.
- A list of your active subscriptions will be shown. Tap on the one you want to cancel.
- Tap on “Cancel Subscription” and confirm your decision to unsubscribe from the app.
3. Using iTunes on a computer to unsubscribe from app subscriptions:
If you prefer managing your app subscriptions on a computer, you can use iTunes. Here’s how:
- Open iTunes on your computer and sign in with your Apple ID.
- Click on “Account” in the menu bar and select “View My Account”.
- Enter your Apple ID password when prompted.
- Scroll down to the “Settings” section and click on “Manage” next to “Subscriptions”.
- A list of your active subscriptions will be displayed. Click on the one you want to cancel.
- Click on “Edit” next to the subscription, then select “Cancel Subscription”.
- Confirm your decision to unsubscribe from the app.
4. Contacting Apple Support for assistance with app subscriptions:
If you are facing issues canceling your app subscriptions or need additional help, you can reach out to Apple Support for assistance. They can guide you through the process and help troubleshoot any problems you may encounter. To contact Apple Support, visit the Apple Support website or use the “Apple Support” app on your iPhone.
By using these methods, you can easily unsubscribe from unwanted app subscriptions on your iPhone. Regularly reviewing and managing your app subscriptions helps you stay in control of your expenses and ensures that you only pay for the apps you truly want to use.
Canceling App Subscriptions through the App Store
Are you tired of unwanted app subscriptions on your iPhone? Fortunately, the App Store provides a straightforward way to manage and cancel subscriptions directly from your device. In this step-by-step guide, we will walk you through the process of accessing and managing app subscriptions in the App Store, as well as provide instructions for canceling any unwanted subscriptions.
To begin, open the App Store on your iPhone. You can find the App Store icon on your home screen, typically identified by a blue icon with a white letter “A”.
Once you’re in the App Store, tap on your profile picture or avatar, which is located in the top right corner of the screen. This will take you to your account settings.
In your account settings, scroll down until you see the “Subscriptions” option. Tap on it to proceed to the subscriptions management page.
Here, you will find a list of all the active and expired subscriptions associated with your Apple ID. To cancel a subscription, simply tap on the desired app from the list.
On the subscription page, you will see the details of the app subscription including the duration, price, and renewal date. Look for the “Cancel Subscription” option and tap on it.
A pop-up confirmation message will appear, asking if you want to confirm the cancellation. If you are sure you want to cancel the subscription, tap on “Confirm” to proceed with the cancellation.
Once the cancellation is confirmed, the subscription will be immediately canceled, and you will no longer be charged for it. However, you will still have access to the app’s content until the current subscription period expires.
It’s important to note that canceling a subscription does not automatically entitle you to a refund for any unused portion of the subscription. Refunds are subject to the app developer’s refund policy.
If you change your mind or decide to resubscribe later, you can easily do so by visiting the app’s subscription page in the App Store and selecting the “Resubscribe” option.
By following these simple steps, you can quickly and easily manage and cancel unwanted app subscriptions directly from the App Store on your iPhone. Keep in mind that regularly reviewing and managing your subscriptions can help you avoid unnecessary charges and keep your app expenses under control.
html
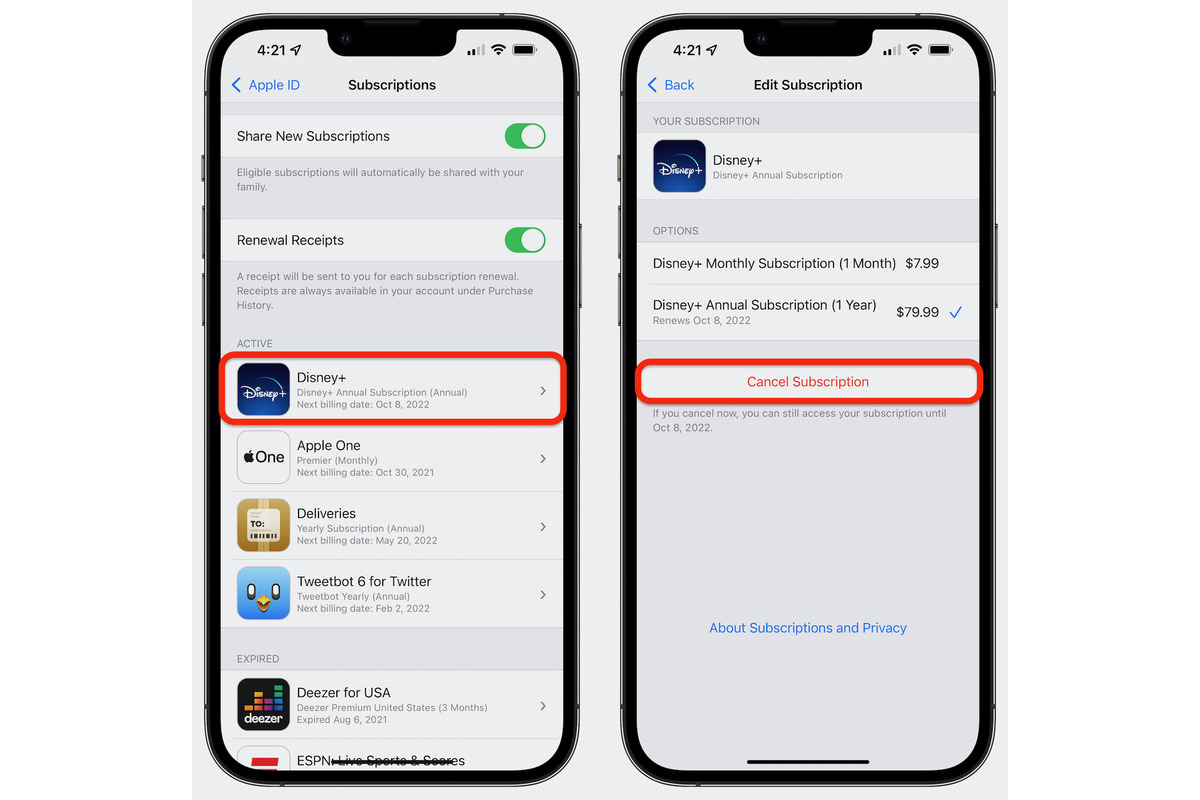
Managing and Canceling Subscriptions through the Settings App
Explaining the process of accessing the Subscriptions section in the Settings app
Step-by-step instructions for canceling subscriptions using the Settings app on iPhone
Managing and canceling subscriptions through the Settings app on your iPhone is a straightforward process. By accessing the Subscriptions section, you can easily review, modify, or cancel any active app subscriptions.
To access the Subscriptions section:
- Open the Settings app on your iPhone.
- Scroll down and tap on your name at the top of the screen.
- Tap on “Subscriptions.”
Once you are in the Subscriptions section, you will see a list of all your active app subscriptions. Each subscription will display the name, duration, and price.
To cancel a subscription, follow these steps:
- Locate the subscription you wish to cancel and tap on it.
- You will be presented with the subscription details. Tap on “Cancel Subscription.”
- Confirm the cancellation by tapping on “Confirm” when prompted.
After confirming the cancellation, your subscription will be canceled at the end of the current billing cycle. You will still have access to the app until the subscription period expires.
Note that some apps may offer the option to downgrade or change your subscription plan instead of canceling it completely. If this option is available, you can select the desired plan change instead of canceling.
Managing and canceling app subscriptions through the Settings app provides a convenient way to stay in control of your subscriptions directly from your iPhone. It allows you to easily monitor and modify your subscriptions as needed, helping you avoid unnecessary charges.
Using iTunes on a Computer to Unsubscribe from App Subscriptions
When it comes to managing your app subscriptions on an iPhone, iTunes on a computer can be a valuable tool. Not only does it offer a bigger screen and easier navigation, but it also provides more options for canceling unwanted subscriptions. Here is a step-by-step guide on how to use iTunes on a computer to unsubscribe from app subscriptions.
- Launch iTunes on your computer and sign in with your Apple ID. Ensure that you are using the same Apple ID associated with your iPhone.
- In the top-left corner of the iTunes window, click on the “Account” tab. A dropdown menu will appear.
- From the dropdown menu, select “View My Account.” You may be prompted to enter your Apple ID password.
- Scroll down to the “Settings” section. Look for the “Subscriptions” option and click on “Manage.”
- A list of all your active subscriptions will appear. Browse through the list and locate the app subscription that you wish to cancel.
- Click on the “Edit” button next to the subscription you want to unsubscribe from.
- A new window will pop up with the details of the subscription. Look for the “Cancel Subscription” option and click on it.
- A confirmation message will appear asking if you want to cancel the subscription. Confirm by clicking on “Confirm” or “Cancel Subscription,” depending on the prompt.
- Once you have successfully canceled the subscription, you will receive a confirmation email. Ensure that you check your email inbox for this confirmation.
That’s it! By following these simple steps, you can easily unsubscribe from app subscriptions using iTunes on a computer. Remember to periodically review your subscriptions to avoid any unwanted charges.
Contacting Apple Support for Assistance with App Subscriptions
When it comes to managing app subscriptions on your iPhone, sometimes you may encounter difficulties or have questions that cannot be resolved through other methods. In such cases, contacting Apple Support can be a valuable resource. Here, we will provide you with some information on how to reach out to them for assistance, along with tips for effectively communicating your issue and getting the necessary help.
One way to contact Apple Support is through their website. Visit the Apple Support website and navigate to the section relevant to app subscriptions. There, you will find various options to connect with an Apple representative, such as live chat or scheduling a call. Choose the option that suits you best and initiate the conversation.
When communicating your issue, it’s important to be concise and clear in your message. Explain the problem you are experiencing with the app subscription and provide any relevant details, such as the name of the app and the subscription plan you want to cancel. This will help the Apple representative understand your situation better and provide you with accurate assistance.
In addition to providing a clear description of the issue, it can also be helpful to include any steps you have already taken to try and resolve the problem. For example, if you have already attempted to cancel the subscription through the App Store or Settings app without success, let them know. This will save time and ensure that the Apple representative can focus on finding a solution rather than repeating steps you have already tried.
Furthermore, it’s important to remain patient and polite when communicating with Apple Support. Remember, they are there to assist you and solve your problem. Avoid using aggressive or demanding language, as it may hinder the support process. Instead, maintain a polite and respectful tone throughout your communication.
If necessary, you may be required to provide additional information or perform certain actions as directed by the Apple representative. Follow their instructions carefully and provide any requested details promptly. This will help expedite the resolution of your issue.
It’s also a good idea to keep a record of your communication with Apple Support, including any case numbers or reference details provided. This will serve as a reference in case you need to follow up or provide additional information at a later stage.
Remember, Apple Support is there to assist you, so don’t hesitate to reach out if you encounter any difficulties with app subscriptions on your iPhone. By effectively communicating your issue and following the tips outlined here, you’ll increase the likelihood of getting the necessary assistance and finding a resolution for your app subscription concerns.
Conclusion
Unsubscribing from unwanted apps on your iPhone is a simple process that can free up space, reduce clutter, and improve the overall performance of your device. By following the steps outlined in this guide, you can easily identify and remove apps that you no longer need or use.
Remember to regularly review your app subscriptions to ensure you are only paying for the services you truly want. Taking control of your app subscriptions will not only help you save money, but it will also eliminate the annoyance of recurring charges for apps you no longer find useful.
By staying organized and mindful of the apps you have subscribed to, you can keep your iPhone optimized, efficient, and tailored to your specific needs.
FAQs
1. How do I unsubscribe from apps on iPhone?
To unsubscribe from apps on iPhone, follow these steps:
- Go to your iPhone’s home screen.
- Tap and hold the app icon that you want to unsubscribe from.
- After a few seconds, the apps will start jiggling, and an “X” icon will appear on the top left corner of the app icon.
- Tap the “X” icon and confirm the action when prompted.
- The app will be deleted from your iPhone, and you will no longer receive any updates or notifications from it.
2. Can I unsubscribe from all apps at once?
Unfortunately, there is no built-in feature on iPhone to unsubscribe from all apps at once. However, you can easily unsubscribe from multiple apps by following the steps mentioned in the previous question for each app individually.
3. Will unsubscribing from an app delete my data?
Unsubscribing from an app will not delete your data from the app’s server or your iCloud backup. Your data will remain intact unless you manually delete it or the app’s Terms of Service state otherwise. To completely remove your data, you may need to delete your account or follow the app’s specific instructions for data deletion.
4. How can I prevent recurring app subscriptions?
To prevent recurring app subscriptions on your iPhone, follow these steps:
- Open the “Settings” app on your iPhone.
- Tap on your Apple ID name, located at the top of the screen.
- Select “Subscriptions” from the list.
- Choose the app subscription you want to cancel and select “Cancel Subscription.”
- Confirm the cancellation when prompted.
By canceling the subscription, you will prevent any further charges from being made for that particular app.
5. How do I check my current app subscriptions?
To check your current app subscriptions on iPhone, do the following:
- Open the “Settings” app on your iPhone.
- Tap on your Apple ID name, located at the top of the screen.
- Select “Subscriptions” from the list.
- You will see a list of your active app subscriptions, along with the option to manage or cancel them.