
Learning to take a screenshot on your iPad is as beneficial and convenient as knowing how to split the screen of your mobile device. Like enabling dual-screens, taking screenshots makes your use of your mobile device more efficient. For example, you can instantly save almost anything, like an article you stumbled upon online, receipts, and text conversations. You can also use screenshots to supplement bug reports when you’re having trouble with an app or your device.
What’s even better is that you can take a screenshot on pretty much any iPad, regardless of its model and generation. That said, how you do so does depend on the buttons that are available on your device. But here’s the good news — you’ll learn how to take a screenshot on your iPad with our help, no matter what your device’s model is.
Inside This Article
- How to Take a Screenshot on an iPad That Has a Home Button
- How to Take a Screenshot on an iPad if There’s No Home Button
- Using AssistiveTouch to Take a Screenshot on an iPad
- Taking a Screenshot on an iPad via the Apple Pencil
- How to Take a Full-Page Screenshot on an iPad
- How to Send a Screenshot from Your Gadget
- Apps That Can Take a Screenshot on an iPad
How to Take a Screenshot on an iPad That Has a Home Button
If you have an iPad that still has a Home button (that is, an iPad mini 1, 2, 3, 4, or 5; iPad Air 1, 2, or 3; iPad Pro 1 or 2; or any iPad from the original series), do these:
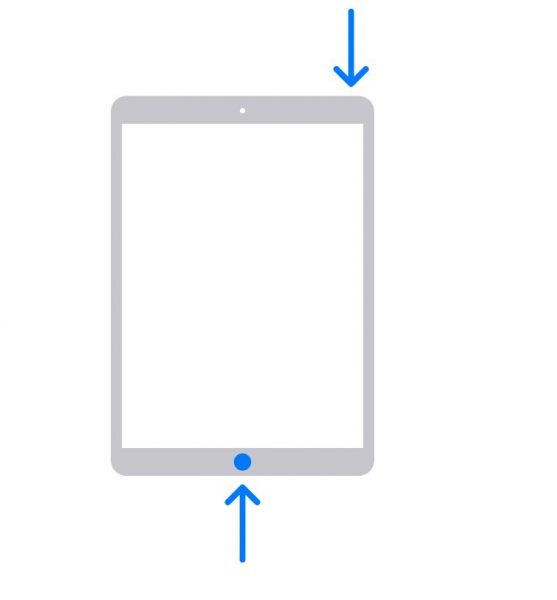
- Know where your iPad’s Home and Power buttons are. The former is on the bottom central part of your gadget’s face, while the latter is on the top-right edge.
- Navigate to the page or screen you want to take an image of.
- Press quickly the Home and Power buttons at once. You’ll know that the screenshot has been taken when your screen flashes for a moment.
- A thumbnail of the screenshot you just took should be on the lower left part of your iPad’s interface. If you want to view and edit or close the captured image, click or swipe left on the thumbnail, respectively.
How to Take a Screenshot on an iPad If There’s No Home Button
At the start of 2018, Apple ceased adding the Home button on iPads. The iPad Pro was the first to do away with it, and then the iPad mini and Air soon followed suit.
So, is it possible to capture a screenshot on your iPad without the said button? Yes, that’s still possible. As of writing, only the iPad mini 6, iPad Air 4, and iPad Pro 3, 4, and 5 don’t have Home buttons. So, if you have any of the said Apple gadgets, try taking a screenshot through these steps:
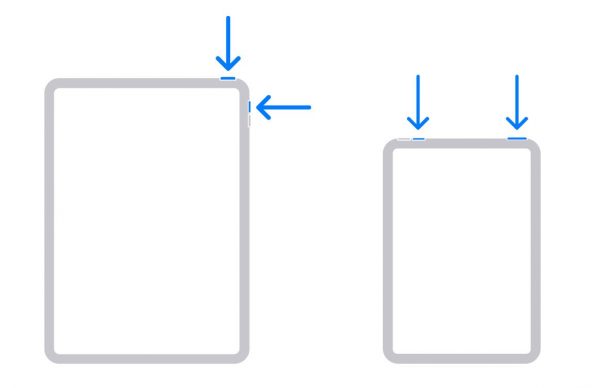
- Press the Power button and either the Volume Up or Volume Down at once. Note that the former button is on the gadget’s top-right corner. The location of the latter two buttons, however, changes depending on the model. On the iPad mini 6, the volume buttons should be on its upper-left part. On other iPad models, you’ll find those on the right side of your device.
- Release both buttons right away.
- When the screenshot has been taken, the iPad screen will flash momentarily. A thumbnail will also be visible, like in the previous tutorial.
Using AssistiveTouch to Take a Screenshot on an iPad
Pressing buttons isn’t the only way you can take a screenshot on an iPad; you can also capture your screen using AssistiveTouch, one of Apple’s accessibility tools. It provides you with an on-screen menu for enabling functions that can usually only be triggered through button combinations (like taking a screenshot). This is a good alternative method if you find it hard to press multiple buttons simultaneously, or if any of your buttons aren’t working properly.
How you turn on and take a screenshot on an iPad with AssistiveTouch differs slightly depending on your iPad’s OS. We guide you through the process below. You’ll know if AssistiveTouch is already enabled if you see a square button at the edge of your iPad’s screen. If it’s not yet enabled, turn on AssistiveTouch on your iPad by following these easy steps:
- Launch your iPad’s Settings app.
- Go to General, and then tap on Accessibility.
- For an iPad utilizing iPadOS 13, 14, or 15, tap on Touch. Otherwise, proceed to the next step.
- Scroll down until you see “Interaction.” Under this heading, select AssistiveTouch.
- Tap on the toggle beside “AssistiveTouch” to turn on this feature.
Once you’ve enabled AssistiveTouch, you can now take screenshots on your iPad without having to press any buttons. Here’s how:
- Tap on the AssistiveTouch button, or the small, square button at the edge of your iPad’s screen.
- Look for and select Device, then the More option.
- Capture on-screen content by pressing Screenshot. Upon tapping, your iPad’s display will flash, signaling that your device has captured a screenshot. A thumbnail will be accessible on the lower-left part of the interface. You can either open that thumbnail by tapping on it or dismiss it by swiping left on it.
Adding the Screenshot Option to the Top Level Menu of AssistiveTouch
If you want to tap on fewer buttons to take a screenshot on your iPad, you can set up the Screenshot option so that you see it right when you open the AssistiveTouch menu. Refer to these quick instructions:
- Access your iPad’s Settings interface, then press General.
- Pick Accessibility among the menu’s clickable options.
- Scroll down to the Interaction section, then hit AssistiveTouch.
- Press Customize Top Level Menu afterward.
- Click the plus symbol near the number of icons you have on your AssistiveTouch interface.
- Tap on the button with the plus sign that just appeared on your iPad screen.
- Scroll down, and tap on “Screenshot” from the list of options.
- Alternatively, you can simply tap on an existing icon on your AssistiveTouch menu to change it to the Screenshot function.
You’ve now added the Screenshot option to the top level of your AssistiveTouch menu. Whenever you need to capture a screenshot on your iPad, you can simply hit the AssistiveTouch button, then the Screenshot option.
Setting Up Custom Actions to Take a Screenshot on an iPad
There’s also a more straightforward way of taking a screenshot using the AssistiveTouch menu button. If you want quicker actions when it comes to taking a screenshot on your iPad, do these now:
- Access the Settings interface via its app on your iPad.
- Head over to General, then tap Accessibility.
- Tap on AssistiveTouch.
- Once you’ve made sure that AssistiveTouch is enabled, select either the Double-Tap or Long Press option under “Custom Actions.”
- From the menu, select Screenshot.
And that’s it! You’ve now set up a shortcut. When you want to take a screenshot on your iPad, simply double-tap or long-press the AssistiveTouch menu button (whichever action you chose in Step 4).
Taking a Screenshot on an iPad via the Apple Pencil
Are you fond of using your Apple Pencil? If yes, that’s great. Did you know you can also use it to capture on-screen content on your iPad? To do so, you only need to follow these easy steps:
- Place the tip of your Apple Pencil on either of the bottom corners of your screen.
- Swipe up diagonally to the center of your iPad’s screen.
- Lift the Apple Pencil to capture an image of the on-screen content.
- You’ll then see a flash on your iPad’s screen, and the Mark Up toolbar will appear beside or at the bottom of the screenshot you’ve just taken. If you want, you can draw on and edit your screenshot using Mark Up.
- Once you’re finished making edits, tap on Done and save your screenshot.
It’s also worth mentioning here that this method doesn’t work on all iPads; that’s because not every iPad model is compatible with the Apple Pencil. The first-gen Apple Pencil only works if you have an iPad 6, 7, 8, or 9; iPad mini 5; iPad Air 3; or iPad Pro 1 or 2. For the second-gen Apple Pencil, it’ll only work if you have an iPad Pro 3, 4, or 5; iPad Air 4; or iPad mini 6.
How to Take a Full-Page Screenshot on an iPad
You might stumble upon an article on the Internet that you might want to read again (or finish reading) later on. In such cases, you no longer need to painstakingly take a screenshot of each section of the article. Simply take a full-page screenshot of the article, and you’re good to go! To do so, follow these steps:
- On your iPad, go to the web page or article you want to take a full-page screenshot of.
- If you’re holding an iPad that has a Home button, capture a screenshot by quickly pressing the Home and Power buttons at once. If your iPad is missing the Home button, do the same action but on the Power button and any of the volume rockers. You can also use your Apple Pencil or the AssistiveTouch menu to take a screenshot on your iPad.
- Look at the captured screenshot by tapping on the thumbnail on the lower left part of your gadget’s display.
- At the mid-upper part of your screen, hit the Full Page option. You can then use the bar on the right to scroll through the web page that you just took a screenshot of.
- If you want, you can edit and draw on your full-page screenshot by using any of the Mark Up tools.
- Once you’re done editing, you can save the full-page screenshot by tapping Done in the top left corner and selecting the “Save PDF to Files” option.
How to Send a Screenshot from Your Gadget
Now that you are familiar with the best ways to capture a screenshot on your iPad, it’s also great to learn how to share the image you got. Luckily, doing so is quick and only takes a few taps. Here’s how:
- Launch your iPad’s Photos app.
- Head over to Albums, and then select Screenshots.
- Pick the specific screenshot you intend to send.
- Select the share icon on the top-right part of the interface.
- From there, simply tap on the platform you want to transmit the image to. You can send the screenshot through iMessage, email, and any messaging or social media app of your choice. You can also transmit it through AirDrop. To be able to do so, both your Bluetooth and Wi-Fi should be on.
Apps That Can Take a Screenshot on an iPad
If for some reason none of these methods worked and you still can’t take a screenshot on your iPad, there are a few apps that can do the job for you. Here are our recommendations:
Awesome Screenshot for Safari
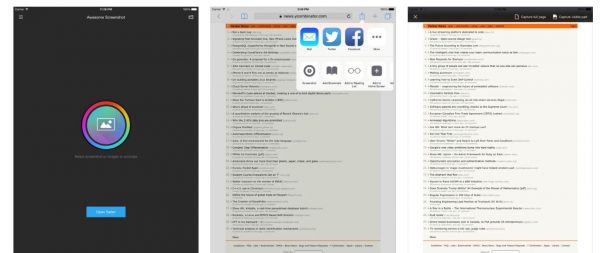
This screenshot app has limited capabilities in that it only lets you take a screenshot if you’re using Safari. But if you only need the screenshot function for when you’re using your web browser, then this screenshot app will do. With this app, you can take a regular or full-page screenshot. Plus, the app also comes with different annotation tools and lets you share your screenshot to any messaging or social media platform.
Download Awesome Screenshot for Safari on iOS
Long Screenshot
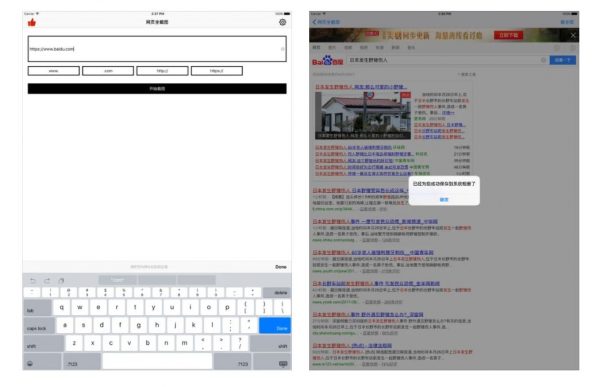
Long Screenshot is another screenshot app you can use. The app can take regular screenshots as well as full-page ones. However, like Awesome Screenshot for Safari, you can only take a screenshot if you’re on your web browser. To utilize Long Screenshot, copy-paste the URL of the website on the app’s empty web address field. Then, your screenshot of that page will be ready within seconds. You can also turn the screenshot into an HD image so that its contents are easier to read.
Download Long Screenshot on iOS
Final Thoughts
Taking a screenshot on your iPad is easy and only takes a few seconds. Other than that, screenshots are also useful in so many different ways. You can take screenshots to save photos you see online, conversations, receipts, or an article you want to read later on.
Plus, the good thing is that all iPad models and generations have the feature built-in. That means you don’t need to scour the web for an app just to take a screenshot on your iPad. However, in case your device can’t take a screenshot using the built-in functions, you can rely on the listed apps here that can do the job.
Want to learn how to take a scrolling screenshot on mobile, too? Check out our tutorial!