
Welcome to our comprehensive guide on how to take a screenshot on an iPad, regardless of the generation you own. Taking a screenshot is a handy feature that allows you to capture and save a snapshot of your device’s screen, whether it’s to share a funny meme, capture an important message, or save a webpage for reference. Knowing how to perform this simple task can enhance your overall iPad experience and help you communicate more effectively. In this article, we will walk you through step-by-step instructions on how to take a screenshot on any iPad model, as well as provide some useful tips and alternative methods. So, let’s dive into the world of iPad screenshots and start capturing those memorable moments!
Inside This Article
- Methods to Take a Screenshot on an iPad
- Using the Side Button and Volume Up Button
- Using Assistive Touch
- Using Apple Pencil (if applicable)
- Using a Bluetooth Keyboard Shortcut
- Conclusion
- FAQs
Methods to Take a Screenshot on an iPad
Taking a screenshot on an iPad is a useful feature that allows you to capture and save important information or memorable moments. Whether you have the latest model or an older generation, you can easily capture screen images with a few simple steps. In this article, we will walk you through four different methods to take a screenshot on an iPad.
1. Using the Side Button and Volume Up Button: This method works on all iPad models that have a physical home button. Simply press and hold the side button (located on the top or right side of the iPad) and simultaneously press the volume up button. The screen will flash, indicating that a screenshot has been taken. You can find the screenshot in your Photos app under the “Screenshots” album.
2. Using Assistive Touch: If you have an iPad without a physical home button, such as the iPad Pro models, you can use Assistive Touch to take a screenshot. First, make sure Assistive Touch is enabled by going to Settings > Accessibility > Touch > Assistive Touch. Once enabled, a floating button will appear on your screen. Tap on the Assistive Touch button, go to Device > More > Screenshot. The screen will momentarily blink, indicating that the screenshot has been captured.
3. Using Apple Pencil (if applicable): If you own an Apple Pencil and want to take a screenshot on your iPad, you can use this handy accessory. Simply start by navigating to the screen you want to capture. Position the Apple Pencil on the bottom-right or bottom-left corner of the screen and swipe upwards or diagonally towards the opposite side of the screen. This gesture will capture the screenshot, and you can find it in the Photos app.
4. Using a Bluetooth Keyboard Shortcut: If you frequently use a Bluetooth keyboard with your iPad, you can use a keyboard shortcut to take a screenshot. Press the Shift + Command + 3 keys simultaneously, and the screenshot will be saved in the Photos app.
With these four methods, you can easily take screenshots on your iPad and save or share important information, funny moments, or any content that you want to capture. Try each method and find the one that suits your needs and preferences. Happy screenshotting!
Using the Side Button and Volume Up Button
If you’re using an iPad and want to capture a screenshot, one of the easiest methods is to use the side button and volume up button combination. This method works for any generation of iPad, making it universally applicable.
To take a screenshot, start by finding the content that you want to capture on your iPad screen. Once you have the content ready, locate the side button and the volume up button on your iPad.
With the content on your screen and the buttons within reach, simultaneously press and release the side button and the volume up button at the same time. You should hear a camera shutter sound, and the screen will briefly flash. This indicates that the screenshot has been successfully taken.
After taking the screenshot, you can find it in the Photos app on your iPad. Open the Photos app and navigate to the “Screenshots” album where all of your captured screenshots are stored. From there, you can view, edit, and share the screenshot as needed.
The “side button + volume up button” combination is a simple and reliable method to capture screenshots on your iPad. It’s convenient and easy to access, making it a popular choice among iPad users.
Using Assistive Touch
If you’re looking for an alternative way to take a screenshot on your iPad, you can utilize the Assistive Touch feature. Assistive Touch is a handy accessibility feature that offers a virtual button overlay on your screen, allowing you to perform various functions with just a few taps.
To enable Assistive Touch:
- Go to Settings on your iPad.
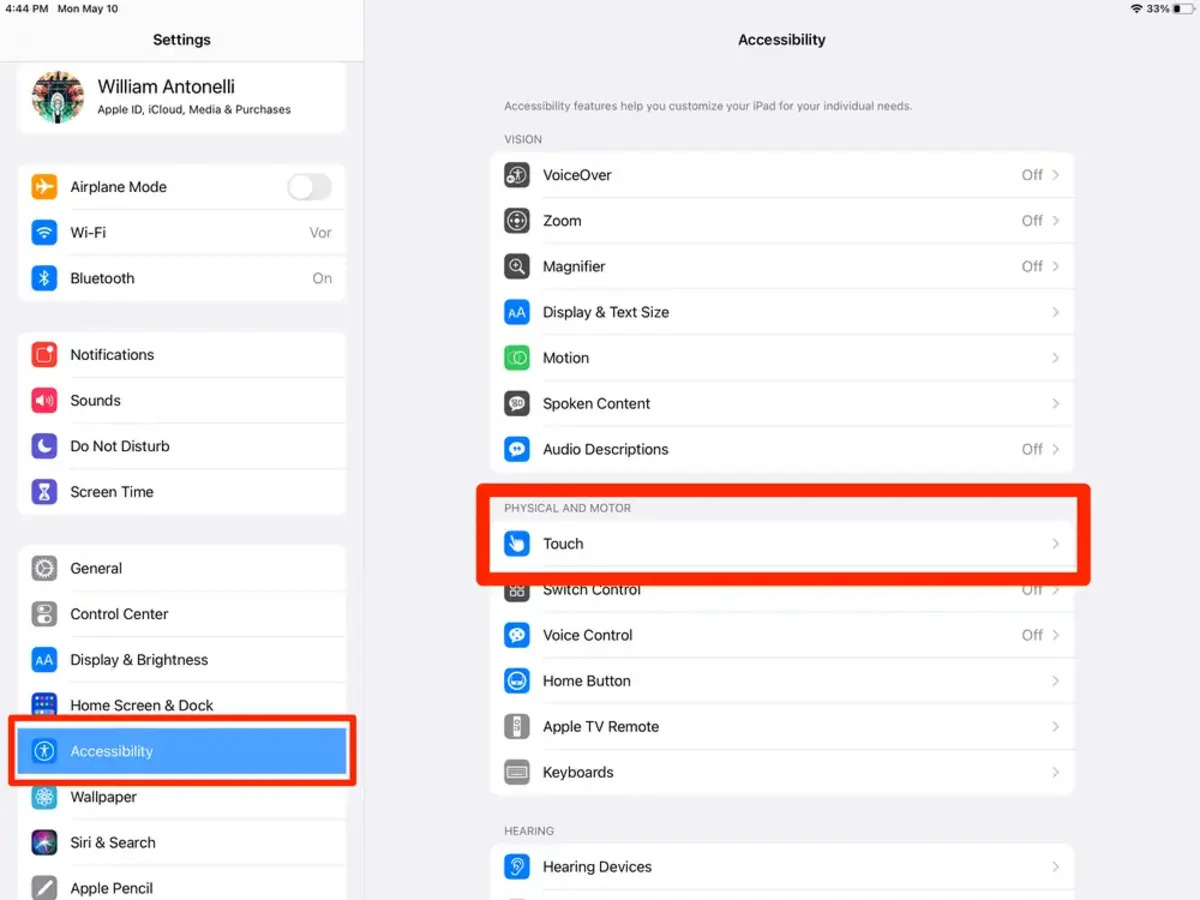
- Tap on Accessibility, and then select Touch.
- Under the “Physical and Motor” section, choose Assistive Touch.
- Toggle the switch to enable Assistive Touch.
Once you have Assistive Touch enabled, follow these steps to take a screenshot:
- Open the screen or app you want to capture.
- Tap on the Assistive Touch button, which appears as a small floating gray sphere on your screen.
- A menu will appear. Tap on Device.
- Another menu will pop up. Tap on Screenshot to capture the screen.
After you take the screenshot, you can find it in your Photos app, just like any other image. From there, you can edit, share, or delete it as needed.
The Assistive Touch method is particularly useful for those who may have difficulty using physical buttons or prefer a more convenient way to take screenshots on their iPad.
Using Apple Pencil (if applicable)
If you own an iPad that is compatible with the Apple Pencil, you have another convenient option for taking screenshots. The Apple Pencil allows for precise control, making it ideal for capturing specific areas of the screen or highlighting important details in a screenshot.
To take a screenshot using the Apple Pencil, follow these steps:
- Open the screen or app you want to capture.
- Hold the Apple Pencil in your hand and position it on the screen, like you would when using it to write or draw.
- Gently tap the screen with the Apple Pencil to initiate the screenshot.
After taking the screenshot, you can find it in the bottom-right corner of the screen. Tapping on it will allow you to edit or share the screenshot right away. You can also find the screenshot in the Photos app, where you can further edit, annotate, or organize it.
Using the Apple Pencil to take screenshots adds an extra level of precision and control to the process. It is especially useful for artists, designers, or anyone who frequently uses their iPad for digital note-taking or sketching.
Note that not all iPad models support the Apple Pencil. Make sure to check if your iPad is compatible with the Apple Pencil before attempting to use this method.
Using a Bluetooth Keyboard Shortcut
If you have a Bluetooth keyboard connected to your iPad, taking a screenshot becomes even more convenient. With just a few simple keystrokes, you can capture whatever is currently displayed on your iPad’s screen.
To use a Bluetooth keyboard shortcut for taking a screenshot, follow these steps:
1. Ensure that your Bluetooth keyboard is connected and paired with your iPad.
2. Navigate to the content or screen you want to capture.
3. Press the Command + Shift + 3 keys simultaneously on your Bluetooth keyboard.
4. The iPad will instantly capture the screenshot, and you will hear a camera shutter sound to indicate that it was successful.
5. The screenshot will be saved to your iPad’s Photos app, where you can access and manage it as needed.
This method is especially useful for those who frequently use a Bluetooth keyboard with their iPads, as it provides an efficient way to capture screenshots without needing to rely on physical buttons or on-screen prompts.
Do keep in mind that the specific keyboard shortcuts may vary depending on the model and brand of your Bluetooth keyboard. It’s a good idea to consult the user manual of your keyboard or search online for the correct shortcut combination if the one mentioned above doesn’t work.
So, if you have a Bluetooth keyboard connected to your iPad, taking screenshots is as easy as pressing a few keys. Give this method a try, and enjoy the convenience it offers for capturing and saving important moments on your iPad.
Conclusion
In conclusion, taking a screenshot on an iPad is a simple and useful feature that can come in handy in various situations. Regardless of the generation of your iPad, the process remains consistent and straightforward. By following the steps outlined in this guide, you can easily capture and save screenshots of important information, memorable moments, or anything else you want to preserve on your device.
Remember, taking screenshots is not only limited to capturing images. You can also use this feature to save and share specific portions of web pages, documents, or even conversations. It’s a versatile tool that can enhance your productivity and communication.
So go ahead and try it out! Experiment with taking screenshots on your iPad and see how it can make your mobile experience more convenient and enjoyable. Don’t miss out on capturing and sharing those important moments – just a few taps away!
FAQs
Q: How do I take a screenshot on an iPad?
To take a screenshot on an iPad, simply press the Power button and the Home button simultaneously. The screen will flash, indicating that the screenshot has been captured. You can find the screenshot in the Photos app under the “Screenshots” album.
Q: Can I take screenshots on any generation of iPad?
Yes, you can take screenshots on any generation of iPad, including the iPad Mini, iPad Air, and iPad Pro. The method of taking a screenshot remains the same across all models.
Q: Can I annotate or edit the screenshots after capturing them?
Yes, after capturing a screenshot on your iPad, you can easily annotate or edit it. Simply open the screenshot in the Photos app and tap on the “Edit” option. From there, you can add text, draw, crop, or apply filters to enhance the screenshot.
Q: Is there a limit to the number of screenshots I can take on my iPad?
There is no specific limit to the number of screenshots you can take on your iPad. However, it’s important to note that the storage capacity of your device will ultimately determine how many screenshots you can keep. If your device is running low on storage, you may need to delete older screenshots to make room for new ones.
Q: Can I share screenshots directly from my iPad?
Yes, you can easily share screenshots directly from your iPad. After capturing the screenshot, you can tap on the “Share” icon and choose the platform or app you want to share it with. This allows you to quickly share the screenshot via email, messaging apps, or social media platforms.