
Are you tired of constantly being interrupted by notifications on your iPhone? Whether you’re in a meeting, enjoying some much-needed alone time, or simply want to disconnect from the digital world for a while, enabling the Do Not Disturb (DND) mode can be a lifesaver. But what if you could go a step further and automatically reply to incoming messages during this mode? Well, you’re in luck! In this article, we will guide you through the process of setting up a Do Not Disturb auto-reply message on your iPhone. Say goodbye to the guilt of leaving messages unanswered and let your friends, family, and colleagues know that you’re currently unavailable without lifting a finger. Let’s dive in and take control of your iPhone’s notifications.
Inside This Article
- Enabling Do Not Disturb on iPhone
- Accessing the Auto-Reply feature
- Customizing the Auto-Reply Message
- Setting up a schedule for Do Not Disturb
- Conclusion
- FAQs
Enabling Do Not Disturb on iPhone
Do Not Disturb is a handy feature on iPhone that allows you to silence calls, alerts, and notifications when you need some peace and quiet. Whether you’re in a meeting, enjoying quality time with loved ones, or simply want to focus on a task, enabling Do Not Disturb can help you maintain a distraction-free environment.
To enable Do Not Disturb on your iPhone, follow these simple steps:
- Open the Settings app on your iPhone.
- Scroll down and tap on “Do Not Disturb.”
- Toggle the switch next to “Do Not Disturb” to turn it on. The moon symbol will appear in the status bar.
Once you’ve enabled Do Not Disturb, your iPhone will automatically silence incoming calls, messages, and notifications. However, it’s important to note that any calls from your Favorite contacts or repeat calls within a three-minute window will still come through, ensuring that urgent or important calls are not missed.
Additionally, you can choose to allow calls from specific groups or contacts by customizing your Do Not Disturb settings. This way, you can ensure that calls from family, close friends, or specific work contacts will still ring through, even when Do Not Disturb is enabled.
Do Not Disturb can be activated manually whenever you need it, or you can schedule it to automatically turn on and off at specific times. This is especially useful if you want your iPhone to enter silence mode during your regular sleeping hours or during important meetings.
By enabling Do Not Disturb on your iPhone, you can create a peaceful and interruption-free environment, allowing you to focus on what matters most in that moment.
Accessing the Auto-Reply feature
Enabling the Auto-Reply feature on your iPhone allows you to automatically send a pre-configured message to anyone who tries to reach you while your device is in Do Not Disturb mode. Whether you are in a meeting, on vacation, or simply need some uninterrupted time, this feature ensures that your contacts receive a polite message letting them know you are currently unavailable.
To access the Auto-Reply feature, follow these simple steps:
- Open the Settings app on your iPhone’s home screen. It is represented by a grey gear icon.
- Scroll down and tap on “Do Not Disturb”.
- On the next screen, you will find a toggle switch for “Do Not Disturb” mode. Enable it by sliding it to the right.
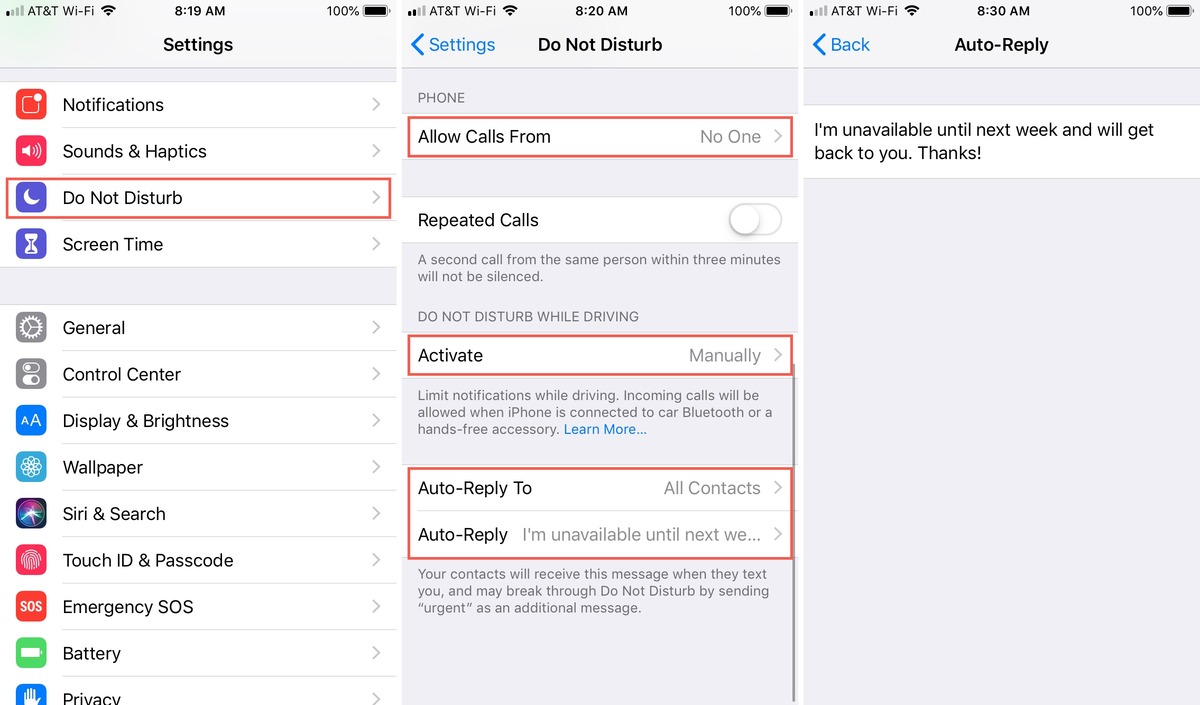
- Below the toggle switch, you will see an option called “Auto-Reply”. Tap on it to access the Auto-Reply settings.
After following these steps, you are now in the Auto-Reply settings section, where you can customize the message that will be sent to your contacts when they try to reach you.
Customizing the Auto-Reply Message
When you enable the Auto-Reply feature on your iPhone’s Do Not Disturb mode, you have the option to customize the message that will be sent in response to incoming calls or text messages. This allows you to inform your contacts about why you are unavailable and when you will be able to respond.
To customize the Auto-Reply message, follow these simple steps:
- Open the “Settings” app on your iPhone.
- Scroll down and tap on “Do Not Disturb.”
- Under “PHONE,” tap on “Auto-Reply.”
- You will see a pre-set message that says “I’m driving with Do Not Disturb While Driving turned on.”
- Tap on that message to edit it.
- Using the keyboard, delete the existing message and enter your desired custom Auto-Reply message.
When customizing the Auto-Reply message, keep in mind that it should be concise and informative. You want to provide your contacts with enough information to understand why you are unavailable, but not overly detailed to the point where it becomes overwhelming.
Here are a few tips to consider when customizing your Auto-Reply message:
- Be polite and professional: Use a friendly tone and thank the sender for their message.
- Inform about your unavailability: Clearly state that you are currently unable to respond due to Do Not Disturb being enabled.
- Provide a time frame: If possible, mention when you will be available to respond. For example, “I will be unavailable until 4pm.”
- Offer alternative contact methods: If applicable, provide an alternative way for urgent matters to reach you, such as an email address or an emergency contact number.
Remember, the goal of the Auto-Reply message is to politely inform your contacts about your unavailability while providing them with enough information to understand why you are unable to respond. Customizing the message ensures that your contacts receive a personalized and clear response, giving them a better understanding of when they can expect to hear back from you.
Setting up a schedule for Do Not Disturb
Do Not Disturb is a useful feature on the iPhone that allows you to control when notifications and calls should be silenced. With Do Not Disturb, you can set a schedule for specific hours of the day, ensuring that your iPhone remains silent and undisturbed during those times.
To set up a schedule for Do Not Disturb, follow these simple steps:
1. Open the “Settings” app on your iPhone.
2. Scroll down and tap on “Do Not Disturb”.
3. Toggle on the “Scheduled” option.
4. Tap on “From” to set the start time for Do Not Disturb.
5. Use the wheels to select the desired hour and minute.
6. Tap on “To” to set the end time for Do Not Disturb.
7. Again, use the wheels to choose the appropriate hour and minute.
8. If you want to repeat the schedule on specific days, tap on “Repeat”.
9. Select the days of the week when you want the schedule to repeat.
10. Once you have set the desired schedule, press the back arrow to save the changes.
With the schedule for Do Not Disturb now set, your iPhone will automatically enter silent mode during the specified hours. This means that calls, messages, and notifications will be muted, allowing you to focus or have uninterrupted sleep.
It’s worth noting that even when Do Not Disturb is enabled, you can still allow calls from certain contacts or repeated calls to come through. This can be useful in case of emergencies or important calls that you don’t want to miss.
By setting up a schedule for Do Not Disturb, you can take control of your iPhone notifications and ensure that you have the uninterrupted time you need without constantly checking your device.
In conclusion, setting up a Do Not Disturb auto-reply message on your iPhone can significantly improve your mobile experience. It allows you to set boundaries and prioritize your time without worrying about missing important calls or messages. This feature is especially useful when you’re in a meeting, on vacation, or simply need some uninterrupted focus time.
By following the simple steps outlined in this article, you can easily customize your auto-reply message and activate the Do Not Disturb mode to automatically send it to your contacts. It’s a great way to let people know that you’re temporarily unavailable while still maintaining good communication etiquette.
Remember, you can always customize your auto-reply message to suit your specific needs, whether it’s a short and sweet response or a more detailed explanation of your availability. So, go ahead, take control of your iPhone, and enjoy some uninterrupted time without any distractions, knowing that your contacts will receive a polite and informative auto-reply message.
FAQs
1. Can I set a Do Not Disturb auto-reply message on my iPhone?
Yes, you can set a Do Not Disturb auto-reply message on your iPhone. This feature allows you to automatically respond to incoming calls and messages when your iPhone is in Do Not Disturb mode.
2. How do I enable the Do Not Disturb auto-reply message?
To enable the Do Not Disturb auto-reply message on your iPhone, go to the Settings app, then tap on “Do Not Disturb.” Scroll down and select “Auto-Reply.” From there, you can customize your auto-reply message and choose whether you want it to be sent to your contacts, recent callers, or everyone.
3. Can I set a specific time for the Do Not Disturb mode and auto-reply?
Yes, you can set a specific time for the Do Not Disturb mode and auto-reply. In the Do Not Disturb settings, you can schedule the mode to turn on and off automatically at specific times. This allows you to have uninterrupted focus during certain hours while still providing auto-reply messages to incoming calls and messages.
4. Will the Do Not Disturb auto-reply message be sent to all incoming calls and messages?
The Do Not Disturb auto-reply message will be sent depending on your settings. You can choose to send it to your contacts, recent callers, or everyone. By selecting “Contacts” or “Recent Callers,” you can ensure that only those in your contacts list or recent call log receive the auto-reply message. Choosing “Everyone” will send the auto-reply message to all incoming calls and messages.
5. Can I customize the Do Not Disturb auto-reply message?
Yes, you can customize the Do Not Disturb auto-reply message on your iPhone. In the Auto-Reply settings, you can edit the default message to personalize it according to your preference. This allows you to convey a specific message or provide any necessary information to the recipient while you are in Do Not Disturb mode.