
The ability to screen record on your iPhone or iPad is a handy feature that can come in handy in various situations. Whether you want to capture a video tutorial, record gameplay, or save a video call for later, knowing how to screen record can be incredibly useful. Screen recording allows you to capture the actions and visuals on your device’s screen, including any audio if desired.
In this article, we will guide you through the process of screen recording on an iPhone or iPad, step by step. We will explore the built-in screen recording feature available on iOS devices, as well as additional options and tips to enhance your recording experience.
So, grab your iPhone or iPad and join us as we delve into the world of screen recording, letting you capture and share moments from your device’s screen with ease.
Inside This Article
- Methods to Screen Record on iPhone/iPad
- Precautions and Tips for Screen Recording on iPhone/iPad
- Editing and Sharing Screen Recordings
- Frequently Asked Questions (FAQs)
- Conclusion
- FAQs
Methods to Screen Record on iPhone/iPad
Screen recording on an iPhone or iPad can be incredibly useful for capturing moments, creating tutorials, or troubleshooting. Luckily, there are several methods available to screen record on these devices:
1. Using the built-in Screen Recording feature:
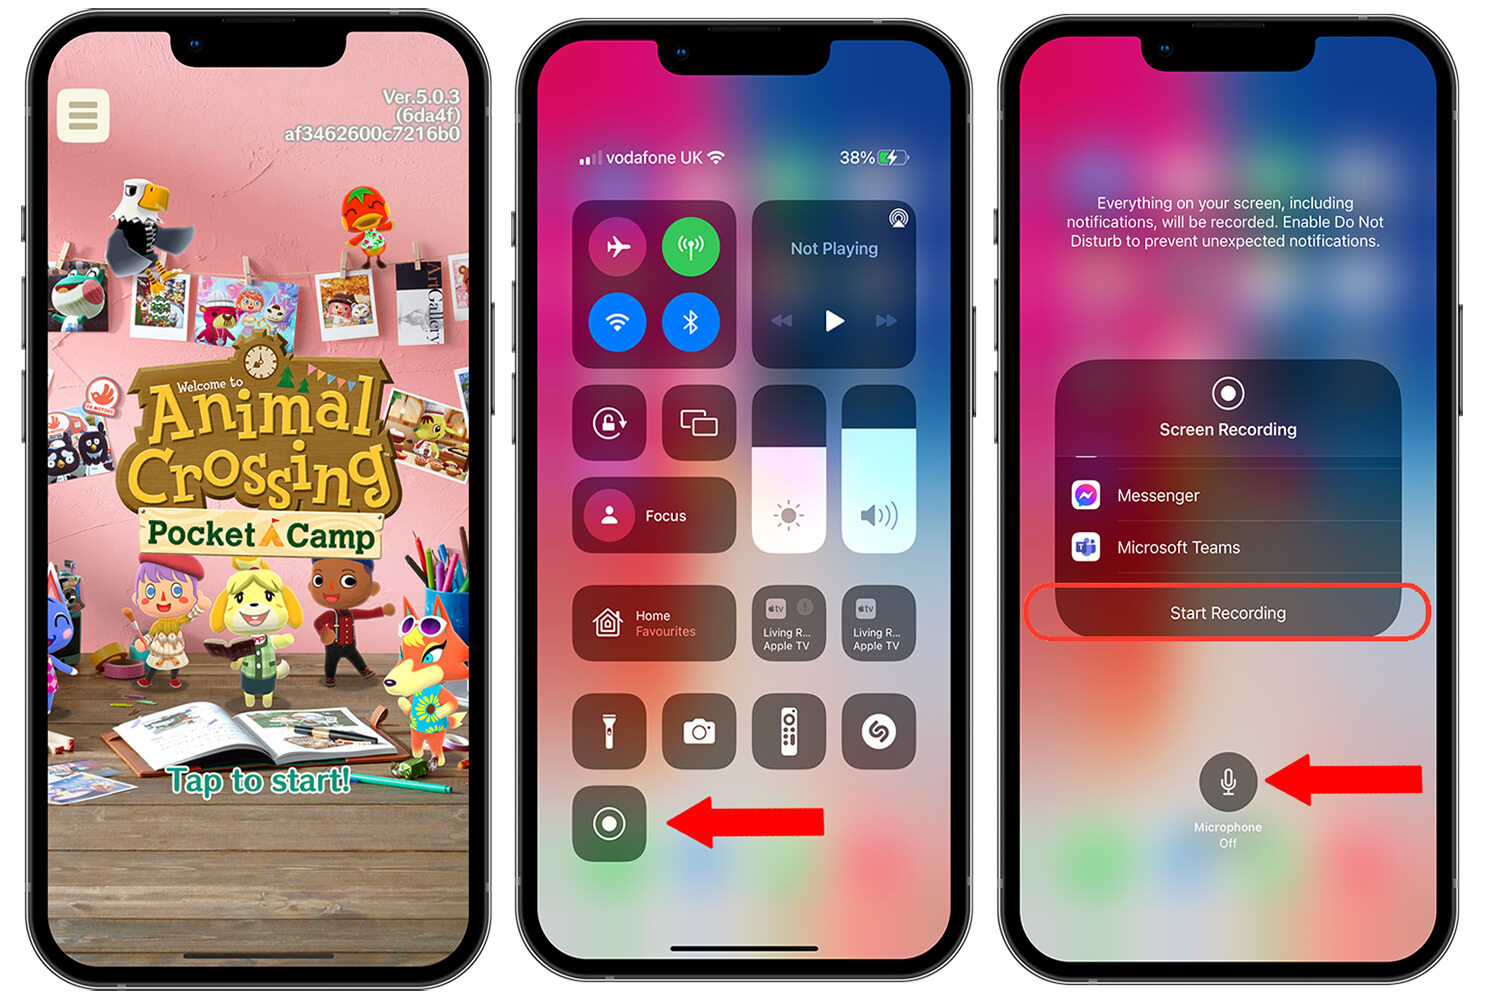
The easiest and most convenient way to screen record on an iPhone or iPad is by using the built-in Screen Recording feature. To access it, simply swipe up from the bottom of the screen to open the Control Center, and tap on the Screen Recording icon. After a three-second countdown, your device will start recording the screen along with any audio. To stop the recording, tap the red bar at the top of the screen or open the Control Center and tap the Screen Recording icon again.
2. Using third-party screen recording apps:
If you’re looking for more advanced features or additional customization options, you can opt for a third-party screen recording app. These apps often provide tools for editing, adding annotations, and even live streaming your screen recordings. Some popular options include DU Recorder, AirShou, and Vidyo.
3. Using QuickTime on a Mac:
If you have a Mac computer, you can use QuickTime Player to screen record your iPhone or iPad. Connect your device to your Mac using a Lightning cable, open QuickTime Player, and select “New Movie Recording” from the “File” menu. In the QuickTime Player window, click the downward arrow next to the record button and choose your iPhone or iPad as the camera and microphone input. Click the record button, and QuickTime will begin recording your device’s screen.
4. Using third-party hardware devices:
For those who are looking for even more professional-grade screen recording capabilities, there are third-party hardware devices available. These devices, such as Elgato Game Capture HD60 and AVerMedia Live Gamer Portable 2 Plus, connect to your iPhone or iPad and offer additional features like multiple audio inputs and higher recording resolutions.
With these different methods at your disposal, you can easily screen record on your iPhone or iPad and capture whatever you need. Whether you choose to use the built-in Screen Recording feature, third-party apps, or hardware devices, you’ll be able to create high-quality screen recordings with ease.
Precautions and Tips for Screen Recording on iPhone/iPad
Screen recording on your iPhone or iPad can be a useful feature for capturing video footage of your device’s screen. However, it’s important to take some precautions and follow some tips to ensure a smooth and secure recording experience. Here are some essential precautions and tips to keep in mind:
1. Do not record sensitive information: When screen recording, make sure to avoid capturing any sensitive information such as passwords, credit card details, or personal conversations. Be mindful of the content you are recording and ensure that it does not compromise your privacy or the privacy of others.
2. Ensure sufficient storage space: Screen recordings can take up a considerable amount of storage space, especially if you are recording lengthy videos. Before initiating a screen recording, check your device’s available storage and free up space if necessary. This will prevent interruptions during the recording process and ensure that your videos are saved without any issues.
3. Adjust recording settings for optimal quality: For the best screen recording experience, it’s important to adjust the recording settings on your iPhone or iPad. You can access these settings by going to the Control Center and long-pressing or 3D touching the screen recording icon. From there, you can choose options such as recording audio, showing touches, or setting the frame rate. Adjust these settings based on your specific recording needs to achieve optimal video quality.
4. Use a stable internet connection: If you are screen recording with the intention of live streaming or sharing your recordings online, it is crucial to have a stable internet connection. A weak or unstable connection can result in poor video quality, buffering issues, or interrupted uploads. Ensure that you are connected to a reliable Wi-Fi network or have a strong cellular data connection when recording and sharing your screen recordings.
By following these precautions and tips, you can ensure a smooth and secure screen recording experience on your iPhone or iPad. Remember to be mindful of the content you record, optimize your device’s settings, and have a stable internet connection for the best results.
Editing and Sharing Screen Recordings
Once you have successfully screen recorded on your iPhone or iPad, you may want to tweak and enhance the recording before sharing it with others. Fortunately, there are built-in editing tools available on your device that allow you to easily make adjustments and modifications to your screen recordings.
To edit a screen recording on your iPhone or iPad, follow these steps:
- Open the Photos app on your device.
- Navigate to the screen recording you want to edit.
- Tap the “Edit” button to enter the editing mode.
- Here, you can trim the beginning or end of the recording by dragging the handles on the timeline.
- You can also crop or rotate the recording, adjust the brightness or saturation, and apply filters.
- Once you are done making the desired changes, tap “Done” to save the edited recording.
Now that you have edited your screen recording, it’s time to share it with others. There are various ways you can share a screen recording on your iPhone or iPad.
One option is to use AirDrop. AirDrop allows you to wirelessly share the recording with nearby Apple devices. To use AirDrop for sharing, follow these steps:
- Open the Photos app and select the edited screen recording you want to share.
- Tap the “Share” button, and a set of sharing options will appear.
- Select the AirDrop icon and choose the Apple device you want to share the recording with.
- On the receiving device, the recipient will be prompted to accept the screen recording.
Alternatively, you can share the screen recording via messages or email. Simply tap the “Share” button, choose the messaging or email app, and select the recipient. The screen recording will be attached to the message or email, ready to be sent.
Another popular option is to upload the screen recording to cloud storage or social media platforms. You can choose from platforms like iCloud Drive, Dropbox, Google Drive, or platforms such as YouTube, Instagram, or Facebook. Simply tap the “Share” button, select the desired platform, and follow the prompts to upload the recording.
Remember to consider the privacy and security implications when sharing screen recordings. Avoid sharing sensitive information and only share the recordings with trusted individuals and platforms.
Frequently Asked Questions (FAQs)
Here are some commonly asked questions about screen recording on an iPhone or iPad:
- Can I record audio while screen recording?
- Can I trim or cut portions of the screen recording?
- What is the maximum duration of a screen recording?
- Can I pause and resume a screen recording?
Yes, you can record audio while screen recording on your iPhone or iPad. When you initiate the screen recording, you have the option to enable or disable audio recording. Simply tap the microphone icon to toggle audio recording on or off. This allows you to capture both the visual and audio elements of your screen recording.
Absolutely! After you have finished screen recording, you can easily trim or cut portions of the recording using the built-in editing tools on your iPhone or iPad. Once you open the recording in the Photos app, tap on the “Edit” button. From there, you can trim the beginning or end of the recording or remove any unwanted sections. This allows you to customize your screen recording and focus on the relevant content.
The maximum duration of a screen recording on an iPhone or iPad depends on various factors such as available storage space and the device’s performance. In general, you can record up to 30 minutes of screen time without interruption. However, if you have sufficient storage space and a newer device, you may be able to record longer durations. Keep in mind that longer recordings require more storage space, so it’s advisable to free up space on your device before initiating a longer screen recording.
Unfortunately, the built-in screen recording feature on an iPhone or iPad does not have a pause and resume functionality. Once you start a screen recording, it will continue until you manually stop it. If you need to pause the recording temporarily, you will have to stop the recording and start a new one when you are ready to resume. It’s a good practice to plan your screen recording ahead of time and ensure you have enough time to capture the desired content without interruptions.
Conclusion
Screen recording on an iPhone or iPad is a powerful tool that allows you to capture and share your device’s screen with others. It can be used for various purposes, such as creating tutorials, demonstrating app functionalities, or recording gameplay. Whether you’re a tech-savvy individual or a professional looking to enhance your productivity, knowing how to screen record on your iOS device can be incredibly useful.
By following the steps outlined in this article, you can easily enable the screen recording feature on your iPhone or iPad, customize the recording settings to suit your needs, and effortlessly capture and share your screen with others. Whether you’re showcasing your app development skills, teaching others how to navigate their devices, or simply sharing a funny moment with friends, screen recording is a versatile tool that can elevate your mobile experience.
So, go ahead and start exploring the world of screen recording on your iPhone or iPad. Capture those important moments, create engaging content, and share your knowledge with others. The possibilities are endless!
FAQs
1. Can I screen record on my iPhone/iPad?
Yes, you can easily screen record on your iPhone or iPad. Both devices have a built-in screen recording feature that allows you to capture everything that happens on your screen.
2. How do I enable screen recording on my iPhone/iPad?
To enable screen recording on your iPhone or iPad, follow these steps:
1. Open the Settings app.
2. Scroll down and tap on Control Center.
3. Tap on Customize Controls.
4. Under “More Controls,” tap on the plus (+) button next to Screen Recording.
5. Close the Settings app.
6. Swipe down from the upper-right or upper-left corner of the screen (depending on your iPhone/iPad model) to open the Control Center.
7. Tap on the Screen Recording icon (a circle inside a circle) to start recording.
3. Where can I find my screen recordings on my iPhone/iPad?
After completing a screen recording on your iPhone or iPad, you can find the recording in the Photos app. Simply open the Photos app, go to the “Albums” tab, and look for the “Screenshots” album. Your screen recording will be saved there.
4. How long can I screen record on my iPhone/iPad?
By default, the screen recording duration on your iPhone or iPad is unlimited. However, if you have limited storage space on your device, the recording may be automatically stopped when you run out of space. It’s recommended to have sufficient free storage before starting a screen recording.
5. Can I screen record audio on my iPhone/iPad?
Yes, you can record both the audio and video of your screen on your iPhone or iPad. To enable audio recording, simply press and hold the Screen Recording icon in the Control Center. This will bring up a menu where you can toggle on/off the microphone audio. Make sure the microphone is enabled if you want to include audio in your screen recording.