
Welcome to our comprehensive guide on how to stop emails from going to junk on your iPhone. If you’re frustrated with important emails constantly ending up in your spam folder, causing you to miss out on important messages, don’t worry – we’ve got you covered. In this article, we’ll provide you with practical tips and solutions to ensure that your emails land safely in your inbox, where they belong. With the increasing reliance on email for work, personal communication, and everything in between, it’s essential to have a reliable and efficient email system on your iPhone. So, if you’re ready to take control of your inbox and say goodbye to the junk folder, let’s dive in and discover how to prevent your emails from getting lost in cyberspace.
Inside This Article
- Why Emails Go to Junk on iPhone
- How to Prevent Emails from Going to Junk on iPhone
- Adjusting Email Settings on iPhone
- Whitelisting Email Addresses on iPhone
- Marking Emails as “Not Junk” on iPhone
- Conclusion
- FAQs
Why Emails Go to Junk on iPhone
When it comes to using email on your iPhone, it can be frustrating when legitimate emails end up in the Junk folder. But why does this happen? There are a few reasons why your iPhone may mistakenly identify certain emails as spam:
1. Unreliable Email Filters: iPhones use built-in filters to analyze incoming email and determine if they are spam. While these filters are generally effective, they may occasionally mark legitimate emails as junk due to their algorithm or configuration.
2. Sender Reputation: The reputation of the sender’s email server plays a significant role in email deliverability. If the sender’s server has been flagged for sending spam in the past, your iPhone may automatically route their emails to the Junk folder.
3. Email Content and Formatting: Certain keywords, phrases, or email formatting may trigger spam filters on your iPhone. This can include excessive use of capital letters, too many hyperlinks, or suspicious attachments.
4. Unfamiliar Senders: If you receive an email from an address that your iPhone doesn’t recognize, it may be more likely to send it to the Junk folder as a precaution.
Now that you understand some of the reasons why emails go to Junk on your iPhone, let’s explore how to prevent this from happening and ensure you never miss an important email.
How to Prevent Emails from Going to Junk on iPhone
Emails going to the junk folder can be quite frustrating, especially when you’re expecting important messages. Fortunately, there are several steps you can take to ensure that your emails make it to the inbox on your iPhone. In this article, we will explore some effective methods to prevent emails from going to junk on your iPhone.
1. Adjust the Mail Settings
The first step to prevent emails from going to junk on your iPhone is to check and adjust your mail settings. Open the Settings app on your iPhone and scroll down to find the “Mail” option. Tap on it and then select “Accounts” to access your email accounts. From there, choose the email account you’re having trouble with, and select “Mail” again. Look for the “Junk” or “Spam” folders option and make sure it is enabled. If not, toggle it on to ensure that junk filtering is active.
Additionally, you can review and modify other settings like the “Filter Unknown Senders” option. By disabling this feature, you’ll prevent emails from unknown senders from being automatically filtered into the junk folder.
2. Mark the Email as Not Junk
If a legitimate email ends up in your junk folder, you can manually mark it as not junk to teach your iPhone’s email client to recognize similar emails in the future. Open the Mail app and navigate to your junk folder. Find the email you want to rescue and open it. Tap the arrow icon at the bottom of the screen to reveal more options. Then, select “Mark” and choose “Mark as Not Junk.” Your iPhone will learn from this action and hopefully redirect similar emails to your inbox in the future.
3. Add Contacts to Safe Sender List
To ensure that emails from important contacts always bypass the junk folder, you can add them to your safe sender list. Open the Contacts app on your iPhone and find the contact you want to add. Tap on their name to view their details, and then select “Add to Favorites.” This action will mark the contact as a VIP and prioritize emails from them, making it less likely for their messages to end up in the junk folder.
4. Disable Email Filtering
If the above steps don’t yield the desired results, you can try disabling email filtering altogether. However, keep in mind that this option may increase the risk of unwanted spam reaching your inbox. To turn off email filtering, go to the Settings app and select “Mail.” Choose “Accounts” and then the email account you want to modify. Tap on “Mail” and locate the option for junk or spam filtering. Disable it to stop your iPhone from automatically sorting emails into the junk folder.
By following these steps, you can significantly reduce the chances of important emails ending up in the junk folder on your iPhone. Remember to periodically check your junk folder for any legitimate emails and mark them as not junk to train your iPhone’s email client. With these adjustments, you can ensure that your inbox remains clutter-free and that you don’t miss any important messages.
Adjusting Email Settings on iPhone
Dealing with email going to the junk folder on your iPhone can be frustrating, but luckily, there are a few adjustments you can make to prevent this inconvenience. By fine-tuning your email settings, you can ensure that important messages land directly in your inbox, where they belong.
To start, open the Settings app on your iPhone and scroll down to find the “Mail” option. Tap on it to access the email settings.
Next, tap on “Accounts” to view the list of email accounts linked to your iPhone. Select the account that is experiencing junk email issues.
Once you’ve selected the account, you’ll see a list of settings specific to that account. Look for the “Mail” section and tap on it to reveal the settings options.
One essential setting to check is the “Mark as Junk” option. Ensure that this setting is turned off to prevent your iPhone from incorrectly marking emails as junk. If it’s already turned off and you’re still facing issues, toggle it on and off to refresh the settings.
Another important setting to consider is the “Move Discarded Messages into” option. By default, this setting is set to the “Trash” folder. However, if you’re finding that important emails are mistakenly ending up in the trash, you can change this setting to the “Inbox” folder.
After making these adjustments, it’s always a good idea to restart the Mail app on your iPhone. This will help ensure that the changes take effect and that the email filtering works as intended.
Remember, it’s also crucial to keep your iPhone’s software updated to the latest version. Regular software updates often include fixes and improvements to the Mail app, which can help address any issues related to email filtering.
By adjusting your email settings on your iPhone, you can have better control over your inbox and prevent important messages from ending up in the junk folder. Take a few minutes to explore the settings and make the necessary changes to optimize your email experience.
Whitelisting Email Addresses on iPhone
Have you ever encountered the frustration of important emails ending up in your iPhone’s junk or spam folder? In today’s digital age, reliable email communication is essential, and missing out on crucial messages can be a real setback. Fortunately, there is a way to prevent this inconvenience by whitelisting email addresses on your iPhone.
When you whitelist an email address, you are essentially telling your iPhone that emails from that address should always be considered safe and should be delivered to your inbox instead of being filtered into the junk folder. Whitelisting is a proactive measure that helps ensure you receive important emails without any disruptions.
Here are some simple steps to whitelist email addresses on your iPhone:
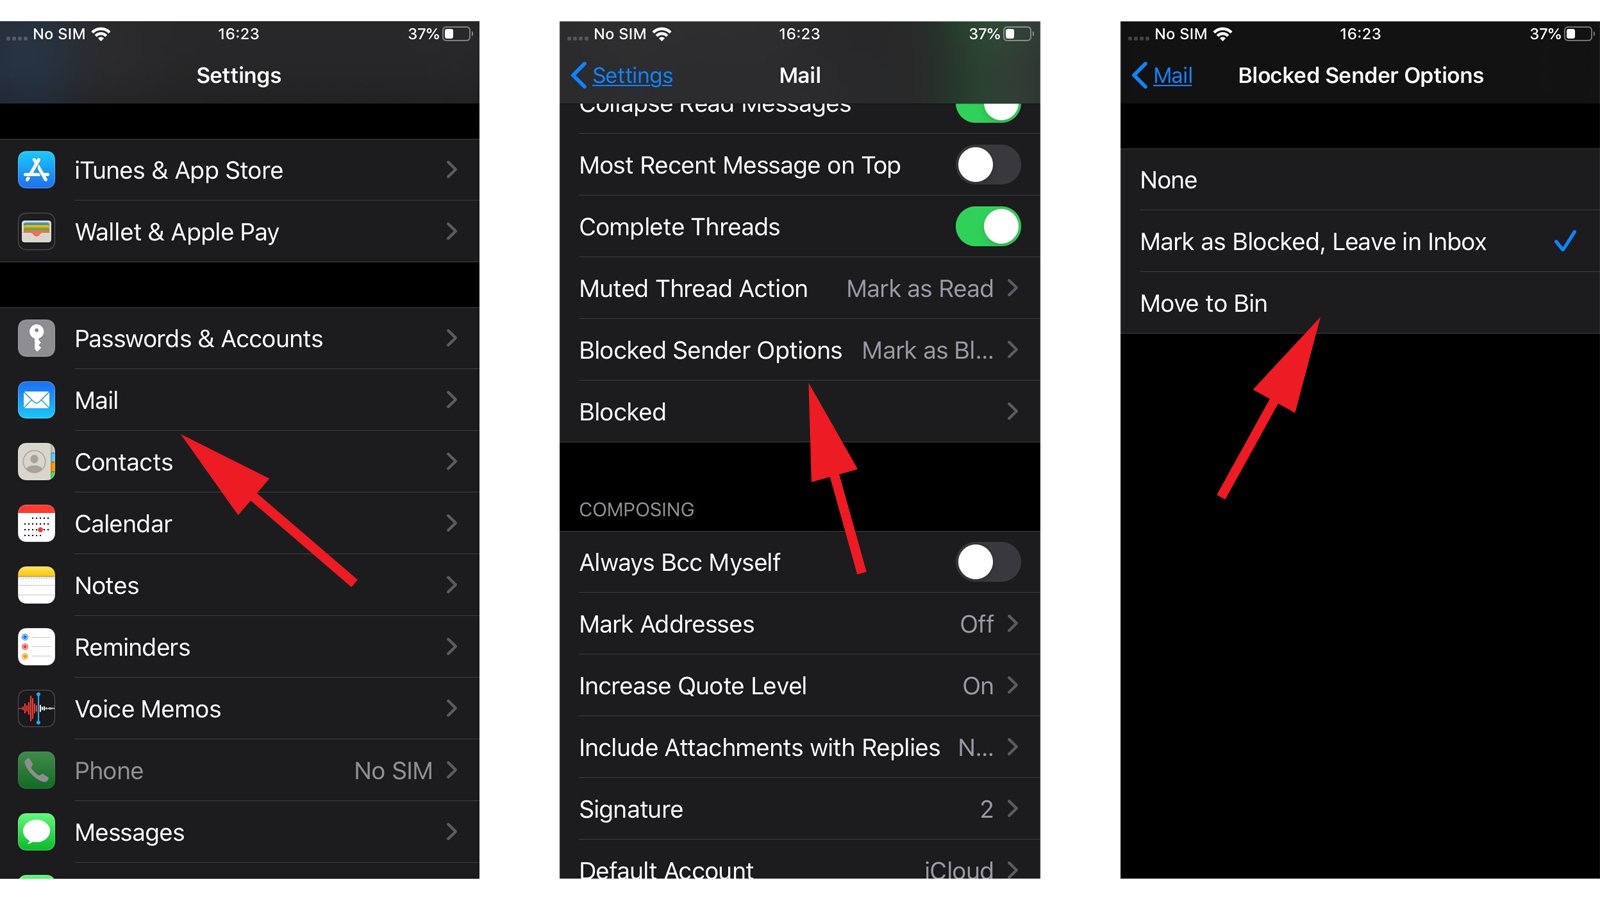
Method 1: Adjusting the Mail Settings
1. Go to the “Settings” app on your iPhone.
2. Scroll down and tap on “Mail.”
3. Select “Blocked” under the “Threading” section.
4. Tap on “Add New…” to add the email address you want to whitelist.
5. Once added, the email address will be considered safe, and emails from that address will be delivered to your inbox.
Method 2: Marking the Email as Not Junk
1. Open the “Mail” app on your iPhone.
2. Find the email in your junk or spam folder that you want to whitelist.
3. Open the email and tap on the “Not Junk” or “Move to Inbox” option.
4. By marking the email as not junk, you are indicating to your iPhone that emails from that sender should be considered safe.
Method 3: Adding Contacts to Safe Sender List
1. Open the “Contacts” app on your iPhone.
2. Find and select the contact you want to add to the safe sender list.
3. Tap on “Edit” in the top right corner of the screen.
4. Scroll down and tap on “Add to Existing Contact.”
5. Select the contact you want to add to the safe sender list.
6. By adding the contact to the safe sender list, any emails from that contact will be delivered to your inbox.
Method 4: Disabling Email Filtering
1. Open the “Settings” app on your iPhone.
2. Scroll down and tap on “Mail.”
3. Select “Accounts” under the “Mail” section.
4. Choose the email account that you want to adjust.
5. Tap on “Advanced” and then tap “Disable” under the “Email Filtering” section.
6. By disabling email filtering, you ensure that all emails from that account are delivered to your inbox.
By following these methods, you can easily whitelist email addresses on your iPhone and prevent important emails from being sent to your junk folder. Say goodbye to the frustration of missing out on crucial communication and enjoy a clutter-free inbox!
Marking Emails as “Not Junk” on iPhone
Dealing with important emails constantly ending up in your iPhone’s junk folder can be frustrating. Thankfully, there is a simple solution – marking those emails as “Not Junk.” By doing so, you can train your iPhone’s mail system to recognize these emails as legitimate and ensure they always land in your inbox. Here’s how you can stop email from going to the junk folder and mark them as “Not Junk” on your iPhone:
Step 1: Open the Mail App
Begin by tapping on the Mail app icon on your iPhone’s home screen. This will open up your email account inbox.
Step 2: Locate the Junk Folder
In the bottom right corner of your mailbox screen, you will see a button labeled “Mailboxes.” Tap on it to view a list of all your email folders. Scroll down until you find the folder labeled “Junk.” Tap on it to open the folder.
Step 3: Select the Email
Browse through the emails in your junk folder and locate the one that you want to mark as “Not Junk.” Tap on the email to open it.
Step 4: Mark as “Not Junk”
Once you have the email open, you’ll notice an icon at the bottom of the screen with a folder and an exclamation point. Tap on this icon to bring up a menu of options.
Step 5: Move to Inbox
In the menu of options, tap on the “Move to Inbox” button. This action will move the selected email from the junk folder to your inbox and teach your iPhone that the email is safe and not junk.
Step 6: Repeat the Process
If you have more emails in your junk folder that are not junk, repeat steps 3 to 5 for each of them. This will ensure that future emails from these senders do not end up in the junk folder.
Step 7: Check the Inbox Folder
Once you have marked all the necessary emails as “Not Junk,” go back to your mailbox by tapping the back arrow at the top left corner of the screen. Check your inbox to see if the emails have been successfully moved and if any future emails from those senders land in your inbox.
By marking emails as “Not Junk” on your iPhone, you can reclaim control over which emails are considered legitimate and prevent important messages from getting lost in the junk folder. Make sure to periodically check your junk folder and move any mistakenly filtered emails to your inbox to further optimize your iPhone’s mail system.
The iPhone offers a seamless and efficient email experience, but sometimes emails end up in the junk folder, causing frustration and missed opportunities. In this article, we have explored various ways to prevent emails from going to the junk folder on your iPhone.
By implementing these strategies, such as adding senders to your contacts, marking emails as “Not Junk,” and adjusting your Mail settings, you can ensure that important emails land in your inbox and stay out of the junk folder. It is also crucial to regularly update your iOS version and keep your device secure by installing reliable antivirus software.
Remember, preventing emails from going to junk requires proactive management and ongoing vigilance. By following the tips and tricks outlined in this article, you can maintain a clutter-free inbox and never miss an important email again.
FAQs
1. Why are my emails going to the junk folder on my iPhone?
There are several reasons why your emails might be ending up in the junk folder on your iPhone. It could be due to the email server marking them as spam, the email client’s filters flagging them as suspicious, or the way your email provider handles incoming messages. Additionally, if you have marked emails from a specific sender as spam in the past, the email client might continue to filter them into the junk folder.
2. How can I prevent my emails from going to the junk folder?
To stop your emails from landing in the junk folder on your iPhone, you can take a few steps. Firstly, make sure that the sender’s email address or domain is added to your contacts or safe senders list. Additionally, you can mark any emails flagged as spam incorrectly as “Not Spam” to train the email client’s filters. It’s also recommended to regularly check your junk folder for any legitimate emails and mark them as “Not Junk” to help the email client learn your preferences.
3. Is there a way to adjust the junk mail filter on iPhone?
Yes, you can adjust the junk mail filter settings on your iPhone. To do this, go to the Settings app, scroll down, and tap on “Mail.” Then, select “Accounts” and choose the email account for which you want to adjust the filter. From there, tap on “Junk” to access the junk mail settings. Here, you can enable or disable the filter or choose to move rejected messages to the “Deleted Mailbox” or “Archive Mailbox” instead of the junk folder.
4. Do different email providers have different junk mail handling?
Yes, different email providers have varying ways of handling junk mail. Some providers might have more advanced spam filters that are better at identifying and filtering out spam emails. Others might rely on user feedback to train their filters, which means that marking emails as spam or not spam plays an important role in their filtering algorithms. It’s important to familiarize yourself with your email provider’s specific guidelines and features for managing junk mail.
5. Are there any third-party email apps that can help prevent emails from going to junk?
Yes, there are several third-party email apps available in the App Store that offer advanced spam filtering and junk mail management features. These apps often have additional customization options and algorithms that can help reduce the likelihood of legitimate emails ending up in the junk folder. Some popular third-party email apps for iPhone include Spark, Edison Mail, and Microsoft Outlook, among others.