
In a world where spam emails seem to be relentless, knowing how to efficiently manage your inbox on your iPhone is crucial. One handy feature available on iPhones is the ability to move unwanted emails directly to the Junk folder. By doing this, you can keep your primary inbox clutter-free and ensure that important emails don’t get lost amid a sea of spam. Whether you want to filter out promotional emails, unsubscribe from mailing lists, or put a stop to annoying messages, learning how to move mail to the Junk folder on your iPhone can be a game-changer. In this article, we will guide you through the process, step by step, so you can regain control over your email experience on your iPhone.
Inside This Article
- – Moving Individual Emails to the Junk Folder – Setting Up Automatic Filtering for Spam Emails – Customizing Junk Mail Settings – Reporting and Blocking Junk Emails
- Conclusion
- FAQs
– Moving Individual Emails to the Junk Folder – Setting Up Automatic Filtering for Spam Emails – Customizing Junk Mail Settings – Reporting and Blocking Junk Emails
Dealing with spam emails can be frustrating, but fortunately, iPhone users have several options to keep their inbox clean and organized. In this article, we will explore different methods to manage unwanted emails on your iPhone, including moving individual emails to the junk folder, setting up automatic filtering for spam emails, customizing junk mail settings, and reporting and blocking junk emails.
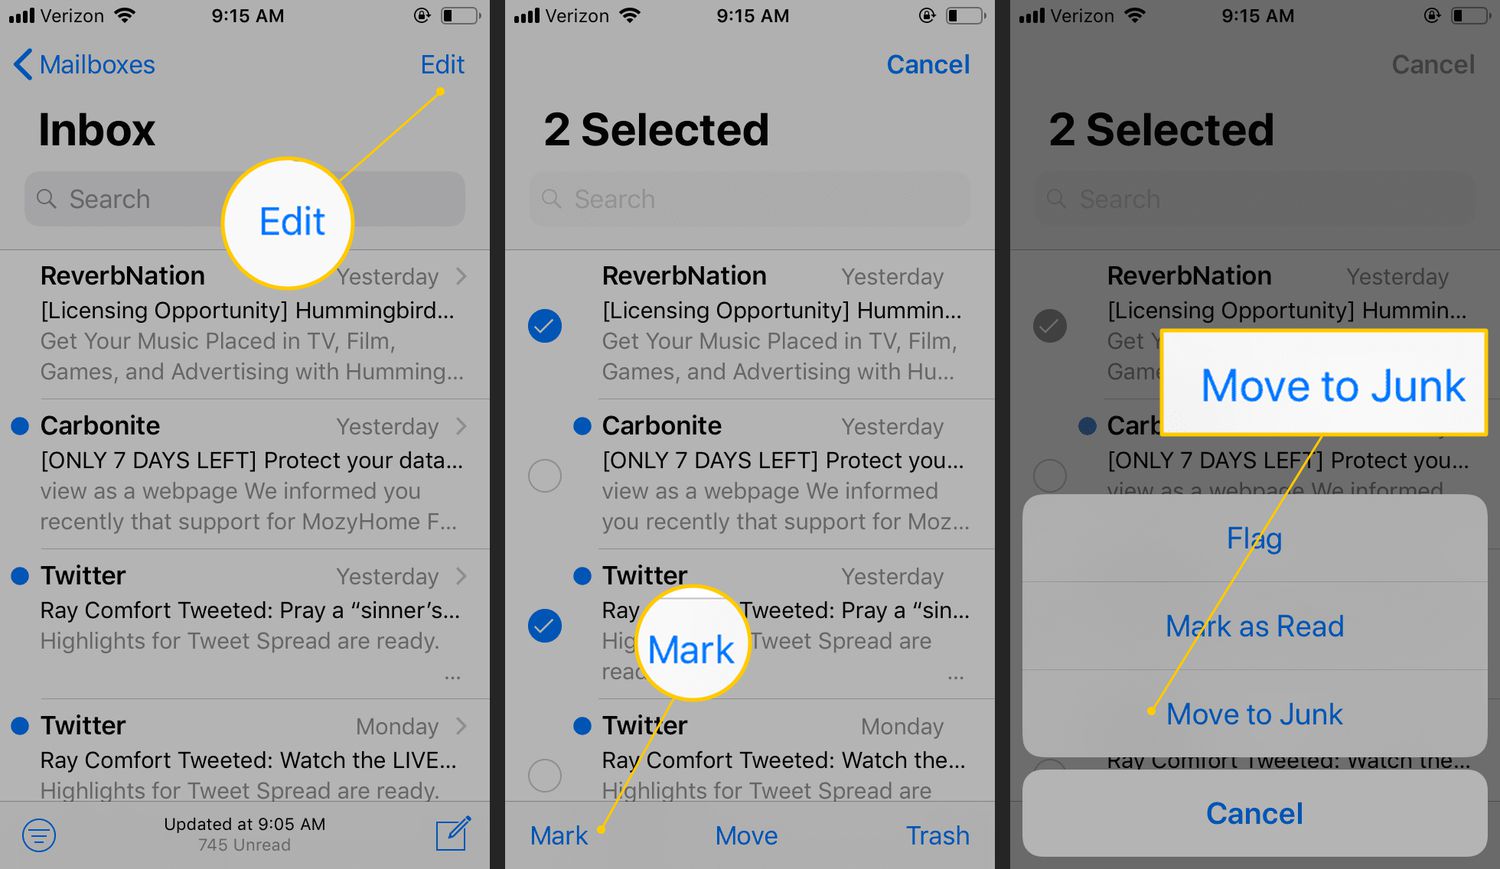
Moving Individual Emails to the Junk Folder
If you come across a spam email in your inbox, you can quickly move it to the junk folder to prevent further clutter. Here’s how:
- Open the Mail app on your iPhone and navigate to the email you want to mark as spam.
- Swipe left on the email to reveal the options menu.
- Tap on the “More” button.
- Tap on the “Mark” option.
- Choose “Mark as Junk” from the options.
By following these steps, you can efficiently move individual emails to the junk folder and keep your inbox organized.
Setting Up Automatic Filtering for Spam Emails
To save time and effort in dealing with spam emails, you can set up automatic filtering to send them directly to the junk folder. Here’s how:
- Go to the Settings app on your iPhone.
- Scroll down and tap on “Mail.”
- Tap on “Blocked” under the “Threading” section.
- Tap on “Add New” and select the contacts or email addresses you want to block.
By blocking specific contacts or email addresses, you can ensure that their emails are automatically directed to the junk folder, saving you the trouble of manually sorting through them.
Customizing Junk Mail Settings
Customizing the junk mail settings on your iPhone allows you to have more control over what gets filtered as spam. Here’s how to do it:
- Open the Settings app on your iPhone.
- Scroll down and tap on “Mail.”
- Tap on “Junk” under the “Threading” section.
- Toggle on the “Move to Trash” option to automatically delete emails identified as junk.
- Toggle on the “Mark as Junk” option to label emails as spam.
- Toggle on the “Load Remote Images” option if you want to view images in emails marked as spam.
By customizing these settings, you can fine-tune the filtering process and tailor it to your specific preferences.
Reporting and Blocking Junk Emails
If you receive persistent and unwanted spam emails, it’s essential to report and block them to prevent further intrusion. Here are the steps to report and block junk emails:
- Open the Mail app on your iPhone and go to the junk folder.
- Open the spam email you want to report.
- Tap on the flag icon at the bottom-left corner of the screen.
- Tap on “Mark as Junk” to report the email as spam.
- To block the sender, tap on the “Contact” button and then select “Block This Contact.”
By reporting and blocking junk emails, you can help improve spam filtering algorithms and ensure a cleaner inbox moving forward.
Conclusion
In conclusion, learning how to move mail to the Junk folder on your iPhone can greatly improve your email management and protect you from unwanted spam and phishing attempts. By following the simple steps outlined in this article, you can easily mark emails as junk, filter them into the Junk folder, and avoid cluttering your inbox with unwanted messages.
Taking advantage of the built-in spam filtering capabilities of your iPhone ensures a safer and more organized email experience. Remember to regularly review your Junk folder to ensure that legitimate emails have not been incorrectly marked as spam.
With these handy tips, you can stay on top of your email correspondence, keep your inbox clean, and focus on the important messages that matter to you. So, take control of your email and make the most of your iPhone’s capabilities today.
FAQs
1. Can I move mail to the junk folder on my iPhone?
Yes, you can move mail to the junk folder on your iPhone. Follow these steps:
- Open the Mail app on your iPhone.
- Find the email you want to move to the junk folder.
- Swipe left on the email to reveal the options.
- Tap on the “More” option.
- Select the “Move to Junk” option.
This will move the selected email to the junk folder on your iPhone.
2. Why should I move mail to the junk folder?
Moving mail to the junk folder helps you keep your inbox clean and organized. By moving suspicious or unwanted emails to the junk folder, you can avoid clutter and reduce the risk of falling victim to phishing or spam emails. It also allows your email provider to learn and improve its spam filtering techniques, making it more effective at catching unwanted emails in the future.
3. How can I identify spam or suspicious emails?
There are several signs that can indicate an email is spam or suspicious:
- Suspicious or unfamiliar sender email address.
- Poor grammar and spelling errors in the email content.
- Requests for personal information, such as passwords or financial details.
- Unsolicited attachments or links.
- Emails with subject lines claiming you’ve won a prize or offering quick money-making opportunities.
Always exercise caution and never click on suspicious links or provide personal information if you’re unsure about the legitimacy of an email.
4. Can I block email senders on my iPhone?
Yes, you can block email senders on your iPhone. Here’s how to do it:
- Open the Mail app on your iPhone.
- Find an email from the sender you want to block.
- Swipe left on the email to reveal the options.
- Tap on the “More” option.
- Select “Block this Contact.”
This will block the sender, and their emails will be automatically diverted to your junk folder.
5. How can I retrieve an email from the junk folder?
If you accidentally moved an email to the junk folder and want to retrieve it, follow these steps:
- Open the Mail app on your iPhone.
- Go to the “Junk” folder.
- Find the email you want to retrieve.
- Swipe left on the email to reveal the options.
- Tap on the “Move” option.
- Select the desired folder to move the email back to (e.g., Inbox).
The email will be moved back to the specified folder.